![]()
bulb head cop cam Instructions
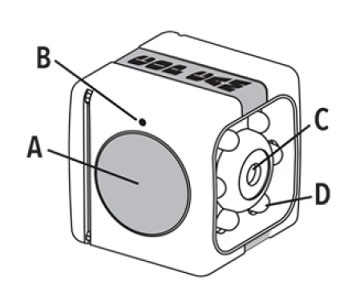
PRODUCT COMPONENTS
A. Power/Record Button
B. Indicator Light
C. Camera Lens
D. Night Mode Bulbs
E. Memory Card Port
F. Charging Port

POWER ON/OFF
To Power On: To turn on press and hold POWER/RECORD button for 4 seconds.
To Power Off: To turn off press and hold POWER/RECORD button for 4 seconds.
GETTING STARTED
STEP 1: To turn on press and hold POWER/RECORD button for 4 seconds. (Figure A) LED light will illuminate solid red. Cop Cam’ will start recording video when motion is detected. Ensure Cop Cam’ is oriented as shown so video is upright. (Figure B)


STEP 2: To switch to photo mode press and hold the POWER/ RECORD button for 2 seconds. LED light will illuminate solid green. To take a photo quickly press the POWER/RECORD button once.

STEP 3: To retrieve footage, remove memory card by pressing inward to release, then pull out of slot. (Figure C) Use included USB cable to connect Cop Cam”‘ to your Computer/Laptop. Access footage following prompts. (Figure D)

STEP 4: To charge Cop Cam”‘, plug into computer/laptop. LED light will alternately flash red and green. (Figure D)
IMPORTANT SAFETY INSTRUCTIONS, READ AND FOLLOW ALL WARNINGS AND INSTRUCTIONS BEFORE USING THIS PRODUCT. INJURY CAN RESULT FROM IMPROPER USE. SAVE THESE INSTRUCTIONS.
WARNING: STORE OUT OF REACH OF CHILDREN. THIS PRODUCT IS NOT ATOY.
NOTICE
- Please review the state and local laws of your jurisdiction regarding using video recording devices. To protext the Cop Cam and recordings from damage:
- Keep away from strong magnets and high voltage.
- Clean the camera lens only with a soft cloth_
- Cop Cam- is not waterproof, do not expose to wet or damp environments.
- Do not place outdoors unless protected.
- Do not immerse in water or other liquids.
- Do not expose to temperatures below 32’F or above 104F.
PRODUCT COMPONENTS

HOW TO CHARGE
BATTERY LIFE INDICATION
- To check the battery, turn Cop Cam- ON by pressing and holding the POWER/RECORD button for 4 seconds (Figure A), Indicator light is solid red when fully charged. When the indicator light begins to flash red every 1 second, the battery is low.

NOTE: When the indicator light starts to flash red every 1 second, the battery has 1D16 charge remaining until plugged into a power source.
HOW TO CHARGE USING COMPUTER/LAPTOP
1. To charge Cop Cam using your computer/laptop, plug the Micro-USE connector end of the supplied USB cable into the charging port of the camera (figure B) Once the Micro-USE cable is plugged into the Cop Cam-, plug the other end of the cable into the USE port of your computer / laptop (figure C)

NOTE: USB port may be located either on the left or right side of your computer/laptop
2. While the camera is charging in your computer/laptop, the indicator light will be alternately flashing red and green.
NOTE: if Cop Cam^ is charging in your computer/laptop, it will ONLY charge NOT record

3. When charging is complete, the indicator light will turn OFF
HOW TO CHARGE USING WALL OUTLET
1. To charge Cop Carr using a wall outlet, start by assembling the table stand following instructions on the top of page 5.
2. Once the table stand is fully assembled, plug the Micro-USB connector end of the supplied USB cable into the charging port of the camera (figure B)
3. Wth the Micro-USB cable connected, gently attach the camera to the swivel dip following the “Using Swivel air instructions on the bottom of page 5. (Figure E)

4. Once the camera is successfully attached to the swivel clip (Figure F), plug the other end of the cable into a wall adapter (not provided), then plug the adapter into the wall outlet (Figure D)

5. While the camera is charging in a wall outlet, the indicator light will flash red every 3 seconds, indicating camera is charging properly.
NOTE: Cop Cam recharging in a wall outlet, the camera will CHARGE and RECORD at the same time
6. When charging is complete, the indicator light will be solid red.
LIGHT INDICATION CHART

HOW TO RECORD VIDEO
1. To turn Cop Cam. on, simply press and hold the POWER /RECORD button for 4 seconds. The camera will automatically start recording when on and motion is detected.

NOTE: LEO light will illuminate solid red when on and recording. Cop Cam will automatic)! 8, loop, always leaving space in your memory card After 7 minute of no motion detected, Cop Cain. will remain ON but will STOP recording.
2. Insert the memory card into the Cop Cam memory card port, (Figured)
NOTE: Memory card is already installed in the unit the memory card is NOT installed in the unit while power is on, the indicator light will flash green 8 times and then the unit will shut off Totem Cop Cam- Off, simply press and hold the POWER/RECORD button for 4 seconds or until LED light turns off.

Night Mode -When Cop Cam-is an and motion is detected, it will continue to record even in darkness. Infrared lights around the camera’s lens (Figure N) will be activated but are not visibly lit
HOW TO TAKE PHOTOS
1. To switch from Video to Photo mode, simply press and hold the POWER/RECORD button down for 2 seconds. LED light will illuminate solid green, indicating Photo mode has been activated. To take a photo, quickly dick the POWER / RECORD button once. The LED light will flash once after each click. indicating photo has been taken
2. To switch back to Video mode, press and hold the POWER/RECORD button for 2 seconds. LED light will turn solid red, indicating Photo mode has been deactivated and camera is back in Video mode

HOW TO RETRIEVE FOOTAGE
1. Start by removing the memory card from the Cop Cam- by gently pressing the memory card inward to release, then carefully put the card out of the slot Insert the memory card into a memory card adapter not provided). (Figure I) Once the memory card is inserted into the adapter, plug the adapter into the memory card port of your computer/laptop. (figure J)


NOTE: Memory card port may be located either on the left or right side of your computer/laptop
2. If you do NOT have a memory card adapter or your computer/laptop does NOT have an memory card port, simply use the provided USB cable to conned Cop Cam^ to your computer/laptop. Plug the Micro USB connector end of the USB cable into the camera. (Figure K) Once the MicroUSB cable is plugged into the camera, plug the other end of the USB cable into the USB port of your computer/laptop. (figure I)

3. Access the footage by going to the drive associated with the Cop Cam-. Go to the DCIM folder to view the video files. You can view, save, or delete recorded videos & Photos here.

USING CAMERA WALL MOUNT / TABLE STAND / SWIVEL CLIP
TABLE STAND ASSEMBLY
- To assemble the table stand, start by holding the camera swivel dip in one hand and the table stand in the other
- Gently press the camera swivel clip clamp together to open. (Figure M-1)
- Insert the grooved base of the table stand into the camera clips opening and allow the grooves to align. (Figure M-2)
- Now the wall mount is fully assembled and is ready to be used as a table stand.

USING SWIVEL CLIP
- With the unit in one hand and the camera swivel clip in the other, place the camera swivel dip on the back of the unit (figure N) Gently press the camera swivel dip down until the dips enter the Cop Cam• mounting grooves, located on the left and right sides of the camera.

NO1E: Clips will make a slight dick sound to indicate proper installation. Make sure POWER/RECORD button & charging port are oriented on the left and right side of the unit when in use. To remove the swivel dip, gently slide the dips either up or down out of the camera mounting grooves.
USING WALL MOUNT
1. To mount the Cop Cam. using the mounting tape provided, first pedal( a single side of the provided mounting tape and place no the back of the wall mount (figure O)

2. Once the mounting tape is docked to the wall mount simply peel the protective film of of the other side of the mounting pad and press the unit firmly onto the mounting surface.(Figure P)

NOTE: Wall Mount can be installed either vertically or horizontally.
3. After the well mount is installed, adjust the angle of the camera by loosening the wall mount base with a screwdriver (net provided). (Figure Q) When desired angle is achieved, make sure to lighten the wall mount base.

4. Ensure the Cop Cam logo is on the top tithe und with the POWER/WRECORD button on the side.(figure R)

5. To remove the wall mount carefully Feel of as not to damage the wall surface.
NOTE: Screws and anchors ale also included into structure. Use common building practices during Installation.
RESET INSTRUCTIONS
- Plug USB into Cop CamTM and into computer
- You may receive a pop-up that will ask you if you would like to scan the removable disk (see image below

- Close this window by clicking the “X”
- The next window will open asking what you would like to do with the new device (see image below )

- Click on “Open folder to view files”
- Click on text file “TIMEREST”

- Time is set up as the following:
YEAR, MONTH, DAY, TIME
20180101235959

- After time is set click “FILE” and “SAVE”
Need more memory?
Purchase a 32GB memory card here:
www.CopCamMicroCard.com
This device complies with Part 15 of the FCC Rules. Operation is subject to the following two conditions: (1) this device may not cause harmful interference, and (2) this device must accept any interference received, including interference that may cause undesired operation
Warning: Changes or modifications to this unit not expressly approved by the party responsible for compliance could void the user’s authority to operate the equipment
NOTE: This equipment has been tested and found to comply with the limits for a Class B digital device, pursuant to Part 15 of the FCC Rules. These limits are designed to provide reasonable protection against harmful interference in a residential installation. This equipment generates, uses and can radiate radio frequency energy and, il not installed and used in accordance with the Instructions, may cause harmful interference to radio communications
However, there is no guarantee that interference will not occur in a partial installation. If this equipment does cause harmful interference to radio or television reception, which can be determined hymning the equipment off and on, the user is encouraged to try to cones the interference by one or more of the following measures.
- Reorient or relocate the receiving antenna.
- Increase the separation between the equipment and receiver.
- Connect the equipment into an outlet on a circuit different from that to which the receiver is connected.
- Consult the dealer or an experienced radian/technician for help.
LIMITATION OF LIABILRY
Liability limited to the purchase price of this product. Telebrands Corp. shall not be liable for any incidental or consequential damages or any implied warranty on this product Some states do not allow the exclusion or limitation of incidental or consequential damages so the above limitation or exclusion may not apply to yon

FAQS
WHAT IS COP CAM™?
Cop Cam™ is a mobile security camera, small and portable enough to use nearly anywhere! (Not waterproof or water resistant). Cop Cam™ can be placed on any flat surface or as a body cam using the Swivel clip.
HOW DOES COP CAM™ WORK?
Cop Cam™ records video day or night whenever motion is detected.
DOES COP CAM™ TAKE PHOTOS TOO?
Yes, please refer to the Quick Start Guide.
HOW IS VIDEO STORED ON THIS CAMERA?
Video is stored on the included 8GB micro SD card.
HOW DO I VIEW RECORDED VIDEO?
Simply remove the micro SD card and insert into your computer or compatible device. You will be able to access the folder for the micro SD card from your computer.
WILL THE CAMERA STOP RECORDING IF IT RUNS OUT OF SPACE?
Cop Cam loop records. That means it never runs out of space, nor stops while recording!
HOW MUCH VIDEO FOOTAGE IS RECORDED BEOFRE COP CAM™ BEGINS LOOP RECORDING?
Cop Cam™ is equipped with the standard 8GB micro SD card records up to 50 minutes of video before loop-recording.
FOR HOW LONG DOES THE BATTERY RUN?
On a full charge, Cop Cam™’s battery runs continuously for 100 minutes.
DOES COP CAM™ RECORD ALL THE TIME?
Cop Cam™ only records when motion is detected. This saves battery time and recording space.
WHEN MOTION IS NOT DETECTED WILL THE CAMERA REMAIN ON?
YES. Cop Cam™ will stop recording after 1 minute if no motion is detected but will remain ON.
HOW DOES COP CAM™ KNOW WHEN TO TURN OFF?
If Cop Cam™ does not detect motion for 3 minutes, it will go into Auto-Off mode to conserve battery life. Once motion is detected again, Cop Cam™ begins recording.
HOW LONG WILL THE BATTERY LAST BETWEEN CHARGES?
The battery will last 1 hour and 30 minutes on a single charge.
DOES COP CAM™ RECORD AUDIO TOO?
Yes! Cop Cam™ has a powerful, built-in microphone that records perfect audio.
WHAT IS THE DIFFERENCE BETWEEN THE STANDARD AND DELUXE MODELS?
The standard Cop Cam™ includes an 8GB micro SD card, while the Deluxe Cop Cam™ includes a 32GB micro SD card that holds 400% more video recordings.
WHAT IS COP CAM™’S CAMERA RESOLUTION’?
720P
DOES COP CAM™ AUTO FOCUS?
YES
HOW MANY FRAMES PER SECOND IS THE VIDEO?
30FPS
HOW IS THE FOOTAGE UPLOADED TO THE COMPUTER?
Footage can be uploaded to your computer using either the provided USB cable OR a memory card adapter (not provided). Please refer to instruction manual for further information.
CAN COP CAM™ BE USED AS A BODY CAM?
Yes, Please refer to the instruction manual section Using Swivel Clip to attach the swivel clip to your Cop Cam™. Please review the state and local laws of your jurisdiction regarding using video recording devices.
I ORDERED MY COP CAM™ AND IT SAID SHIPPING WILL TAKE 3-6 WEEKS. WHY SO LONG?
Shipping MAY take 3-6 weeks. Throughout different times of the year demand is greater than others, so we always state 3-6 weeks. However, we always do our best to plan for those times of the year so we can avoid “back orders.”
HELP! I PLACED AN INCORRECT ORDER. HOW CAN I CHANGE THIS?
What you want to do is call this toll free number for customer service: 1-844-814-9726. To find your order they will need your phone number (or email address if you provided it), last name, and zip code. They will absolutely get your order fixed for you. Keep in mind order processing takes a full 24 hours, so they may not have your order in the customer service system until at least 24 hours after you’ve placed your order.
I ORDERED COP CAM™, BUT I HAVEN’T BEEN CHARGED YET. WHEN SHOULD I EXPECT TO BE CHARGED?
We process your order within 24 hours, but we do not charge your card for the purchase until the order is shipped to your address.
WHAT IF I DON’T LIKE COP CAM™?
Your satisfaction is 100% guaranteed. If you are dissatisfied with your Cop Cam™ for any reason, simply return the product within 30 days for an easy refund of your purchase price, excluding shipping and handling. See our return policy for more information. Exceptions may apply.