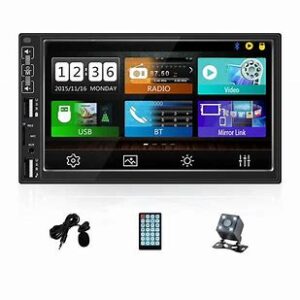
Car Multimedia Player
User Manual
LG-7-EW-001
Preface
In order to make sure the product fits the car 100%, customers need to take the measurement of dashboard Installation before purchase, mainly the length and height of the panel.
In order to prevent injuries and fires, please pay attention to the following instructions:
Please check the car horn line carefully before Installation, if it is grounded or collides, you need to rewire the car horn line and connect the product. otherwise, the machine will be burned.
In order to prevent short circuits and so on, do not drop the metal object in the device.
If there Is smoke or a peculiar smell in the device, please turn off the power at once.
Please do not make the device fall or strong collision. In order to prevent device failure, please observe the following note:
Please do not install the device in the place of strong sunlight, high temperature, high humidity, or dusty. Please replace the fuse which is the same specification. If you are using different specifications of the fuse. may cause the failure of the device. In order to prevent a short circuit, please pull out the power wire when you replace the fuse. In order to be able at any time to deal with road and traffic conditions change, please lower the volume when driving.
Please do not get the device wet when a washing car, this may cause a short circuit, then fire or failure will be caused.
Warning
- .0n ly connect the unit to a DC 12V power supply with negative grounding. If you are connected to the car of 24V WS be burned. Nowt Only the panel lase! with vocoding can be used lathe carol thy power supply)
- When the machine is in a state of abnormal during Ilw operation. you need to use a pointed object to press the key of ‘RESIon Me panel). then it will be reset and in factory stale.
- .Never install the unit where the operation fOr safety driving is restrained.
- Never use the video display function in the front when driving to prevent the violation of laws regulation and also 10 reduce the flak of tragic accident except using for the rearview video camera.
- Never expose the unit. amplifier, speakers to moisture or water to prevent electronic sparks or fires.
- Please do not change the fuse in the power cord without professional guidance: improper fuse may cause damage to these using units even Cause fife.
- When the temperature is too high or 100 low In the car. please BONE the temperature firstly. and then use this machine.
Installation
The unit installs for security, please install it offers to the following diagram description:
- .Please make the unit in the proper place. Conned the unit refer to the diagram, end test it works well or not.
- Pb: tithe wrapped the Connection line with Insulation tape to ensure complete wiring after testing well.
- Please bend the hook of metal I. and insert the metal into the instrument panel then fix it.
- Put the unit into a metal hook unit it locks.
General Features
TFT HD Touch Screen BT/FM/TF/USB/MPS/REARVIEW/PHONE LINK
- Digital TFT Touch Screen
- With TF card Slot, With USB 2.0 port
- Support 1080P Video playback
- Support the Audio playback format of MP3/WAV/FLAC/APE
- Support the Video playback format of RM/RMVB/V0B/DAT/MOV/MP4 /FLV/AVI/MPG etc
- FM Range: 87.5MHz-108.MHz(Europe)
- With Remote Control
- Power-off with auto-memory store function under radio or TF /1.158 mode
- EQ / Clock / Mute Function
- BT Function
- AUX-In Function
- Rear View Camera Function
- Support Steering Wheel Control
- 1 Way Video input
- 1 Way Video output
- 2 Way Audio output
- 1 Way Subwoofer Output
- Phone Link
- IOS Phone CarPlay
- Rear Microphone interface
- DC 12V Power Supply
Basic Operation
1. When using reversing rear view function, reversing the video signal from the corresponding port input connection backline, when reversing will automatically switch to reversing visual state.
2. Audio I Video input Select AUX Mode, plug-in Audio input lines to front AUX Port, and plugin Video Wire to the rear Video input Port.
3. Operation of BT Function Firstly, open the BT function of your phone, and then search BT name to the machine, pairing, enter the password “0000”, after pairing successfully, the BT symbol will be turn green, that’ll be ok. When calls come in, it will enter the interface of BT automatically, press![]() to answering the phone, press
to answering the phone, press ![]() to hanging the phone.
to hanging the phone.
4. Operation of Phone Link
Android Phone: 1. Open your Phone’s Bluetooth, search the device name of the MPS, pair, enter the pin code “0000”, when connected successfully, the voice of your phone will transmit to the MP5; 2. Open the android phone “Setting°, find the Option of “Developer options’, enter this option, turn on the option “USB Debugging.
3. Connect your Phone to MPS by USB Cable, click the icon of Autolink, Scan the OR Code, Open the pop-up link, download and install the APP, then open the APP, Click to allow screencast, the image of the phone will display on the MP5 screen, you can operate your phone on the MP5 screen.
5. IOS Phone CarPlay function IOS Phone: Connect your IOS Phone to the MP5 by USB cable, the MP5 will Automatically connect to the phone and enter carplay interface.
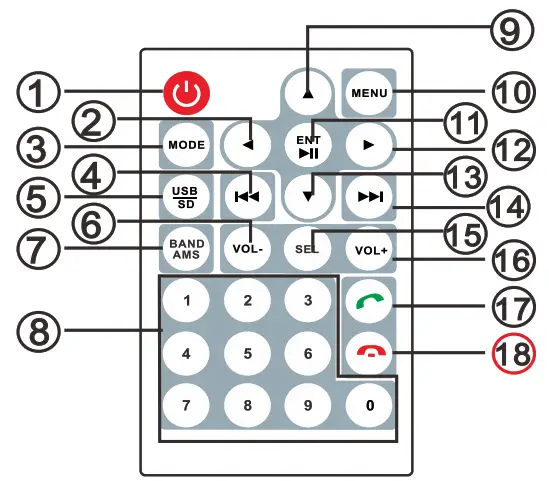
Remote Control Description

1. Power switch
2. • Left
3. Mode switch
4. Last song
5. USB/SD
6. Volume+
7. Band/Automatic/ Station search
8. Digital key
9. • UP
10. Menu
11. Confirm/ Play/Pause
12. ► Right
13. • Under
14. Next song
15. Choice
16. Volume-
17. Answer the phone
18. Hang up
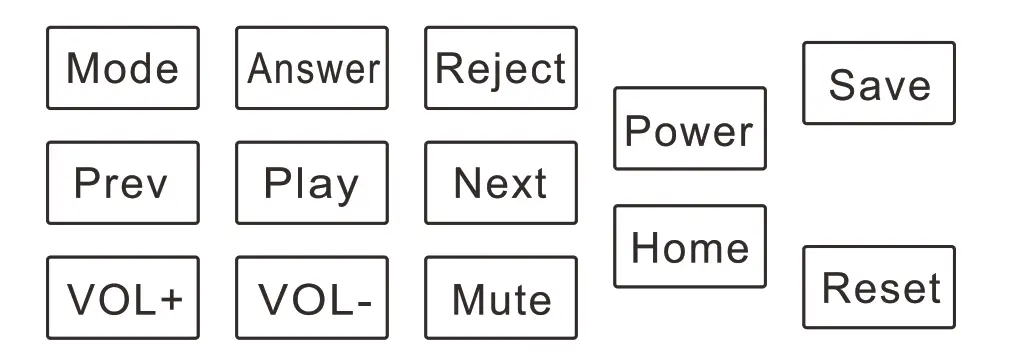
Steering Wheel Control Learning

- After connecting the wires, please open the UI, choose the button which you need, eg: Next
- After connecting the wires, press the’ Next I button, it will show the UI which you need. Press “Reset” to enter into the reset function.
- Press the I Save I button to prove the setting successfully, then, Exit interface.
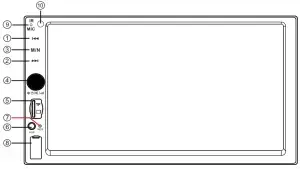
Front Panel

1 ► Last song.
2. ►I : Next song.
3. M / N: Press it to switch between the current mode and the home page.
4. Knob Button: When power is turned off, short press is turned on the power; When power is turn on, press short time is mute, turn left or right to adjust volume, long press is turn off the power.
5. TF: TF Card Slot.
6. AUX: AUX Audio input.
7. RES: Reset the unit.
8. USB: USB Slot.
9. MIC: Microphone.
10. IR: Remote control sensor.
Wire Diagram

![]() Please check the speaker line carefully before installation. If any grounding or touching, please connect again, otherwise the unit will be burned.
Please check the speaker line carefully before installation. If any grounding or touching, please connect again, otherwise the unit will be burned.
FAQ
- The machine couldn’t boot. Please check whether the connection of the power of positive and negative is right, on the other hand, check whether the fuse is burned, it’s better to send us photos to show in order to solve the problem.
- Black screen or shutdown automatically. It may lose software, so please check the date of production on the PK board. we can provide the right software to update after knowing the date of production.
- No sound. Check the wiring diagram, make sure the connection is right.
- The button doesn’t work. Check whether the keys have stuck.
- The radio doesn’t work. Check whether the connection of the radio antenna is right.
- Search station automatically and couldn’t stop. The local radio signal may be too weak, try to search the station hardly.
Specification
SNR 65dB
Frequency response 20Hz-20KHz
Loudspeaker impedance 4~8
Tone Control Bass+/-7dB(100Hz) Treble+/-7dB(100Hz)
FM
FM frequency 87.5MHz-108.0MHz
Sensitivity 25dB
Selectivity 60dB Separation 35dB