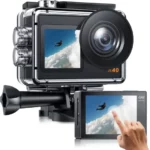
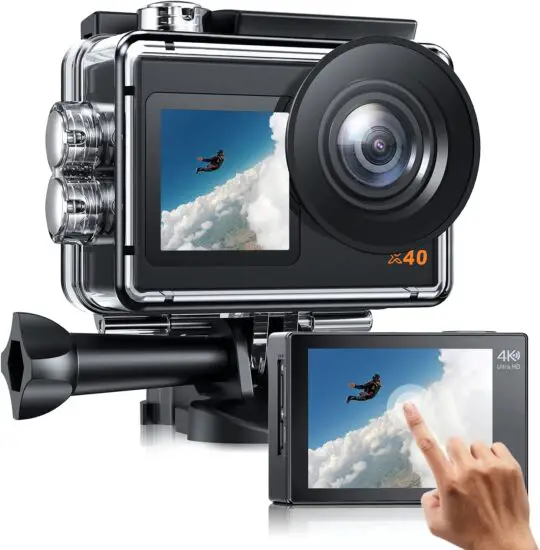
CamPark X40 4K Ultra HD Action Camera User Manual
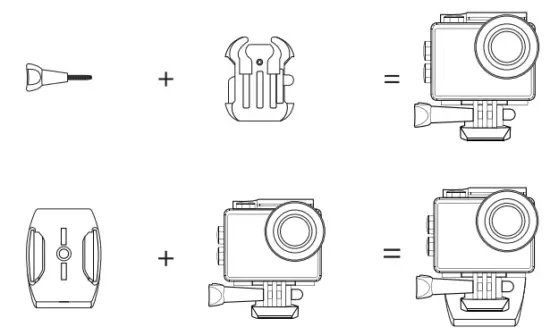
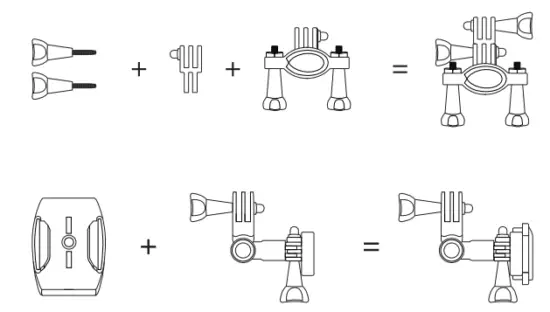
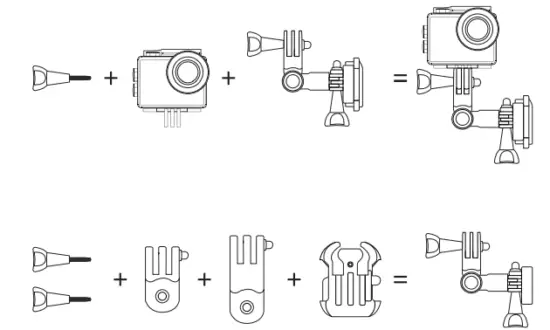
Accessories Introduction

Attention
- Keep it safe from falling and dropping.
- Keep it distance from any strong magnetic interference objects like electrical machine to avoid strong radio waves that Might be damage the product and the quality of sound and image.
- Keep the camera away from water and liquids(unless equipped with waterproof case). This may cause the malfunction of camera.
- Keep it safe from children while on charging. It takes about 3 hours to charge the battery. We advise you to take the battery out of the camera after use in order to avoid loss of battery power.
- We recommend you use high quality Class 10 Micro SD Card max support for the best results. Please format the micro SD card on the camera before using and restart the camera after formatting.
- Do not expose the product directly to high temperatures over 55:C
- Do not place heavy objects on the camera.
- Avoid data or loss, do not place your Micro SD card near strong magnetic.
- To extend the life of the camera, do not use it when the battery is extremely low
Product Instruction
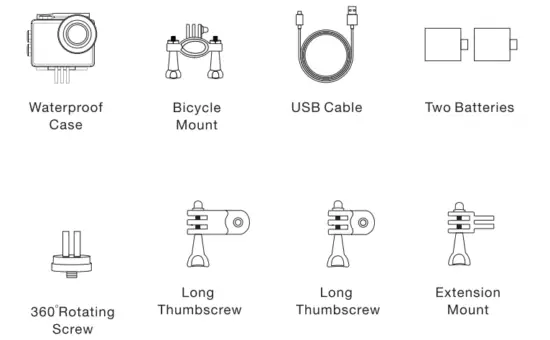
Package Contents

Product Instructions
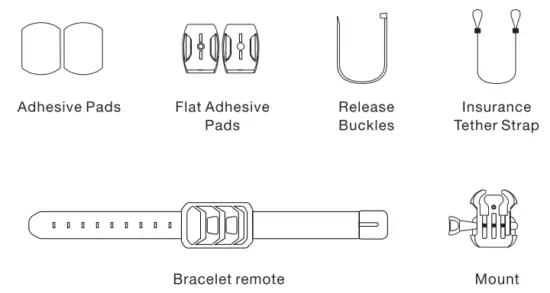
Accessories
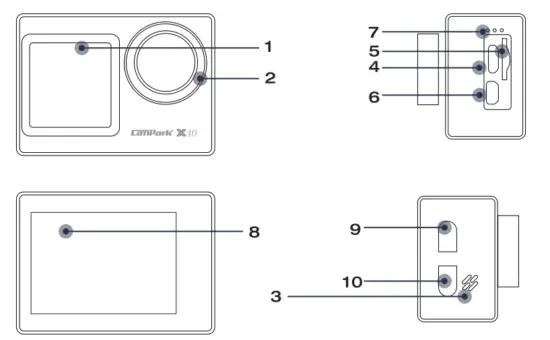
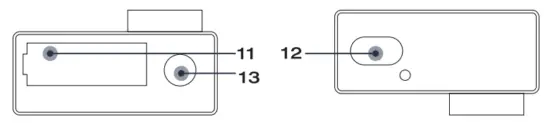
- Vice Screen
- Lens
- Speaker
- Micro USB
- Card Slot
- Micro HDMI
- Mic
- Main Screen
- UP/Mode
- Down
- Battery Cover
- Power/OK/Sh utter
- Mounting Hole
Battery Charging and Installation
The battery and the camera are packaged separately, so please make sure that the battery is charged with power, inserted into the camera before turning the camera on.
A. Battery Charging
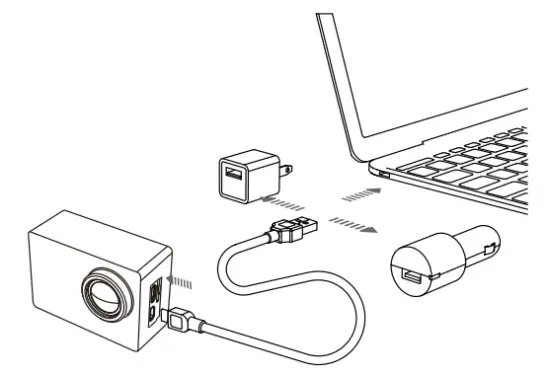
- Please note the dual USB battery charger is not included in the camera’s accessories. You may need purchase one if you want.
- Connect the camera with USB cable, you can charge it with a power adapter or computer. Charging with computer may be slower than with a power adapter due to output of computer USB ports.
- When the camera is charging, the charging indicator on the left of main screen will lights red. It will disappear if the battery is fully charged.
SD Card Insertion and Formatting
A. SDCard Insertion and Out
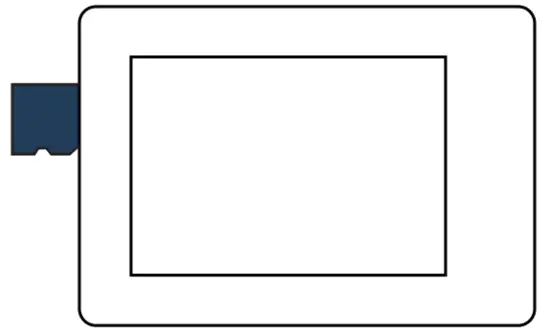
- Find the Micro SD card slot in the camera, and insert the card into the camera as the direction and push inside.
- SD card out: Press down the SD card until you’ ve heard a insertion sound; Then the SD card will pop out along with a pop sound.
B.SD Card Formatting
- Insert the micro SD card before turn on the camera.
- Turn on the camera, press “UP/Mode” button (or touch the “Setting” icon on the bottom right corner of screen) to enter Setting menu.
- Find the “Format”setting item, select “SD card”, press OK button, to complete the format.
The camera supports regular brand micro SD card, Class 10 or above, 8GB to 64GB, please ensure the quality of micro SD card. You must format the micro SD card on the camera before Using.
Operating Instruction
The X40 Camera has 4 modes: Video Mode, Photo Mode,
Playback Mode, Settings Mode. Below are the function instructions of each button under these modes.
Turn ON/OFF
Press and hold on the “Power/OK” button: Turn on the camera.
Press and hold on the “Power/OK” button: Turn off the camera.
Switch the screen
Press and hold on the “UP/Mode” button to switch the screen
Under each mode.
Mode Operation Instructions
Press the Mode Button, then press the down key to select the Mode you want.

Settings TabIe
Click the lower middle corner of the screen to switch between video mode and photo mode.Click the lower right corner to enter the system Settings menu.
Click the bottom left corner to enter the playback menu.
Video Setting
Video Resolution: 4K 30fps/2.7K 30fps/1080P 120fps/1080P 60fps/1080P30fps/720P 240fps/720P 120fps/720P 60fps/ 720P 30fps
The default resolution is 4K 30fps.
EIS: Off/On.
Choose to turn on/off the anti-shake function.
Looping Video: Off/2 Min./3 Min./5 Min.
When this fonction is turned on. the video recorded will be segmented at the time you set
Time-Lapse Video: Off/0.5 Sec./1 Sec./2 Sec./5 Sec./10 Sec. /30 Sec./60 Sec.
The video recorded will be compressed to the time length you set. For example, an image of a scene may be captured once every second, then played back at 30 frames per second; this is an apparent 30 times speed increase.
Slow Motion: OFF/1080P 4X/1 080p 2X/720P 8X/720P 4X
Photo Setting
Photo Resolution: 20M/16M/13M/8M
Sharpness: High/Middle/Low
The higher the sharpness, the more detail.
Time-Lapse Photo: 3 Sec./5 Sec./10 Sec./20 Sec.
After you press Shuttle/OK Button,the camera take photos according to the time gap you set.
Burnt Photo: 3 photos/5 photos/10 photos.
The default setting is Off.
Press the Power/OK Button once to take a few pictures in a row.
General Setting
Time Watermark: On/off
Turn on this function, the recorded videos or photos will show the date and time.
Exposure: -3, -2, -1, 0, 1, 2, 3
Adjust the exposure value when shooting, it will make the brightness of the photo more realistic.
ISO: Auto/100/200/400/ 800/1600/3200/6400
ISO refers to the light sensitivity of either the film or imaging sensor.
Beyond simply changing the exposure, ISO also affects image quality. A higher ISO typically translates to a noisy or”grainy”image.
White Balance: Auto/Sunny/Cloudy/Incandescent/Fluorescence Choose different shooting modes in different environments.
Metering Mode: Average/Center/Spot/Matrix.
You can choose the metering mode according to your needs.
Distortion Correction: Off/On
You can choose to turn On/Off the distortion correction function.
System Setting
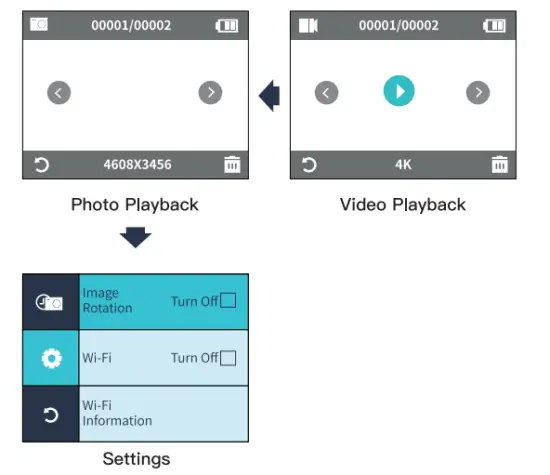
Image Rotation: On/Off
When turned on, the video is reversed
Power Off: Off/3Min/5Min/10Min
After setting a period of time,if there is no operation on the camera, the camera will automatically shut down.
Date &Time: _Y_M_D 00:00: 00
Tipa: Since the camera does not have a built-in battery, once the battery is removed or the camera is out of power while shooting, the camera’s time will be reset to 2018/01/01 when it powered on at next time, and then you need to reset the time in the setting.
LED Indicator: On/Off
Turn on or off the indicator light.
Reset Wi-Fi: Revert to factory Settings
WI-FI: On/Off
Turn on or off the WIFI
Screen Saver: Off/30sec./1 min./2min.
After a set period of time, if there is no operation on the camera, the screen will automatically go black. At this point the camera does not turn off, you can press any button to light the screen.
Format: YES/NO
Format the memory card in the camera. Once this operation is implemented, all date will be deleted. We recommend you to format your memory card in the camera before use.
Reset: YES/NO
Restore all camera settings to default settings.
Exit:
Touch the “Back” icon
VIDEO MODE
Video:
There will be a video icon on the upper left corner of the camera screen. Please confirm that you have set up your video settings. If the video icon in your camera’s LCD is not shown, press the Mode Button repeatedly to the setting menu and select the desired option in the Video Setting(such as Looping Video/-Time-lapse Video/Slow Motion etc).
To Start Recording:
Press the Power/OK Button. The camera Status Light(Blue) on the left of screen and a Red Dot on the screen will flash while recording.
Time-Lapse Video: If you turn on the Time-lapse video in Video setting, there will be a clock icon at the top of the camera screen. The number displayed on the icon is the time of the video compression you set.
Tips: This camera automatically stops recording when the battery is out of power. Your video will stored before the camera powers off.
This camera automatically stops recording when the SD card is full if the looping record function is turned off. Files will be overwritten in recording order when the SD card is full If the looping record function is turned on.
PHOTO MODE
Photo:
There will be a photo icon on the upper left corner of the camera screen. Please confirm that you have set up your photo settings. If the photo icon in your camera’s LCD is not shown, press the Mode Button repeatedly to the setting menu and select the desired option in the Photo Setting(such as Time-lapse Photo/ Burst Photo)
To capture a photo: Press the Power/OK Button. The camera will emit a shutter sound (Volume in General Setting needs to be turned on).
Time Lapse Photo: If you turn on the Time-lapse photo in Photo setting, there will be a clock icon at the top of the camera screen. The number displayed on the icon is the time interval for taking pictures.
Burst Photo series: Press the Power/OK Button, the camera will continuously take the number of photos you have set. At this time, the time interval set in Time-Lapse Photo will become invalid.
PLAYBACK
Playback Videos and Photos
Press Mode Button to switch the camera to Playback mode (Playback video and Playback photo). Press the DOWN Button to cycle the videos or photos and then Press the OK Button to playback the desired options.
To delete a file in the file preview interface,cIick the delete key in the lower right corner to delete the file.
To exit playback mode, press the Mode Button to the main preview menu, press the Mode Button again to turn to settings mode.
Tips: Due to different camera supported file formats may be different, files recorded on other cameras with the same memory card may can’t be played back on this camera.
Wifi/Computer/TV Connecting
Wi-Fi CONNECTION
Connect to the Wi-Fi
TheWi-Fi Application allows you to control your camera remotely on a smartphone or tablet. You can view the video or pictures on your phone, and download the recordings. The connecting steps are as following:
- Download the DVKING 4K app on your smart phone or tablet in Google Play or Apple App Store.
- Click the Settings key in the lower right corner or press the mode Button to find the WIFI switch. Or press and hold on the DOWN button to turn on the WIFI
- Find and connect the Wi-Fi in the Wi-Fi list on your phone with the Wi-Fi name and password displayed on the camera.
- Open the DVKING 4K App on your smart phone or tablet after the Wi-Fi is connected, you’ II find the camera is controlled by your phone.
- Tips:
- Press the UP/MODE Button again to turn off the Wi-Fi.
- The camera can only connect to one device at a time. The Wi-Fi connection is a little bit power-consuming, so please avoid connecting Wi-Fi when the battery power is low.
App available on:
Scan QR code to download the camera App


Computer Connecting
There are two options when you use the included micro-USB cable to connect to a computer: MSDC and Charg ing mode. Press Up/Down button to switch between these three modes and press Shutter/OK Button to enter.
MSDC: Access to the fles which stored in camera’s micro SD card to copy or view them on a computer. This function can also achieved by a micro SD card reader.
Charging mode: The USB cable is only used as a charging cable. In this mode, you can still use the camera.
Accessories Introduction
- With HDMI output, you can display the movies and images recorded by this camera on large screens of TV, projector; etc.
- Turn off the camera.
- Connect the camera arid TV with commercially available Micro HDMI cable (NOT INCLUDED).
- Turn on the camera and turn on the HDMI setting on the device which you intended to input.
Tips
- The HDMI input device should support 1080P.
- When outputting HDMI, the display of the camera turns black. The screen is displayed on the HDMI input device, but the operation is operated with the camera.
Product Specification
| Model | X40 |
| Lens | 170°HD Wide-angle fish-eye lens |
| Display dimension | 29.8×59.2×41 mm |
| Photo Resolution | 20M/16M/13 M/8M |
| Video Format | mp4 |
| Image Format | JPEG |
| Wi-Fi Connection | Android/iOS supported(8-15 meters) |
| Charging Time | About 3 hours(5V/1A) |
| Micro SD Card | Support class 10 or above,
8-64GB micro SD card |
| Ports | Micro USB/Micro HDMI |
| Waterproof Depth | 40M/131.2ft |
| Operating temperature | 0°C-45°C |
| Battery | Rechargeable 1350mAh Li-ion battery |
If You Have Any Questions or Problems
Please contact us by : [email protected]
We will offer prompt and authoritative reply within 24 hours and try our best to resolve your problem ASAP.
More Safe Guarantee with CAMPARK!
If you are not satisfied with our product. Please tell us about your thought. That will be much appreciated.
Q and A
Q: Which type of memory card can be supported by this camera?
A: This camera can support a Class 10 Micro SDHC Memory Card (TF Card),64 GB is the maximum size that can be supported.
Q: Although you have already inserted the SD card, the screen prompts “Please insert SD card”.
A:
- Please make sure that the micro SD card is formatted in the camera before using.
- If the micro SD card is formatted and the problem still exists, the file system of the original SD card may be corrupted. Please try to change a micro SD card (class 10 or above, 8-64GB).
Q: The recorded files have not been saved.
A: You need to make sure the camera is recording and the SD card is in the correct format for normal recording or replace by other SD card that meets the requirements.
Q: Can not operate or turn on the camera normally.
A: First ensure that the battery can be charged, whether full charged or replaced the backup battery and then boot up the operation.
Q: Action camera goes hot during normal use.
A: Because this machine is a fully sealed digital device, it will have a certain amount of heat during use, temperatures of around 45 Celsius is within tolerant range.
Q: Sound quality is poor or there is no sound on playback.
A:
- Please make sure that the device is not in the waterproof case while recording, because the waterproof case is tightly-sealed and will reduce the sound.
- Please make sure the audio is on in the settings.
Q: Is the remote control waterproof?
A: The remote control is not completely waterproof, so it should not be fully immersed in water. If the camera encounters with occasional splashing water, please wipe it clean and dry in time.