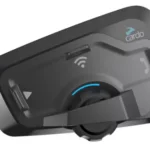
cardo FREECOM 1 Duo Communication System User Manual
INTRODUCTION
Thank you for choosing the Cardo FREECOM 1 communication and entertainment system for motorcycle helmets. We wish you a great FREECOM 1 experience and encourage you to visit www.cardosystems.com/support regarding any questions, suggestions or comments you may have.
If you have not yet installed the FREECOM 1 unit on your helmet, please install it as described in the Installation Guide provided in the package. And don’t forget to register your FREECOM 1 at www.cardosystems.com/update.
GETTING STARTED
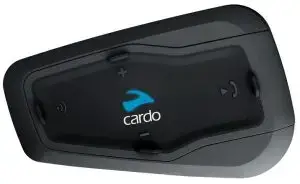
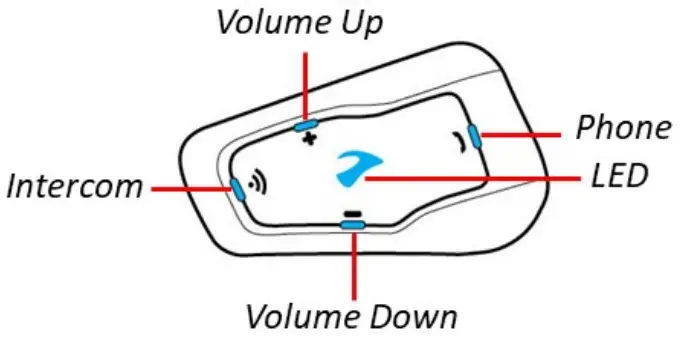
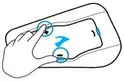
GETTING TO KNOW YOUR FREECOM 1
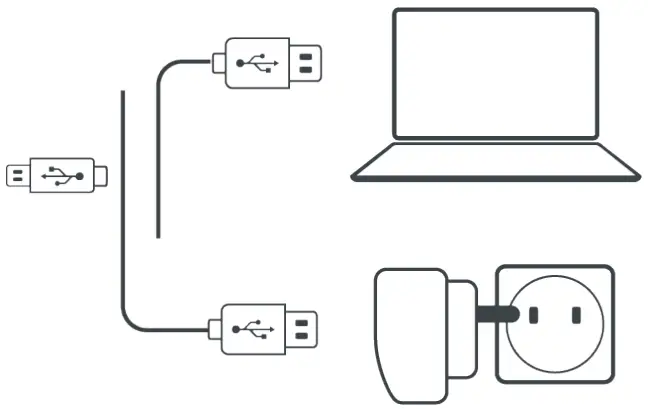
CHARGING THE FREECOM 1
Make sure that your FREECOM 1 battery is charged for at least 4 hours before initial use.
To charge the unit:
- Using the supplied USB cable, connect your computer or wall charger to the USB port on your FREECOM 1.
- Charging with the wall charger is faster than via a computer USB port.
- Charging your unit switches it off automatically. To use your unit while it is being charged, switch it on. (see Switching Your Unit On/Off on page 5).
While charging, the LED indicates the charging status as follows:
- Red LED on — charging
- Red LED off — charging complete
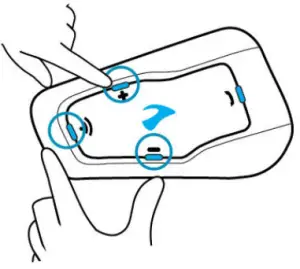
SWITCHING YOUR UNIT ON/OFF
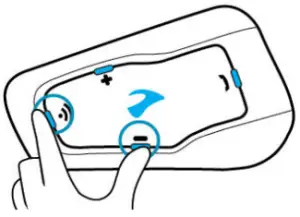
To switch your FREECOM 1 on:
- Press both
 and
and  for 1 second.
The speaker plays an ascending tone and a voice message greets you.
The LED confirms your FREECOM 1 is on:- Normal and low battery — LED flashes blue three times.
- Charging — LED flashes red and purple three times.
To switch your FREECOM 1 off:
- Press both
 and
and  .
.
The LED flashes red three times, confirming that your unit is switching off. The speaker plays a descending tone and a voice message, “Goodbye”.
USING YOUR FREECOM 1
You can operate the various features of your FREECOM 1 in the following ways:
- Press a button or combination of buttons on the unit.
- Use the Cardo Mobile App on your mobile device (once it is paired with the unit).
PAIRING YOUR UNIT TO BLUETOOTH DEVICES
Your FREECOM 1 has two Bluetooth channels for connection to Bluetooth devices such as mobile phones, GPS devices, and Bluetooth music players with A2DP.
To connect your unit to a Bluetooth device, you must first pair them. Once paired, they automatically recognize each other whenever they are within range.
If you are pairing more than one device, Cardo recommends that you pair the mobile phone to channel 1, and the additional device (such as GPS, music player or additional mobile phone) to channel 2.
If you are pairing the unit to more than one mobile phone, the phone paired with channel 1 is the default phone for outgoing calls.
To pair Bluetooth channel 1 to a mobile phone:
- Enable Bluetooth on the mobile phone.
- On the unit in standby mode, press
 for 5 seconds.
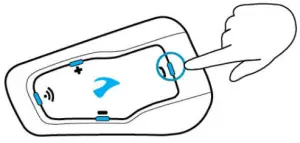
The LED flashes red and blue. - On your mobile phone, search for Bluetooth devices.
- When your FREECOM 1 appears in the list of available devices, select it.
If prompted for a PIN or Passkey, enter 0000 (four zeros).
The phone confirms that pairing has succeeded and the LED flashes purple for 2 seconds.
To pair Bluetooth channel 2 to another Bluetooth device:
- Enable Bluetooth on the device (for example, your mobile phone, GPS device, or music player).
- On the unit in standby mode, press
 for 5 seconds. The LED flashes red and blue.
- Tap twice. The LED flashes red and green.
- If you are pairing a GPS device, press
 .
.
The LED flashes slower. - On the device you are pairing, search for Bluetooth devices.
- When your FREECOM 1 appears in the list of available devices, select it.
If prompted for a PIN or Passkey, enter 0000 (four zeros).
The device confirms that pairing has succeeded and the LED flashes purple for 2 seconds.
- If pairing is not completed within 2 minutes, the unit automatically returns to Standby.
- If you have paired two different mobile phones directly to your FREECOM 1, set one as default for making calls (see Setting the Default Mobile Phone on page 11).
- Not all Bluetooth mobile phones broadcast Bluetooth Stereo music (A2DP) even if the phone has an MP3 player function. Consult your mobile phone’s user manual for more information.
- Not all Bluetooth GPS devices allow connection to Bluetooth audio devices. Consult your GPS User Manual for more information.
To cancel the pairing process:
- Press for 2 seconds.

The LED stops flashing red and blue/green.
To reset all Bluetooth device pairing:
- Press for 5 seconds.
The LED flashes red and blue. - Press
 and for 2 seconds.
The LED flashes purple 5 times, confirming that pairing has been reset.
ON THE ROAD
FREECOM 1 makes it easy for you to receive phone calls and listen to music in a convenient and safe manner.
BASIC AUDIO FUNCTIONS
The basic audio functions are the same whether you are listening to music, speaking on the intercom, or having a phone conversation.
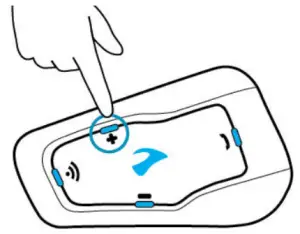
To turn the volume up:
- Tap
 .
.
An increasingly louder tone is played on the speaker until you reach the maximum volume, as indicated by the maximum volume tone
To turn the volume down:
- Tap
 .
.
An increasingly quieter tone is played on the speaker until you reach the minimum volume, as indicated by
the minimum volume tone.
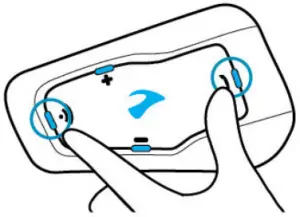
To mute the microphone and lower the speaker volume to the minimal level:
- Simultaneously tap and .

To unmute the microphone and raise the speaker volume to the previous level:
- Tap or .
An ascending tone is played on the speaker.
MAKING AND RECEIVING PHONE CALLS
You can use your mobile phone to make and receive phone calls while paired to your FREECOM 1.
To make a phone call:
- To dial using your mobile phone’s voice dial option, simultaneously tap and , then make your call as per the instructions for your mobile device.

- To redial the last number called on your mobile device, press and hold down for 2 seconds.
- To dial your preset speed dial number, tap 3 times. (The speed dial number must be set in the Cardo Mobile App prior to use.)
- If you connected two mobile phones to your unit, you cannot make an additional phone call from the other phone while a phone call is already active.
To answer a call:
- Tap
 or say “Hey” in a loud voice.
To reject a call:
- Press for 2 seconds.
To ignore a call:
- Simultaneously tap and , or wait 30 seconds.
To end a call:
- Tap
SWITCHING BETWEEN TWO CALLS ON TWO MOBILE PHONES
Your FREECOM 1 can toggle between two calls on two mobile phones when both mobile phones are paired to your unit.
To toggle between two calls on two mobile phones (without disconnecting either call):
- Tap twice.

To disconnect the current call and switch to the other call:
- Tap .
STREAMING MUSIC
You can stream music from your paired device to your FREECOM 1.
To start music streaming from your paired device:
- Tap .
To stop music streaming:
- Press for 2 seconds.
To skip to the next track (while streaming):
- Tap .
To skip back to the previous track (while streaming):
- Tap twice.
SWITCHING MUSIC SOURCES
If two music (A2DP) audio sources are paired, FREECOM 1 uses the audio source from which you last played music.
To switch to the other audio source:
- Stop music (A2DP) playback from the current device (see Streaming Music on page 9).
- Play music (A2DP) from the other device.
FREECOM 1 automatically remembers your last played device.
LISTENING TO FM RADIO
The FREECOM 1 is equipped with a built-in FM radio.
To turn on the FM radio:
- Tap twice.
When you switch on your FM radio, the station that was playing when you last switched off resumes playing.
To turn the FM radio off:
- Press for 2 seconds.
To skip to the next station:
- Tap .
To skip back to the previous station:
- Tap twice.
To scan for and select a station:
- Simultaneously tap and .

The FM radio plays each station that it finds for several seconds. - When you hear a station you want to select, tap .
To store a scanned station in the active preset:
- Tap within 20 seconds of stopping the scan.
PERSONALIZING YOUR DEVICE
Get the most out of your FREECOM 1 by changing the settings and customizing your unit according to your own personal preferences, using either of the following methods:
- Cardo Mobile App on iOS or Android devices.
- Cardo Update on Windows / Mac – minimum requirements – Windows® 7 / Mac OS X 10.8
- Unit buttons.
Cardo recommends you customize your settings before going out on the road. You can adjust any of these settings as required after experiencing them under road conditions.Object Default Value Description Cardo Mobile App (iOS/Android) Cardo Update AGC sensitivity (Off/Low/Medium/High) Medium AGC automatically adjusts speaker volume according to ambient noise and riding speed. For example, when set to Low, higher ambient noise will cause the volume increase to kick in at a higher level. 

Bluetooth friendly name FREECOM 1 Sets the name that appears on your phone while pairing and in the Cardo app. FM Band According to Your Region If you are in Japan, select Japan. Otherwise, select Worldwide. Language According to Your Region Voice announcements language (see Spoken Status Announcements below). Mobile priority Mobile 1 If you paired your unit to two mobile phones, you must set one of them as the default phone for outgoing calls. RDS (Enable/Disable) Disable Radio Data System allows the radio to automatically retune to the strongest frequency available for the FM station you are listening to when the signal becomes too weak. Set speed dial numbers Empty Pre-set phone numbers for automatic dialing. Set the 6 FM radio presets 107.5 Pre-set FM radio stations. Spoken Status Announcements (Enable/Disable) Enable Voice announcements inform you to whom or to what device you are connected.
SETTING THE DEFAULT MOBILE PHONE
If you paired your unit to two mobile phones, you must set one of them as the default phone for outgoing calls.
If you do not set a default phone, the phone that you first paired with your unit is automatically set as the default phone.
To set the default phone:
- During a mobile call, press for 5 seconds.
USING PARALLEL AUDIO STREAMING
Your FREECOM 1 sets the various audio sources to either foreground (volume remains the same) or background (volume reduced) as described in the following table:
| Mobile Phone 1/2 | GPS | Music |
| Foreground | Foreground | |
| Foreground | Background | |
| Foreground |
AUDIO SOURCE PRIORITIES
If Parallel Audio Streaming is disabled, FREECOM 1 manages the audio sources you hear through the speakers according to the following audio source priorities.
| Priority | Audio Source |
| Higher Priority
↑ Lower Priority |
Mobile phone, GPS device instructions Music
FM Radio |
TROUBLESHOOTING
SOFT RESET
If your FREECOM 1 stops responding, reset it in one of these ways:
- Turning it off and then on again (see Getting Started on page 5).
- Using the supplied USB cable, connect your unit to the computer or wall charger for 30 seconds
RESET PAIRING
The options below delete all paired units or devices.
To reset mobile device pairing:
- While in standby mode, press for 5 seconds.
The LED flashes red and blue. - Press and for 2 seconds.
The LED flashes purple 5 times slowly, confirming that pairing has been reset.
RESET TO FACTORY SETTINGS
This option deletes all paired units, devices and all configuration settings.
To perform a factory reset through the unit:
- Check that your FREECOM 1 is in Standby mode (see FREECOM 1 LED Indications on page 14).
- Simultaneously press for 5 seconds.

The LED flashes purple 5 times slowly, confirming that pairing has been reset.
FAQ
Additional answers to common problems can be found at www.cardosystems.com/support/freecom-1/.
APPENDIX A. FREECOM 1 LED INDICATIONS
Your FREECOM 1 operates in various modes. Each mode consists of a group of features currently available for your use. For example, when FREECOM 1 plays music, it will be in music playing mode, enabling features related to playing music such as skipping to the next and previous tracks.
Events are considered to occur whenever you operate a feature and when FREECOM 1 responds. For example, turning on music is an event.
The device’s current mode is indicated by the unit LEDs. You also hear voice announcements on your unit for mode changes and events.
The following table shows LED indications for modes and events according to the current battery state.
| LED | Flashing | Battery State | Mode or Event |
| Blue | Fast (three times) | Normal Low Battery Charging |
|
| Blue | Slow (repeated at 3-second intervals) | Normal |
|
| Blue | Slow twice (repeated at 3-second intervals) | Normal |
|
| Purple | For 2 seconds | Normal Low Battery Charging |
|
| Purple | Slow (5 times) | Normal Low Battery |
|
| Purple/Red | Purple twice slowly, then red | Charging |
|
| Purple/Red | Slow purple and red (repeating) | Charging |
|
| Red | Slow twice (repeated at 3-second intervals) | Low Battery |
|
| Red | Fast (repeated at 3-second intervals) | Low Battery |
|
| Red | Fast (repeating fast) | Normal Low Battery Charging | |
| Red | Fast (3 times) | Normal Low Battery Charging |
|
| Red | Remains on | Charging |
|
| Red/Blue | Alternating fast | Normal Low Battery Charging |
|
| Red/Blue | Alternating slow | Normal Low Battery |
|
| Red/Green | Alternating fast | Normal Low Battery Charging |
|
| Red/Green | Alternating slow | Normal, Low Battery |
|
| Yellow | For 2 seconds | Normal Low Battery Charging |
|
GLOSSARY
| Term/Abbreviation | Description |
| A2DP | Advanced Audio Distribution Profile (for music). A protocol for playing music over Bluetooth. |
| AGC sensitivity | AGC (Automatic Gain Control) automatically adjusts speaker volume and microphone sensitivity according to ambient noise and riding speed. |
| Device | Mobile phone, GPS or music player. |
| Language | Voice announcements and voice commands language. |
| Unit | Cardo or non-Cardo Bluetooth Communication system. |
| Voice control | Voice activation (by saying a word or phrase) of certain features for hands-free operation. |
| Voice control sensitivity | Adjusts your microphone sensitivity for voice activation while you are riding. |
SUPPORT
For additional information: www.cardosystems.com/support/freecom1/
To avoid potential problems and to receive our support and warranty coverage, we strongly recommend buying our products only from authorized Cardo dealers.
Your favorite brick-and-mortar store is always your best bet. Unauthorized online resellers and online auction sites such as eBay are not among Cardo’s authorized dealers, and purchasing our products from such sites will be at your own risk. Cardo strives to provide quality products and exceptional customer service. We select dealers who share that vision. Buying grey market items from unauthorized online dealers is counterproductive and also adversely affects unsuspecting online consumers who may be purchasing used, counterfeit or defective products or devices whose warranties are void. Protect your investment by purchasing genuine Cardo products only from authorized dealers
© 2019 Cardo Systems
All rights reserved. Cardo, the Cardo logo and other Cardo marks are owned by Cardo and may be registered. All other trademarks are the property of their respective owners. Cardo Systems assumes no responsibility for any errors that may appear in this document. Information contained herein is subject to change without notice.