CELESTRON Rowe Ackermann 11 V2 Schmidt Astrograph Instruction Manual
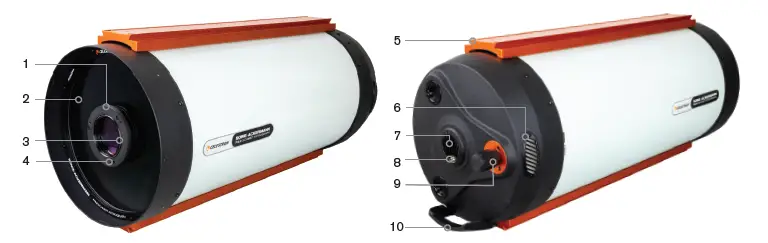
Overview
| 1 | Lens Group | 6 | Vents |
| 2 | Corrector | 7 | Cooling Fan |
| 3 | Optical Window Cell | 8 | 12V DC Power Jack for Cooling Fan |
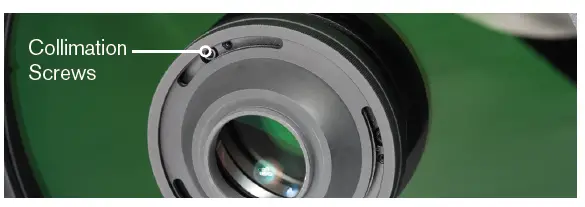
| 4 | Collimation Screws | 9 | Focus Knob |
| 5 | Accessory Dovetail Plate | 10 | Handle |
Parts List
Optical Tube Assembly, M42 Camera T-adapter, M48 Wide Camera Adapter, Retaining Ring, 8 x AA Battery Pack (batteries not included), Dust Cap
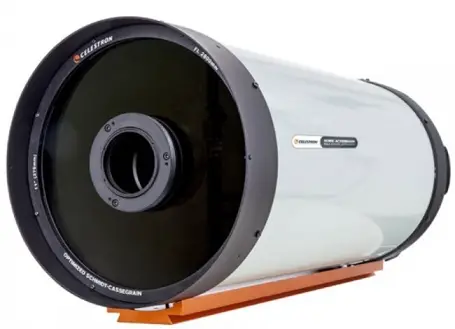
The Rowe-Ackermann Schmidt Astrograph 11 (RASA 11) is an incredibly fast (F/2.2) 11” aperture optical system that delivers a flat field without optical aberrations. It is capable of
capturing stunning deep-sky astronomical images without the difficulties presented by slower and longer focal length telescopes. The astrograph can only be used with a camera.
Mounting the Astrograph
The RASA 11 has a CGE dovetail mounting bar. This is compatible with mounts that accept a CGE or Losmandy-D style dovetail. The astrograph itself weighs 35 lbs., so a mount with
a load capacity greater than that is required to ensure good performance when a camera and any accessories are added.
Installing a Camera
Use one of the two supplied camera adapters to attach to your DSLR or astronomical camera. The M42 adapter fits most cameras with standard T-threads. The wider M48 adapter can be used with full frame cameras with minimal vignetting. DSLR cameras require a T-ring, sold separately, for the make and model of your camera. Astronomical cameras have a wide range of backfocus, depending on the model and accessories used.
The included camera adapters allow 55 mm of distance from the adapter to the imaging sensor. If your astronomical camera has a backfocus distance less than 55 mm, you will need to add a spacer to reach the correct distance.
Cameras with sensors larger than 43 mm diagonal (full frame) will require a custom adapter to better illuminate the sensor. Refer to Celestron’s website for a drawing of camera adapter requirements to help determine how a custom adapter should be made.
Note: Due to the steep light cone at f/2.2, camera housings can be a source of vignetting. Despite having a large illuminated field (78% illumination at 21 mm off-axis), vignetting can occur when the camera’s sensor is deeply recessed within its housing.
This is common with DSLR sensors, sometimes resulting in rectangular vignetting.
To Attach Your Camera:
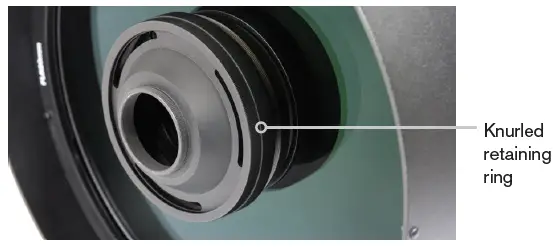
- Place the knurled retaining ring over the camera adapter and loosely thread it onto the lens group housing at the front of the RASA.
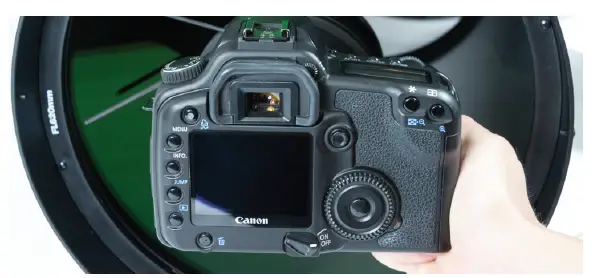
- Holding your camera, thread the camera body (or T-ring, if a DSLR is used) to the camera adapter.
- Carefully hold the camera so the camera adapter seats flatly on the lens group housing.

- Finish threading the retaining ring onto the RASA. Turn until the camera adapter is snug against the lens group housing. Do not over tighten! Camera orientation can be adjusted later.
Caution: Over tightening the retaining ring can increase the chance of loosening the lens assembly on the corrector, or cause the lens assembly to rotate against the corrector.
Keep the camera adapter snug against the lens group housing, but do not over tighten the retaining ring.
Adjusting Camera Orientation
Once the camera is installed, you can rotate it by slightly loosening the retaining ring. Loosen the ring no more than 1/8th turn, rotate the camera as desired, and retighten the ring,
remembering not to over tighten.
Fan Operation and Optics Cool Down
It takes time for the optics of the RASA to reach thermal equilibrium with the outside air. The greater the temperature difference between where the astrograph is stored and the outdoors, the longer it takes to cool down.
The RASA is equipped with a cooling system containing a 12-volt DC MagLev fan. The supplied battery pack requires 8 AA batteries (not included); install the batteries as indicated in the plastic mold of the battery holder. Plug the supplied battery pack into the power jack near the fan to turn the fan on and unplug power to turn the fan off.
We recommend powering the fan on before using the RASA, you can do this while preparing your other imaging equipment so the astrograph has time to cool down to the ambient temperature. Alternatively, the fan can be powered with any 12V DC power supply which provides at least 100mA and has a 5.5 mm/2.1 mm tip positive DC power plug.
Focusing
The focuser moves the primary mirror forward and backward within the rear cell. The RASA 11 utilizes a redesigned focus system, called the Ultra-Stable Focus System (USFS), which minimizes unwanted lateral movement of the primary mirror when focusing or slewing the astrograph, thus minimizing both “focus shift” and “mirror fl op”.
To focus, turn the focus knob until the image appears sharp in your camera. If the knob
will no longer turn, the focuser has reached the end of its mechanical travel. In this case, rotate the knob in the opposite direction until focus is achieved. A single turn of the focusing knob does not move the primary mirror much; it takes about 30 turns to go through the entire range of focus. If focusing on a dim object and the focus knob is turned too quickly, it is possible to go right through focus without seeing the image. To
avoid this problem, try fi rst focusing on a bright star so the image is visible even when out of focus.
Celestron offers a focus motor which is compatible with the RASA. A focus motor can be a great convenience when astroimaging, as the focusing is much more precise and can be done from the same computer that is controlling the camera. Third-party software will even allow auto-focusing with the focus motor.
Attaching Accessories
The RASA 11 includes a CGE dovetail accessory bar which is also compatible with Losmandy-D plate accessories. The dovetail accessory bar can be used to mount an optional guidescope.
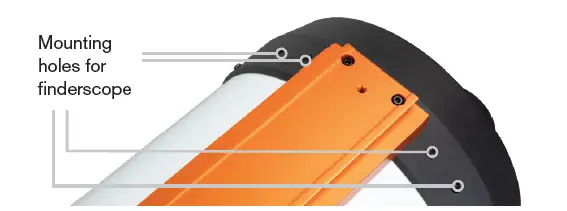
A Celestron fi nderscope can be attached using the pairs of threaded holes in the rear cell of the astrograph. These holes have Phillips-head screws in them when not in use.
Removing the Optical Window
The optical window at the front of the lens group can be removed from the RASA. This is to maintain best optical performance for the ultra-fast F/2.2 optical system when an extra piece of fl at glass, such as a fi lter, is added into the light path. If you are using fi lters, the optical window should be removed. Celestron offers a Light Pollution Imaging Filter for the RASA 11 which mounts in place of the optical window, this can be very
useful in obtaining longer sub-exposures from light-polluted skies. Also, if your camera utilizes an optical window in its housing, you may want to consider removing the RASA’s
optical window, regardless if a fi lter is used or not.
To remove the optical window:
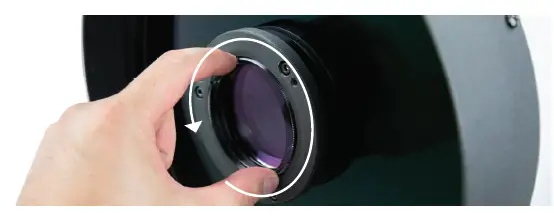
- With the camera adapter removed, carefully grab hold of the knurled cell of the optical window.
- Carefully unthread the optical window from the Astrograph.
Collimation
The RASA is factory aligned, but may need a slight adjustment after it is transported.
The primary mirror and corrector are permanently aligned at the factory. You can make adjustments to the tilt of the lens assembly if needed.
The astrograph must be collimated with the camera installed. We recommend using a camera that does not obstruct the light path of the telescope, making it easier to see concentric star patterns.
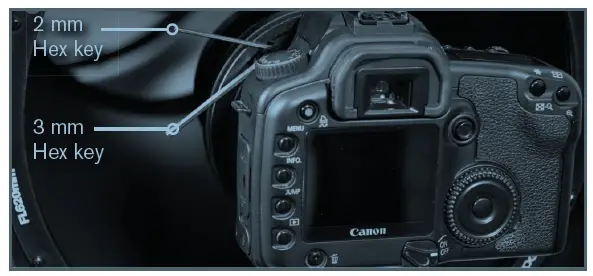
Equipment needed:
2 mm Hex key
3 mm Hex key
Artifi cial star or a star outside at night, such as Polaris
Camera setup, ready to image
- Install the camera on the RASA as described in the “Installing a Camera” section of this manual.
- Rotate the camera adapter so that the 3 slotted openings allow access to the collimation screws
- Point the astrograph at your star and focus the camera.
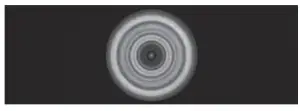
- Defocus the star by about one turn of the focus knob.
- Inspect the star pattern. When collimated, the pattern should look like a concentric doughnut. If the pattern is concentric, no adjustment is necessary.
OUT-OF-FOCUS STAR IMAGE FOR COLLIMATED TELESCOPE - Adjust the RASA’s collimation if needed by slightly loosening one of the 3 mm socket head screws, and tightening the paired 2 mm set screw. Alternatively, you can loosen the 2 mm set screw and then tighten the 3 mm socket head screw. Each pair of screws work together as a push/pull system; tightening one requires fi rst loosening the other. Always adjust one pair of collimation screws at a time.
- If the star pattern is thin on one side, adjust the collimation so that the star moves towards the thin side, then adjust the position of the RASA to re-center the star. Repeat this until you achieve correct collimation.
OUT-OF-FOCUS STAR IMAGES FOR RASA NEEDING COLLIMATION
Dew Prevention
The Schmidt corrector is especially susceptible to condensation forming on it because the glass is directly exposed to the night sky, like the windshield on your car. If the temperature of the corrector drops below the dew point, dew may form on the corrector within minutes.
The easiest way to help prevent dew is to add an optional dew shield, available from
Celestron, which shrouds the front of the astrograph and reduces radiant cooling of the corrector. If conditions are more severe, a dew heater, commonly available from other manufacturers, can be added to apply slight heat to the corrector to keep above the dew point and dry all night. If light dew has already formed on the corrector, you can try pointing the astrograph downward to allow the corrector to warm a bit until it clears. If heavy dew forms, you can use a hair dryer to heat the corrector and evaporate the moisture until it is clear.
Do not store the astrograph if covered in dew. Allow it to dry first without the dust cover on. Storing optics when wet can promote mold growth on the optical surfaces.
Specifications
| Optical Design | Rowe-Ackermann Schmidt |
| Aperture | 279 mm |
| Focal Length | 620 mm |
| Focal Ratio | 2.22 |
| Central obstruction diameter | 114 mm |
| Optical Coatings | StarBright XLT |
| Optical Window | Broadband AR fully-multicoated removable optical window |
| Focuser | Ultra-Stable Focus System |
| Cooling Fan | 12V DC, MagLev, 5.5 mm/2.1 mm tip positive power jack |
| Optical Tube Dimensions | 33 in. long x 13 in. diameter |
| Total Telescope Kit Weight | 35 lb |
| Backfocus from included camera adapters | 55 mm |
| Total back focus from flat surface above optical window | 72.8 mm |
| Wavelength Range | 400-700 nm |
| On-axis RMS spot size | <2.00 µm |
| RMS spot size 21 mm off-axis | <2.25 µm |
| Relative illumination 21 mm off-axis | 78% |
| Optimized Image Circle Diameter | 43.3 mm |
| Total Usable Field | 52 mm |
Cleaning of the Optics
Dust, debris, and fingerprints on the optics will generally have little effect on imaging with the RASA.
However, if the external surfaces of the Schmidt corrector or the lens group become excessively dirty, they should be cleaned. Dust can be removed with a blower bulb or an optical cleaning brush. Then, use optical cleaning solution and lens cleaning tissue to remove any remaining debris or stains. Apply the solution to the tissue and then apply the tissue to the lens. Use low pressure strokes, do not rub in circles. When cleaning the corrector, strokes should go from the center to the outer edge. Use a new tissue for each stroke so as not to spread any oils or debris.
To minimize the need for cleaning, keep the dust cover on the astrograph when it is not in use.
Cleaning the internal optical surfaces should only be done by the Celestron Repair Department. If your RASA needs internal cleaning, please contact Celestron for a return authorization number and price quote.
FCC NOTE: This equipment has been tested and found to comply with the limits for a Class B digital device, pursuant to part 15 of the FCC Rules. These limits are designed to provide reasonable
protection against harmful interference in a residential installation. This equipment generates, uses, and can radiate radio frequency energy and, if not installed and used in accordance with the instructions, may cause harmful interference to radio communications. However, there is no guarantee that interference will not occur in a particular ninstallation. If this equipment does cause harmful interference to radio or television reception, which can be determined by turning the equipment off and on, the user is encouraged to try to correct the interference by one or more of the following measures:
- Reorient or relocate the receiving antenna.
- Increase the separation between the equipment and receiver.
- Connect the equipment into an outlet on a circuit different from that to which the receiver is connected.
- Consult the dealer or an experienced radio/TV technician for help.
This product is designed and intended for use by those 14 years of age and older.