CHAMBERLAN Universal Wireless Keypad User Manual

Introduction
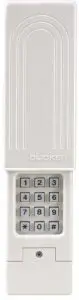
Thank you for your purchase of the Universal Wireless Keypad. PLEASE DO NOT RETURN TO THE RETAIL STORE. If for any reason you have questions or need help with troubleshooting please call: 1-800-442-1255.
 Read instructions thoroughly BEFORE beginning. If using this product STOP with residential door openers, this product must be used only with door openers manufactured after 1993 that utilize photoelectric sensors. The photoelectric sensors are always located on or near the bottom of the door track.
 WARNING: This product can expose you to chemicals including lead, which are known to the State of California to cause cancer or birth defects or other reproductive harm. For more information go to www.P65Warnings.ca.gov

To prevent possible SERIOUS INJURY or DEATH from a moving gate or garage door:
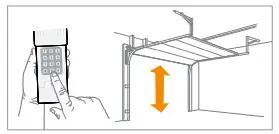
- Install keypad within sight of garage door, out of reach of small children at a minimum height of 5 feet (1.5 m) above floors, landings, steps or any other adjacent walking surface, and away from ALL moving parts of door.
- ALWAYS keep remote controls out of reach of children. NEVER permit children to operate, or play with remote controls.
- Activate gate or door ONLY when it can be seen clearly, is properly adjusted, and there are no obstructions to door travel.
- ALWAYS keep gate or garage door in sight until completely closed. NEVER permit anyone to cross path of moving gate or door.
DETERMINE GARAGE DOOR OPENER TYPES:
Proceed with instructions according to your garage door opener type.
NOTE: Your motor unit and/or remote control may look different.
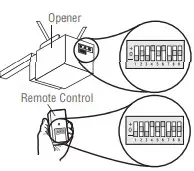
TYPE 1
Chamberlain, Sears Craftsman, LiftMaster, Master Mechanic and Do It garage door openers or receivers with: 3 position DIP switches.
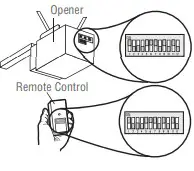
TYPE 2
Genie, Linear and Moore-OMatic garage door openers or receivers with: 2 position DIP switches.
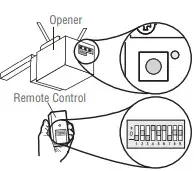
TYPE 3
Chamberlain, Sears Craftsman, LiftMaster, Master Mechanic and Do It garage door openers or receivers with: Yellow, white or grey Smart/Learn buttons.
TYPE 4
Chamberlain, Sears Craftsman, LiftMaster, Master Mechanic, Do It, Genie Intellicode, Overhead Door, Stanley, Wayne Dalton or Linear garage door openers with: Smart/Learn button.
TYPE 5
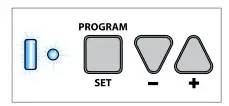
Genie Intellicode 2 garage door openers with: Program/ Set button.
BEFORE STARTING:
You MUST have a Genie IntelliCode 2 remote control with at least one button already programmed to the opener.
Programming
TYPE 1
Chamberlain, Sears Craftsman, LiftMaster, Master Mechanic and Do It garage door openers or receivers with: 3 position DIP switches.
 Select and write a 4-digit PIN: __ __ __ __
 Determine your opener ID using the list below.
| ID | DIP Switch Type |
| 11 | 9 DIP switch garage door openers (U.S.) |
| 12 | 9 DIP switch garage door openers (Canada) |
| 15 | 8 DIP switch garage door openers |
| 19 | 7 DIP switch garage door openers |
 The first DIP switch must be set to the “-” position on your remote and opener. Record your DIP switch sequence for remaining DIP switches. If the DIP switch is in the “+” position place a 1, “0” position place a 2, “-” position place a 3 in the corresponding box in the chart below:
NOTE: Leave any unused switch locations blank.
| DIP Switch Sequence | 1 | 2 | 3 | 4 | 5 | 6 | 7 | 8 | 9 |
| + 0
– |
|||||||||
| 3 |
 Press and hold the * and # buttons until keypad stops flashing.
 Enter PIN from step 1, press #.
 Enter ID from step 2, press #.
 Enter DIP switch sequence from step 3 and press # key.
 To test and use, wait until lights turn off, enter your PIN and press the 0 key.

If opener does not function, repeat programming.
TYPE 2
Genie, Linear and Moore-O-Matic garage door openers or receivers with: 2 position DIP switches.
Select and write a 4-digit PIN: __ __ __ __
Determine your opener ID using the list below.
| ID | DIP Switch Type |
| 13 | 12 DIP switch Genie garage door openers |
| 14 | 10 DIP switch Linear garage door openers |
| 16 | 10 DIP switch Stanley garage door openers |
| 17 | 9 DIP switch Genie garage door openers |
| 18 | 8 DIP switch Linear, Moore-O-Matic garage door openers |
Record your DIP switch sequence. If DIP switch is in the “on” or “up” position place a 1, “off” or “down” position place a 2 in the corresponding box in the chart below:
NOTE: Leave any unused switch locations blank.
| DIP Switch Sequence | 1 | 2 | 3 | 4 | 5 | 6 | 7 | 8 | 9 | 10 | 11 | 12 |
| ON
OFF |
||||||||||||
Press and hold the * and # buttons until keypad stops flashing.
Enter PIN from step 1, press #.
Enter ID from step 2, press #.
Enter DIP switch sequence from step 3 and press # key.
To test and use, wait until
lights turn off, enter your PIN and press the 0 key.
If opener does not function, flip DIP switches, so if a switch is “on” or “up” flip it “off” or “down” in step 3.
TYPE 3
Chamberlain, Sears Craftsman, LiftMaster, Master Mechanic and Do It garage door openers or receivers with: Yellow, white or grey Smart/Learn buttons.
Select and write a 4-digit PIN: __ __ __ __
Your opener ID is 11. 1 1
Record your DIP switch sequence. Set your first DIP switch to “-“, your first DIP switch must be set to the “-” position on your remote and opener. If the DIP switch is in the “+” position place a 1, “0” position place a 2, “-” position place a 3 in the corresponding box in the chart below:
NOTE: Leave any unused switch locations blank.
| DIP Switch Sequence | 1 | 2 | 3 | 4 | 5 | 6 | 7 | 8 | 9 |
| + 0
– |
|||||||||
| 3 |
Press and hold the * and # buttons until keypad stops flashing.
Enter PIN from step 1, press #.
Enter 11, press #.
Enter DIP switch sequence from step 3, press #.
Press and release the Smart/Learn button on garage door opener. 9 Enter your 4 digit PIN and press the 0 key. 10 To test and use, wait until lights turn off, enter your PIN and press the 0 key.
If opener does not function, repeat programming. 5
TYPE 4
Chamberlain, Sears Craftsman, LiftMaster, Master Mechanic, Do It, Genie Intellicode, Overhead Door, Stanley, Wayne Dalton or Linear garage door openers with: Smart/ Learn button.
Select and write a 4-digit PIN: __ __ __ __
Determine your opener ID using the list below.
| ID | Garage door opener brand and manufacturing dates |
| 1 | Linear garage door openers manufactured from 1997 to present. |
| 2 | Chamberlain, Sears Craftsman, LiftMaster, Master Mechanic and Do It garage door openers manufactured from 1997 to 2004 [Orange/Red Button]. |
| 3 | Chamberlain, Sears Craftsman, LiftMaster, Master Mechanic and Do It garage door openers manufactured from 2005 to present [Purple Button]. |
| 4 | Chamberlain, Sears Craftsman, LiftMaster, Master Mechanic and Do It garage door openers manufactured from 1993 to 1996 [Green Button]. |
| 5 | Genie Intellicode and Overhead Door garage door openers manufactured from 2005 to present (315 MHz). |
| 6 | Genie Intellicode and Overhead Door garage door openers manufactured from 1995 to present (390 MHz). |
| 7 | Stanley garage door openers manufactured in 1998 to present. |
| 8 | Chamberlain, Sears Craftsman, and LiftMaster garage door openers manufactured 2011 to present [Yellow Button]. |
| 9 | Wayne Dalton garage door openers manufactured in 1999 to present. |
Press and hold the * and # buttons until keypad stops flashing.
Enter PIN from step 1, press #.
Enter ID from step 2, press #.
Press and release the Smart/Learn button on garage door opener.
Enter your 4 digit PIN and press the 0 key.
NOTE: For Genie and Overhead Door units, press the 0 key twice.
To test and use, wait until lights turn off, enter your PIN and press the 0 key.
If opener does not function, repeat programming. 6
TYPE 5
Genie Intellicode 2 garage door openers with: Program/Set button.
Select and write a 4-digit PIN: __ __ __ __
Press and hold the * and # buttons until keypad stops flashing.
Enter PIN from step 1, press #.
Press 5, then press #.
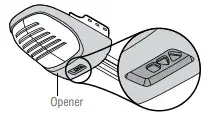
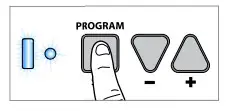
On the garage door opener, press and hold the Program/Set button until both the long and short LED light up BLUE.
Release the Program/Set button and only the round LED will be lit in BLUE.
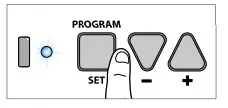
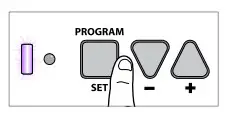
Press and release the Program/Set button and the long LED will flash PURPLE.
On the Genie® remote control, press and release the button that is already programmed to the garage door opener. Both LEDs will flash PURPLE.
 On the CLICKER® keypad, enter the PIN from step 1, and press and release the 0 key. Both LEDs on the garage door opener will light up PURPLE.
 O n the CLICKER® keypad, press and release 0 again. Both LEDs on the garage door opener will light up BLUE.
 On the CLICKER® keypad, press and release 0 again. This will activate the garage door opener and programming is complete.
 To test and use, wait 30 seconds, then enter your PIN and press the 0 key.
If opener does not function, repeat programming. 7
Installation
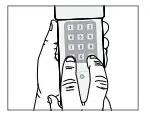
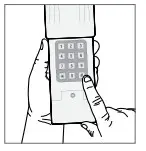
Install out of reach of small children at a minimum height of 5 feet (1.5 m) above floors, landings, steps or any other adjacent walking surface, and away from ALL moving parts of door. Secure keypad to a smooth surface. Mount the keypad out of the path of the moving garage door, but within sight of it (4″ [10 cm] clearance is needed for the cover).

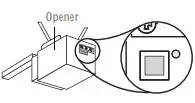
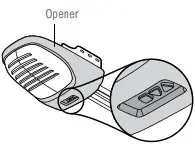
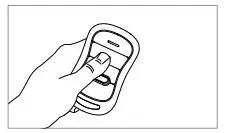
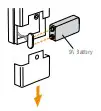
Remove cover.
Remove battery cover to expose mounting holes.
Remove battery and mount keypad using screws provided.
Reassemble.
Changing your 4-digit pin
Enter existing PIN, press *, enter new PIN and press *. To test and use, enter your new PIN and press the 0 key.
Battery
To prevent possible SERIOUS INJURY or DEATH:
- NEVER allow small children near batteries.
- If battery is swallowed, immediately notify doctor. Replace the 9-Volt battery when keypad light becomes dim or does not light up. Slide cover up, remove battery cover, and replace battery. Re-programming may be necessary.
FAQs
Why won’t my keypad work?
- Did the keypad lights come on when you entered your PIN? If the keypad lights do not turn on when you press a button, it indicates that the battery needs to be replaced. Replace with a 9V battery.
- Try reprogramming the keypad to the garage door opener.
- Make sure the keypad is compatible with your garage door opener (Chamberlain 315 MHz or 390 MHz garage door openers manufactured after January 1, 1993).
- If the solutions above did not work, replace the keypad.
How do I erase my pin?
To clear out the keypad, press and hold the * and the # keys together until the keypad stops flashing. Proceed to reprogram the keyless entry.
Can I program the keypad to a second garage door opener?
The keypad can only activate one garage door opener.
Do I always have to use a 0 after my 4 digit PIN to activate the opener?
After programming the keypad, any fifth number will act as the “enter” button to activate the opener.
Why does the door move after I only press 1 number button?
After operating the garage door with the keypad, the keypad lights will flash for 10 seconds. The keypad remains active during the 10 seconds of flashing; any number will activate the door.
Where is my LEARN button located?
If equipped with a LEARN button, it can either be found on the garage door opener or on an external receiver. To locate the receiver look for an antenna. Some receivers will require a cover be removed to gain access to the switch positions.
Will I have to reprogram the keypad after changing the battery?
The keypad should retain its memory. If the keypad no longer operates the operator, reprogram the keypad to your system.
Where is my LEARN button on my gate?
Most gate operators have a built-in radio receiver or an external receiver. The receiver on a gate opener can usually be found within the cabinet of the operator. To gain access you might require permission if used in a community gate.
How do I program my Chamberlain/LiftMaster opener?
Please refer to the instructions included with your opener. You can also find the instructions on the Chamberlain/LiftMaster website at http://www.chamberlain.com/manuals/ or http://www.liftmaster.com/manuals/.
How do I program my Craftsman opener?
Please refer to the instructions included with your opener. You can also find the instructions on the Craftsman website at www.craftsman.com or by calling 1-800-944-9200, ext 53800 (for hearing impaired).
How do I program my Raynor opener?
Please refer to the instructions included with your opener. You can also find the instructions on Raynor’s website at www.raynorgaragedooropeners.com or by calling 1-800-843-4184 (for hearing impaired).
Does it work with craftsman opener made in 20000?
I have been to the year 20,000 and come back to warn you all.. In the year 20,000 you will only need to use telekinesis to open all doors. Craftsman will have been deemed offensive by the use of the term “man” and the name will be changed to a symbol without meaning. Most of the world will have given up on the b.s. here and moved to Mars… all warranties will be voided upon your move… except your car warranty but some nonsexually unidentified being from India will call you and let you know… 100x… per day… before to have your credit card handy for that.
What frequency does this work for? (Mhz)
I purchased this product about 6 months ago because I updated my previous garage door opener (which came with a new frequency). Although I don’t know the specific frequency range or discrete frequencies that this product matches, I believe it is compatible with a wide range of brands and frequencies, and it covers many older models as well. My recommendation would be to call the Customer Service number for Chamberlain and ask specifically about the frequency you are concerned about.
Can you close the garage as well as open it? I assume so, but don’t see that actually stated anywhere. Thx
I found that you can press any key to stop and reverse direction when the door is moving. Made me think that the garage door could now be opened by anyone by pressing nay key. Wish the manual was better phrased.
Is this keypad compatible with Raynor?
Raynor is an opener brand but the wireless electronic remote opener could be several other brands. I have a Raynor opener with a Linear / Multi-Code opener. It’s old – 25 yrs and uses the 10 DIP switches, but it works fine with the visor remotes and my 3 Cadillacs with built in wireless transmitters. Linear is mentioned in the instructions so it should work with a Raynor opener.
Can it be hacked?
It absolutely CAN be hacked. Unfortunately! After incorrectly entering a code, you can still get the door to open once in a while. Just hit several random keys on the keypad and wait for a door to open. This has worked for me 30 times, usually when I am trying to enter a code with thick gloves on. Just punch a 4-digit code – and then keep pressing about 6 more buttons in frustration. The door will sometimes open. They should redesign this product for sure.
will this keypad work with allstar model 3500?
We have not attempted to mate these components.
How to set the password? the previous house owner did not give me the pin, can anyone be so nice to tell me how to set the new pin?
The contractor that installed this for me gave me the steps written in a piece of paper. We did try changing it to another PIN and I wanted to try it before he was gone. It was a bit of more than one time trial. But it did work at the end. Hopefully these steps help you as well.
1) Press * and # together until keypad stops flashing
2) Enter your new four digit code and press #, press 2, press # on the keypad
3) Press & release square red button on the back of the Liftmaster machine that is in the ceiling of your garage
4) Enter the same 4 digit again and press 0 in the keypad
As the other customer mentioned, the timing is very important and pressing the correct buttons on the keypad is very important. Please try it more than once if it doesn’t work. It sure should work. Good luck.
Video
WARRANTY
ONE YEAR LIMITED WARRANTY
The Chamberlain Group, Inc. warrants to the first consumer purchaser of this product that it is free from defect in materials and/or workmanship for a period of 1 year from the date of purchase.
NOTICE: To comply with FCC and or Industry Canada (IC) rules, adjustment or modifications of this receiver and/or transmitter are prohibited, except for changing the code setting or replacing the battery. THERE ARE NO OTHER USER SERVICEABLE PARTS. Tested to Comply with FCC Standards for Home or office use. Operation is subject to the following two conditions:
- this device may not cause harmful interference, and
- this device must accept any interference received, including interference that may cause undesired operation.
www.chamberlain.com
1-800-442-1255