CHORD Hugo M Scaler User Manual

Introduction
Welcome to the M Scaler Quickstart Guide. This shortened guide is supplementary to the main manual which should be referred to for full safety and operational information. Please note, more information on any of these topics is listed within the full manual found under the product page:
chordelectronics.co.uk/product/hugo-mscaler
Warranty
M Scaler comes with a comprehensive 3-year warranty. To activate this warranty, please register your device via the Chord Electronics website: chordelectronics.co.uk/register-product
Note: please do not use a third-party charger with the M Scaler as it voids the warranty.

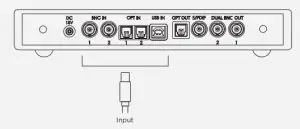
Connecting your source to M Scaler
In order to use the M Scaler, you must connect your source to any input of the device. You can connect multiple sources if you wish and select between them later from within the menu. Please note that if you are using the USB input with a MAC/Linux device you will not need a driver but if you are connecting a Windows device it will need a driver from the M Scaler section of our website: chordelectronics.co.uk/product/hugo-mscaler
Connecting M Scaler to DAVE, TT 2 or Qutest
Connect dual-data mode to a Chord Electronics DAC using two BNC cables and ensure your OP SR is set to white. Plug BNC OUT 1 into BNC IN 1 and BNC OUT 2 into BNC IN 2. If you only plug one BNC cable into the device you will only experience a maximum upsampling of 384kHz. You no longer require your source to be connected to your DAC.
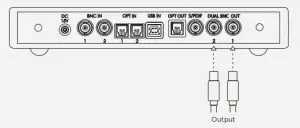
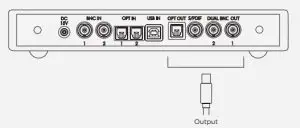
Connecting M Scaler to a third-party DAC
Connecting M Scaler to a third-party DAC without a supported dual data mode (x2 parallel BNC inputs) will yield maximum upsampling of 384kHz. We recommend connecting M Scaler to your DAC via BNC/ S/ PDIF for the maximum upsampling of 384kHz in this configuration. Connect any output of M Scaler to the input of your DAC. You no longer require your source to be connected to your DAC.
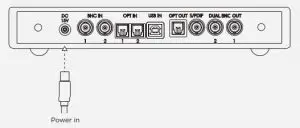
Connecting the power supply to M Scaler
Connect only the supplied power supply to the DC 15V input of M Scaler. Once connected, M Scaler will automatically power on. M Scaler does not have a power button and will remain on until the power supply is disconnected.
Selecting your input
Press the INPUT button to select the source you require. The colour changes depending on input selected, see diagram below. If you are using dual data, when you select BNC 1 the M Scaler will automatically switch on both outputs to dual data mode.
 |
 |
 |
 |
 |
 |
 |
| USB | BNC 1 | BNC 2 | Optical 1 | Optical 2 | Automatic | DUAL BNC (auto) |
Viewing the incoming sample rate
When an input is selected and audio is being played back, the sample rate will be indicated via the DX OP button. M Scaler supports incoming sample rates from 44.1 kHz to 768 kHz – 16-bit to 32-bit. You can refer to the illuminated colours DX OP button below and their associated sample rates. 44.1 48 88.2 96 176.4 192 352.8 384 705.6 768 DSD kHz
 |
 |
 |
 |
 |
 |
 |
 |
 |
 |
 |
| 44.1 | 48 | 88.2 | 96 | 176.4 | 192 kHz | 352.8 | 384 | 705.6 | 768 | DSD |
Selecting your upsample rate
You must select the corresponding colour for the upsample rate best suited for your system. Select this by pressing the OP SR (Output sample rate) button.
 |
 |
 |
 |
| No up-sampling | Medium | High | Max |
How to avoid latency when watching video
If watching video with the audio channel routed through M Scaler, you can minimise latency (lip-sync issues) by activating `Video Mode’. There are three options: On, Off or Automatic. For video with accompanying audio, we recommend either On or Automatic. In Automatic mode, the VIDEO sphere shows one of two colours: yellow (music playback detected) or cyan (video playback detected). You can also simply leave Video Mode off when listening to music.
 |
 |
 |
 |
| Off | On | Music PB | Video PB |
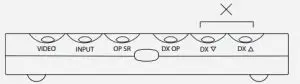
DX buttons
The last two buttons on the M Scaler unit (DX OP, DX down, DX up) are not to be used as of yet, they have been implemented for a future product that will pair with the M Scaler. Please leave them off.