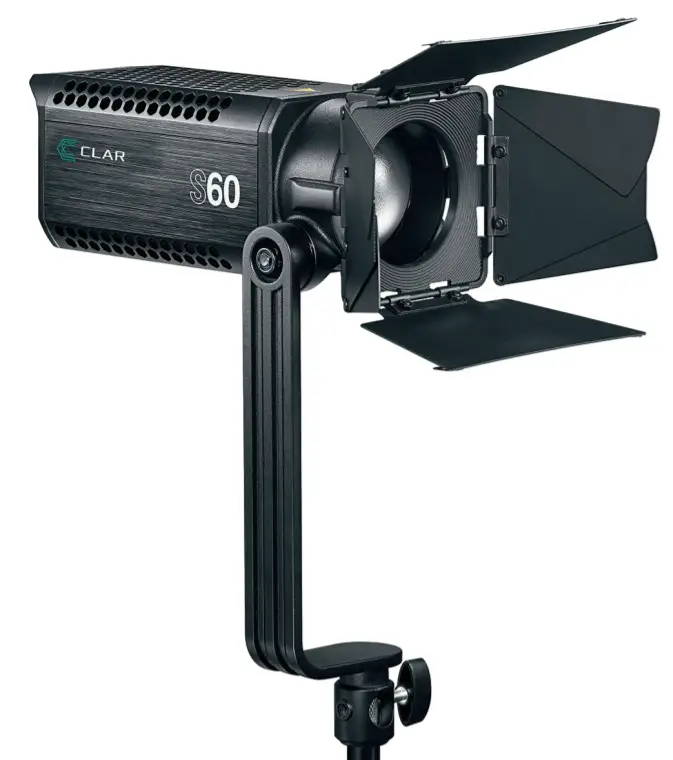
![]() S60
S60
Focusing LED Light
It’s all possible with CLAR Wireless LED.
Foreword
The CLAR 560 Focusing LED Light is the remarkable solution for a precision spot to flood LED lighting for all videography where excellence Is the priority. The lightweight system utilizes an integrated optical system that projects a superbly graduated soft 6 to 55-degree throw, 40,000 (spot) to 3,200 (flood) lux at 1 meter/3.28 feet. with a TCLI beyond 97Qa and CRI over 96Ra for pure color heaven. Of course, you can electronically control brightness levels stepless, with values displayed clearly on the LCD information panel, while enjoying the gentle precise tight to wide beam illumination. The build is tough. Solid aircraft-grade aluminum for a light time of use. So lightweight at 3 pounds that it begs to be present for all opportunities that call for serious lighting. Small, yet powerful and adept primed for professional delivery of creative and essential lighting without the mass and size usually associated with such a formidable feature-laden productive unit Mobile versatility on location and in the studio. The tiny form factor Is the key to masterfully placed lights for serious and precise placement. Quiet on the set! Not a sound is heard from the light fixture to disturb a sound recording session, even though aggressive fan-cooled ventilation assures stability. We don’t mean to boast but our diminutive COB LED soars into incandescence land – where only tungsten-halogen once ruled – without a semblance of heat and Just a whisper of imperceptible sound from its brainy efficient cooling system.
Features
- Optical excellence provides soft and even light at any angle setting, from spot to flood.
- HO 97+ TLCI and 96+ CRI ratings guarantee natural, pure color.
- The consistent color temperature within 300°K of Daylight.
- Great for videographers, portrait shooters, performance and event coverage, product shots, and anyplace LED precision is the goal.
- Lightweight and cool performance invite longtime lamp life
- Acts as an inky spot to a swath of flood coverage with the twist of a knob.
- Built-in wireless 2.46Hz remote control for up to 164ft with the optional controller.
- Multiple sources of power free the S60 LED for use almost anywhere.
- Silent treatment for audio purity during recording sessions.
- Quality construction through and through.
- Marvelous range of accessories to master the light.

- Do not disassemble or modify. Should the product break down, send the defective back to the authorized service center for inspection and maintenance.
- Keep dry. Do not handle with wet hands, immerse in water, or expose to rain. Do not place In high temperature or high humidity conditions.
- Keep out of reach of children.
- As this product adopts a make and breaks device, please keep it easy to be used.
- Disconnect from the power supply when it will not be used for an extended period.
- If this product overheats. it will cease operation and resume working after cooling down. This is due to the built-in overtemperature protection.
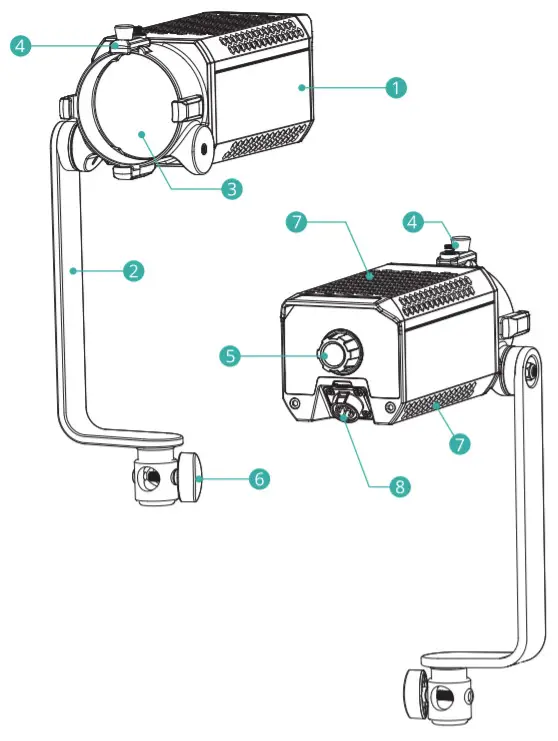
CLAR S60 Nomenclature
- S360 Lamp

| 1. Lamp Fixture 2. Tilt Adjusting Bracket 3. Lens 4. Accessory Latch |
5. Select Dial 6. Support Lock Screw 7. Thermovent 8. Power Socket |
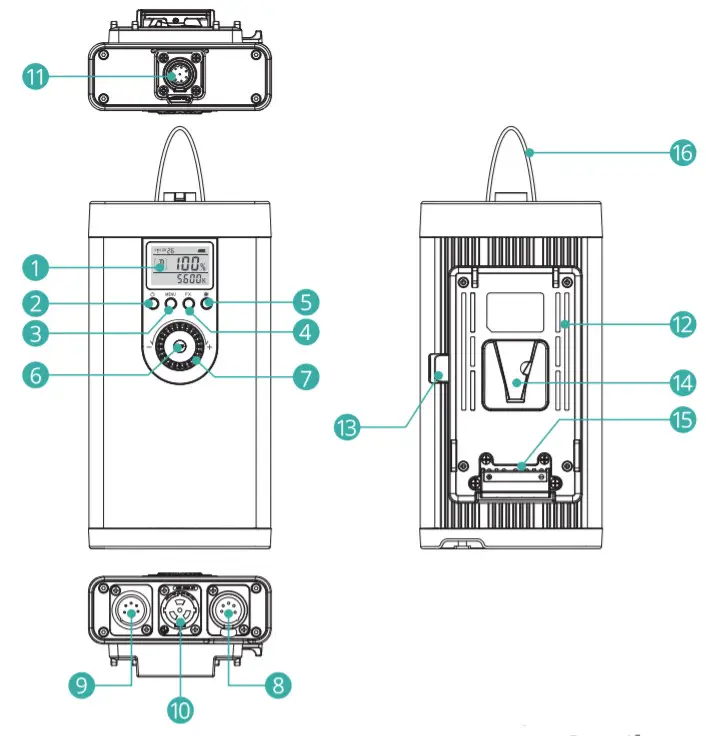
- Controller
| 1. Display 2. Power Switch 3. MENU Button 4. FX Button 5. Fan Switch 6. SET Button 7. + – Select Dial 8. DMX Output Port (male) |
9. DMX Output Port (female) 10. Power Input 11. Power Output 12. Battery Clip 13. Battery Release Button 14. Battery Compartment 15. Battery Base 16. Steel Cable Loop |
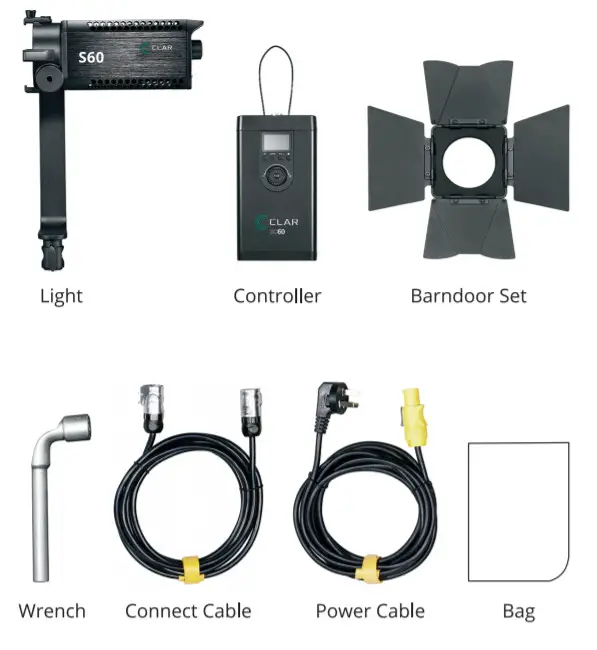
Included Items
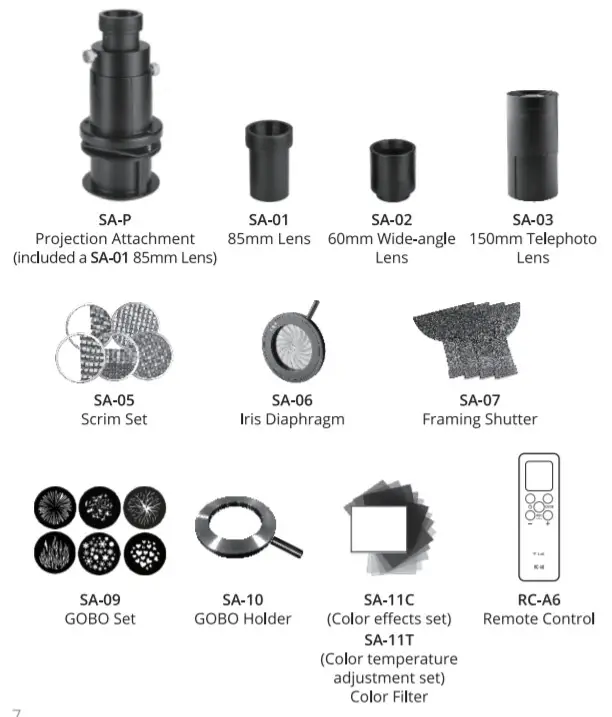
Optional Accessory
The Clar S60 can be used In combination with the following accessories sold separately, for exceptional effects.
Power Supply
• AC Power Supply
- Insert the two ends of the power source connect the cable into the controller’s power output port and the lights power input port until a “click” can be heard.
- Insert the power cables output end into the controller’s input port. Then, rotate it clockwise to 15° until a “click” can be heard.
- Connect the power cable to the power source. To remove the Connect Cable, press the PUSH Button and carefully pull the cable simultaneously. To remove the Power Cord, depress the PUSH Button on the end of the cord and rotate the cord 15 counterclockwise. Extract carefully.
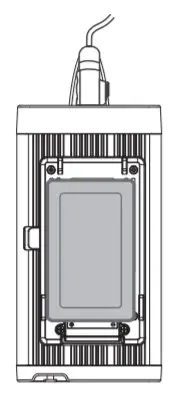
• V-port Battery Power Supply (Optional)
Install the V-port battery onto the controller’s battery compartment. Power, power the light on to operate.
Note: Only use a standard V-port battery with 14.8V voltage. Do not supply power with a battery whose voltage is over 16.8V.
Operation
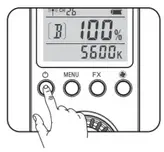
- Power switch:
Short press the power switch, to turn on the 560. The Clar S60 LEO lamp illuminates. Press the button again to turn off the light

- Brightness adjustment:
The Home Screen is the main interface. Turn the select dial to adjust brightness from 0% to 100%.
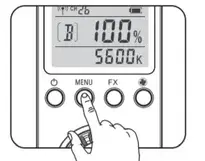
- Light effects setting:
While in the Home Screen, short press the FX button once to enter the setting interface. Turn the select dial to choose light effects from OFF and 1 to 8.
Display FX1 FX2 FX3 FX4 FXS FX6 FX7 FX8 Scene Flash 1 Flash 2 Flash 3 Storm 1 Storm 2 Storm 3 TV Broken bulb Short press the FX button or SET button to exit from the FX light effects mode and back to the main interface after settings finished are complete.
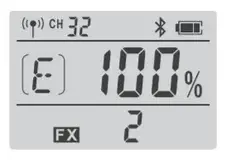
Note: If a light effect is selected from 1 to 8, the FX icon and light effect will be displayed on the main interface. Brightness levels are adjustable when the FX mode is active. The color temperature will not be displayed. - Silent Mode:
While on the Home Screen, short press the Fan button ge to turn the cooling fan on or off. The S60 enters Silent Mode. The brightness level is limited to 0% to 50%.
 Note: The cooling fan runs by default and the brightness range is 0% to 100%.
Control Mode Selection
1. 2.4G Wireless Control
The CLAR S60 LED light features built-in wireless 2.4GHz connectivity with the optional RC-A6 remote controller, for individual and light group values.
Multiple LED lights can be controlled. 32 channels and 99 IDs are available for keeping the signal interference-free.
Note: 1. Please set the LED light’s Channel, Group, and ID to the same as remote controls.
2. The wireless signals can only be received while the LED light is powered on.
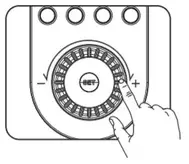
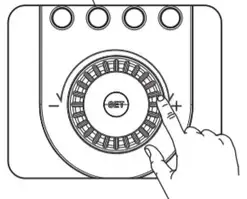
CH Channel AdjustmenVGR Group Adjustment/ID Value Adjustment
In the main interface, short press the MENU button once and turn the select dial to adjust Channel, Group, and ID values.
In the CH channel setting interface, short press the SET button the channel icon flashes. Turn the select dial to choose a Channel from 1 to 32. Press the SET button to confirm. The icon stops flashing.
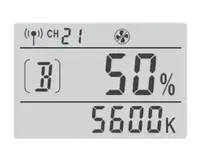
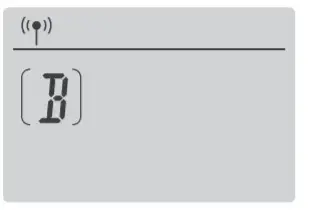
In the GR group setting interface, short press the SET button. The group icon flashes. Turn the select dial to choose the Group, from A to F and 0 to 9. Press the SET button to confirm. The icon stops flashing.
In the ID value setting interface, short press the SET button. The group icon flashes. Then, turn the select dial to choose a value from OFF and 1 to 99. Press the SET button to confirm. The icon stops flashing.
After setting all these parameters, short press the SET button to confirm and return to the main interface.
Note: The LED light will automatically return to the main interface if there’s no operation after 10 seconds.
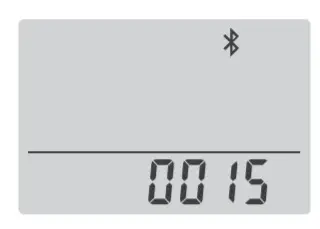
Bluetooth Control
2.1 Bluetooth Mode Display & RESET
Function. Check the Bluetooth code: in the main interface, short press the MENU button. Press the select dial to switch the icons. The Bluetooth icon appears in the display panel.
Bluetooth reset function: in the Bluetooth Mode Code interface, long-press the SET button for 2 seconds, and the Bluetooth icon flashes to indicate the reset sequence. Resetting: the icon stops flashing after a successfully reset. Then, short press the MENU button to return to the main interface.
Note: The S60 retains the Bluetooth link info for the installed device after turning off the lamp. There is no need to relink. The 560 will recognize the last Bluetooth connection parameters. When changing devices, reset (forget) the old Bluetooth setting and connect the new device to use the APP.
2.2 Scan the QR code to download the “Godox light” smartphone APP for use with Apple or Android devices. For more smartphone APP operations, please open the “help” in APP to gain detailed guidance.
http://www.guteleben.com/html/dl_app/c_ble/GodoxLight/index.html
DMX Control Mode
In the main interface, short press the MENU button once and turn the select dial until the DMX icon is displayed. Short press the SET button and the icon flashes. Then, turn the select dial to set the DMX channel from 1 to 512. Then, short press the SET button to confirm the setting. The DMX icon returns to normal. Short press the MENU button to return to the main interface.
DMX Parameters:
| Operation Mode/Code | CCT | FX | Note |
| n(MOde) | 0-51 | 52-255 | |
| n+1 | DMX*(100/255) Integer integer 0-100% Brightness 0.100% Brightness | DMX*(100/255)Integer integer 0-100% Brightness 0.100% Brightness | |
| n+2 | DMX*(total light effects/255) | For example: total light effects 8, DMX=160, light effects NO =160’8/255=5 |
Technical Data
| Focusing LED Light | CLLXLS60 | ||
| Power Supply | AC Per Supply | 100-240V 50/60Hz 0.9A | |
| V-port battery | Standard voltage: 14.8V (optional) | ||
| Output Power | 60W | ||
| Color Temperature | 5600°K±300°K | ||
| 100% Illuminance (LUX) | Flood (Central Area) | 3200 | |
| (3.3ft/1 m, darkroom) | Spot (Central Area) | 40000 | |
| CRI | 96 Ra | ||
| TLCI | a.97 Qa | ||
| Brightness Range | 0%-100% | ||
| Channel (CH) | 32 (1 to 32) | ||
| Group (GR) | 16 (A to F/O to 9) | ||
| Beam Angle | 6°-55° | ||
| Working Environment Temperature | 14- 104°F! -10 – 40°C | ||
| Control Method | Smartphone APP 2.4G wireless remote control | ||
| DMX control | |||
| 2.4G Wireless Transmission Distance | 164ft/ 50m | ||
| Dimension | Light body: 13.4 x 4.2 x 3.9in / 264 x 7 x 100mm | ||
| Controller: 10.5 x 4.4 x 2.5in / 268 x 113 x 64mm | |||
| New weight | Light body: 48oz / 1.36kg | ||
| Controller: 33.2oz / 0.94kg | |||
*Product design and specifications are subject to change without notice.
Care Procedures
- Don’t attempt to modify the unit yourself. If it becomes damaged, please contact your vendor or take it to an authorized repair service. Do not disassemble this equipment. Touching the product’s internals could result in injury. In the event of a malfunction, the product should be repaired only by a qualified technician.
- Use prudence and attach to support with the stand adapter.
- After using the light for extended periods, allow it to cool before storing, to avoid damage to the electronic components.
- Don’t use the light to support any other equipment or lift your imaging device by the unit.
- Please use a soft dry cloth to clean the light. If necessary, carefully wash with a cloth dampened with neutral detergents, and then dry with a soft cloth.
FCC Statement
This device complies with part 15 of the FCC Rules. Operation is subject to the following two conditions:
(1) This device may not cause harmful interference, and
(2) this device must accept any interference received, including interference that may cause undesired operation. Any changes or modifications not expressly approved by the party responsible for compliance could void the user’s authority to operate the equipment.
Note: This equipment has been tested and found to comply with the limits for a Class B digital device, pursuant to part 15 of the FCC Rules. These limits are designed to provide reasonable protection against harmful interference in a residential installation.
This equipment generates uses and can radiate radio frequency energy and, if not installed and used in accordance with the instructions, may cause harmful interference to radio communications. However, there is no guarantee that interference will not occur in a particular installation. If this equipment does cause harmful interference to radio or television reception, which can be determined by turning the equipment off and on, the user is encouraged to try to correct the interference by one or more of the following measures:
- Reorient or relocate the receiving antenna.
- Increase the separation between the equipment and receiver.
- Connect the equipment into an outlet on a circuit different from that to which the receiver is connected.
- Consult the dealer or an experienced radio/ TV technician for help.
One Year CLAR Limited Warranty
CLAR warrants to the original purchaser that your OAR product shall be free from defects in material and workmanship for the period of one (1) year from the date of purchase (or delivery as may be required in certain jurisdictions), or thirty (30) days after replacement, whichever comes later.
CLAR’s entire liability and your exclusive remedy for any breach of warranty shall be, at CLAR’s option, to repair or replace the hardware, provided that the hardware is returned to the point of purchase or such other place as CLAR may direct with a copy of the sales receipt or dated itemized receipt. CLAR may, at its option, replace your product, offer to provide a functionally equivalent product, or repair any product with new, refurbished, or used parts as long as such parts are In compliance with the product’s technical specifications. Any replacement hardware product will be warranted for the remainder of the original warranty period or thirty (30) days, whichever is longer, or for any additional period of time that may be applicable in your jurisdiction. If the product has been discontinued, the warranty provider reserves the right to replace it with a model of equivalent quality and function.
This warranty does not cover problems or damage resulting from accident, abuse, misapplication, or any unauthorized repair, modification or disassembly, improper operation or maintenance, normal wear, and tear, or usage not in accordance with product instructions or connection to the improper voltage supply, use of consumables, such as replacement batteries, not supplied by CLAR, except where such restriction Is prohibited by applicable law.
Except where prohibited by applicable law, this warranty is nontransferable and is limited to the original purchaser and the country in which the product was purchased. This warranty gives you specific legal rights, and you may also have other rights, including a longer warranty duration that may vary under local laws.
To start a warranty claim, contact the CLAR Customer Service Department to obtain a return merchandise authorization (“RMA”) number, and return the defective product to OAR, along with the RMA number and proof of purchase.
Question about our product line? Need Product Support?
CLAR is the light leader. You have a mighty lighting tool to accomplish exquisite images bursting with creative expression. Continuous light is not hampered by guide number restrictions. The image-maker has ultimate control with absolute assurance that the image on the preview screen correctly portrays the captured vision.
Enjoy your purchase and keep in touch with us as your gain experience and the pleasure of producing exciting and unique imaging with CLAR. We are proud of our products and celebrate our customers. We are with you, from product selection to everyday use. Be secure with your purchase and reach us as you need.
Email us: [email protected]
Call: 212-647-9300
Address: Adorama Brands, 42 West 18th Street, New York, NY 10011
You can always contact us at [email protected] for personal technical support. Our website contains a wide range of Support and FAQ pages with valuable technical assistance.
CLAR is a registered trademark of ADORAMA CAMERA. CO 2021 Adorama Inc. All Rights Reserved.
CLLCLS60
Adorama Inc., New York, NY
www.adorama.com/ourbrands