All GS38 Models
![]()

Instruction Booklet
For your safety and continued enjoyment of this product, always read the instruction book carefully before using it.
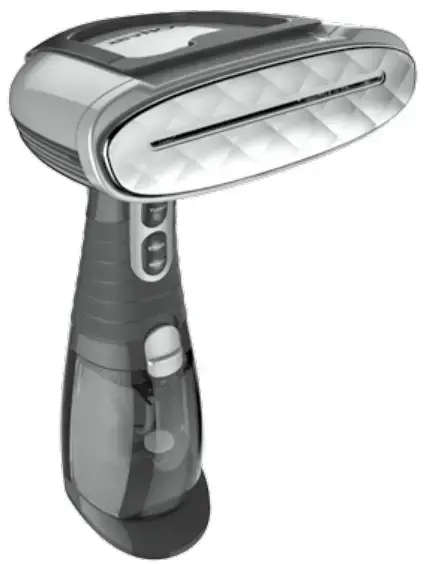
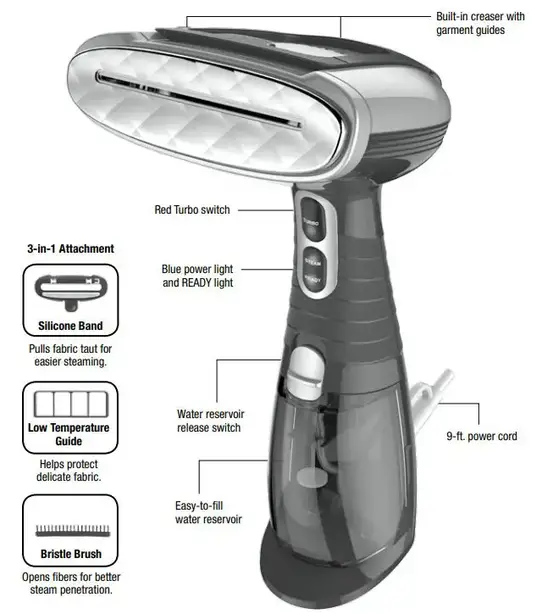
GETTING TO KNOW YOUR STEAMER
IMPORTANT SAFETY INSTRUCTIONS
When using electrical appliances, especially when children are present, basic safety precautions should always be taken, including the following:
READ ALL INSTRUCTIONS BEFORE USING
DANGER – Any appliance is electrically live even when the switch is off. To reduce the risk of death by electric shock:
- Always unplug appliances immediately after use and before cleaning.
- Do not place or store appliances where they can fall or be pulled into a tub or sink.
- Do not place in, or drop into water or other liquids.
- Do not reach for an appliance that has fallen into the water. Unplug immediately.
- Use only in a dry area.
WARNING – To reduce the risk of burns, electrocution, fire, or injury to persons:
- This appliance should never be left unattended when plugged in.
- This appliance is not a toy and is not to be used by children.
- Close supervision is necessary when this appliance is used near children or individuals with certain disabilities. Unsupervised use could result in fire or personal injury.
- Use this appliance only for its intended use as described in this manual. Do not use attachments not recommended by the manufacturer.
- Rest the appliance on a stable surface when placed on its base.
- Never operate this appliance if it has a damaged cord or plug, if it is not working properly, or if it has been dropped or damaged, or dropped into water. Do not attempt to repair the appliance. Incorrect reassembly or repair could cause a risk of fire, electric shock, or injury to persons when the appliance is used. Return the appliance to an authorized service center for examination and repair.
- Do not allow the cord to contact heated surfaces. Do not pull or twist the cord. Let the appliance cool completely before putting it away. Loop cord loosely around the appliance when storing.
- This appliance has a polarized plug (one blade is wider than the other). As a safety feature, this plug will fit in a polarized outlet only one way. If the plug does not fit fully in the outlet, reverse the plug. If it still does not fit, contact a qualified electrician. Do not attempt to defeat this safety feature.
- Never drop or insert any object into any opening.
- Do not use outdoors or operate where aerosol (spray) products are being used or where oxygen is being administered.
- Do not use an extension cord to operate the appliance.
- The surfaces of this appliance are hot when in use. Do not let heated surfaces touch eyes or skin.
- Do not place the steam nozzle directly on any surface or on the appliance power cord while it is hot or plugged in.
- Unplug this appliance before filling or emptying the water.
- Do not operate the steamer without properly filling the water container with distilled water.
- Never yank cord to disconnect from outlet; instead, grasp plug and pull to disconnect.
- Burns could occur from touching hot parts, hot water, or steam. Use care when removing the water reservoir or when you turn a steam appliance upside down – there may
be hot water in the reservoir. Always position steamer with head away from you and any other person when turning on. - Do not hold hand in front of steam.
- To reduce the likelihood of circuit overload, do not operate another high-wattage appliance on the same circuit.
- Use caution when installing or removing an attachment as it may contain hot water from condensation. Ensure that the unit is off, attachment is dry or cooled off to avoid
contact with hot water. - Never steam clothes you, or someone else is wearing.
- When emitting steam, this appliance may cause burns if it is used too close to the skin or eyes, or if it is used incorrectly. To reduce the risk of contact with hot water emitting from the steam vents, test the appliance before use by holding it away from the body.
SAVE THESE INSTRUCTIONS
IMPORTANT
FOR HOUSEHOLD USE ONLY
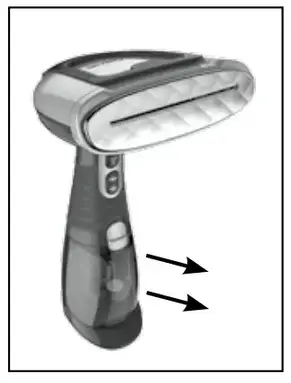
FILLING INSTRUCTIONS
- Make sure the unit is unplugged.
- Stand the unit on a table and grasp with one hand.
- On other hand, move the release switch up toward the steam head nozzle.
- Pull the reservoir out, away from the steamer body.
- The rubber inlet cover is located on the top of the water reservoir.
- Open the inlet cover and fill the reservoir with distilled water (which can be found in grocery stores). We recommend that you use distilled water only as this will prevent
mineral deposits in the boiler that can reduce the performance or clog the water system. - Close the inlet cover and return the reservoir to its place, making sure that it snaps in place and is secure.
OPERATING INSTRUCTIONS
- Fill the water reservoir with distilled water. We recommend that you use distilled water only, as this will prevent mineral deposits in the boiler that can reduce performance or clog the water system.
- Plug the unit into the electrical outlet.
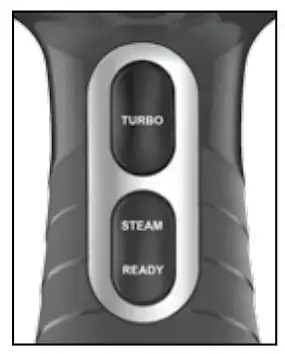
- The blue READY light will illuminate and begin blinking. Allow 40 seconds for the unit to warm up. The appliance is ready to use when the READY light stops blinking and remains solid. Note: Before the first use or when the unit has not been used for a long period of time, it will be necessary to prime (i.e., fill with water) the internal tank while the steamer prepares to steam. You may hear a small tapping noise during the heat-up process; this is normal.
- Your steamer has 2 options for steam, regular Steam, and Turbo. Use the Steam setting (blue button) for delicate fabrics or freshening lightly wrinkled garments. Use the Turbo setting (red button) for thicker fabrics and heavily wrinkled articles.
- Pointing the steam jets away from you, and anyone else in the room, press either the blue Steam button or the red Turbo button to release steam. Always have steam facing away from you or anyone in the room.
- When first using the device, test on an old cloth, as there may be sediment left from the manufacturing process or transportation.
- To stop the flow of steam, depress the button(s) that you have turned on, either the red, blue, or both.
- Unplug the device when it is not in use.
USING CREASER
This garment steamer has a built-in creaser on the top of the unit. To use, slide the garment under the clip and align the edge with the pattern as marked on the creaser. Press the Steam button and steam will issue from the port on the top of the unit. Slide the steamer along the edge of the garment to create a sharp crease.
Note: Steam will continue to emit from the steam slot on the front of the unit during creaser use!
USING 3-IN-1 ATTACHMENT
With the garment steamer off and cool, snap the silicone brush attachment over the steam head ensuring it is firmly affixed. At this point, the silicone brush can be used or you can choose to affix either the Bristle Brush or Delicate Fabric Guide inserts into the channel on the top of the silicone Brush attachment as desired. Note, only one function of the 3-In-1 attachment can be used at a time
CAUTION: Use extreme care when changing the attachments after the unit has been in use as the steam head will continue to be hot.
STEAMING TIPS
- First test unit on an inconspicuous area of the item to be steamed using the regular Steam setting to ensure fabric can tolerate the effects of steam. If there is no evidence of damage, you can proceed to use the steamer on that item.
- To prepare your fabric for steaming, brush it with the brush attachment. This will loosen the fibers and allow better steam penetration.
- Hang your garment or fabric. Note: Avoid using metal clothes hangers, if possible.
- Pass the steam jets just above the fabric where the wrinkles are. It may take a few passes to remove the wrinkles completely.
- For heavier fabrics or severely wrinkled fabrics, you may position the steamer head directly on the fabric for a few seconds to remove wrinkles. Be cautious when working
with delicate fabrics. - After use, turn the unit off by depressing the button(s) that you have turned on, either the red, blue, or both. Empty any remaining water from the tank to avoid leakage. With dry hands, unplug your garment steamer from the outlet.
BE SURE TO PRESS THE BUTTONS “OFF” PRIOR TO UNPLUGGING THE UNIT. - CAUTION: If hanging a garment on a door while steaming, be careful not to damage the door with steam.
- When steaming, always keep the unit in motion. Do not continuously hold steamer over an area or touch steamer jets directly to fabric for more than a few seconds as this can cause damage, including shrinkage, melting, or color shift on certain types of material.
- In the case of heavier, durable fabrics such as wool coats or bedding, the Turbo setting and slower passes with the steamer may be necessary to achieve desired results. As always, start by testing on an inconspicuous area of the item to be steamed using the regular Steam setting to ensure fabric can tolerate the effects of steam, and adjust your technique as needed to obtain the results desired.
LIMITED ONE-YEAR WARRANTY (U.S. AND CANADA ONLY)
Conair will repair or replace (at our option) your unit free of charge for 12 months from the date of purchase if the appliance is defective in workmanship or materials.
To obtain service under this warranty, return the defective product to either service center listed below, together with your purchase receipt and $12.00 for postage and handling.
| Conair Corporation | Conair Corporation |
| Service Department | Service Department |
| 150 Milford Road | 7475 N. Glen Harbor Blvd. |
| East Windsor, NJ 08520 | Glendale, AZ 85307 |
California residents need only provide proof of purchase and should call 1-800-3-CONAIR for shipping instructions. In the absence of a purchase receipt, the warranty period shall be 12 months from the date of manufacture.
ANY IMPLIED WARRANTIES, INCLUDING BUT NOT LIMITED TO THE IMPLIED WARRANTY OF MERCHANTABILITY AND FITNESS FOR A
PARTICULAR PURPOSE SHALL BE LIMITED IN DURATION TO THE 12-MONTH DURATION OF THIS WRITTEN, LIMITED WARRANTY. Some
states do not allow limitations on how long an implied warranty lasts, so the above limitations may not apply to you.
IN NO EVENT SHALL CONAIR BE LIABLE FOR ANY SPECIAL, INCIDENTAL, OR CONSEQUENTIAL DAMAGES FOR BREACH OF THIS OR ANY
OTHER WARRANTY, EXPRESS OR IMPLIED, WHATSOEVER. Some states do not allow the exclusion or limitation of special, incidental, or consequential damages, so the above limitation may not apply to you. This warranty gives you specific legal rights, and you may also have other rights, which vary from state to state.
Service Centers
| Conair Corporation | Conair Corporation |
| Service Department | Service Department |
| 150 Milford Road | 7475 N. Glen Harbor Blvd. |
| East Windsor, NJ 08520 | Glendale, AZ 85307 |
For information on any Conair product, call
1-800-3-CONAIR or visit us on the web at
www.conair.com
Please register this product at:
www.conair.com/registration
©2016 Conair Corporation
East Windsor, NJ 08520
Glendale, AZ 85307
Made in China
15PA016551
IB-13950