cookworks Milk Frother Instruction Manual
EP2178-V
For household and indoor use only. Please read these instructions before use and retain for future reference.
ELECTRICAL SAFETY
- You should only plug the appliance into a 220V‐240V AC, 50Hz supply. Connecting it to other power sources may damage the appliance and will invalidate the guarantee.
- Switch off and unplug when not in use and before cleaning the appliance or changing accessories or approaching parts that move.
- Keep the appliance and its cord out of reach of children less than 8 years.
- Do not allow children to use the appliance without supervision.
- This appliance can be used by children aged from 8 years and above and persons with reduced physical, sensory or mental capabilities or lack of experience and knowledge if they have been given supervision or instruction concerning use of the appliance in a safe way and understand the hazards involved. Children shall not play with the appliance. Cleaning and user maintenance shall not be made by children unless they are older than 8 and supervised.
- Keep stand, cable, plug and outside of milk frother dry and away from areas where it is likely to get splashed. Avoid spillage on the connector. Never immerse in water.
- Do not pull on the cable to disconnect from mains supply.
- Do not operate the appliance if damaged or after it malfunctions.
In the event the supply cord is damaged, in order to avoid a hazard, it must only be replaced by a qualified service engineer, with a suitably approved part. - This appliance must be positioned so that the plug is accessible, and the plug socket is within easy reach of the power cord.
- This appliance must be plugged into an earthed socket outlet.
WARNING!
- This appliance is intended exclusively for use in domestic households. It is not suitable for commercial use.
- Do not cover and allow the milk frother to cool fully before storing.
- The surfaces of the milk frother will become hot during use. Do not touch and always carry by the handle. Note the milk frother and heating element is subject to residual heat after use.
- Do not use the milk frother near or under surfaces that are heat sensitive or those that may be damaged by steam.
- Do not overfill the milk frother as hot milk water may be ejected during operation.
- Do not open the lid while the milk frother is in operation.
- Use only with the stand provided and to heat milk. This appliance can cause personal injury if misused.
PARTS
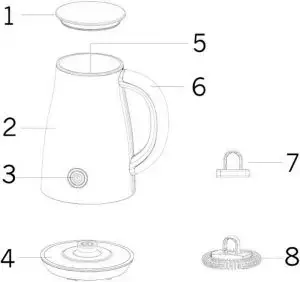
- Lid
- Milk frother body
- Switch with indicator
- Stand
- Milk compartment and spindle
- Handle
- Agitator
- Whisk
TO FROTH AND HEAT MILK
- Place the milk frother on a stable, flat, heat resistant surface and away from surfaces that may be damaged by steam.
- Fully unwind the cable and plug in. For safety do not allow the cable to dangle over the edge of units.
- Remove the milk frother from the stand and remove the lid.
- Fit the whisk onto the spindle at the base of the milk compartment.
- Add milk up to the lower level marked on the inside of the milk compartment. Do not overfill (max 100ml) as milk may overflow after frothing and ideally the milk should be at a starting temperature between 5-10˚C.
- Refit the lid, place the milk frother body onto the stand and the switch indicator will illuminate red when connected to the mains.
- Press the switch, the indicator will illuminate blue and the milk frother will start to heat and whisk the milk.
- When the milk has reached approximately 65˚C, the milk frother will automatically switch off and the indicator will revert to red.
- Remove the lid and pour out the milk.
- To stop or interrupt the frothing and heating process, press the switch to turn off the appliance or lift the body of the milk frother from the stand.
- If the frother is to be used again after a short interval the milk compartment can be rinsed between uses (see step 2 cleaning section). Wait 3 minute before restarting the frother.
Notes:
- Before first use clean milk frother in accordance with the advice in the cleaning section.
- This milk frother is fitted with a safety device that automatically switches off the appliance after using for 5 consecutive cycles. The indicator will flash blue for approximately 5 minutes and the appliance cannot be used. When the indicator turns red the appliance can be used again.
TO HEAT MILK (WITHOUT FROTHING)
Follow the directions on the previous page but fit the agitator at step 4 instead of the whisk.
Add milk up to the upper level marked on the inside of the milk compartment. A maximum of 200ml milk may be added when not frothing the milk.
TO FROTH MILK (WITHOUT HEATING)
- Place the milk frother on a stable, flat, heat resistant surface and away from surfaces that may be damaged by steam.
- Fully unwind the cable and plug in. For safety do not allow the cable to dangle over the edge of units.
- Remove the milk frother from the stand and remove the lid.
- Fit the whisk onto the spindle at the base of the milk compartment.
- Add milk up to the lower level marked on the inside of the milk compartment. Do not overfill (max 100ml) as milk may overflow after frothing and ideally the milk should be at a starting temperature between 5-10˚C.
- Refit the lid, place the milk frother body onto the stand and the switch indicator will illuminate red when connected to the mains.
- Press and hold the switch until the indicator flashes blue (approx. 2 seconds) and the milk frother will start to whisk (but not heat) the milk.
- The milk frother will automatically switch off and the indicator will revert to red.
- Continue from step.
CLEANING
Clean the milk frother after each use.
- Switch off and unplug the milk frother and allow it to cool completely.
- The inside of the milk frother can be rinsed between consecutive uses or partially cleaned before carrying out a full clean. To rinse, fill the milk compartment with 200ml of water and operate the frother for a short interval. Discard the liquid.
- Remove the lid, whisk or agitator and wash these loose parts in hot water with a little washing up liquid. Rinse and wipe dry. Not suitable for the dishwasher.
- Wash the milk compartment with hot water and a little washing up liquid. Rinse and wipe dry with a soft cloth.
- Wipe external surfaces with a soft damp cloth. Do not use detergent or abrasives as these may scratch the surface.
TECHNICAL SPECIFICATION
| Cookworks Milk Frother | ||
| Model | EP2178-V | |
| Rated Voltage & Frequency | 220 — 240V AC 50Hz | |
| Rated Power Input | 450W | |
| Capacity | Overall | 450m1 litre |
| Useable (frothed milk) | 100m1 | |
| Useable (unfrothed milk) | 200m1 | |
| Class rating | 1 (earthed) | |
| BS 1362 fuse | 3A | |
| Product dimensions (external) | 172 x 128 x 205 mm | |
| Product weight (net) | 0.8 kg approx. | |

RECYCLING ELECTRICAL PRODUCTS
You should now recycle your waste electrical goods and in doing so help the environment.
 This symbol means an electrical product should not be disposed of with normal household waste. Please ensure it is taken to a suitable facility for disposal when finished with. Visit www.recycle-more.co.uk, click on “bank locator” and enter your postcode to find your nearest recycling site.
PLUG / WIRING ADVICE
The wires in this mains lead are coloured in accordance with the following UK electrical code:
BLUE = NEUTRAL
BROWN = LIVE
GREEN + YELLOW = EARTH
Non-rewireable plug
This appliance may be fitted with a “non‐rewireable” plug. If you need to change the fuse in a “non‐rewireable” plug, the fuse cover must be refitted. If the fuse cover is lost or damaged, the appliance must not be used.
Rewireable plug
The colours of the wires in the mains lead of this appliance may not correspond with the coloured markings identifying the terminals in a rewireable plug. Rewireable plugs should only be replaced by a suitably competent person. If in doubt, consult a qualified electrician.

The BLUE wire must be connected to the terminal marked with the letter N.
The BROWN wire must be connected to the terminal marked with the letter L.
The GREEN & YELLOW wire must be connecting to the terminal marked with the letter E or the earth symbol 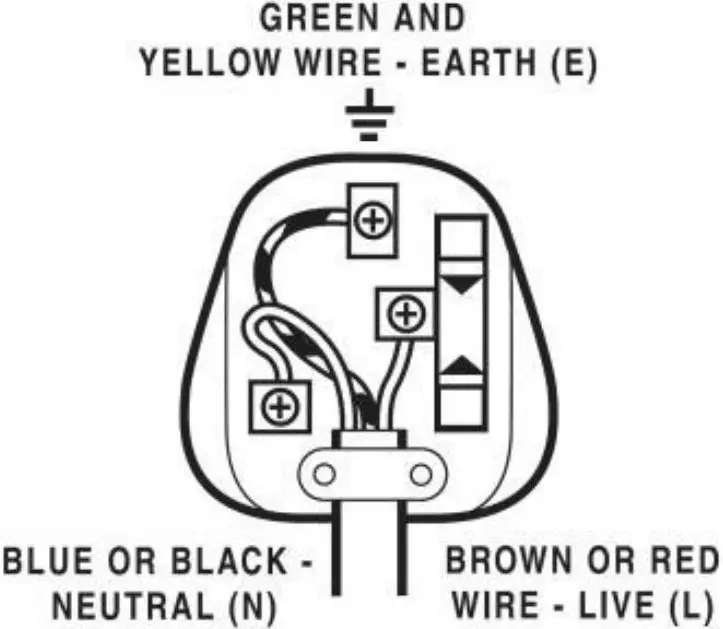 .
.
Produced in China for and imported by
Argos Limited,
489-499 Avebury Boulevard, Milton Keynes, MK9 2NW
www.argos.co.uk/cookworks
Tel: 0345 640 3030
Warranty
PRODUCT GUARANTEE
1 Year
This product is guaranteed against manufacturing defects for a period of 1 Year.
This product is guaranteed for twelve months from the date of original purchase. Any defect that arises due to faulty materials or workmanship will either be replaced, refunded or repaired free of charge where possible during this period by the dealer from whom you purchased the unit.
The guarantee is subject to the following provisions:
- The guarantee does not cover accidental damage, misuse, cabinet parts, knobs or consumable items.
- The product must be correctly installed and operated in accordance with the instructions contained in this manual. A replacement copy of this instruction manual can be obtained from www.argos-support.co.uk
- It must be used solely for domestic purpose.
- The guarantee will be rendered invalided if the product is re-sold or has been damaged by inexpert repair.
- Specifications are subject to change without notice.
- The manufacturer disclaims any liability for the incidental or consequential damages.
- The guarantee is in addition to, and does not diminish your statutory or legal rights.
Guarantor: Argos Ltd
489 – 499 Avebury Boulevard
Central Milton Keynes
MK9 2NW
www.argos-support.co.uk

