![]()
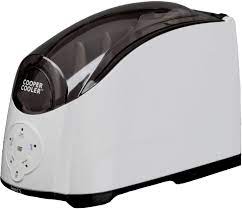
Rapid Beverage Chilling Appliance
Cooper Cooler – Model HC01

Important Safeguards
PLEASE READ ALL INSTRUCTIONS BEFORE USING YOUR COOPER COOLER
- Before using any electrical appliance, basic safety precautions should be followed to prevent or reduce the risk of electric shock, fire, and/or injury.
- Do not let children use the Cooper Cooler without adult supervision. Store your Cooper Cooler out of reach of children.
- To prevent electric shock, do not immerse the power adaptor or Cooper Cooler in water or other liquids.
- Check voltage to be sure that the voltage indicated on the nameplate agrees with your voltage.
- Unplug your Cooper Cooler when not in use and before cleaning, adding water or ice, or emptying water.
- Do not use your Cooper Cooler if the power adaptor or electrical cord is damaged, or after the unit malfunctions or is dropped or damaged in any manner. Contact our toll-free number, 1-877-C-COOLER, for repairs.
- To reduce the risk of fire or electric shock, do not attempt to disassemble your Cooper Cooler as it does not contain any user-serviceable parts.
- To reduce the risk of injury, do not let the cord hang over the edge of a table or counter or touch hot surfaces.
- Do not use any attachments that have not been provided by Revolutionary Cooling Systems, Inc. Use of such attachments may damage your Cooper Cooler, may present a hazard and will void the warranty.
- Flashing lights indicate ready to operate. Avoid any contact with movable parts.
- Always keep cover closed before use.
- Do not operate for other than intended use.
- Only use the power adaptor provided.
- Operate your Cooper Cooler on a clean, dry, and level surface.
- Keep your Cooper Cooler away from any hot appliances or surfaces.
- Do not attempt to move your Cooper Cooler while it is in operation or still plugged in. To move your Cooper Cooler safely, unplug the unit, make sure the unit does not contain a beverage, and that all ice and water has been poured out of the unit. Only then can you safely move your Cooper Cooler. While moving, please use caution to not drop your Cooper Cooler and also pay attention to the cord to prevent tripping over it.
- To prevent injury, avoid contact with all moving parts. Do not open the cover while the unit is in operation. Keep hands, hair, clothing, and any items that may become entangled away from the rotating drive roller. Only use your Cooper Cooler for its intended purpose.
- When not in use, unplug your Cooper Cooler, pour out the ice/ water bath, and allow to air dry.
- Do not operate your Cooper Cooler when the water level is below the minimum fill line or when the water level is above the maximum fill line.
- Do not use abrasive powders or scouring pads since they may scratch the surface of your Cooper Cooler. Use only mild soap and water and allow to air dry.
- Your Cooper Cooler is designed for household use only. Any servicing other than cleaning and user maintenance should be done only by authorized Revolutionary Cooling Systems personnel.
- When using your Cooper Cooler to heat baby bottles:
- Be careful when filling and disposing of the hot water bath.
- Always test the temperature of the formula/breast milk before giving it to your child.
- Do not use water that is above 60ºC/140ºF in the Cooper Cooler. Do not use boiling water.
- NEVER use a microwave oven to heat the water used in the Cooper Cooler or to further re-heat your baby formula/breast milk.
- Keep your child away from the machine when it is in operation.
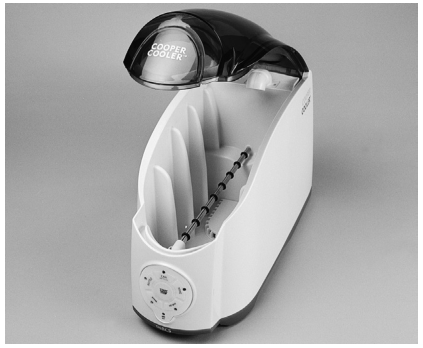
Description Of Parts

A. Main Lid Cover
B. Removable Lid Cap
C. Maximum Fill Line
D. Minimum Fill Line
E. Touch-Pad Timer
F. Add Ice Indicator Light
G. Non-Slip Feet
H. 1.5 liter Ice and Water Bin
I. Drive Roller
J. Water Exit Jet
Please Note: There are 4 sets of air inlets on the base of the unit. Due to condensation, water may trickle out of these air inlets. This is normal and not the result of a leak within the unit.
Introduction
Congratulations, you are the proud owner of the Cooper Cooler™, a rapid beverage chilling/warming appliance from Revolutionary Cooling Systems (RCS). The Cooper Cooler is a household electrical appliance to satisfy your beverage “Chill- On-Demand™” needs. It is fun, safe, and easy to use!
• Quickly chill room-temperature beverages to a cold drinking temperature. Great for emergency situations at social events or parties when unexpected guests arrive. Also great for just chilling beverages prior to your meals.
• Use your Cooper Cooler as a fast and convenient way to further chill refrigerated beverages that are still not cold enough.
• Free up room in your refrigerator by storing your non-perishable canned and bottled beverages (like beer and soda), outside of your refrigerator to provide more space for perishable foods and drinks.
• Perfect for the kitchen, home bar, boat, camper/RV, dormitory, tail-gate party, hotel/motel room, office break room, etc.
• Your Cooper Cooler can also be used as a baby bottle warmer that rapidly and evenly warms your baby formula or breast milk. Just add hot tap water.
Your Cooper Cooler uses an external power adaptor that can plug into any electrical outlet. The Cooper Cooler Tailgater (Model HC02) also includes an additional 12V DC adaptor for use in a standard car outlet. Thank you again for your purchase and be on the lookout for other RCS products.
Product Features
Product
• 1.5 Liter Ice Bin capacity conveniently allows placement of two typical ice-cube trays (approx. 30 ice cubes) which chills five to six beverages.
• Non-Slip Feet help prevent the unit from slipping or moving during operation.
• Maximum Water Level Line indicates when to remove excess water from the unit.
• Minimum Water Level Line indicates the minimum amount of water needed to operate the unit.
• ADD ICE Indicator Light informs the user when the ice bath temperature is not optimal (ice bath temperature above 4°C/39°F) and that more ice should be added. Please note: this light will be on when heating baby formula.
• Electronic Touch-Pad Timer allows for easy-to-use beverage container setting cycles based on the type of container to be chilled.
• EXTRA button allows the user the option of chilling their beverage to 1°-2°C/34°-36°F.
• NO SPIN button chills allow users to chill non-cylindrical-shaped containers or delicate wines. With this setting, the beverage is sprayed, but not rotated.
• Removable Lid Cap allows almost any size bottle to be chilled with the Cooper Cooler.
• The Cooper Cooler is safe for carbonated beverages and does not cause them to explode or fizz upon immediate opening.
How to Operate Your Cooper Cooler to Chill Beverages
Now that you are ready to use your Cooper Cooler, please follow these simple instructions to rapidly chill your beverages. See dia- gram on page 8.
- Place the unit on a clean, dry, level surface. Carefully remove the clear thin film protector on the Touch-Pad Timer. Plug the barrel plug of the household power adaptor into the back of the unit and the other end into an appropriate outlet. For Tailgater units being operated in a car setting, plug the barrel plug of the car power adaptor into the back of the unit and the other end into a cigarette lighter port. The BOTTLE, CAN, and WINE lights will flash to indicate it is ready to operate. Add two standard trays of ice cubes (approx. 30 cubes) into the machine. Make sure ice is not trapped between the roller and side ribs or above the drive roller. Note: Two standard ice trays will chill five to six 12 oz. beverages.
- Pour two cups of cold water (16oz.) into the ice-water bin. Check to see if the ice-water bath is above the minimum fill line, but not over the maximum fill line.
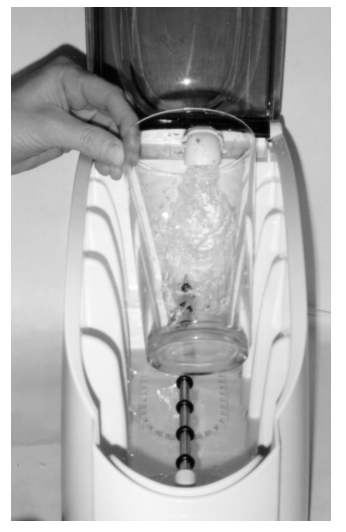
- Lift the lid and place your beverage container horizontally onto the roller with the container neck or top facing out. For maximum cooling results, the container should be resting on the right side of the drive roller.
- Secure the removable lid cap and close the lid. Check to make sure the lid is down to prevent water from leaking out.
- If your container has a longer neck, such as with a typical wine bottle, remove the removable lid cap by sliding it downward.
This will allow the neck to stick out of the unit. See page 7. - Choose from the following STANDARD SETTINGS to chill your desired beverage to 6°C/43°F:
Electronic Touch-Pad Timer

CAN – Choose this setting for beverages in 7oz. to 16 oz. aluminum cans. The cycle lasts 1 minute.
BOTTLE – Choose this setting for beverages in 7oz. to 14 oz. glass or plastic bottles. The cycle lasts 3.5 minutes.
WINE – Choose this setting for wine bottles or thicker glass containers. The cycle lasts 6 minutes. See our Wine Temperatuature Guideline Chart for chill times and temperature recommendations on page 10.
You may also select from the following OPTIONAL SETTINGS depending on your beverage chilling needs.
EXTRA – This setting will chill your beverage down to ice cold 1°-2°C/34°-36°F by doubling the time of the STANDARD SETTINGS.
NO SPIN – This setting is used to chill non-cylindrical or non-rotatable containers. This setting should also be used if you do not wish to agitate the contents of your beverage container, such as delicate wines. Note: Spraying the container with cold water still provides excellent cooling.
CAN + NO SPIN cycle time lasts 2 minutes.
BOTTLE + NO SPIN cycle time lasts 6 minutes.
WINE + NO SPIN cycle time lasts 10 minutes.
Once the cycle setting is chosen, press the START/STOP button and watch your beverage chill to perfection. Please note: Although the times are pre-set for your convenience, the cycle can be stopped at any time by pressing the START/STOP button.
7. After the cycle has elapsed, make sure the all motion has stopped. Lift the lid and remove your cold beverage.
8. After prolonged use, check to see if the Add Ice Indicator Light is on. If it is, add additional ice and remove any excess water. The ADD ICE indicator light will not turn off until you press the START/STOP button to begin chilling another beverage. See ADDING MORE ICE & REMOVING WATER on page 9 for detailed instructions.
Removable Lid Cap


Quick Start Guide to Chilling
- Lift lid to upright position.
- Add two trays of ice and two cups (16 oz.) of cold water.

- Place container on the right side of the roller with the top/neck of the container facing out.

- Close the lid and choose your beverage chilling setting.


Adding More Ice and Removing Water
Ice will need to be added as additional beverages are chilled. The ADD ICE indicator light in front of the unit is lit when the ice/water bath is above 4°C/39°F. The ADD ICE indicator light will not turn off until you press the START/STOP button to begin chilling your next beverage.
To add more ice, follow the steps below:
- Remove water until it is even with the minimum fill line. To remove water, select the CAN + NO SPIN setting. Place a cup under the water exit jet and press the START/STOP button. When the cup is full, press the START/STOP button again and discard the water. Continue this process to remove more water until it is at the minimum fill line.
- Add a minimum of one tray of ice to the ice and water bin and make sure no ice is trapped between the roller and side rib or above the drive roller.

Wine Temperature Guideline Chart
| Wine Type | Temp. (°F/°C) |
Chill Time with SPIN Setting |
Chill Time NO SPIN Setting |
| Red, | 59°-65°F | 1 minute | 2 minutes/ |
| Zinfandels, Burgundy | 15°-18°C | CAN | CAN + NO SPIN |
| Ports, Sherry, | 52°-57°F | 2 minutes | 4 minutes |
| Lighter Reds | 11°-14°C | CAN + EXTRA | CAN + EXTRA + NO SPIN |
| Roses, Dry | 46°-50°F | 3.5 minutes | 6 minutes |
| Whites | 8°-10°C | BOTTLE | BOTTLE + NO SPIN |
| Sweet Whites, Sparkling |
41°-45°F 5°-7°C |
6 minutes WINE |
10 minutes WINE + NO SPIN |
You can now enjoy wine at any temperature, not just the temperature of your refrigerator. Please note: The final temperature of the beverage will vary based on the starting temperature. This chart assumes a starting temperature of 20°C/68°F to 25°C/77°F. The WINE setting is set to chill a standard wine bottle from 25°C/77°F to 6°C/43°F. The chilling cycle is six minutes. You can stop the machine at any time during the cycle by pressing the START/STOP button. With certain bottles, there may be a small amount of splashing out of the front of the unit when the lid cap is removed. Please Note: Chilling wine rapidly does not alter the quality or taste of wine. If you are using the Cooper Cooler for wine, the unit has two modes of operation—a regular mode which sprays the rotating bottle with ice water, and an optional NO SPIN mode which sprays the wine bottle with ice water without rotation. The NO SPIN mode serves two purposes:
• For those who feel that rotating may agitate their fine wines.
• For those who save/collect their wine labels since rotating the wine bottle may groove or tear off the wine label. Select the NO SPIN button after any of the other buttons (BOTTLE, CAN, WINE, or EXTRA) to activate the NO SPIN mode. See the graph below for approximate wine bottle chill times starting from room temperature 77°F/25°C.

How to Operate Your Cooper Cooler as a Baby Bottle Warmer
- Turn on your hot tap water and let it run until the hottest temperature is obtained (approximately 45°C/113°F to 55°C/131°F).
BE CAREFUL WHEN FILLING AND DISPENSING OF THE HOT WATER. - Lift the lid and add hot tap water to the maximum fill line.
- Place your baby bottle onto the roller with the nipple or cap side facing out and close the lid. Make sure the nipple or cap is sealed tight to prevent any liquid from leaking.
- If your baby bottle is cylindrical and able to be rotated on the roller, select the CAN/BABY BOTTLE button and press the START/ STOP button. The unit will warm the baby bottle for 1 minute. If your baby bottle is not cylindrical or not able to be rotated on the roller, select the NO SPIN button and the CAN/BABY BOTTLE button. Next, press the START/STOP button. The unit will warm the baby bottle for 2 minutes. Please refer to the baby bottle warming chart guidelines on the right for cycle times and approximate temperatures.
- When the warming cycle has finished, take your baby bottle out and test the temperature before serving it to your child.
ALWAYS TEST THE TEMPERATURE OF THE BABY FORMULA/ BREAST MILK BEFORE GIVING IT TO YOUR CHILD. - If the baby formula/breast milk has not reached your desired temperature, repeat steps 4 and 5.
Baby Bottle Warming Temperature Guideline Chart
When using the Cooper Cooler to heat baby formula, the final temperature will vary based on: the starting temperature of the baby formula, the temperature of the hot water, the volume of formula being heated, and the container being used.
The following chart is presented as a guideline. Warming times will vary. PLEASE NOTE: Household hot water temperature will vary, but is normally between 45°C/113°F and 55°C/131°F.
ALWAYS TEST THE TEMPERATURE OF THE BABY FORMULA/ BREAST MILK BEFORE GIVING IT TO YOUR CHILD.

Storage and Cleaning
When you are finished using your Cooper Cooler follow these steps for storage.
- Remove any beverages from inside the unit.
- Remove all water and ice from the ice water bin. To remove the ice and water for storage, select the CAN+ NO SPIN setting, then place a cup under the water exit jet and press the START/STOP button. When the cup is full, press the START/ STOP button again and discard the water. Continue this process until no more water is flowing from the water exit jet. There will still be a small amount of water in the ice water bin. To remove this water, first, unplug the unit, then rock the unit front to back to remove any water caught in the pump system. Carefully pour the water into your sink over the side of the unit and not over the touchpad timer. Avoid getting the touch pa timer wet. Always remember to remove the water when you are finished with the unit. Do not allow water to sit in the Cooper Cooler for extended periods of time.
- Allow the unit to air dry with the lid up.
- Store the unit in a safe place out of the reach of children.
If the inside of the unit is dirty, clean with mild lukewarm soapy water as detailed below. - Pour two cups of lukewarm soapy water into the ice water bin.
- Plug in the unit and close the lid. Choose the CAN + NO SPIN setting and let the soapy water circulate in the machine.
Follow the water removal instructions on the left to remove the soapy water. - Pour two cups of regular tap water into the ice water bin.
- Put down the lid. Rinse the unit with tap water. Choose the CAN + NO SPIN setting and let the tap water circulate in the machine. Follow the water removal instructions on the left to remove the soapy water.
- Unplug the unit and allow it to air dry.
Please note: Do not use abrasive powders or scouring pads since they may scratch the surface of your Cooper Cooler.
One Year Limited Warranty
We warrant to the original purchaser, that your Cooper Cooler will be free from defects in material or in workmanship under normal household use for a period of one year from the date of purchase. Your Cooper Cooler has been manufactured under strict specifications and has been designed for use with only Revolutionary Cooling Systems approved accessories or replacement parts. These warranties expressly exclude any defects or damages resulting from unapproved accessories, or replacement parts or other repairs other than those that have been authorized by Revolutionary Cooling Systems. This warranty does not cover any damage or defect due to accident, misuse, shipment, improper service, unreasonable use, tamper, cosmetic damage, acts of God, accidental breakage, abuse, or negligence.
During the above one-year warranty period, a product with a defect will be either repaired or replaced with a reconditioned comparable model (at RCS’ discretion) when the product is returned to the RCS facility. The repaired or replacement product will be in warranty for the balance of the one-year warranty period and an additional one-month period. No charge will be made for such repair or replacement.
We suggest that you complete and mail the enclosed warranty registration card promptly to facilitate verification of the date of the original purchase. RCS grants you a one-year warranty which gives you specific legal rights, and you may also have other rights which vary from state to state. Return of the warranty registration is not a condition of these warranties. RCS will not be held liable for any special, incidental, or consequential damage, resulting from possession, use, or loss of use of this product either directly or indirectly. There shall be no claims for defects or failure of performance or product failure under any theory of tort, contract or commercial law including, but not limited to, negligence, gross negligence, strict liability, breach of warranty, and breach of contract. However, some states do not allow the exclusion of or limitation of incidental or consequential damages or defects, so the foregoing limitations may not apply to you.
Repairs and Servicing
Before calling Customer Service, please have the unit information available. If you are protected under our warranty and are returning the Cooper Cooler, you must call for a Return Authorization Number. Please call our customer service center between the hours of 9am to 5pm EST at 1-877-C-COOLER. If your Cooper Cooler is outside the 1 year limited warranty period, you have the following two options: Replace the Unit: Please send a check for $40 plus $15 shipping.
Your new unit will have a new 1 year limited warranty. Return for Repair: Enclose one check for $40 ($25 repair fee plus $15 for shipping & handling). RCS will repair your unit and return it to you, or send a comparable refurbished unit. Your new unit will have a 3 month limited warranty. RCS cannot assume responsibility for loss or damage during incoming shipment. COD shipments cannot be accepted. No returns will be accepted without prior authorization.
The Cooper Cooling Process was invented at The Cooper Union for the Advancement of Science and Art. The name “Cooper Cooler” was chosen as a dedication to the institution and the inspiration of its founder Peter Cooper. The Cooper Cooler is designed, manufactured, and distributed by Revolutionary Cooling Systems, Inc. (RCS). To learn more about RCS and our technology or to provide feedback, please visit our website listed below. This product is protected under US patents No. 5,505,054, No. 6,662,574 and No. D475,895.
![]()
Visit our Website at: CooperCooler.com or RevCooling.com