![]()
COSORI CAF-L501 Series Pro LE 4.7 Litre Air Fryer

Package Contents
- 1 x Pro LE 4.7-Litre Air Fryer
- 1 x Recipe Book
- 1 x User Manual
Specifications
- Power Supply: AC 220-240V, 50/60Hz
- Rated Power: 1500W
- Capacity: 4.7 L / 5.0 qt (serves 3-5 people)
- Temperature Range: 75 °-230 ° C
- Time Range; 1-60 min
- Dimensions; 27.2 x 27.5 x 30.3 cm/ 10.7 X 10.8 X 11.9 in
- Weight: 4.54 kg I 10 lb
- Standby power: <0.5W
IMPORTANT SAFEGUARDS
Follow basic safety precautions when using your air fryer.
Read all instructions.
Key Safety Points
- Do not touch hot surfaces. Use handle.
- Use caution when turning the basket over after cooking, as the hot crisper plate may fan out and create a safety hazard.
- Do not block any ventilation openings. Hot steam is released through openings. Keep your hands and face clear of openings.
General Safety
- Do not immerse the air fryer housing, cord, or plug in water or liquid.
- Closely supervise children near your air fryer.
- Unplug when not in use, and before cleaning. Allow to cool before putting on or taking off parts.
- Do not use your air fryer if it is damaged, not working, or if the cord or plug is damaged. Contact Customer Support (see page 17).
- Do not use third-party replacement parts or accessories, as this may cause injuries.
- Do not use outdoors.
- Do not place the air fryer or any of its parts on a stove, near gas or electric burners, or in a heated oven.
- Be extremely cautious when moving your air fryer (or removing the basket) if it contains hot oil or other hot liquids.
- Do not clean with metal scouring pads. Metal fragments can break off the pad and touch electrical parts, creating a risk of electric shock.
- Do not place anything on top of your air fryer. Do not store anything inside your air fryer.
- Do not strike or hit the top of the air fryer with hard objects, as this may cause the tempered glass to crack. Tempered glass is stronger and fractures more safely than ordinary glass, but it may shatter unexpectedly after being cracked. If you see a crack, contact Customer Support
(see page 17). - This air fryer can be used by children 8 years and older as well as persons with reduced physical, sensory,
or mental capabilities or lack of experience and knowledge if they have been given supervision or instruction concerning use of the air purifier in a safe way and understand the hazards involved. - Children should not play with the air fryer.
- Cleaning and user maintenance should not be made by children without supervision.
- This air fryer is not intended to be operated by means of an external timer or separate remote-control system.
- Only use your air fryer as directed in this manual.
- Not for commercial use. Household use only.
While Air Frying
- An air fryer works with hot air only. Never fill the baskets with oil or fat.
- Never use your air fryer without the basket in place.
- Do not place oversized foods or metal utensils into your air fryer.
- Do not overfill the air fryer basket. Heaping amounts of food may touch the heating coils and cause a fire hazard.
- Do not touch accessories during or immediately after air frying.
- Do not place paper, cardboard, non -heat-resistant plastic, or similar materials, into your air fryer. You may use parchment paper or foil.
- Never put baking or parchment paper into the air fryer without food on top. Air circulation can cause paper to lift and touch heating coils.
- Always use heat-safe containers. Be extremely cautious if using containers that aren’t metal or glass.
- Keep your air fryer away from flammable materials (curtains, tablecloths, etc). Use on a flat, stable, heat-resistant surface away from heat sources or liquids.
- Immediately turn off and unplug your air fryer if you see dark smoke coming out. White smoke is normal, caused by heating fat or food splashing, but dark smoke means that food is burning or there is a circuit problem. Wait for smoke to clear before pulling the basket out. If the cause was not burnt food, contact Customer Support (page 17).
- Do not leave your air fryer unattended while in use.
Plug & Cord
- Do not let the power cord (or any extension cord) hang over the edge of a table or counter, or touch hot surfaces.
- Remove and discard the protective cover fitted over the power plug of the air fryer to prevent choking hazards.
- Never use an outlet below the counter when plugging in your air fryer.
- Keep the air fryer and its cord out of reach of children less than 8 years old.
Electromagnetic Fields
The Cosori Air Fryer complies with all standards regarding electromagnetic fields (EMF). If handled properly and according to the instructions in this user manual, the appliance is safe to use based on scientific evidence available today. This symbol means the product must not be discarded as household waste, and should be delivered to an appropriate collection facility for recycling. Proper disposal and recycling helps protect natural resources, human health and the environment. For more information on disposal and recycling of this product, contact your local municipality, disposal service, or the shop where you bought this product.
GETTING TO KNOW YOUR AIR FRYER
Your Cosori Air Fryer uses rapid 360° air circulation technology to cook with little to no oil for quick, crispy, delicious food with up to 85% fewer calories than deep fryers. With user-friendly, one-touch controls, a nonstick basket, and an intuitive, safe design, the Cosori Air Fryer is the star of your kitchen.
Note:
- Do not try to open the top of the air fryer. This is not a lid.
- The basket and crisper plate are made of aluminium metal with nonstick coating. They are PFOA -free and BPA free.
Air Fryer Diagram

- A. Air Inlet
- B. Control Screen
- C. Crisper Plate
- D. Basket
- E. Basket Handle
- F. Basket Release Button
- G. Housing Handles
- H. Air Outlet
- I. Air Outlet Spacer
- J. Power Cord
Display Diagram
Note: When you press a button to use a function or program, it will tum white to show that it’s active.

Note: This tums the Shake Reminder on/off.
Control Panel

Display Messages

BEFORE FIRST USE
Setting Up
- Remove all packaging from the air fryer, including any temporary stickers.
- Place the air fryer on a stable, level, heatresistant surface. Keep away from areas that can be damaged by steam (such as walls or cupboards).
Note: Leave 13 cm I 5 inches of space behind and above the air fryer. [Figure 1.1] Leave enough room in front of the air fryer to remove the basket.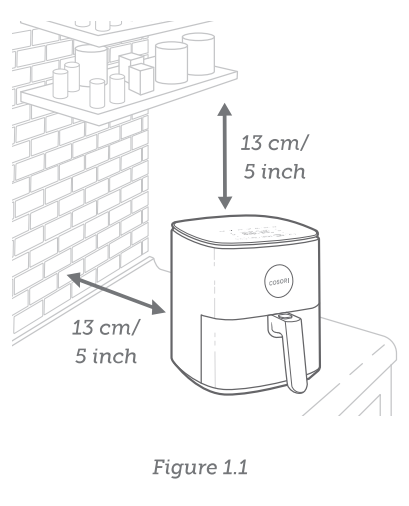
- Hold down the basket release button, and pull the handle to remove the basket. Remove all plastic from the basket.
- Wash both the basket and crisper plate thoroughly, using either a dishwasher or a non-abrasive sponge.
- Wipe the inside and outside of the air fryer with a slightly moist cloth. Dry with a towel.
- Insert the crisper plate back into the basket, and place the basket inside the air fryer.

Test Run
A test run will help you become familiar with your air fryer, make sure it’s working correctly, and clean it of possible residues in the process.
- Make sure the air fryer basket is empty and plug in the air fryer.
- Press PREHEAT. The display will show “205°C” and “4 MIN”.
- Press ►II to begin preheating. When preheating is done, the air fryer will beep.
- Pull out the basket and let it cool for 4 minutes. Then place the basket back into the air fryer.
- Press STEAK to select the Steak function. The display will show “230°C” and “6MIN”.
- Press TIME once. The time will change to 5 minutes.
- Press ►II to begin. When finished, the air fryer will beep.
- Remove the basket. This time, let the basket cool completely for 10-30 minutes.
Note:
- Use caution when tu ming the basket over after cooking, as the hot crisper plate may fall out and create a safety hazard.
- Do not unscrew the basket handle from the basket.
Rubber Stoppers
- The crisper plate contains 4 rubber stoppers made of safe, FDA-approved material. These stoppers keep the crisper plate fitted to the bottom of the basket, prevent the crisper plate from directly touching the basket, and in rare cases, damaging the nonstick coating on the basket.
- Only remove the rubber stoppers for deaning purposes. For easy removal, start from the bottom of the crisper plate and puU out one side of the stopper at a time. [Figure 1.2]
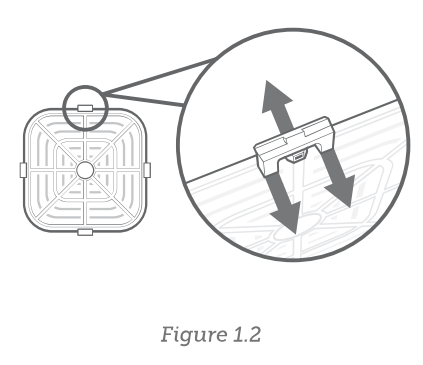
- To place the rubber stoppers back onto the crisper plate, first soak them in water. Then, push each stopper back in through the bottom of the crisper plate. Push in one side of the stopper at a time.

USING YOUR AIR FRYER
Preheating
We recommend preheating before placing food inside the air fryer, unless your air fryer is already hot. Food wiU not cook thoroughly without preheating.
- Plugin. Press

- Press PREHEAT. The display will show “205°C” and “4 MIN”.
- Optionally, press the + or – buttons to change the temperature. The time with adjusts automatically.
- Press ►II to begin preheating.
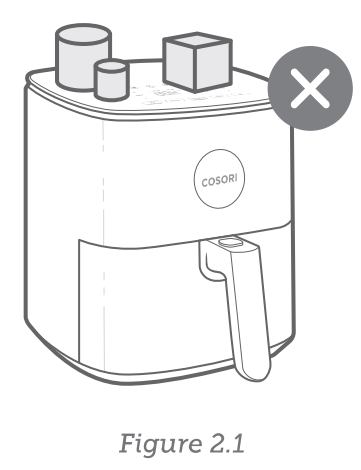
- When preheating is done, the air fryer will beep 3 times. The display will show the set preheat temperature. [Figure 2.1]


Note: If no buttons are pressed for 3 minutes, the air fryer will clear all settings and go into standby.

Air Frying
Note:
- Do not place anything on top of your air fryer. This may interfere with your cooking program or cause cracks in the glass on the display. Figure 2.11
- An air fryer is not a deep fryer Do not fill the basket with oil, frying fat, or any liquid.
- When taking the basket out of the air fryer, be careful of hot steam.

Cooking Functions
Using a cooking function is the easiest way to air fry. Cooking functions are programmed with an ideal time and temperature for cooking certain foods.
- Press the function’s button to select the function. The air fryer will automatically change to the function’s default settings.
- You can change a function’s time (1-60 minutes), temperature (75° -230°C), and Shake Reminder.
- Press and hold the + or – button to rapidly increase or decrease the time or temperature.
- Add or remove a Shake Reminder by pressing SHAKE.
- To go back to a function’s default settings, press the function’s button again.
Note: Results may vary Check out our Recipe Book for a guide to using cooking functions for perfect results.
| Function | Default Temperature | Default Time (minutes) | Shake Remin der?* |
| Chicken 190°c
French Fries** 19s•c Frozen Foods 17s•c Steak – 23o•c Seafood 17s•c Veggies 170°c Bacon 160°c Preheat 2os0 c Keep Warm 7s•c |
20 minutes
25 minutes 10 minutes 6 minutes
8 minutes
10 minutes 8 minutes 4 minutes |
((SHAKE))
((SHAKE)) ((SHAKE)) |
|
| 5 minutes | |||
See Shaking Food (page 13).
See Cooking Guide (page 14) for more tips on air frying French fries.
Air Frying
- Preheat your air fryer (see page 11).
- When your air fryer displays READY, add food to the basket.
- For the best results, add the crisper plate into the basket to allow excess oil to drip down to the bottom of the basket.
- Select a cooking function (see page 12).
Note: Cooking functions are programmed with an ideal time and temperature for cooking certain foods. You can also set a custom time and temperature without choosing a cooking function. - Optionally, change the temperature and time, and add a Shake Reminder. You can do this anytime during cooking.
- Press the + or – buttons to change the temperature (75°-230°C) or time (1-60 minutes).
Note:- To rapidly increase or decrease time or temperature, press and hold the + or -buttons.
- Press SHAKE to add or remove a Shake Reminder during cooking.
- Press the + or – buttons to change the temperature (75°-230°C) or time (1-60 minutes).
- Press ►II to begin air frying.
- When the Shake Reminder is turned on, it will appear halfway through cooking time. The air fryer will beep 5 times, and (Shake) will blink on the display.
- Press the basket release button to take the basket out of the air fryer, being careful of hot steam. The air fryer will pause cooking automatically, and the display will tum off until the basket is replaced.
- Shake or flip the food.
- Put the basket back into the air fryer.
Note: See Shaking Food (page 13)
- The air fryer will beep 3 times when finished. The display will show:
- Optionally, press Keep Warm. Press the + or – buttons to change the time (1-60 minutes).
- Press the basket release button to take the basket out of the air fryer, being careful of hot steam.
- Allow to cool before cleaning.

Shaking Food
How to Shake
- During cooking, press and hold the basket release button to take the basket out of the air fryer, and shake, mix, or flip the food.
- To shake food:
- Hold the basket just above a heat-resistant surface for safety purposes.
- Shake the basket.
Note: Do not use this method if there is a risk of hot liquids splashing.
- If the basket is too heavy to shake and there are hot liquids present:
- Place the basket on a heat-resistant holder or surface.
- Use tongs to mix or flip the food.
- To shake food:
- When you take the basket out, the air fryer will pause cooking automatically. As a safety feature, the display will tum off until the basket is replaced.
- When you replace the basket, cooking will automatically resume.
- Avoid shaking longer than 30 seconds, as the air fryer may start to cool down.
What to Shake
- Small foods that are stacked will usually need shaking, such as fries or nuggets.
- Without shaking, foods may not be crispy or evenly cooked.
- You can flip other foods, such as steak, to ensure even browning.
When to Shake
- Shake or flip food once halfway through cooking, or more if desired.
- The Shake Reminder is designed to remind you to check on your food. Tap SHAKE to turn on the Shake Reminder. Certain cooking functions use the Shake Reminder automatically (see Cooking Functions, page 12).
Shake Reminder
- The Shake Reminder will alert you with 5 beeps, and (Shake) will blink on the display.
- If you do not remove the basket, the Shake Reminder will beep again after 1 minute and the display will show a solid (Shake).
- The Shake Reminder will go away once you take out the basket.
Cooking Guide
Overfilling
- If the basket is overfilled, food will cook unevenly.
Using Oil
- Adding a small amount of oil to your food will make it crispier. Use no more than 30 mL / 2 US tbsp of oil.
- Oil sprays are excellent for applying small amounts of oil evenly to all food items.
Food Tips
- You can air fry any frozen foods or goods that can be baked in an oven.
- To make cakes, hand pies, or any food with filling or batter, place food in a heat-safe container before placing in the basket.
- Air frying high-fat foods will cause fat to drip to the bottom of the baskets. To avoid excess smoke while cooking, pour out fat drippings after cooking.
- Liquid-marinated foods create splatter and excess smoke. Pat these foods dry before air frying.
French Fries
- Add 8-15 mL / ½-1 US tbsp oil for crispiness.
- When making fries from raw potatoes, soak uncooked fries in water for 15 minutes to remove starch prior to frying. Pat dry with a towel before adding oil.
- Cut uncooked fries smaller for crispier results. Try cutting fries into 0.6- by 7.6-cm /¼- by 3-inch strips.
Note: For more from the Cosori Kitchen, check out our Recipe Book and Tips from the Chef.
More Functions
Pausing
- Press ►II to pause cooking. The air fryer will stop heating, and ►II will turn blue until you press ►II to resume cooking.
- After 30 minutes of inactivity, the air fryer will turn off.
- This function allows you to pause the cooking program without removing the basket from the air fryer.
Automatically Resume Cooking
- If you pull out the basket, the air fryer will pause cooking automatically. The display will turn off temporarily as a safety feature.
- When you return the basket, the air fryer will automatically resume cooking based on your previous settings.
Automatically Shutoff
- If the air fryer has no active cooking programs, the air fryer will clear settings and turn off after 3 minutes of inactivity.
Overheat Protection
- If the air fryer overheats, it will automatically shut down as a safety feature.
- Let the air fryer cool down completely before using it again.
CARE and MAINTENANCE
Note:
- Always clean the air fryer basket and crisper plate after every use.
- Lining the basket with foil /except the crisper plate) may make cleanup easier.
- Turn off and unplug the air fryer. Allow it to cool completely before cleaning. Pull out the basket for faster cooling.
- Wipe the outside of the air fryer with a moist cloth, if necessary.
- The basket and crisper plate are dishwasher safe. You can also wash the basket and crisper plate with hot, soapy water and a non-abrasive sponge. Soak if necessary.
Note: The basket and crisper plate have a nonstick coating. Avoid using metal utensils and abrasive cleaning materials.- For stubborn grease:
In a sman bowl, mix 30 mL / 2 US tbsp of baking soda and 15 mL / 1 US tbsp of water to form a spreadable paste. - Use a sponge to spread the paste on the basket and crisper plate and scrub. Let the basket and crisper plate sit for 15 minutes before rinsing.
- Wash basket with soap and water before using. 5. Clean the inside of the air fryer with a slightly moist, non-abrasive sponge or cloth. Do not immerse in water. [Figure 3.1] If needed, clean the heating coil to remove food debris.
- For stubborn grease:
- Dry before using.
Note: Make sure the heating coil is completely dry before turning on the air fryer.

TROUBLESHOOTING

If your problem is not listed, please contact Customer Support (see page 17).
WARRANTY INFORMATION

TERMS & POLICY
Arovast Corporation warrants all products to be of the highest quality in material, craftsmanship, and service for 2 years, effective from the date of purchase to the end of the warranty period. Warranty lengths may vary between product categories. If you have any questions or concerns about your new product, please contact our helpful Customer Support Team.
CUSTOMER SUPPORT
Arovast Corporation
1202 N. Miller St., Suite A
Anaheim, CA 92806
USA