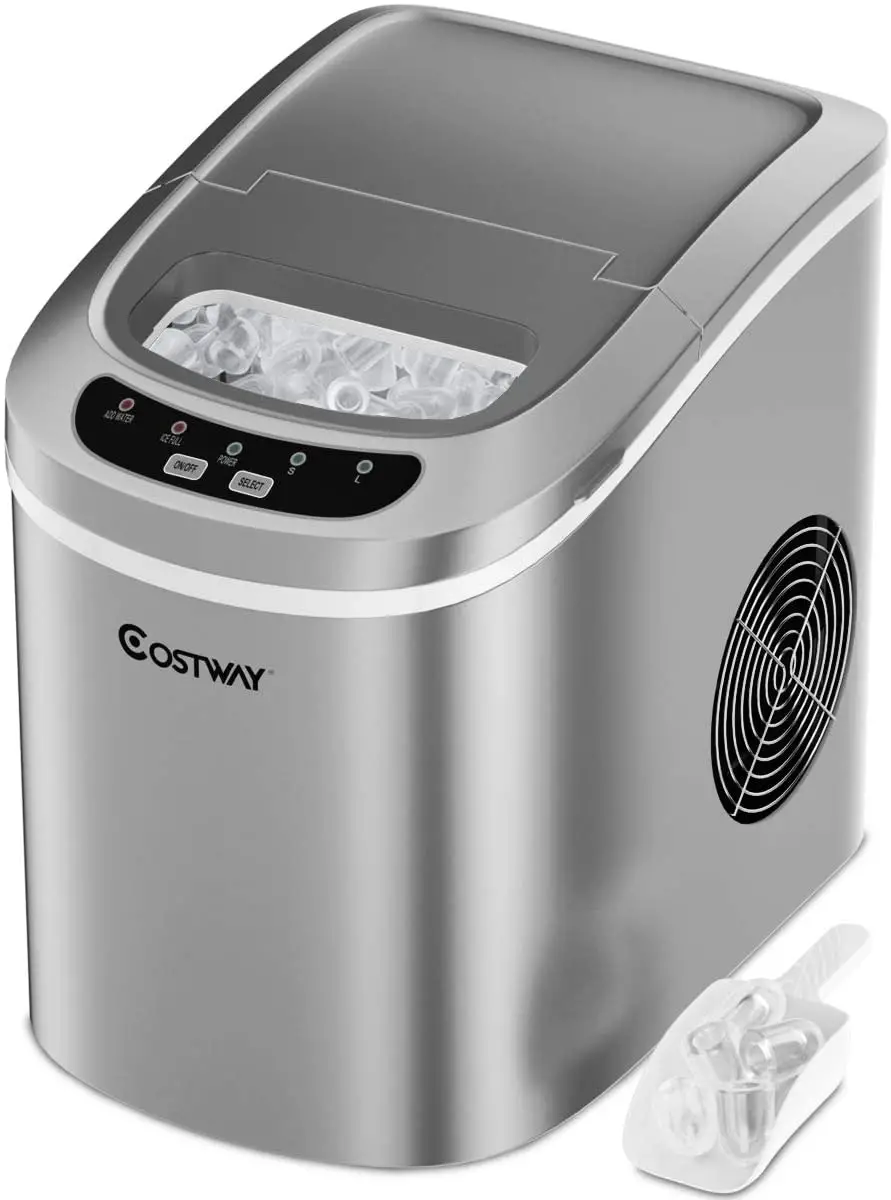
COSTWAY EP25063US Ice Maker Machine
Please give us a chance to make it right and do better! Contact our friendly customer service department for help first. Replacements for missing or damaged parts will be shipped ASAP!
Before You Start
WARNING
- Please read all instructions carefully.
- Retain instructions for future reference.
- Separate and count all parts and hardware.
- Read through each step carefully and follow the proper order.
- We recommend that, where possible, all items are assembled near to the area in which they will be placed in use, to avoid moving the product unnecessarily once assembled.
- Always place the product on a flat, steady and stable surface.
- Keep all small parts and packaging materials for this product away from babies and children as they potentially pose a serious choking hazard.
PREPARING YOUR ICEMAKER FOR FIRST USE
Your safety and the safety of others are very important.
We have provided many important safety messages manual and your appliance.
All safety messages will tell you what the potential hazard is, tell you how to reduce the chance of injury, and tell you what can happen if the instructions are not followed.
When using electrical appliances, basic safety precautions should be followed to reduce the risk of fire, electric shock, and injury to persons or property. Read all instructions before using any appliance.
WARNING:
- Do not operate this or any other appliance with a damaged cord.
If the supply cord is damaged, it must be replaced by the manufacturer or its service agent or a similarly qualified person in order to avoid a hazard.
This ice-maker must be positioned so that the plug is accessible .
Connect to properly polarized outlets only. No other appliance should be plugged into the same outlet. Be sure that the plug is fully inserted into the receptacle. - Do not run the power cord over carpeting or other heat insulators. Do not cover the cord. Keep cord away from traffic areas, and do not submerge in water.
- We do not recommend the use of an extension cord, as it may overheat and become a risk of fire. If you must use an extension cord, use No.14AWG minimum size and rated no less than 1875 watts.
- Unplug the ice maker before cleaning or making any repairs or servicing.
- Exercise caution and use reasonable supervision when appliance is used near children.
- Do not use your ice-maker outdoors. Place the ice-maker away from direct sunlight and make sure that there is at least 4 inches of space between the back of your unit and wall. Keep a minimum distance of 4 inches on each side of your unit free.
- Do not use other liquid to make the ice-cube other than water.
- Do not clean your ice maker with flammable fluids. The fumes can create a fire hazard or explosion.
- Do not tip over.
- If the ice maker is brought in from outside in wintertime, give it a few hours to warm up to room temperature before plugging it in.
WARNING: This appliance must be earthed. - DANGER – Risk Of Fire or Explosion. Flammable Refrigerant Used. Do Not Use Mechanical Devices To Defrost Ice Maker. Do Not Puncture Refrigerant Tubing.
- DANGER – Risk Of Fire Or Explosion. Flammable Refrigerant Used. To Be Repaired Only By Trained Service Personnel. Do Not Puncture Refrigerant Tubing.
- CAUTION – Risk Of Fire Or Explosion. Flammable Refrigerant Used. Consult Repair Manual/Owner’s Guide Before Attempting To Install or Service This Product. All Safety Precautions Must be Followed.
- CAUTION – Risk Of Fire Or Explosion. Dispose Of Property In Accordance With Federal Or Local Regulations. Flammable Refrigerant Used .
- CAUTION-Risk Of Fire Or Explosion Due To Puncture Of Refrigerant Tubing;Follow Handling Instructions Carefully. Flammable Refrigerant Used.
- The ice maker should be installed in accordance with the safety standard for Refrigeration Systems, ASHRAE15. The ice maker shall not be installed in corridors or hallways of public buildings.
- If the unit is with problem need to be maintained, that replacing with like components and that servicing shall be done by factory authorized service personnel, so as to minimize the risk of possible ignition due to incorrect parts or improper service.
IMPORTANT:
The wires in this mains lead are colored in accordance with the following code:
Green or Green with a strip
- yellow: Grounding
- White: Neutral
- Black: Live
To avoid a hazard due to instability of the appliance, it must be placed at an even or flat surface.
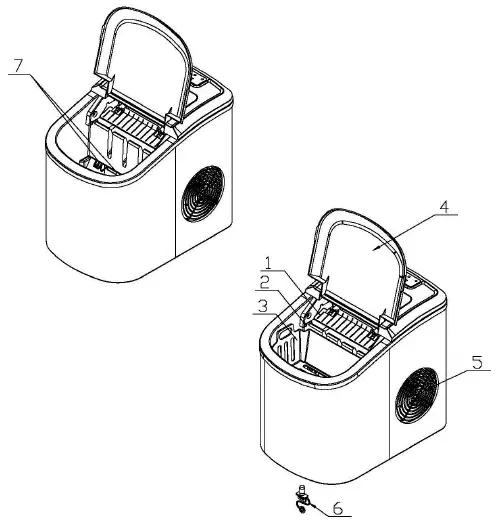
GET TO KNOW YOUR UNIT
General instruction
- Ice scoop.
- Ice full sensor
- Ice basket
- Top cover with transparent window
- Air outlet
- Water drain cap: at front bottom side of the unit.
- MAXIMUM WATER LEVEL: ——–▲——–
Remove the ice basket, you can see the water level mark.
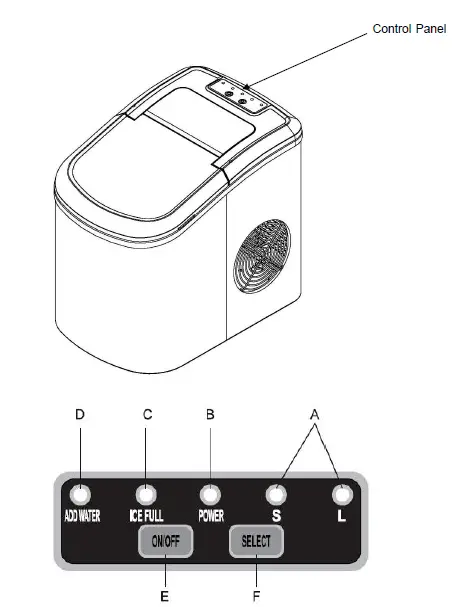
OPERATING PROCEDURES AND MAINTENANCE
Position of control panel & function
Control Panel: Easy to use, visible functions touch display setting.
- A. Selected ice size displaying: Small and Large.
- B. Power indicator
- C. Ice-Full indicator
- D .Water shortage indicator
- E. Button to turn on/off the unit.
- F. Button to select ice cube size.
 UNPACKING YOUR ICE MAKER
- Remove the exterior and interior packaging. Check if ice basket and ice scoop inside. If any parts are missing, please contact our customer service.
- Remove the tapes for fixing ice shovel, ice basket & ice scoop. Clean the tank & ice basket.
- Put the ice maker on a level & flat counter top without direct sunlight and other sources of heat (i.e.: stove, furnace, radiator). Maker sure that there is at least 4 inches gap between the back & LH/RH sides with the wall.
- Allow one hour for the refrigerant fluid to settle before plugging the ice maker in.
- The appliance must be positioned so that the plug is accessible.
WARNING: fill with potable water only. Only use drinking water.
CONNECTING YOUR ICE MAKER
DANGER
* Improper use of the grounded plug can result in the risk of electrical shock. If the power cord is damaged please call our customer service.
- This unit should be properly grounded for your safety. The power cord of this appliance is equipped with a three-prong plug which mates with standard three prong wall outlets to minimize the possibility of electric shock.
- Plug your appliance into an exclusive, properly installed, grounded wall outlet. Do not under any circumstances, cut or remove the third (ground) prong from the power cord. Any questions concerning power and/or grounding should be directed toward a certified electrician.
- This appliance requires a standard 110-120volt, 60Hz electrical outlet with three-prong ground.
CLEANING AND MAINTAINING YOUR ICE MAKER
Before using your ice maker, it is strongly recommended to clean it thoroughly.
- Take out the ice basket.
- Clean the interior with diluted detergent, warm water and a soft cloth.
- Then use the water to rinse the inside parts, and drain out the water by unplugging the drain cap on front bottom side.
- The outside of the ice maker should be cleaned regularly with a mild detergent solution and warm water.
- Dry the interior and exterior with a clean soft cloth.
- When the machine is not to be used for a long time, drain water completely & dry the interior.
USING YOUR ICE MAKER
- Open the cover, remove the ice basket and pour water into tank.
Keep water level below the water level mark. - Press “Power” button on the control panel to begin the ice making cycle.
- Select the ice cube size by pressing the “Select” button. If the room temperature is lower than 60℉, it is recommended to select small ice cube in order to avoid ice sticking together.
- The ice making cycle lasts approx. 6 to 13 minutes, depending on seletion of ice cube size and the room temperature. The recommended room temperature is 50℉ to 105 ℉.
- If water pump can’t inject water, the ice maker will stop automatically, and the “Add Water” indicator will be on.Press “Power” button, fill water up to the max. water level mark and press “Power” button again to turn on the unit again.Allow the refrigerant liquid inside the compressor at least 3 minutes to settle before restarting.
- The ice maker stops when the ice basket is full and the “Ice” indicator will be on. Warning: Direct sunlight or sunlight reflection may cause infared sensor malfunction. If the unit doesn’t stop even ice cubes obstruct sensor, move the unit where no sunlight.
- Change water in the water reservoir every 24 hours to ensure a reasonable hygiene level. If unit isn’t to be used, drain all the water and dry the tank.
TROUBLESHOOTING
| PROBLEM | POSSIBLE CAUSE | SOLUTION |
| “ Add Water” indicator is on. | Lack of Water. | Stop the ice maker, fill water, and press “Power” button again to
restart the unit. |
| “Ice” indicator is on. | Ice is full in basket. | Remove ice from ice basket.
Continuous press “Select” button 5 seconds, the unit could make ice 10 cycles even “Ice” indicator is on. |
| Ice cubes stick together. | The ice making cycle is too long. | Stop the ice maker, and restart it when the ice blocks melt. Select the
small size ice cube selection. |
| Water temperature in
inner tank is too low. |
Replace the water. Temperature of water recommended at 45℉-90℉ | |
| Ice making cycle is normal but no ice formed. | Room temperature or
water temperature in inner tank is too high. |
The room temperature should be 50
℉-105℉, water temperature should be 45℉-90℉ |
| Refrigerant in cooling
system leaks. |
Verify by a qualified technician. | |
| Pipe in the cooling
system is blocked. |
Verify by a qualified technician. |
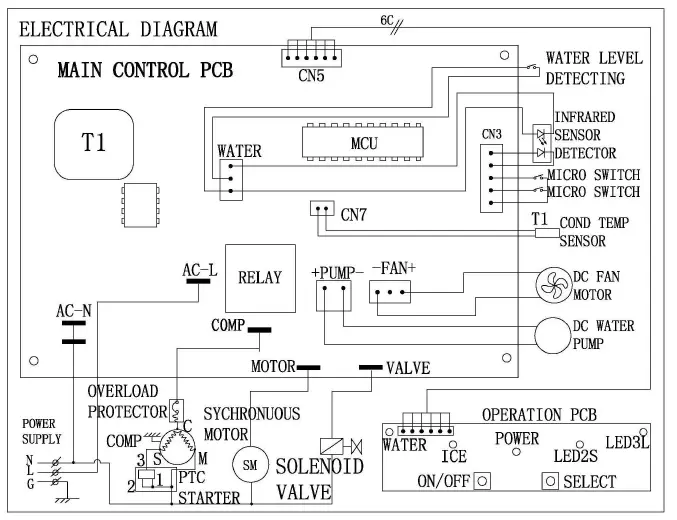
TECHNICAL PARAMETERS AND CIRCUIT DIAGRAM
| Model | EP25063US |
| Protection Type | I |
| Power | 115V/60Hz |
| Ice Making Current | 1.7A |
| Ice Harvest Current | 2.0A |
| Refrigerant | R600a 0.81Oz/23g |
| Design Pressure | |
| High Side | 290Psig |
| Low Side | 88Psig |
| Vesicant | C5H10 |
| Net Weight | 7.7Kg |
| Enclosure | Plastic |
EXPLOSIVE DIAGRAM
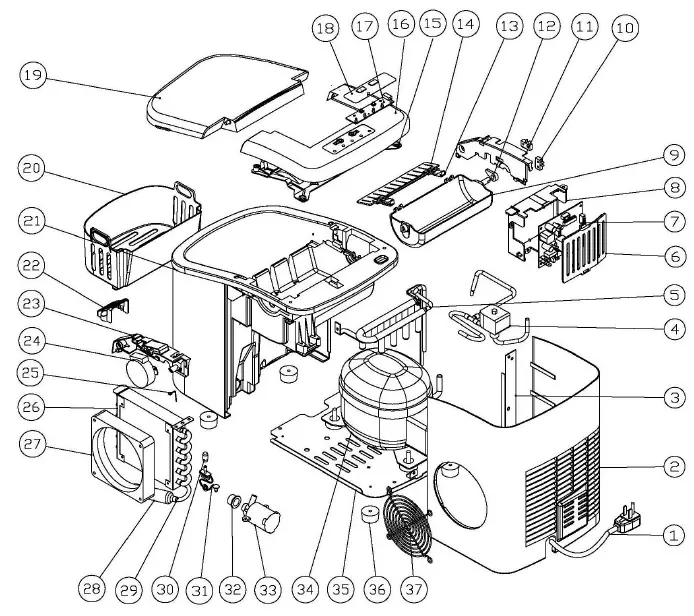
| 1. Power cord | 2. Back panel | 3. Plate inforce |
| 4. Magnetism valve | 5. Evaporator | 6. Control box cover |
| 7. Main PCB | 8. Control box | 9. Ice making box |
| 10. Micro switch | 11. Inner tank bracket, LH | 12. Cam |
| 13. Ice scoop link | 14. Ice scoop | 15. Back window |
| 16. Back top panel | 17.Displaying PCB | 18.Touch pad |
| 19. Front top panel | 20. Ice basket | 21. Foaming asm |
| 22. Water filter | 23. Inner tank brackt, RH | 24 .Sychronuous motor |
| 25. Stainless wire | 26. Condenser | 27. DC Fan motor |
| 28. Filter dryer | 29. Copper tube filter | 30. Silicon plug drain |
| 31. Nylon plug drain | 32. Silicon sealing pump | 33. DC water pump |
| 34. Compressor | 35. Plate bottom | 36. Rubber foot |
| 37. Air grille |
Welcome to visit our website and purchase our quality products!
With your inspiring rating, COSTWAY will be more consistent to offer you
EASY SHOPPING EXPERIENCE, GOOD PRODUCTS and EFFICIENT SERVICE!
US office: Fontana, California
UK office: Ipswich
- Reward Points
- Exclusive Customer Service
- Permanent Shopping Cart
- Order History
Contact Us!
Do NOT return this item.
Contact our friendly customer service department for help first.
E-mail
US: [email protected]
UK: [email protected]
SAFETY INSTRUCTIONS
IMPORTANT!
- Carefully read the instructions before operating the unit. This appliance is for indoor use only.
- Rating: This unit must only be connected to a 120 V / 60 Hz earthed outlet.
- Installation must be in accordance with the regulations of the country where the unit is used.
- If you are in any doubt about the suitability of your electrical appliance, have it checked and, if necessary, modified by a qualified electrician.
- This air cooler has been tested and is safe to use. However, as with any electrical appliance – use it with care.
- Disconnect the appliance from the power socket before changing filters, dismantling, assembling or cleaning.
- Avoid touching any moving parts within the appliance.
- Never insert fingers, pencils or any other objects through the guard.
- This appliance is not intended for use by persons (including children) with reduced physical, sensory or mental capabilities. It is also not intended for use by those with a lack of experience and knowledge unless they have been given supervision or instruction concerning the use of the appliance by a person responsible for their safety. Do not leave children unsupervised with this appliance.
- Do not clean the unit by spraying it or immersing it in water.
- Do not operate the appliance with wet hands.
- Never connect the unit to an electrical outlet using an extension cord. If an outlet is not available, one should be installed by a qualified electrician.
- Never operate this appliance if the cord or plug is damaged. Ensure the power cord is not stretched or exposed to sharp objects/edges.
- A damaged supply cord should be replaced by the manufacturer or a qualified electrician in order to avoid a hazard.
- Any service other than a regular cleaning or filter replacement should be performed by an authorized service representative. Failure to comply will void the warranty.
- Do not use the appliance for any purpose other than its intended use.
- Never use the mains plug as a switch to start and stop the air cooler. Use the provided ON/OFF button located on the control panel.
- Always place the unit on a dry and stable surface. Do not move or tilt the unit when the water tanks are full.
- The appliance should not be installed in laundry or wet rooms.
- Do not use this unit in environments with flammable or explosive gases.
- Avoid keeping the unit in direct sunlight for a long period of time.
Energy Saving and Unit Safety Protection Tips
- Do not cover or restrict the airflow from the outlet or inlet grills.
- For maximum performance, the distance between the unit and a wall or objects should be at least 50cm (20 inches).
- While in operation, ensure that the level of the water tank does not exceed MAX and does not fall below MIN.
- Keep the filters clean. Under normal conditions, filters should only need cleaning once every three weeks (approximately). Since the filters remove airborne particles, more frequent cleaning may be necessary, depending on the air quality.
- In order to achieve maximum efficiency, the unit should be placed near an open door or window. Evaporative Air Coolers work with an evaporative cooling mechanism that requires cross ventilation.
- This unit will lose efficiency if the relative humidity within the room exceeds 60%.
- The ambient operating temperature range is from 5°C to 40°C. If used in low temperatures (as a humidifier) it is recommended to fill the water tank with warm (but not hot) water.
FEATURES
- Air Cooler with a 12-liter tank.
- Air Cooler, Humidifier, and Air Cleaner with ionizer for improved air quality.
- Slim design takes minimal space.
- The evaporative cooler is an economical solution saving energy with no need for venting.
- Ideal for rooms and spaces which cannot be sealed or traditionally air-conditioned.
- 3 fan speeds: Low, Medium, and High, allowing selection between maximum cooling and quiet operation.
- Oscillation setting for improved air distribution.
- Directional louvers allow spot cooling.
- Honeycomb Filter for improved cooling performance and air cleaning.
- Easy to use digital control panel and intelligent remote.
- Handle and wheels for great mobility.
- Powerful air throw with an auto-swing for faster cooling.
- Easy to fill tank and icebox.
- Pump protection.
SPECIFICATIONS
- Airflow: 350 m3/h
- Water tank: 12 Litres
- 3 speed fan: Low / Medium / High
- 7.5 hour timer
- High-efficiency honeycomb cooling pads
- Remote Control
- Oscillation
OPERATION
The air cooler cools the air by means of evaporation. When water evaporates into the air, the result is a mixture of air and water molecules. This chemical change requires heat which is taken from the water molecules, resulting in a spot cooling effect. 
The recommended relative humidity for optimum operation is 60% or lower. A drier climate makes for more noticeable cooling. The evaporative air cooler should not be used in enclosed or sealed spaces. It must be kept level and there must be water in the tank. Doors and windows should be open.. to allow free air flow. The evaporative air cooler works best when placed near an open window air current. The evaporative air cooler can also be used to humidify dry environments (during cool weather). To be used for humidification the windows and doors should be closed to allow the humidified air to accumulate. The evaporative air cooler is not an air conditioner as it does not use a compressor or refrigerant. It should not be expected to cool as effectively as a refrigerated air conditioner. When the product is used for the first time, the Honeycomb cooling media will have an odor, this should dissipate within a week of use. 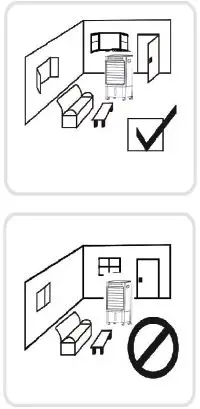
PARTS LIST
Please Note: Both water tanks are part of the main unit, and are not removable.
INSTALLATION
This unit can easily be moved from one room to another. While moving the unit please note that it must always be kept upright and then placed on an even surface.
- Remove all packaging while keeping the air cooler in a vertical position.
- Make sure that all parts are present and that the unit is assembled correctly-including the castor wheels (these need to be pushed into place on the base of the unit)
- Water tank: Fill the top water tank with water ensuring that the water tank does not to go above the MAX level visible on the front of the unit.
- When Cooling/humidifying, the water level must not be lower than the MIN water line.
- If you want to increase the cooling effect, you can put ice or the ice packs into the either water tank, but be sure that by adding ice or ice packs the water level does not go over the MAX limit. Empty some water if necessary via the drain pipe on the back of the unit.
- Make sure that the filter pad is properly inserted into the back of the unit.
- Connect the power plug to a working socket, and then press the power button.
Please note: When the unit is plugged in, the appliance will go through a diagnostic process to ensure it is ready for operation. When this operation is performed, the lights on the front will flash.
ICEBOX
The icebox can absorb the heat in the water, which in turn can lower the temperature of the water tank. This can make the air flow cooler.
- Remove the icebox and put it in the freezer until it is totally frozen.
- Put the frozen icebox into the top water tank.
CONTROL PANEL AND SETTINGS
CONTROL PANEL 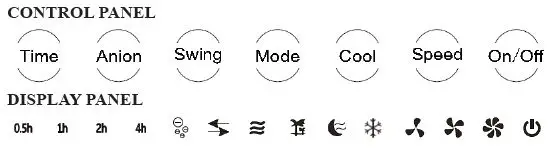
- POWER button: After connecting the power cord the air cooler is in standby mode. Press the ON/OFF button to turn the air cooler on or off.
- SPEED button: Press the SPEED button to cycle through the fan speeds. The currently selected fan Speed will be illuminated on the display.
- MODE button: Press this button to change between the three airflow styles. Standard: The fan will blow at maximum speed.
- Breeze: The fan speed will fluctuate to imitate a natural breeze.
- Sleep: The fan speed will decrease by one level per half hour and then continue to run at Low speed.
- TIMER button: The timer can be used as a shutdown with a duration between 1 hour and 7 hours. Repeatedly press the TIMER button to select the duration of the timer. The duration is calculated by adding up the lights illuminated. So if 1H, 2H and 4H are all lit then 7 hours is selected. If the timer lights are off, the timer is not activated.
Please note: These are single use timers, and cannot be combined or automatically repeated. - ANION button: Press the ANION button to activate the ionizer. Press the button again to turn the ionizer off. When activated the ANION button will illuminate on the display.COOL button: Press the COOL button to turn on the Humidifying function, which cools the air. Press the button again to turn it off. When the COOL function is turned off, the Air Cooler will operate as a fan, and the water will not be used to cool the air.
- SWING button: Press the SWING button to turn the oscillation function of the air outlet on or off. The swing indicator will be illuminated when the function is activated. The vertical direction of the airflow can be manually adjusted.
REMOTE CONTROL
The remote allows the same functions to be controlled as the main control panel on the air cooler. 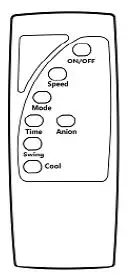
- Open the remote controller rear cover and install two AAA battery
- The buttons have the same function as the main control panel
- The remote has an effective control distance of 6 meters.
CLEANING AND MAINTENANCE
ATTENTION: Please shut off the unit and unplug from the mains before cleaning or performing any maintenance.
CLEANING THE SURFACE
Clean the plastic housing with a duster or a soft wet cloth. Do not use chemical solvents (such as benzene, alcohol or gasoline) as they may cause irreversible damage. Make sure no water enters the control panel.
CLEANING THE WATER TANK
Unplug the power cord and remove the honeycomb filter bracket. With a cloth (dipped in a mild detergent), wipe the water tank. Before using the unit, the tank should be rinsed by filling the tank and allowing it to drain through the drain port. Draining the water reservoir and refilling it with fresh water at least once a week will help reduce any mineral deposits and keep the filters clean. Do not run the unit in Humidify mode with stale water in the tank. We recommend emptying the tank and refilling it with fresh water if water has been standing in the tank for an extended period of time.
MAINTAINING AND CHANGING THE HONEYCOMB FILTER PADS
The appliance is supplied with Honeycomb cooling/filters pads. The cleaning frequency for the Honeycomb filter depends on local air and water conditions. In areas where the mineral content of water is high (hard water), mineral deposits may build up on the honeycomb cooling filter and restrict airflow. If mineral deposits remain on the Honeycomb pads, the filter should be removed and washed under fresh water. For a deeper clean a mild detergent should be used with a soft brush. Once cleaned the filter should be rinsed in clean water before leaving to dry. We recommend cleaning the honeycomb filter at least every two months, depending on your needs. For best results, allow the honeycomb filter to dry after each use by turning off the COOL function and running the unit as a fan for 15 minutes before turning the unit off.
END OF SEASON MAINTENANCE
- Empty the tank and clean it following the instructions above.
- Clean the Honeycomb pad.
- Store the Ice pack in the water tank.
- Cover the unit and keep it in a dry place.
TROUBLESHOOTING
Do not repair or disassemble the unit by yourself, unauthorized repair attempts will invalidate the warranty and may cause bodily harm.
| Issue | Possible Reason | Possible Reason |
| No power | 1. Power cord is unconnected
2. Honeycomb filter support is not installed correctly 3. The master switch is not turned on. 4. The power key is not pressed. |
1. Connect the power cord
2. Install the honeycomb filter correctly. 3. Turn on the master switch 4. Press the power key. |
| No dust elimination | 1. The honeycomb filter is
blocked. 2. The air inlet is blocked |
1. Remove the honeycomb
filter and clean it. 2. Remove the obstruction |
| Odour emission from unit | 1. New unit. When the unit is used for the first time, the Honeycomb cooling media will have an odour, which will dissipate within a week of use
2. Honeycomb filter may have developed mould or bacterial growth. |
1. No action required
2. Clean the filter pads with mild antibacterial solution. Dry before use. |
If the above solutions do not resolve the problem please contact the service center.
Disposal: Do not dispose of this product as unsorted waste. Collection of such waste must be handled separately as special treatment is necessary. Recycling facilities are now available for all customers at which you can deposit your old electrical products. Customers will be able to take any old electrical equipment to participate civic amenity sites run by their local councils. Please remember that this equipment will be further handled during the recycling process, so please be considerate when depositing your equipment. Please contact the local council for details of your local household waste recycling center.
TECHNICAL DATA
Model Number: ES10012US-WH
| Description | Symbol | Value | Unit |
| Water Tank | 12 | Litres | |
| Voltage | 120 | V | |
| Frequency | 60 | Hz | |
| Maximum fan flow rate | F | 3.6 | m3/min |
| Power | P | 65 | W |
| Standby Power Consumption | PSB | <0.3 | W |
| Fan sound power level | LWA | ≦56.6 | dB(A) |
| Maximum air velocity | c | 5.6 | Meters/sec |
| Size (LxWxH) | 11.4 x 11 x 27 | Inch | |
| Net weight | 11.7 | lbs | |
COSTWAY FP10123US Portable Air Conditioner

Before You Start
- Please read all instructions carefully.
- Retain instructions for future reference.
- Separate and count all parts and hardware.
- Read through each step carefully and follow the proper order. We recommend that, where possible, all items are assembled near to the area in which they will be placed in use, to avoid moving the product unnecessarily once assembled.
- Always place the product on a flat, steady and stable surface. Keep all small parts and packaging materials for this product away from babies and children as they potentially pose a serious choking hazard.
BEFORE YOU BEGIN
PRODUCT DESCRIPTION
Our powerful portable air conditioners are great cooling solutions for single rooms, creating a comfortable atmosphere in your space. It also has ventilation and dehumidifying function for circulating air and removal of moisture. They’re self-contained systems that do not require any permanent installation allowing you to move to the space in which it is most needed. They’re commonly used in kitchen, temporary residence, computer rooms, garages, and many other places where installation of Air-conditioner Outdoor Unit is limited.
FOR YOUR SAFETY
WARNING- to reduce the risk of fire, electric shock or injury to persons or property:
- Please let the portable air conditioner stand upright for at least 24 hours before plugging in.
- If the supply cord is damaged, it must be replaced by the manufacturer, or similarly qualified persons in order to avoid a hazard.
- The appliance shall be disconnected from its power source during service.
- Always operate the unit from a power source of equal voltage, frequency and rating as indicated on the product identification plate.
- Always use a power outlet that is grounded.
- Unplug the power cord when cleaning or when not in use.
- Do not operate with wet hands. Prevent water from spilling onto the unit.
- Do not immerse or expose the unit to rain, moisture or any other liquid.
- Do not leave the unit running unattended. Do not tilt or turn over the unit.
- Do not unplug while the unit is operating.
- Do not unplug by pulling on the power cord.
- Do not use an extension cord or an adapter plug.
- Do not put objects on the unit.
- Do not climb or sit on the unit.
- Do not insert fingers or other objects into the air outlet.
- Do not touch the air inlet or the aluminum fins of the unit.
- Do not operate the unit if it is dropped, damaged or showing signs of product malfunction.
- Do not clean the appliance with any chemicals.
- Ensure the unit is far away from fire, inflammable, or explosive objects.
- The unit shall be installed in accordance with national wiring regulations.
- Do not use means to accelerate the defrosting process or to clean, other than those recommended by the manufacturer.
- The appliance shall be stored in a room without continuously operation sources (for example: open flames, an operating gas appliance or an operating electric heater).
- The appliance shall be stored so as to prevent from mechanical damage occurring.
- Do not piece or burn, even after use.
- Be aware that refrigerants may not contain an odour.
- Compliance with national gas regulations shall be observed.
- Keep any required ventilation openings clear of obstruction.
- The appliance shall be stored in a well-ventilated area where the room size corresponds to the room area as specified for operation.
If you don’t understand something or need help, please contact the customer services.
PRODUCT OVERVIEW
PRODUCT DIAGRAM
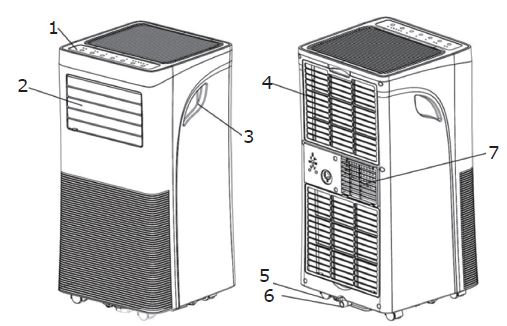
- Control panel
- Air outlet with adjustable louver
- Handle
- Air inlet with air filter
- Caster
- Drainage Hole
- Air Exhaust
FEATURES
- High Capacity in a compact size with cooling, dehumidifying and fan function.
- Temperature setting and display
- LED Digital display
- Electronic control with built-in timer, sleep mode
- Self-evaporating system for better efficient
- Auto shut off when tank full
- Automatic restart in the event of power outage
- Auto defrosting function at low ambient temperatures
- Remote control
- 2-speed fan
- Casters for easy mobility
INSTALLATION
UNPACKING
- Unpack the carton and take the appliance and accessories out.
- Check the device after unpacking for any damage or scratches on it.
- Accessories:

- Exhaust hose
- Hose connector
- Window kit adapter
- Remote control
- Window kit
Choose your location

- If tipped more than 45°, allow the unit to set upright for at least 24 hours before start up.
- Place the unit on a firm, level surface in an area with at least 50cm (20’’) of free space around it to allow for proper air circulation.
- Do not operate in close proximity to walls, curtains, or other objects that may block air inlet and outlet. Keep the air inlet and outlet free of obstacles.
- Never install the unit where it could be subject to:
- Heat sources such as radiators, heat registers, stoves or other products that produce heat.
- Direct sunlight
- Mechanical vibration or shock
- Excessive dust
- Lack of ventilation, such as cabinet or bookcase
- Uneven surface
ATTACH THE EXHAUST HOSE
The air conditioner requires being vented outside so that the exhaust air can escape the room which coming from the appliance contains waste heat and moisture. Do not replace or extend exhaust hose which will result in decreased efficiency, even worse shut down the unit due to low backpressure.
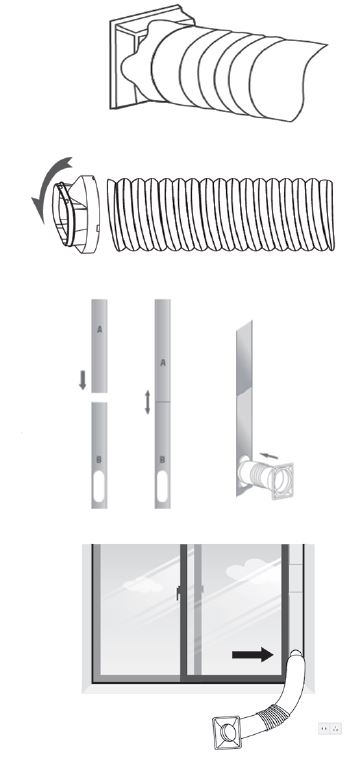
- Step 1: Connect the hose connector to one end of the exhaust hose.
- Step 2: Connect the windows kit adapter to the other end of the exhaust hose.
- Step 3: Extend the adjustable window kit to the length of your window. Connect the exhaust hose to the window kit.
- Step 4: Close your window to secure the kit in place. It needs to hold the windows kit firmly in place, secure the window kit with duct tape if required. It is recommended that the gap between the adapter and the sides of the window should be sealed off for maximum efficiency.

- Step 5: Attach the hose connector to the exhaust air outlet of unit.
- Step 6: Adjust the length of the flexible exhaust hose, and avoid bends in the hose. Then place AC near an electrical outlet.
OPERATION
CONTROL PANEL AND DISPLAY

| 1 | POWER | Press to switch the machine on or off. |
| 2 | MODE | Press Mode button to switch the operation mode between fan, cooling, and dehumidifier. |
| 3 | TIMER | Set a time for the unit to automatically start or stop. |
| 4 | UP | Increase the desired temperature (60.8℉-89.6℉/16℃~32℃) or timer setting. |
| 5 | DOWN | Decrease the desired temperature or timer setting. |
| 6 | SPEED | Press to switch the fan speed between HIGH and LOW |
| 7 | FAN SPEED
Indicator |
Display high fan speed & low fan speed |
| 8 | MODE
Indicator |
The Mode Display between Cooling, Dehumidifying and fan. |
REMOTE CONTROL

Start-up and Shutdown
- Press POWER to turn the unit on. The unit runs in in FAN as default.
- Press MODE button to select the desired operation mode.
- Press POWER again to turn off the power.
Operation mode
The unit has four operation modes: Cool, dry, fan, sleep.
Cooling your room
- Select the cool mode to lower the temperature in your room.
- Press MODE button repeatedly until the LED of COOL operation lights up.
- Press Up/Down button to adjust the temperature which is displayed on the screen. The temperature can be set between 60.8℉(16℃) and 89.6℉(32℃).
- Press SPEED button repeatedly until the desired fan speed indicator lights up.
- To control the direction of the air flow horizontally, please adjust the inner louver by hand.
Note: The air conditioner stops if the room temperature is lower than selected temperature.
Ventilating your room
- Press MODE button repeatedly until the LED of FAN operation lights up.
- In ventilation mode the room air is circulated, but not cooled.
- Press SPEED button repeatedly to select the fan speed as desired.
Drying your room
Press MODE button on the control panel or remote control, the LED of DRY operation lights up. The fan speed is unable to select. User should connect the hose to the drain outlet at the bottom of the unit.
Note: In this mode, the fan speed switches over to low speed and cannot be selected.
Sleep mode (this function can only be used with a remote control)
The sleep mode can be activated when in cool mode. After 1 hour the preset temperature is increased by 33.8℉(1℃), after another hour the preset temperature will again be increased by 33.8℉(1℃).
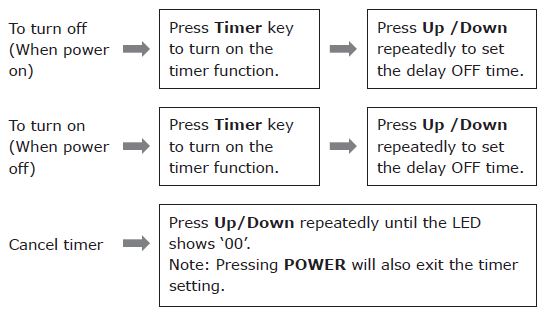
TIMER SETTING (1hour-24hours) :
The timer has two ways of operation:
Automatic Defrost
At low room temperatures, frost may build up at the evaporator during operation. The unit will automatically start defrosting and the POWER LED blinking. The defrost control sequence is as follows: A. When the unit operates in the cooling operation, drying operation, the ambient temperature sensor senses the evaporator coil temperature is below 30.2℉(-1℃), after the compressor will stop operating for 10 minutes or the coil temperature up to 44.6℉(7℃), the unit restart to cool operating mode.
Overload Protection
In the event of a power loss, to protect the compressor there is a 3-minute delay until the compressor restarting.
DRAINAGE
Self- evaporating system The self-evaporating system uses the collected water to cool the condenser coils for better efficient performance. It is no need to empty the drainage tank in cooling operation except in drying operation and high humidity conditions. The condensate water evaporates at the condenser and evacuated through the exhaust hose. For continuous operation or unattended operating in drying operation, please connect the attached drain hose to the unit. Condensate water can be automatically flow into a bucket or drain by gravity.
- Switch off the unit before operating.
- Remove the plug of the water outlet opening, and keep it in safe area.
- Securely and properly connect the drain hose and make sure it is not kinked and clear of obstruction.
- Place the outlet of hose over a drain or bucket and ensure that water could freely flow out of the unit.
- Do not submerge the end of hose into water; otherwise it can cause “Air Lock” in the hose.

To avoid water spillage:
- As the negative pressure of condensate drain pan is large, tilt the drain hose downward toward the floor. It is appropriate that the degree of inclination should exceed 20 degrees.
- Straighten the hose to avoid a trap existing in the hose.
CLEANING AND CARE
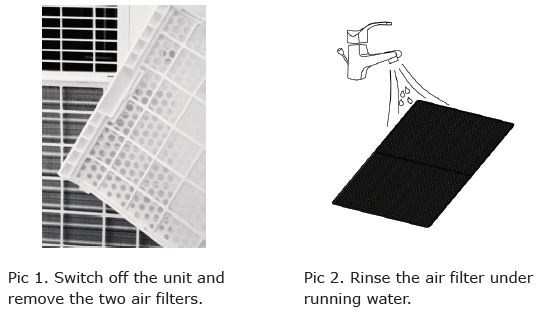
CLEANING THE AIR FILTER (every two weeks)
Dust collects on the filter and restricts the airflow. The restricted airflow reduces the efficiency of the system and if it becomes blocked it can cause damage to the unit.
The air filter requires regular cleaning. The air filter is removable for easy cleaning. Do not operate the unit without an air filter, or the evaporator may be contaminated.
- Press POWER button to switch off the unit and unplug the power cord.
- Remove the filter mesh from the unit.
- Use a vacuum cleaner to suck dust from the filter.
- Turn the filter over and rinse the air filter under running water. Let the water run through the filter in the opposite direction of air flow. Set aside and allow the filter to air dry completely before reinstalling.
Warning!!!
Do not touch the evaporator surface with bare hands, or it could cause injury of your fingers.
General Measures:
- Gas/vapor heavier than air. It may be accumulated in confined spaces, particularly at or below ground level.
- Eliminate every possible source of ignition.
- Use appropriate personal protection equipment (PPE).
- Evacuate unnecessary personnel, isolate, and ventilate area.
- Do not get in eyes, on skin, or on clothing. Do not breathe vapors or gas.
- Prevent entry to sewers and public waters.
- Stop the source of the release, if safe to do so. Consider the use of water spray to disperse vapors.
- Isolate the area until gas has dispersed. Ventilate and gas test area before entering. Contact competent authorities after a spill.
TROUBLESHOOTING
| Symptom | Inspection | Solution |
| The unit is not operating. | √ Check the power
connection in securely. |
■ Insert the power cord securely into the wall outlet. |
| √ Check if the water
level indicator lights up? |
■ Empty the drain pan by removing the rubber plug. | |
| √ Check the room
temperature. |
■ The range of operating temperature is 41℉-95℉(5℃-35℃). |
| The unit works with reduced capacity. | √ Check the air filter
for dirt. |
■ Clean the air filter as necessary. |
| √ Check if the air duct is blocked. | ■ To clear the obstacle. | |
| √ Check if the room
door or window is open. |
■ Keep the door and windows closed. | |
| √ Check if the desired operating mode is selected and the temperature is properly set. | ■ Set the mode and temperature at proper set-point according the manual. | |
| √ The exhaust hose is
detached. |
■ Make sure the exhaust hose is securely attached. | |
| Water
Leakage |
√ Overflow while
moving the unit. |
■ Empty the water tank
before transport. |
| √ Check if the drain hose is kinked or bent. | ■ Straighten the hose to avoid a trap existing. | |
| Excessive Noise | √ Check if there are any loose or vibrating parts. | ■ Secure and tighten the parts. |
| √ Check if there are any loose or vibrating parts. | ■ Secure and tighten the parts. | |
| √ Noise sounds like
water flowing. |
■ Noise comes from flowing refrigerant. This is normal. |
| Error Codes | E0 | √ Communication faults between main PCB and display PCB. | ■ Check the wire harness of the display PCB for damage. |
| E1 | √ Ambient temperature sensor failure. | ■ Check connection or replace it. To clean or replace the temperature sensor. | |
| E2 | √ Coil temperature
sensor failure. |
■ Check connection or replace it. To clean or replace the temperature sensor. | |
| Ft | √ Condensate water
high level alarm. |
■ Empty the drain pan by removing the rubber plug. |
DECOMMISSIONING
STORAGE
Long-Term Storage – If you will not be using the unit for an extended period of time (more than a few weeks) it is best to clean the unit and dry it out completely. Please store the unit as per the following steps:
- Unplug the unit and remove exhaust hose and window kit, store with the unit.
- Drain the remaining water from the unit.
- Clean the filter and let the filter dry completely in a shaded area.
- Re-install the filter at its position.
- The unit must be kept in upright position when in storage.
- Preserving the machine in ventilating, dry, non- corrosive gas and safe place indoors.
ATTENTION:
The evaporator inside the machine has to be dried out before the unit is packed to avoid component damage and molds. Unplug the unit and place it in a dry open area for days to dry it out. Another way to dry the unit is turn on the machine, adjust it to low-wind ventilation mode, and maintain this state until the drainage pipe becomes dry, so as to keep the inside of the body in a dry state and prevent it from mildewing.
DISPOSAL
Do not dispose of electrical appliances as unsorted municipal waste, use separate collection facilities. Contact your local government for information regarding the collection systems available. If electrical appliances are disposed of in landfill or dumps, hazardous substances can leak into the groundwater and get into the food chain, damaging your health and well-being.
Warning
Please talk to your doctor before you start an exercise program. Please be sure to consult your doctor or a professional before you start if you are over the age of 35 or not feeling well, and this is your first time fitness exercises. Please follow the instructions to install and use this product
SAFETY INSTRUCTION
Many safety questions had been considered in the design and manufacture of this product, but please follow the instructions below just in case. We do not accept any consequences arising from abnormal operations.
To ensure your safety and avoid accidents, please read the instructions carefully
before using.
- Please consider your physical condition and properly and regularly train to ensure that you have enough physical strength for training when starting training with this product. Mistakes or excessive training will not benefit our health.
- This product is not suitable for children. Do not use if you feel unwell physically or mentally unless they are under the supervision or direction of a person responsible for their safety regarding the use of the product. Children should be monitored to make sure they do not play with equipment.
- This product is suitable for family use, is not suitable for professional training and testing, and cannot be used for medical purposes.
- The heart rate display site of this product provides clinical date.
- If the power cod is damaged, it must be replaced by the manufacturer or professional maintenance personnel to avoid danger.
- Please check all parts before use to ensure that screws and nuts are locked.
- Please wear comfortable tight clothes to avoid the clothes being hung by the machine. Don’t let children or pets play around in case of accidents.
- Please put the product on a smooth, clean and flat ground. Make sure there is no sharp objects nearby. Keep away from water and heat sources.
- Keep your hands away from all moving parts. Do not put your hands and feet in the gap under the running belt.
- This product is only for one person at run time.
- Make sure screws and bolts are tightened after assembly
- Please use the accessories provided by the original factory , Rigorous private replacement.
- This product is HC grade, with a maximum weight of 264.5 lbs.
- There should be at least a 39.3X78.7 inch safe area behind the treadmill when in use
ASSEMBLY INSTRUCTION

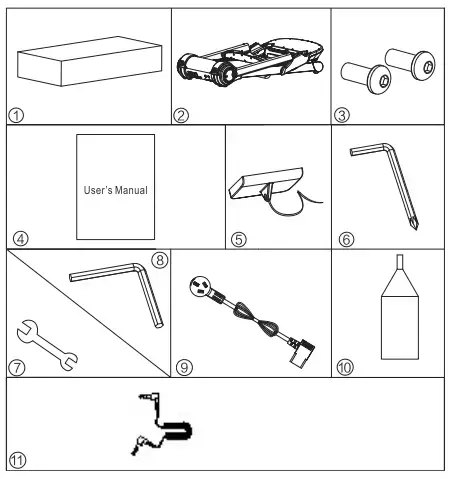
Spare Parts List
| No | Item Name | specification | Qty |
| 1 | Whole Carton Box | 1640*815*315mm | 1 |
| 2 | Treadmill | 1 | |
| 3 | Hex socket button head screws | M8”20 Full Teeth | 2 |
| 4 | User’s manual | 1 | |
| 5 | Safety Key | 1 | |
| 6 | 5#hex wrench | 1 | |
| 7 | open-ended wrench 13# 16# | 1 | |
| 8 | 6# hex wrench | 1 | |
| 9 | Power Cable | 1 | |
| 10 | Silicone oil | 30mI | 2 |
| 11 | Mp3 connection line | / | 1 |
| 12 | / | / | 1 |
Assembly Tools:
5#hex wrench Notice: Please do not make it in power before finishing installment
ASSEMBLY STEPS
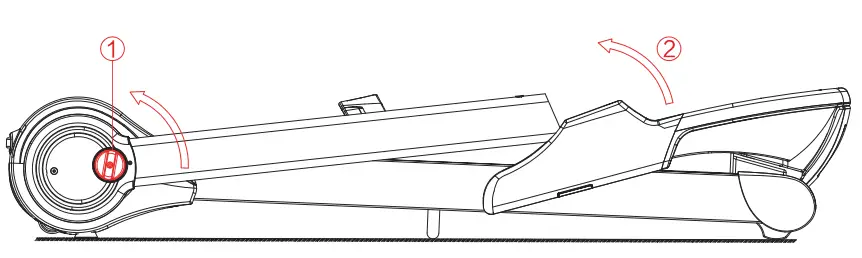
Step 1:First screw the left and right knobs of the column to the unlocked positions, then put the electronic watch match the riser like @ . as shown in the figure 1.
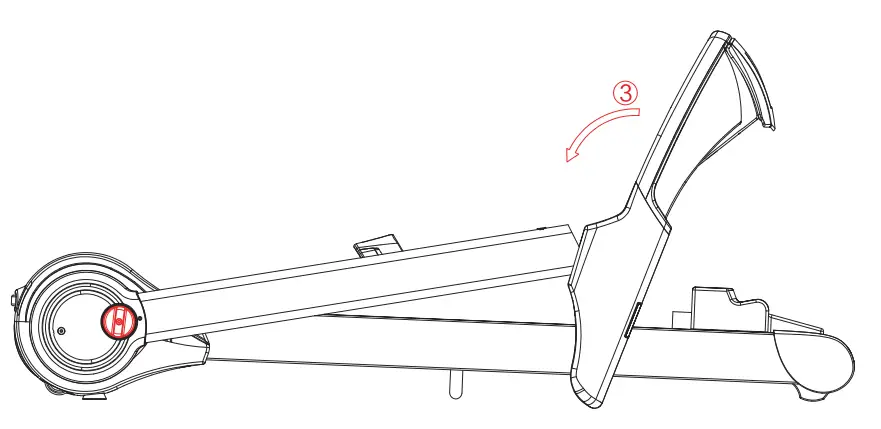
Step 2: Make the riser and electronic watch totally matched like 3. Please do not fold the cable inside the riser as shown in the figure 2.
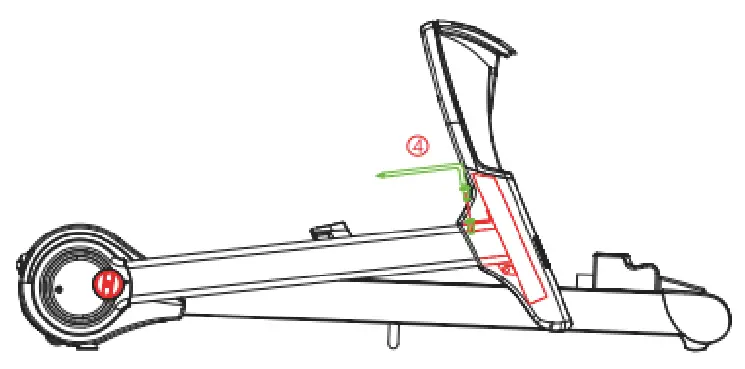
Step 3: Use a 5# hex wrench and M8*20 flat-head screws to securely lock the electronic watch as shown in the figure 3
Step 4: When locked the electronic watch, Put up the left and right riser to the limit position. Then we can twist the knobs to lock the treadmill.
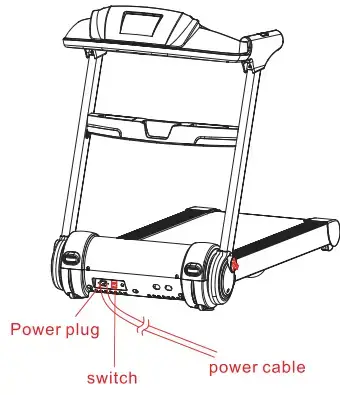
Step 5: After all the steps above, Please insert the power cable in socket, and open the power switch. Then the treadmill’s electric watch will light,
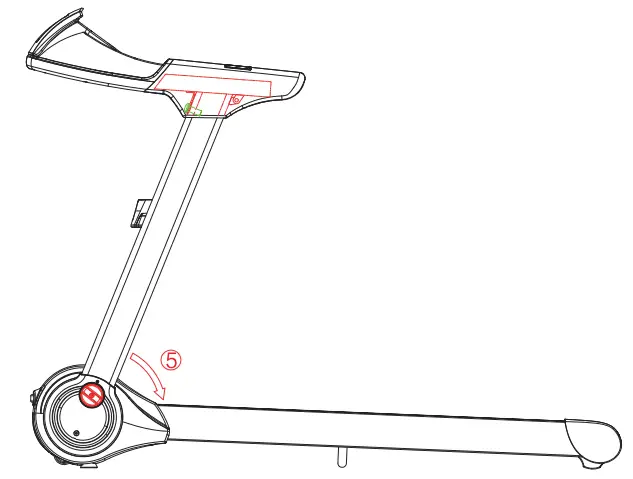
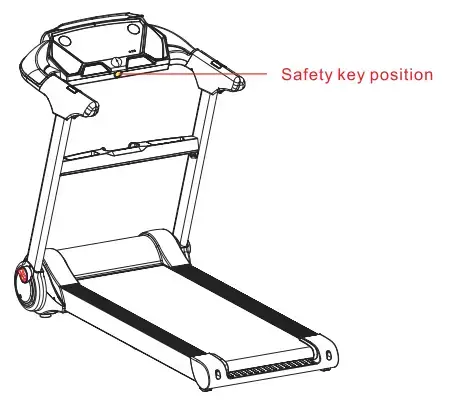
Step 6: Put on the safety key on yellow position,Then we can use the treadmill.
Please note: Confirm that all operations are completed as described above turn on the power before. Please refer to the following instructions for the operation of the treadmill.
Technical parameter
| Carton Box size(inch) | 64 5 32 12 +4 | Voltage | AC-110V 60Hz |
| Product Size(inch) | 60.4 29.8*46.7 | Peak Motor Power | 2.25HP |
| Running Area(inch) | 16.5 47.6 | Speed Range | 0.62-8.7 mph |
| Net Weight | 105.81bs | Max User Weight | 264.51bs |
| Display | Speed/Time/Distance/Calorie/Heart Rate/Step | ||
Our Company reserves the right to make technical improvements. Subject to change without notice.
Grounding instructions
This product must be grounded. In the event of a fault or damage, grounding provides an optimal way to shunt current to reduce the risk of electric shock. This product is equipped with a power cord, a grounding conductor, and a grounding plug. The plug must be connected to the correct power outlet and the installation and grounding must be consistent with the parameters of the user’s area of use.
Warning: Incorrect connection of the grounding conductor can result in electric shock. If you are unable to confirm that the product is properly grounded, please arrange for a qualified electrician or after-sales personnel to check. If the plug does not match the outlet, do not modify the plug yourself. Choose a correct outlet and have a qualified electrician install it.
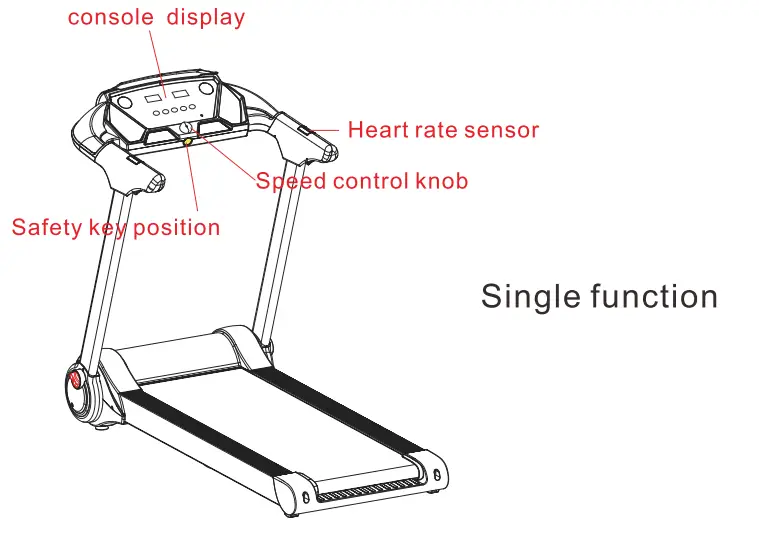
Digital Tube Windows Display Instructions
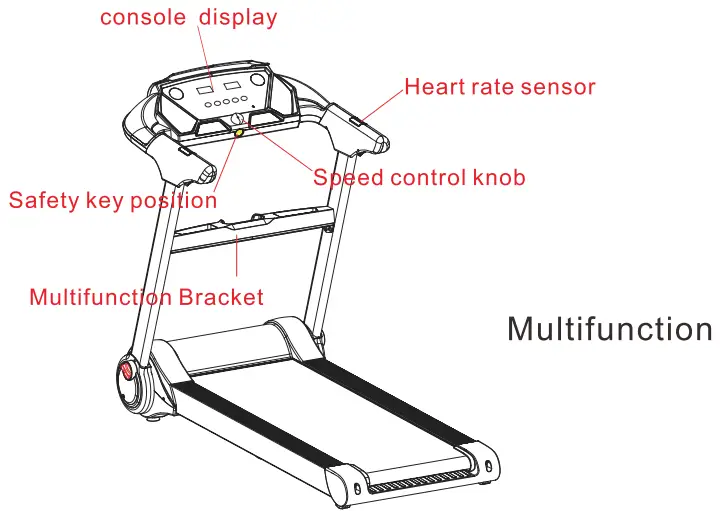
Windows and Keys Instructions:
- “TIME” “STEP SPEED” window: Displays time/step/speed values
- “DISTANCE” “HEART RATE CALORIES” window: Displays distance/heart rate/calorie values. When something is wrong, this window will display the corresponding error prompt code.
- “START/STOP”: START/ST0P keys, START the treadmill in stopping state, STOP the treadmill in running state.
- Speed Increment Key, In the state of stopping or measuring fat is the key of setting parameters; in the state of running is the key of speed increment;
- Speed Decrement Key, In the state of stopping or measuring fat is the key of setting parameters; in the state of running is the key of speed decrement;
- “QUICK SPEED KEY”: 3 mph and 5 mph quick speed key, in the running state of the treadmill, directly set the speed as the key to specify the value
- Speed Control Knob: Acceleration clockwise, 0.3mph per grid; deceleration by counterclockwise, 0.3mph per grid.
Startup Instructions:
Operating instructions in manual normal mode:
- Attach the safety key to the safety key position on the panel, turn on the power switch, and the buzzer will sound once. Then enter manual normal mode.
- Press the Start button. The windows display: 3333 -2222 — 1111, and each time the buzzer is sounded, the motor is started.
- The starting speed is: 0.62mph. At this time, you can press the speed +, – key, quick speed keys 3mph, Smph to adjust the speed or turn the knob to switch acceleration and deceleration.
- Heart rate test, hold the light hand grip with both hands, and have a heart rate display in heart rate window after a few seconds.
Safety Key function instructions
The safety key is composed of light touch switch, clothes clip and nylon rope. In any state, as long as the safety key is out of position, the treadmill stops running, the electronic meter keyboard is forbidden to operate. And the screen displays “E-07” with a prompt sound. After placing the security lock every time, the screen will display for w seconds, and then enter the system default working state.
MP3
It can be played by connecting the audio adapter wire with MP3 headphone jack and the audio input hole of the electronic meter.
Bluetooth Function
When connected with APP, The treadmill can be controlled by APP.
Data Display Range
| Start | Range | |
| Time (Minutes:Second) | 0:00 | 0:00—99:59 |
| Speed (mph) | 0.0 | 0.0— 8.7 |
| Step | 0 | 0-9999 |
| Distance (mile) | 0.00 | 0.00— 99.9 |
| Ca lories (KC) | 0.0 | 0.0—999 |
| Heart Rate | 0 | 50-200 |
Common failures and processing method
Please call our dealer or our after-sales service if you have any other questions
| Questions | Possible causes | Maintenance methods |
| Treadmill don’t work | Not connected | Put plug to insert socket |
| Power is not turned on | Put the power switch in position“NO” | |
| Safety lock drop | Put the safety lock in correct position | |
| Circuit signal system break | Check the controller input terminal and signal circuit | |
| The fuse blew out | Replace fuse | |
| The running belt
doesn’t run .Ruths, |
Insufficient lubrication | Add silicone oil lubricant |
| Belt is too tight | Adjust belt tightness | |
| Running belt slipped | Running belt too loose | Adjust running belt tightness |
| Running belt too tight | Adjust running belt tightness |
| Questions | Possible cause | Maintenance Methods |
| E01 | Poor communication | The signal line is not plugged it. Plug it again |
| E02 | Power assault | Power tube breakdown, replacement of electronic
control |
| E03 | Non-sensing signal | Sensing wire is not plugged in properly. Plug it
again correctly |
| E04 | Controller motor abnormal | Overload, replace controller or motor |
| E05 | Overload protect | Overload, replace controller |
| E06 | System self-check failed | System failure, replace controller |
| E07 | Safety lock drop | Put the safety lock in correct position |
| abnormal
display |
External disturbance | Turn off power switch. Turn on it after one minute |
Sports advice and guidelines
warm-up exercise
warm up for 5-10mins before each operation
Breathe
Do not hold your breath during operation. Normally prepare to release action and inhale through the nose,exhale through the mouth. The breathing should be coordinated with movement. If the breathing is too rapid, the movement should be stopped immediately.
Frequency
The exercise of the same muscle should keep 48hours of rest. That is , only train the same area every other day.
Load
Determine the amount of training according to the individual physical condition, and then practice according to asymptotic load.It is normal phenomenon for muscle soreness at the beginning of training. As long as continue to practice the soreness can be eliminated.
Relax
The reductive action should be done for 5mins after practicing every time. Especially extend flabby for ministry muscle.avoid muscle long-term condensation, and keep muscle flexibility.
Diet
Do not eat at least 1 hour before training and half an hour after training to protect your digest system. Avoid drinking plenty of water to avoid increasing burden of heart and kidney.
Stretching exercise
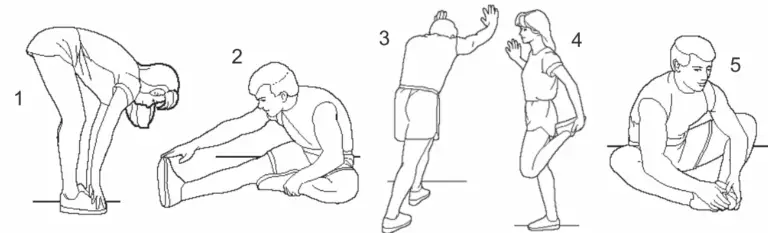
It is important to stretch before training, no matter how intense the training will be. It is easier to stretch the muscles when they are warm. warm up by running for 5 to 10 minutes and then stop and stretch as follows 5 times for 10 seconds or more on each leg. continue to stretch even after training. Do it again after you work out.

- Stretch down
Bent your knees slightly and slowly bend your body to relax your back and shoulders. And try to touch your toes with your hands. Hold for 10-15 seconds, then relax. Repeat three times (see figure 1) - Hamstring stretch
Sit on a clean seat cushion and straighten one leg. Bring the other leg in close to the inside of the leg. Try to touch your toes with your hands.Hold for 10-15 seconds, then relax. Repeat with each leg e times (see figure 2) - Stretch the calf and hamstring
Stand with two hands on a wall or tree. One foot is behind. Keep your hind legs straight and on your heels, leaning against a wall or tree. Hold for 10-15 seconds. And then relax. Repeat 3 times for each leg.(see figure 3) - Quadriceps stretch
Keep balance with left hand to hold the wall or table. Then extend your right hand backward. Hold your right ankle and slowly pulling toward your hips until you feel tension in front of your thighs muscles. Hold for 10-15 seconds, then relax. Repeat 3 times with each leg (see figure 4) - Sartorius muscle (muscle of the inner thigh) stretch
Sit with your feet facing each other and knees facing out. Grab both feet with both hands and put toward the groin. Hold for 10-15 seconds. Then relax, repeat 3 times (see figure 5)
Product maintenance
- lubrication
The running is used for a period of time, it must be lubricated with special methy silicone oil.
Advice:- 1 hour or less per week Lubricate once every 6 months
- Less than 3 hours per week Lubricate once every 3 months
- 3-6 hours per week Lubricate once every 2 months
- More than 6 hours per week Lubricate once every 1 month
Do not lubricate too much. It is not the more lubricants the better.
Remember: Proper lubrication is an important factor in improving the life of the treadmill.
- As for the way to check if you need to add lubricant. Just grab the running belt and touch the middle of the running belt back with your hands as much as possible.You don’t need to add lubricant if you have silicone on your hand (a little damp) You have to add lubricant if the pad is dry and there is no silicone on your hand.
- the step of lubricate on the running plate (as shown right picture)
- Stop running for and fold the machine.
- Lift the running belt of the underside of the main body, Put the oil pot as far as possible into the middle of the running belt. And spray methyl silicone oil inside of the running and both sides.
- You can make use of the treadmill speed of 1km/h to evenly lubricate and step on the running belt from left to right. After a few minutes, the methyl silicone oil can be completely absorbed by the running belt
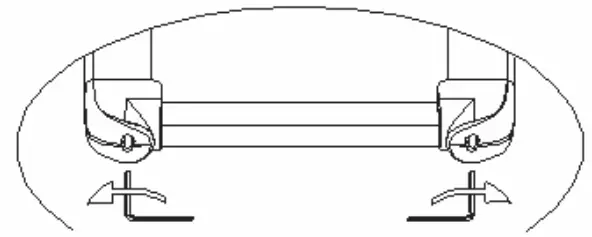
- Adjust tightness of running belt, All treadmills shall be adjusted for tightness before delivery and after installation. However, the running belt may be loosened after a period of use.
For example,The treadmill had stopping and slipping question during exercise.Adjust bolts of running belt with the left and right synchronous as per clockwise direction to half a circle as the unit when this phenomenon occurs.The feet will slip if the running belt is too loose.
But it is not good to be too tight. It is easy to increase the load of the motor and damage the motor,running belt and roller etc. - Running belt deviation adjustment
All treadmills need to be adjusted the running belt before delivery and after installation.But the running belt may be deviated after a period of use which may be caused by the following reasons.- The main body is not placed smoothly.
- The feet of users are not in the center of the running belt.
- The feet of users are uneven force
It will be returned to normal after a few minutes of no-load rotation if deviation is caused by man-made.It should be adjusted with 6mm wrench at a half circle as the unit for deviation of non•recover automatically

Please adjust left bolt with clockwise or right bolt with counterclockwise if running belt is left deviation.
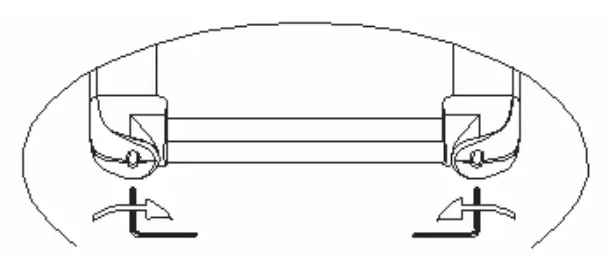
Please adjust right bolt with clockwise or left bolt with counterclockwise if running belt is right deviation.
The running belt deviation is not within the scope of warranty. And it is mainly maintained by the user according to the manual. Running belt deviation will seriously damage the running belt. The mistake must be found in time and corrected.
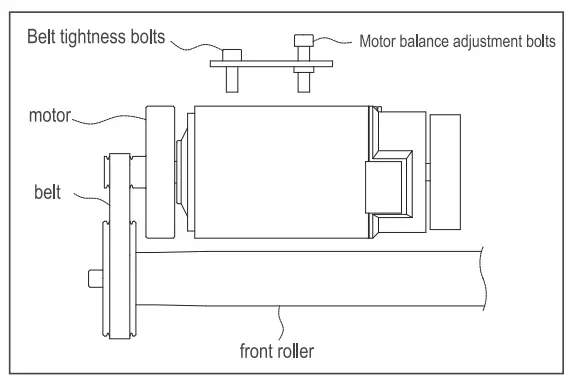
- Adjustment of motor belt (as shown in the right picture)
All treadmills have been adjusted for the motor belt before and after installation, but they may still be out after a period of use. Now the phenomenon of loose slip, mainly by the user to adjust.
Adjustment steps:- Adjust the parallelism of the motor with a wrench Turn the bolt half a turn counterclockwise.
- Turn the belt tightening bolts clockwise Half a circle.
NOTE: clean belt and pulley grooves regularly.
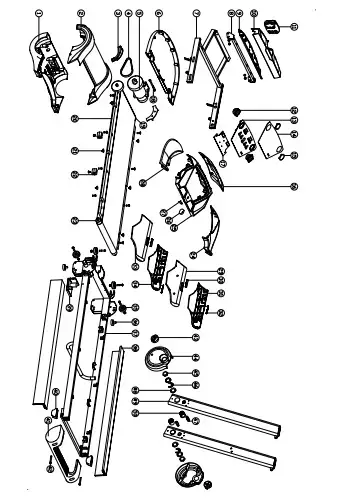
Explosion Diagram
Explosion Diagram Chart
| No. | Name | Quantity |
| 1 | Upper Cover | 1 |
| 2 | Bottom Cover | 1 |
| 3 | Riser Bottom Case | 2 |
| 4 | Running Belt | 1 |
| 5 | Motor | 1 |
| 6 | Electric Watch Bottom Case | 1 |
| 7 | Electric Watch Welding Parts | 1 |
| 8 | Shelf Welding Parts | 1 |
| 9 | Shelf Lower Case | 1 |
| 10 | Shelf Upper Case | 1 |
| 11 | Vibration Plate | 1 |
| 12 | Speaker | 2 |
| 13 | Digital Tube PCB fixed frame | 1 |
| 14 | Digital Tube sticker | 1 |
| 15 | Speaker Net | 2 |
| 16 | Electronic watch hood | 1 |
| 17 | Digital tube PCB board | 1 |
| 18 | Hexagon bolt set | 1 |
| 19 | Front Roller | 1 |
| 20 | Running Board | 1 |
| 21 | Edge Strip Group | 6 |
| 22 | Diamond Cushion | 4 |
| 23 | Rear Wheel | 1 |
| 24 | Right Separation Cover | 1 |
| 25 | Electronic Watch Upper
Case |
1 |
| 26 | Adjustable Knob | 1 |
| 27 | Safety Key Iron Piece | 1 |
| 28 | Left Separation Cover | 1 |
| 29 | Right handle inner cover | 1 |
| 30 | Inner medial heartbeat Sensor | 2 |
| 31 | Right handle outer cover | 1 |
| 32 | outer medial heartbeat Sensor | 2 |
| 33 | Lefthandleouter cover | 1 |
| 34 | Lefthandleinnercover | 1 |
| 35 | Moving wheel set | 4 |
| 36 | Adjustable Footpad | 2 |
| 37 | Main frame welding Parts | 1 |
| 38 | Edging Strip | 2 |
| 39 | Bottom Controller | 1 |
| 40 | Rear Footpad | 2 |
| 41 | Rear tail cover | 1 |
| 42 | Rear Roller Adjustable Screw | 2 |
| 43 | Knob | 2 |
| 44 | Riser Lower Cover | 2 |
| 45 | Hex thin nut | 2 |
| 46 | E-shaped gasket | 2 |
| 47 | Foldable Screw Bolt | 2 |
| 48 | Bumping Gasket | 2 |
| 49 | Riser | 2 |
| 50 | Riser Support Rubber Sleeve | 2 |
Gymax App Instruction Manual
This document is applicable to the Android version and iOS version of the official APP of Gymax.
iOS: Search Gymax in App Store to download
Android: search and download from Google Play store
Functions Overview
Gymax App iOS/Android with Gymax platform provides users the control of sports intelligent device, sports data recording, sports mall, dynamic sharing in community, system Settings and other functions.
The Main functions
- Sign In
- Sports Scenes
- Sports Mall
- Community Dynamic
- Settings
Sign in Process
Sign in
For the convenience of users, Gymax provides three login methods: Facebook and E-mail, and iOS users can also Sign in with Apple.Users can quickly sign in to the Gymax App and use it.
Retrieve Password
If E-mail users forget Passwords, users can click “Forget Password” on the mailbox login interface to jump to the Password retrieval interface, and then reset Passwords.

Edit Information
In the personal information interface, clicking the avatar, users can edit the avatar and upload the avatar by choosing album or camera.

Sports Scenes
Connecting services
On the home page, users can freely choose the device type to connect. After connecting successfully , users then start the device page, such as the “Treadmill” interface.


Starting exercises
Selecting the device page, such as “Start” on the “Treadmill” interface, users enter the running free, as shown below:
- Waiting for GyMax to automatically connect to the treadmill.

- When the connection status sign
 is lit, it means that the APP has successfully connected to the treadmill. Users click
  ,then the treadmill start Running and enter the countdown. 3.2.1 GO

- The Gymax App synchronizes exercise data, such as mileage, duration, calories, and speed, as users run on the treadmill, and users can start or stop, accelerate or decelerate the treadmill, which intuitively shows users’ current sports ranking and the number of online sports in real time.

- When users finish the exercise, the Gymax App will show users’ total mileage.

- Users can share the sports data to the community or save it to the phone album.


Sports Plan
Users can click “Add More Training Plans” to Add users’ own sports plans.

Setting Goals
- Users can set suitable sports goals

- . When the goal is reached, the exercise automatically ends.

Training Course
- Users can select courses in the interface of training course.

- And then Start training with a fitness coach

Exercise Record
The user can view the Exercise data record in the device page. (me-exercise data)

Sports Mall
Users can purchase satisfied sports devices.

Community Dynamic
- In sports community, users can share dynamic communication with each other.

- Users can comment

- Users can post dynamics in community. dynamics.

- Users can remove the released dynamics in Me-My Dynamic.

Settings
System Settings
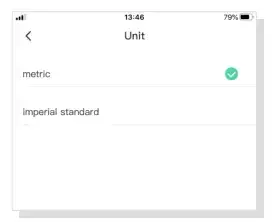
Users can click “Me” to enter the set up, including unit, feedback, terms of agreement, privacy agreement and clear cache, etc.

Unit settings ( metric or imperial standard)

Clear Cache
Users can clean up the system cache according to users’ needs, including Gymax App H5 web page load cache and image load cache.
Feedback
Users can submit suggestions and the problem for improving the product.

Welcome to visit our website and purchase our quality products!
With your inspiring rating, COSTWAY will be more consistent to offer you
EASY SHOPPING EXPERIENCE, GOOD PRODUCTS and EFFICIENT SERVICE!
US office: Fontana, California
UK office: Ipswich
- Reward Points
- Exclusive Customer Service
- Personalized Recommendations
- Permanent Shopping Cart
- Order History

We would like to extend our heartfelt thanks to all of our customers for taking time to assemble this product and giving us valuable feedbacks.
THIS INSTRUCTION BOOKLET CONTAINS IMPORTANT SAFETY INFORMATION. PLEASE READ AND KEEP FOR FUTURE REFERENCE.
THIS INSTRUCTION BOOKLET CONTAINS IMPORTANT SAFETY INFORMATION. PLEASE READ AND KEEP FOR FUTURE REFERENCE.
Please give us a chance to make it right and do better! Contact our friendly customer service department for help first. Replacements for missing or damaged parts will be shipped ASAP!
Follow Costway


COSTWAY HandBuch Christmas Tree

WARNING: There are plastic caps on the end of the pole that are useless. Please make sure remove them before assembling.
If the cap is broken or missing, please don’t worry.


ASSEMBLY INSTRUCTION OF CHRISTMAS TRE
- Christmas tree component:
- tree top
- tree body
- iron stand
The amount of accessories depends on the height of Christmas tree.
Goods in kind prevail
- Open the iron stand in the shape of an “X
- Set the screws into the hole of iron stand

- Remove packing material from ends of poles and Insert the last tree body into the center of the iron stand
- Tighten the screws of stand, keeping the tree body upright
- Insert the necking down tree body and push down branches

- Insert the tree top
- Unfold all the leaves of the tree.Repeat each layer towards tree top.Curve each tip upward for natural appearance.
- Assembly is fully complete. The tree is ready to decorate and enjoy!

ASSEMBLY INSTRUCTION OF LED LIGHTING CHRISTMAS TREE
- Christmas tree component:
- tree top
- tree body
- iron stand
- connecting line and transformer
- The amount of accessories depends on the height of Christmas tree.
- Goods in kind prevail

- Get the seperated connecting line and transformer in the carton
- Insert the joint part
- Find the joint part with red rope in the tree

- Connect all the joint parts of tree body with the connecting line
- Electrify the light and enjoy the lighting romance

CAUTION:
- Firmly secure all the screws before use.
- Product is intended for indoor use only.
- Don’t place the tree in a wet location.
- The seasonal products are not intended for permanent installation or use.
- lf any part is missing,.broken, damaged or won, stop using the item until repairs are made or replacement parts are installed.
- Don’t use the item in a way that is inconsistent with the manufacturer’s instructions.

Before You Start
- Please read all instructions carefully.
- Retain instructions for future reference. and count all parts and hardware.
- Read through each step carefully and follow the proper order.
- We recommend that, where possible, all items are assembled near to the area in which they will be placed in use, to avoid moving the product unnecessarily once assembled.
- Always place the product on a flat, steady and stable surface.
- Keep all small parts and packaging materials for this product away from babies and children as they potentially pose a serious choking hazard.
product overview

Tools
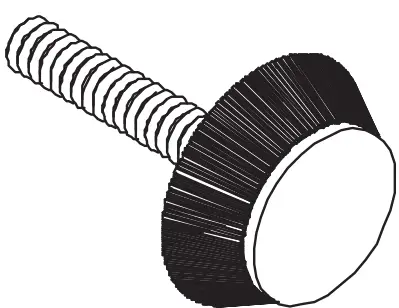
- Bolt 6x35mm ( 22 pcs)
- Bolt 6x20mm ( 4 pcs)

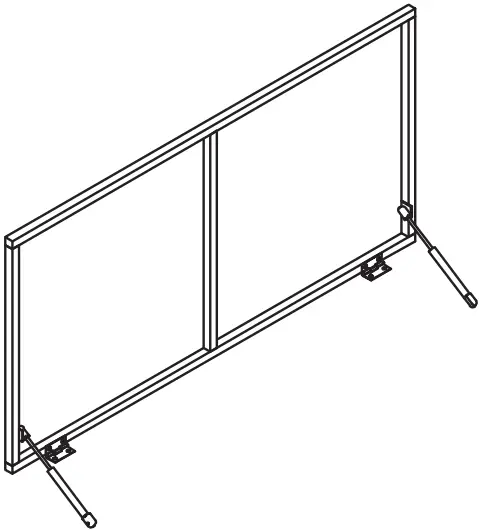
- Feet ( 4 pcs)

- Allen key M4 ( 1pcs)

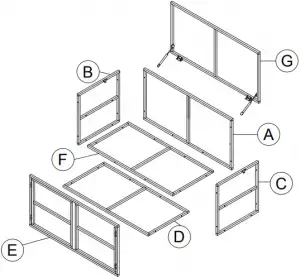
Product Parts
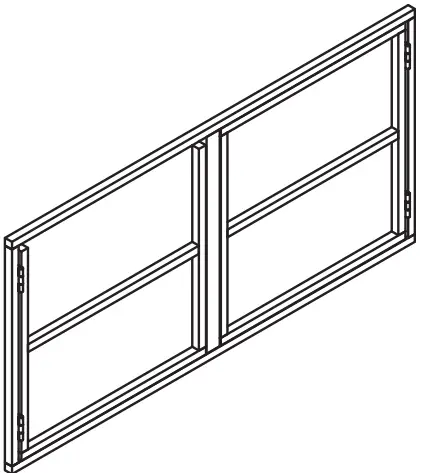
- Back frame ( 1 pcs)
- Left Frame ( 1 pcs)

- Right frame ( 1 pcs)
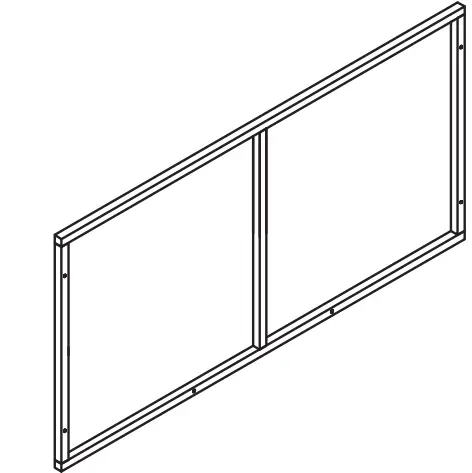
- Bottom frame ( 1 pcs)
- Door frame ( 1 pcs)
- Middle frame ( 1 pcs)
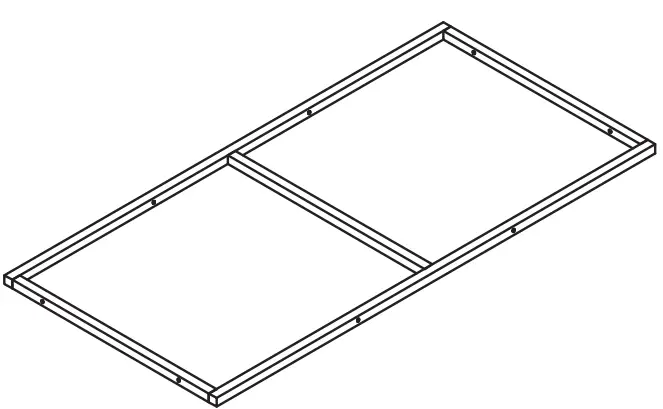
- Top frame ( 1 pcs)
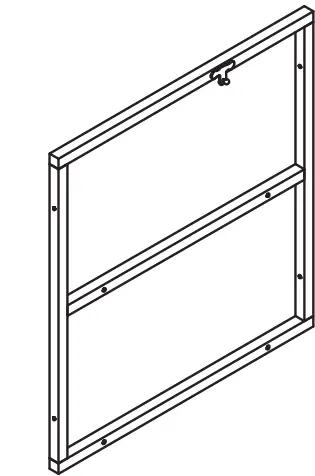
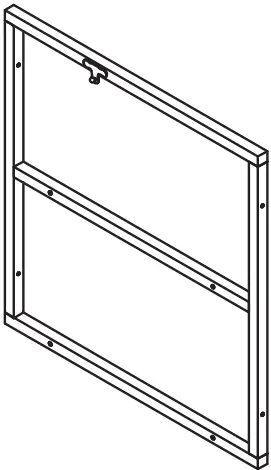
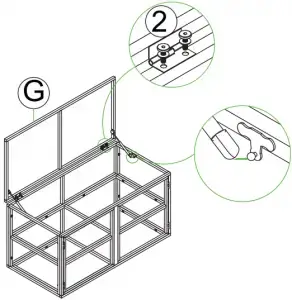
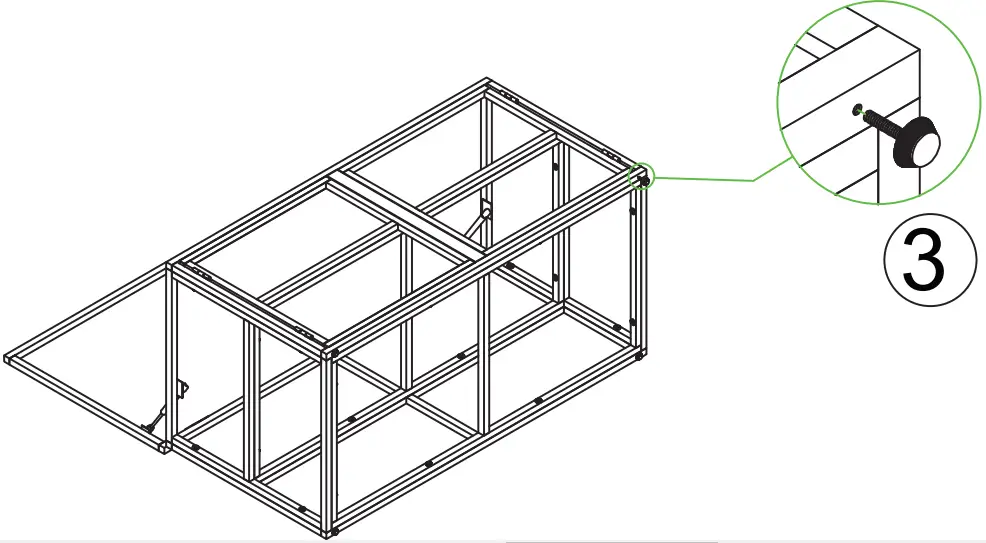
Assembly Instructions
- Step 1

- Step 2
- Step 3
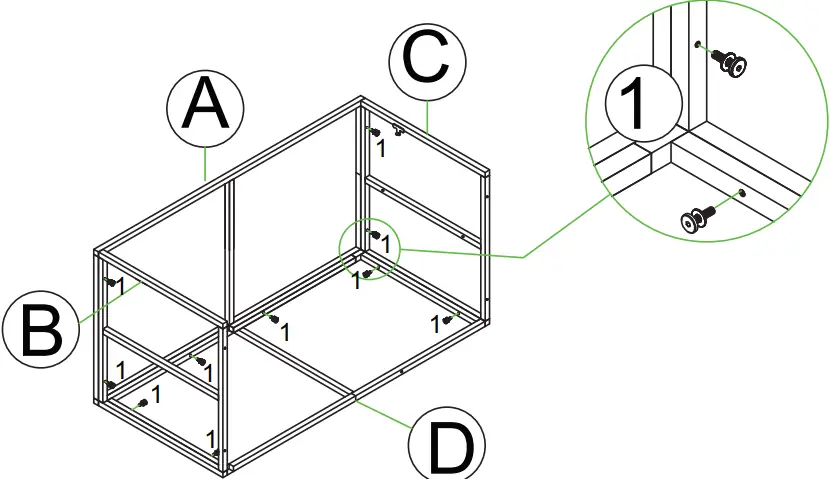
- Step 4
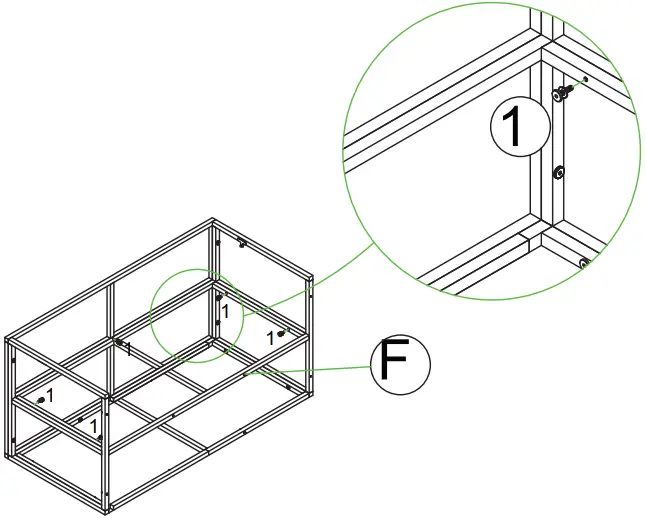
- Step 5
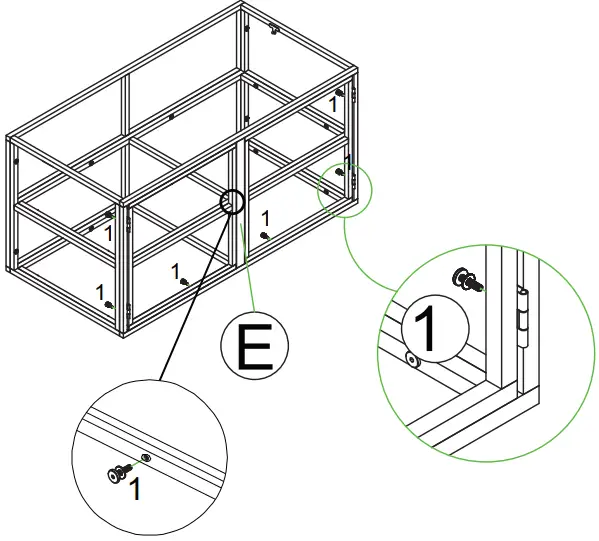
- Step 6
Welcome to visit our website and purchase our quality products!
Your suggestions and comments for COSTWAY are really important to us! We sincerely solicit you to go back to our shop and leave a good rating in just a simple click. It would be quite encouraging if you could kindly do so like below:
 Great products so far.
February 24, 2019
Great products so far. Fast delivery, easy setup, and working without any issues.
With your inspiring rating, COSTWAY will be more consistent to offer you EASY SHOPPING EXPERIENCE, GOOD PRODUCTS and EFFICIENT SERVICE!
US office: Fontana, California
UK office: Ipswich

- Reward Points
- Exclusive Customer Service
- Personalized Recommendations
- Permanent Shopping Cart
- Order History
5 Star Rating

We would like to extend our heartfelt thanks to all of our customers for taking time to assemble this product and giving us valuable feedbacks.

Contact Us!
Do NOT return this item.
Contact our friendly customer service department for help first.
Email :
]]>