COSTWAY SP37068BK SuperFit 2.25HP Folding Treadmill User Manual
Warning
Please talk to your doctor before you start an exercise program. Please be sure to consult your doctor or a professional before you start if you are over the age of 35 or not feeling well, and this is your first time fitness exercises. Please follow the instructions to install and use this product
SAFETY INSTRUCTION
Many safety questions had been considered in the design and manufacture of this product, but please follow the instructions below just in case. We do not accept any consequences arising from abnormal operations.
To ensure your safety and avoid accidents, please read the instructions carefully
before using.
- Please consider your physical condition and properly and regularly train to ensure that you have enough physical strength for training when starting training with this product. Mistakes or excessive training will not benefit our health.
- This product is not suitable for children. Do not use if you feel unwell physically or mentally unless they are under the supervision or direction of a person responsible for their safety regarding the use of the product. Children should be monitored to make sure they do not play with equipment.
- This product is suitable for family use, is not suitable for professional training and testing, and cannot be used for medical purposes.
- The heart rate display site of this product provides clinical date.
- If the power cod is damaged, it must be replaced by the manufacturer or professional maintenance personnel to avoid danger.
- Please check all parts before use to ensure that screws and nuts are locked.
- Please wear comfortable tight clothes to avoid the clothes being hung by the machine. Don’t let children or pets play around in case of accidents.
- Please put the product on a smooth, clean and flat ground. Make sure there is no sharp objects nearby. Keep away from water and heat sources.
- Keep your hands away from all moving parts. Do not put your hands and feet in the gap under the running belt.
- This product is only for one person at run time.
- Make sure screws and bolts are tightened after assembly
- Please use the accessories provided by the original factory , Rigorous private replacement.
- This product is HC grade, with a maximum weight of 264.5 lbs.
- There should be at least a 39.3X78.7 inch safe area behind the treadmill when in use
ASSEMBLY INSTRUCTION
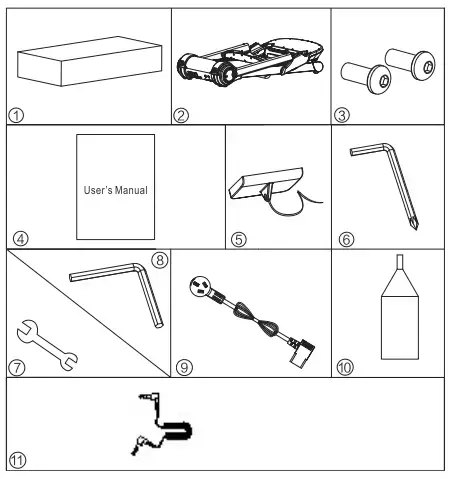
Spare Parts List
| No | Item Name | specification | Qty |
| 1 | Whole Carton Box | 1640*815*315mm | 1 |
| 2 | Treadmill | 1 | |
| 3 | Hex socket button head screws | M8”20 Full Teeth | 2 |
| 4 | User’s manual | 1 | |
| 5 | Safety Key | 1 | |
| 6 | 5#hex wrench | 1 | |
| 7 | open-ended wrench 13# 16# | 1 | |
| 8 | 6# hex wrench | 1 | |
| 9 | Power Cable | 1 | |
| 10 | Silicone oil | 30mI | 2 |
| 11 | Mp3 connection line | / | 1 |
| 12 | / | / | 1 |
Assembly Tools:
5#hex wrench Notice: Please do not make it in power before finishing installment
ASSEMBLY STEPS
Step 1:First screw the left and right knobs of the column to the unlocked positions, then put the electronic watch match the riser like @ . as shown in the figure 1.
Step 2: Make the riser and electronic watch totally matched like 3. Please do not fold the cable inside the riser as shown in the figure 2.
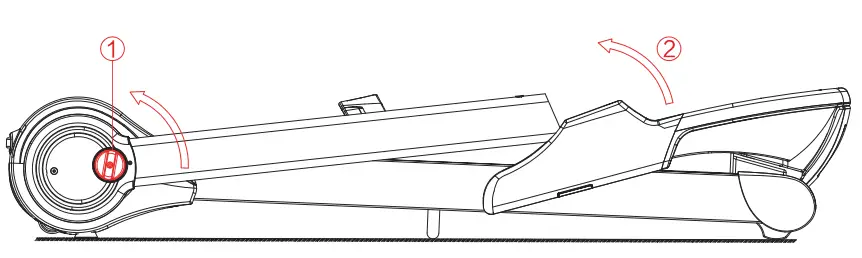
Step 3: Use a 5# hex wrench and M8*20 flat-head screws to securely lock the electronic watch as shown in the figure 3
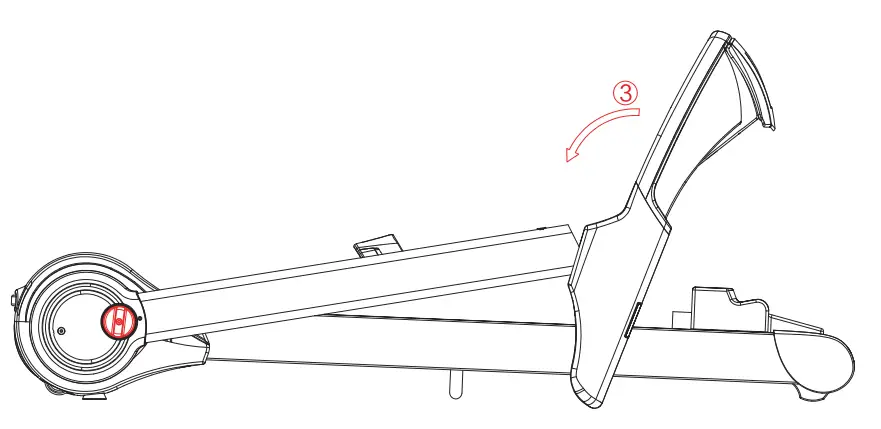
Step 4: When locked the electronic watch, Put up the left and right riser to the limit position. Then we can twist the knobs to lock the treadmill.
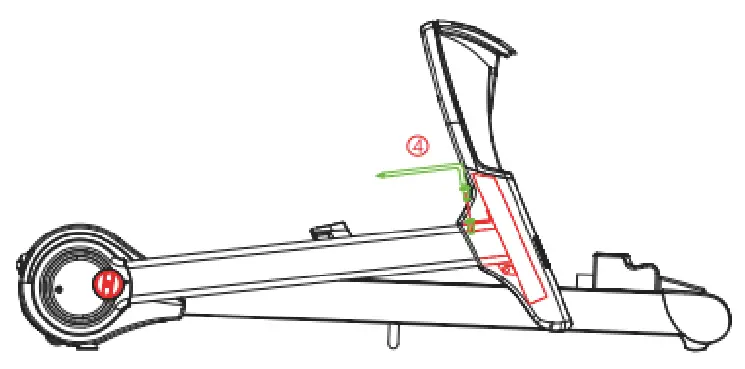
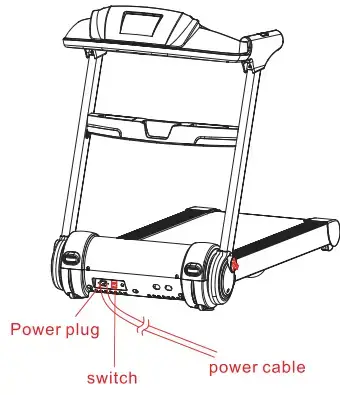
Step 5: After all the steps above, Please insert the power cable in socket, and open the power switch. Then the treadmill’s electric watch will light,
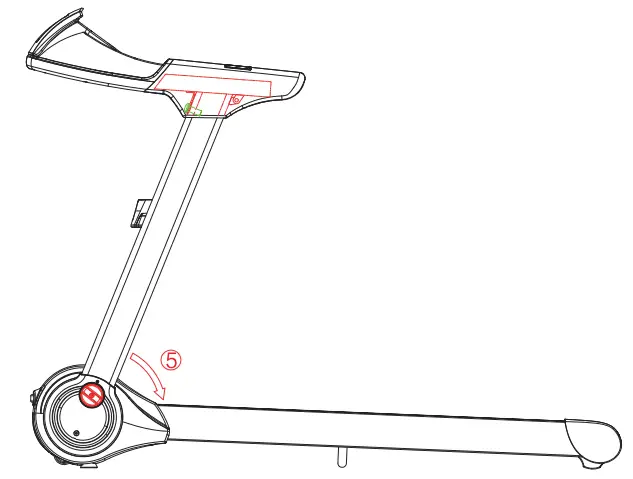
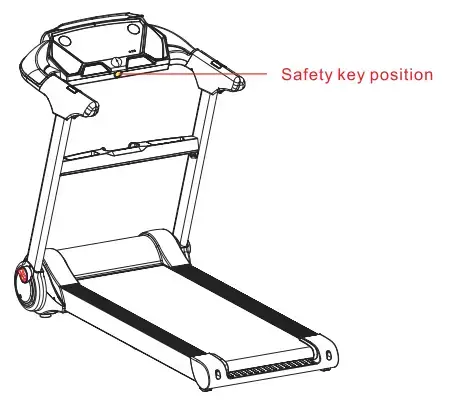
Step 6: Put on the safety key on yellow position,Then we can use the treadmill.
Please note: Confirm that all operations are completed as described above turn on the power before. Please refer to the following instructions for the operation of the treadmill.
Technical parameter
| Carton Box size(inch) | 64 5 32 12 +4 | Voltage | AC-110V 60Hz |
| Product Size(inch) | 60.4 29.8*46.7 | Peak Motor Power | 2.25HP |
| Running Area(inch) | 16.5 47.6 | Speed Range | 0.62-8.7 mph |
| Net Weight | 105.81bs | Max User Weight | 264.51bs |
| Display | Speed/Time/Distance/Calorie/Heart Rate/Step | ||
Our Company reserves the right to make technical improvements. Subject to change without notice.
Grounding instructions
This product must be grounded. In the event of a fault or damage, grounding provides an optimal way to shunt current to reduce the risk of electric shock. This product is equipped with a power cord, a grounding conductor, and a grounding plug. The plug must be connected to the correct power outlet and the installation and grounding must be consistent with the parameters of the user’s area of use.
Warning: Incorrect connection of the grounding conductor can result in electric shock. If you are unable to confirm that the product is properly grounded, please arrange for a qualified electrician or after-sales personnel to check. If the plug does not match the outlet, do not modify the plug yourself. Choose a correct outlet and have a qualified electrician install it.
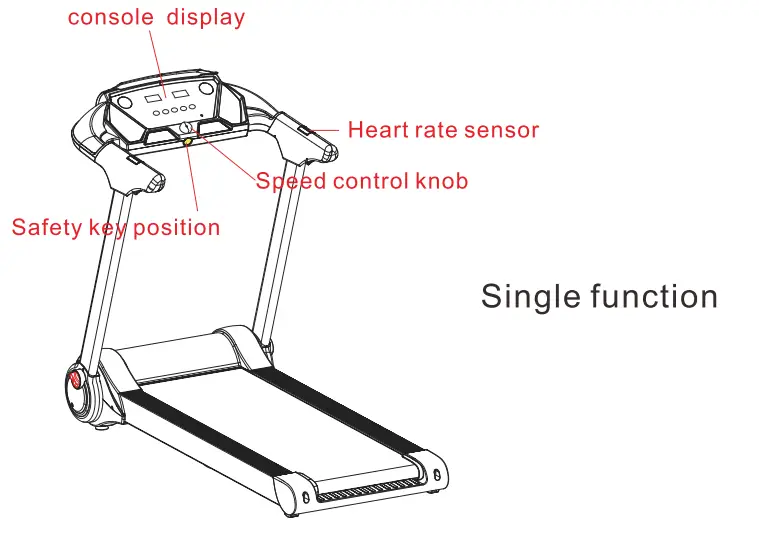
Digital Tube Windows Display Instructions
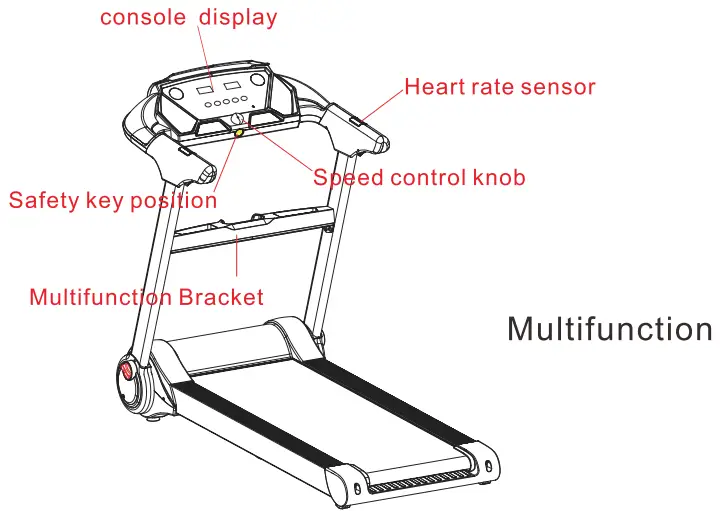
Windows and Keys Instructions:
- “TIME” “STEP SPEED” window: Displays time/step/speed values
- “DISTANCE” “HEART RATE CALORIES” window: Displays distance/heart rate/calorie values. When something is wrong, this window will display the corresponding error prompt code.
- “START/STOP”: START/ST0P keys, START the treadmill in stopping state, STOP the treadmill in running state.
- Speed Increment Key, In the state of stopping or measuring fat is the key of setting parameters; in the state of running is the key of speed increment;
- Speed Decrement Key, In the state of stopping or measuring fat is the key of setting parameters; in the state of running is the key of speed decrement;
- “QUICK SPEED KEY”: 3 mph and 5 mph quick speed key, in the running state of the treadmill, directly set the speed as the key to specify the value
- Speed Control Knob: Acceleration clockwise, 0.3mph per grid; deceleration by counterclockwise, 0.3mph per grid.
Startup Instructions:
Operating instructions in manual normal mode:
- Attach the safety key to the safety key position on the panel, turn on the power switch, and the buzzer will sound once. Then enter manual normal mode.
- Press the Start button. The windows display: 3333 -2222 — 1111, and each time the buzzer is sounded, the motor is started.
- The starting speed is: 0.62mph. At this time, you can press the speed +, – key, quick speed keys 3mph, Smph to adjust the speed or turn the knob to switch acceleration and deceleration.
- Heart rate test, hold the light hand grip with both hands, and have a heart rate display in heart rate window after a few seconds.
Safety Key function instructions
The safety key is composed of light touch switch, clothes clip and nylon rope. In any state, as long as the safety key is out of position, the treadmill stops running, the electronic meter keyboard is forbidden to operate. And the screen displays “E-07” with a prompt sound. After placing the security lock every time, the screen will display for w seconds, and then enter the system default working state.
MP3
It can be played by connecting the audio adapter wire with MP3 headphone jack and the audio input hole of the electronic meter.
Bluetooth Function
When connected with APP, The treadmill can be controlled by APP.
Data Display Range
| Start | Range | |
| Time (Minutes:Second) | 0:00 | 0:00—99:59 |
| Speed (mph) | 0.0 | 0.0— 8.7 |
| Step | 0 | 0-9999 |
| Distance (mile) | 0.00 | 0.00— 99.9 |
| Ca lories (KC) | 0.0 | 0.0—999 |
| Heart Rate | 0 | 50-200 |
Common failures and processing method
Please call our dealer or our after-sales service if you have any other questions
| Questions | Possible causes | Maintenance methods |
| Treadmill don’t work | Not connected | Put plug to insert socket |
| Power is not turned on | Put the power switch in position“NO” | |
| Safety lock drop | Put the safety lock in correct position | |
| Circuit signal system break | Check the controller input terminal and signal circuit | |
| The fuse blew out | Replace fuse | |
| The running belt
doesn’t run .Ruths, |
Insufficient lubrication | Add silicone oil lubricant |
| Belt is too tight | Adjust belt tightness | |
| Running belt slipped | Running belt too loose | Adjust running belt tightness |
| Running belt too tight | Adjust running belt tightness |
| Questions | Possible cause | Maintenance Methods |
| E01 | Poor communication | The signal line is not plugged it. Plug it again |
| E02 | Power assault | Power tube breakdown, replacement of electronic
control |
| E03 | Non-sensing signal | Sensing wire is not plugged in properly. Plug it
again correctly |
| E04 | Controller motor abnormal | Overload, replace controller or motor |
| E05 | Overload protect | Overload, replace controller |
| E06 | System self-check failed | System failure, replace controller |
| E07 | Safety lock drop | Put the safety lock in correct position |
| abnormal
display |
External disturbance | Turn off power switch. Turn on it after one minute |
Sports advice and guidelines
warm-up exercise
warm up for 5-10mins before each operation
Breathe
Do not hold your breath during operation. Normally prepare to release action and inhale through the nose,exhale through the mouth. The breathing should be coordinated with movement. If the breathing is too rapid, the movement should be stopped immediately.
Frequency
The exercise of the same muscle should keep 48hours of rest. That is , only train the same area every other day.
Load
Determine the amount of training according to the individual physical condition, and then practice according to asymptotic load.It is normal phenomenon for muscle soreness at the beginning of training. As long as continue to practice the soreness can be eliminated.
Relax
The reductive action should be done for 5mins after practicing every time. Especially extend flabby for ministry muscle.avoid muscle long-term condensation, and keep muscle flexibility.
Diet
Do not eat at least 1 hour before training and half an hour after training to protect your digest system. Avoid drinking plenty of water to avoid increasing burden of heart and kidney.
Stretching exercise
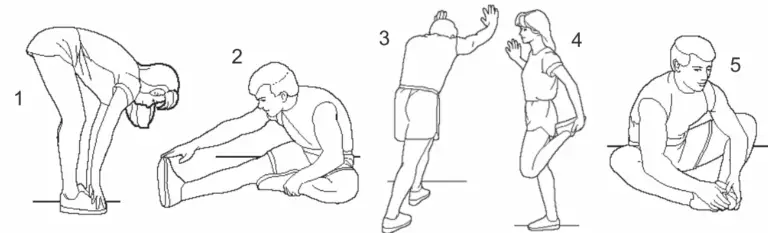
It is important to stretch before training, no matter how intense the training will be. It is easier to stretch the muscles when they are warm. warm up by running for 5 to 10 minutes and then stop and stretch as follows 5 times for 10 seconds or more on each leg. continue to stretch even after training. Do it again after you work out.

- Stretch down
Bent your knees slightly and slowly bend your body to relax your back and shoulders. And try to touch your toes with your hands. Hold for 10-15 seconds, then relax. Repeat three times (see figure 1) - Hamstring stretch
Sit on a clean seat cushion and straighten one leg. Bring the other leg in close to the inside of the leg. Try to touch your toes with your hands.Hold for 10-15 seconds, then relax. Repeat with each leg e times (see figure 2) - Stretch the calf and hamstring
Stand with two hands on a wall or tree. One foot is behind. Keep your hind legs straight and on your heels, leaning against a wall or tree. Hold for 10-15 seconds. And then relax. Repeat 3 times for each leg.(see figure 3) - Quadriceps stretch
Keep balance with left hand to hold the wall or table. Then extend your right hand backward. Hold your right ankle and slowly pulling toward your hips until you feel tension in front of your thighs muscles. Hold for 10-15 seconds, then relax. Repeat 3 times with each leg (see figure 4) - Sartorius muscle (muscle of the inner thigh) stretch
Sit with your feet facing each other and knees facing out. Grab both feet with both hands and put toward the groin. Hold for 10-15 seconds. Then relax, repeat 3 times (see figure 5)
Product maintenance
- lubrication
The running is used for a period of time, it must be lubricated with special methy silicone oil.
Advice:- 1 hour or less per week Lubricate once every 6 months
- Less than 3 hours per week Lubricate once every 3 months
- 3-6 hours per week Lubricate once every 2 months
- More than 6 hours per week Lubricate once every 1 month
Do not lubricate too much. It is not the more lubricants the better.
Remember: Proper lubrication is an important factor in improving the life of the treadmill.
- As for the way to check if you need to add lubricant. Just grab the running belt and touch the middle of the running belt back with your hands as much as possible.You don’t need to add lubricant if you have silicone on your hand (a little damp) You have to add lubricant if the pad is dry and there is no silicone on your hand.
- the step of lubricate on the running plate (as shown right picture)
- Stop running for and fold the machine.
- Lift the running belt of the underside of the main body, Put the oil pot as far as possible into the middle of the running belt. And spray methyl silicone oil inside of the running and both sides.
- You can make use of the treadmill speed of 1km/h to evenly lubricate and step on the running belt from left to right. After a few minutes, the methyl silicone oil can be completely absorbed by the running belt
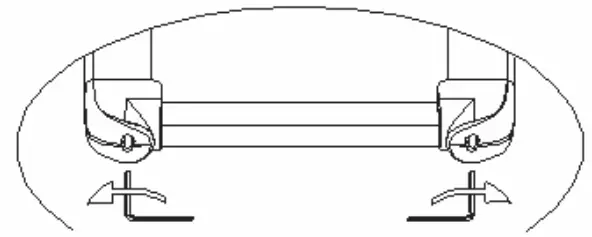
- Adjust tightness of running belt, All treadmills shall be adjusted for tightness before delivery and after installation. However, the running belt may be loosened after a period of use.
For example,The treadmill had stopping and slipping question during exercise.Adjust bolts of running belt with the left and right synchronous as per clockwise direction to half a circle as the unit when this phenomenon occurs.The feet will slip if the running belt is too loose.
But it is not good to be too tight. It is easy to increase the load of the motor and damage the motor,running belt and roller etc. - Running belt deviation adjustment
All treadmills need to be adjusted the running belt before delivery and after installation.But the running belt may be deviated after a period of use which may be caused by the following reasons.- The main body is not placed smoothly.
- The feet of users are not in the center of the running belt.
- The feet of users are uneven force
It will be returned to normal after a few minutes of no-load rotation if deviation is caused by man-made.It should be adjusted with 6mm wrench at a half circle as the unit for deviation of non•recover automatically

Please adjust left bolt with clockwise or right bolt with counterclockwise if running belt is left deviation.
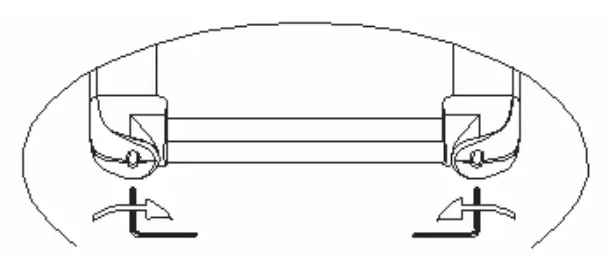
Please adjust right bolt with clockwise or left bolt with counterclockwise if running belt is right deviation.
The running belt deviation is not within the scope of warranty. And it is mainly maintained by the user according to the manual. Running belt deviation will seriously damage the running belt. The mistake must be found in time and corrected.
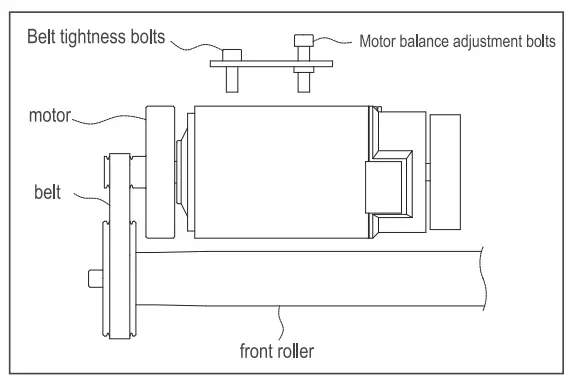
- Adjustment of motor belt (as shown in the right picture)
All treadmills have been adjusted for the motor belt before and after installation, but they may still be out after a period of use. Now the phenomenon of loose slip, mainly by the user to adjust.
Adjustment steps:- Adjust the parallelism of the motor with a wrench Turn the bolt half a turn counterclockwise.
- Turn the belt tightening bolts clockwise Half a circle.
NOTE: clean belt and pulley grooves regularly.
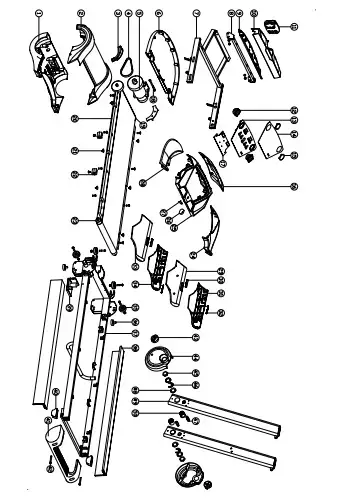
Explosion Diagram
Explosion Diagram Chart
| No. | Name | Quantity |
| 1 | Upper Cover | 1 |
| 2 | Bottom Cover | 1 |
| 3 | Riser Bottom Case | 2 |
| 4 | Running Belt | 1 |
| 5 | Motor | 1 |
| 6 | Electric Watch Bottom Case | 1 |
| 7 | Electric Watch Welding Parts | 1 |
| 8 | Shelf Welding Parts | 1 |
| 9 | Shelf Lower Case | 1 |
| 10 | Shelf Upper Case | 1 |
| 11 | Vibration Plate | 1 |
| 12 | Speaker | 2 |
| 13 | Digital Tube PCB fixed frame | 1 |
| 14 | Digital Tube sticker | 1 |
| 15 | Speaker Net | 2 |
| 16 | Electronic watch hood | 1 |
| 17 | Digital tube PCB board | 1 |
| 18 | Hexagon bolt set | 1 |
| 19 | Front Roller | 1 |
| 20 | Running Board | 1 |
| 21 | Edge Strip Group | 6 |
| 22 | Diamond Cushion | 4 |
| 23 | Rear Wheel | 1 |
| 24 | Right Separation Cover | 1 |
| 25 | Electronic Watch Upper
Case |
1 |
| 26 | Adjustable Knob | 1 |
| 27 | Safety Key Iron Piece | 1 |
| 28 | Left Separation Cover | 1 |
| 29 | Right handle inner cover | 1 |
| 30 | Inner medial heartbeat Sensor | 2 |
| 31 | Right handle outer cover | 1 |
| 32 | outer medial heartbeat Sensor | 2 |
| 33 | Lefthandleouter cover | 1 |
| 34 | Lefthandleinnercover | 1 |
| 35 | Moving wheel set | 4 |
| 36 | Adjustable Footpad | 2 |
| 37 | Main frame welding Parts | 1 |
| 38 | Edging Strip | 2 |
| 39 | Bottom Controller | 1 |
| 40 | Rear Footpad | 2 |
| 41 | Rear tail cover | 1 |
| 42 | Rear Roller Adjustable Screw | 2 |
| 43 | Knob | 2 |
| 44 | Riser Lower Cover | 2 |
| 45 | Hex thin nut | 2 |
| 46 | E-shaped gasket | 2 |
| 47 | Foldable Screw Bolt | 2 |
| 48 | Bumping Gasket | 2 |
| 49 | Riser | 2 |
| 50 | Riser Support Rubber Sleeve | 2 |
Gymax App Instruction Manual
This document is applicable to the Android version and iOS version of the official APP of Gymax.
iOS: Search Gymax in App Store to download
Android: search and download from Google Play store
Functions Overview
Gymax App iOS/Android with Gymax platform provides users the control of sports intelligent device, sports data recording, sports mall, dynamic sharing in community, system Settings and other functions.
The Main functions
- Sign In
- Sports Scenes
- Sports Mall
- Community Dynamic
- Settings
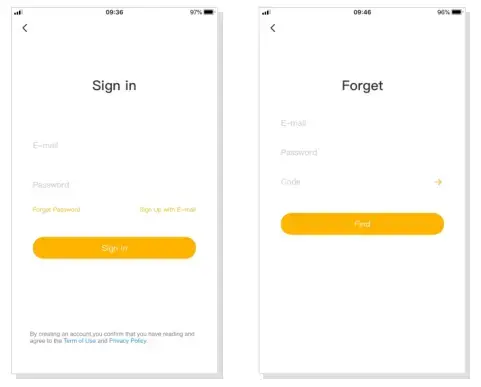
Sign in Process
Sign in
For the convenience of users, Gymax provides three login methods: Facebook and E-mail, and iOS users can also Sign in with Apple.Users can quickly sign in to the Gymax App and use it.
Retrieve Password
If E-mail users forget Passwords, users can click “Forget Password” on the mailbox login interface to jump to the Password retrieval interface, and then reset Passwords.

Edit Information
In the personal information interface, clicking the avatar, users can edit the avatar and upload the avatar by choosing album or camera.
Sports Scenes
Connecting services
On the home page, users can freely choose the device type to connect. After connecting successfully , users then start the device page, such as the “Treadmill” interface.

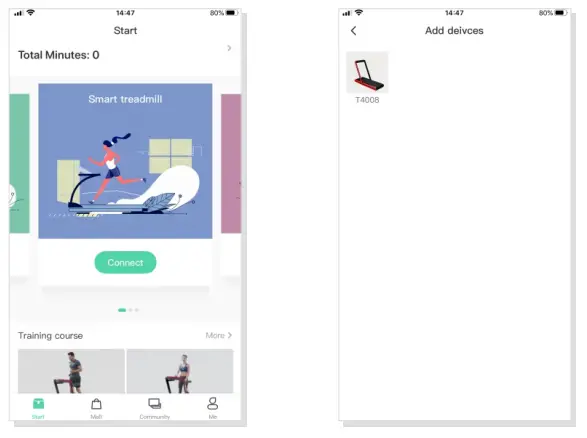
Starting exercises
Selecting the device page, such as “Start” on the “Treadmill” interface, users enter the running free, as shown below:
- Waiting for GyMax to automatically connect to the treadmill.

- When the connection status sign
 is lit, it means that the APP has successfully connected to the treadmill. Users click
  ,then the treadmill start Running and enter the countdown. 3.2.1 GO

- The Gymax App synchronizes exercise data, such as mileage, duration, calories, and speed, as users run on the treadmill, and users can start or stop, accelerate or decelerate the treadmill, which intuitively shows users’ current sports ranking and the number of online sports in real time.

- When users finish the exercise, the Gymax App will show users’ total mileage.

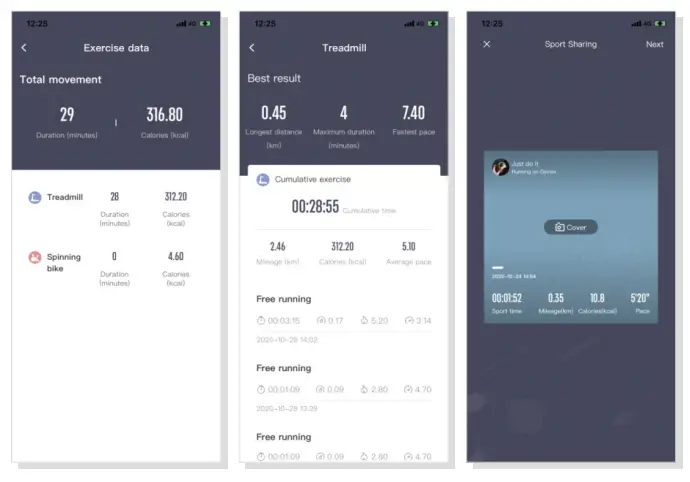
- Users can share the sports data to the community or save it to the phone album.


Sports Plan
Users can click “Add More Training Plans” to Add users’ own sports plans.

Setting Goals
- Users can set suitable sports goals

- . When the goal is reached, the exercise automatically ends.

Training Course
- Users can select courses in the interface of training course.

- And then Start training with a fitness coach

Exercise Record
The user can view the Exercise data record in the device page. (me-exercise data)

Sports Mall
Users can purchase satisfied sports devices.
Community Dynamic
- In sports community, users can share dynamic communication with each other.

- Users can comment

- Users can post dynamics in community. dynamics.

- Users can remove the released dynamics in Me-My Dynamic.

Settings
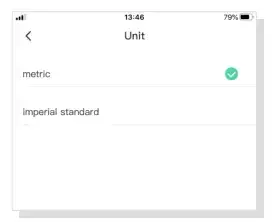
System Settings
Users can click “Me” to enter the set up, including unit, feedback, terms of agreement, privacy agreement and clear cache, etc.

Unit settings ( metric or imperial standard)

Clear Cache
Users can clean up the system cache according to users’ needs, including Gymax App H5 web page load cache and image load cache.
Feedback
Users can submit suggestions and the problem for improving the product.

Welcome to visit our website and purchase our quality products!
With your inspiring rating, COSTWAY will be more consistent to offer you
EASY SHOPPING EXPERIENCE, GOOD PRODUCTS and EFFICIENT SERVICE!
US office: Fontana, California
UK office: Ipswich
- Reward Points
- Exclusive Customer Service
- Personalized Recommendations
- Permanent Shopping Cart
- Order History

We would like to extend our heartfelt thanks to all of our customers for taking time to assemble this product and giving us valuable feedbacks.
THIS INSTRUCTION BOOKLET CONTAINS IMPORTANT SAFETY INFORMATION. PLEASE READ AND KEEP FOR FUTURE REFERENCE.
THIS INSTRUCTION BOOKLET CONTAINS IMPORTANT SAFETY INFORMATION. PLEASE READ AND KEEP FOR FUTURE REFERENCE.
Please give us a chance to make it right and do better! Contact our friendly customer service department for help first. Replacements for missing or damaged parts will be shipped ASAP!
Follow Costway