SAFETY INSTRUCTIONS
IMPORTANT!
- Carefully read the instructions before operating the unit. This appliance is for indoor use only.
- Rating: This unit must only be connected to a 120 V / 60 Hz earthed outlet.
- Installation must be in accordance with the regulations of the country where the unit is used.
- If you are in any doubt about the suitability of your electrical appliance, have it checked and, if necessary, modified by a qualified electrician.
- This air cooler has been tested and is safe to use. However, as with any electrical appliance – use it with care.
- Disconnect the appliance from the power socket before changing filters, dismantling, assembling or cleaning.
- Avoid touching any moving parts within the appliance.
- Never insert fingers, pencils or any other objects through the guard.
- This appliance is not intended for use by persons (including children) with reduced physical, sensory or mental capabilities. It is also not intended for use by those with a lack of experience and knowledge unless they have been given supervision or instruction concerning the use of the appliance by a person responsible for their safety. Do not leave children unsupervised with this appliance.
- Do not clean the unit by spraying it or immersing it in water.
- Do not operate the appliance with wet hands.
- Never connect the unit to an electrical outlet using an extension cord. If an outlet is not available, one should be installed by a qualified electrician.
- Never operate this appliance if the cord or plug is damaged. Ensure the power cord is not stretched or exposed to sharp objects/edges.
- A damaged supply cord should be replaced by the manufacturer or a qualified electrician in order to avoid a hazard.
- Any service other than a regular cleaning or filter replacement should be performed by an authorized service representative. Failure to comply will void the warranty.
- Do not use the appliance for any purpose other than its intended use.
- Never use the mains plug as a switch to start and stop the air cooler. Use the provided ON/OFF button located on the control panel.
- Always place the unit on a dry and stable surface. Do not move or tilt the unit when the water tanks are full.
- The appliance should not be installed in laundry or wet rooms.
- Do not use this unit in environments with flammable or explosive gases.
- Avoid keeping the unit in direct sunlight for a long period of time.
Energy Saving and Unit Safety Protection Tips
- Do not cover or restrict the airflow from the outlet or inlet grills.
- For maximum performance, the distance between the unit and a wall or objects should be at least 50cm (20 inches).
- While in operation, ensure that the level of the water tank does not exceed MAX and does not fall below MIN.
- Keep the filters clean. Under normal conditions, filters should only need cleaning once every three weeks (approximately). Since the filters remove airborne particles, more frequent cleaning may be necessary, depending on the air quality.
- In order to achieve maximum efficiency, the unit should be placed near an open door or window. Evaporative Air Coolers work with an evaporative cooling mechanism that requires cross ventilation.
- This unit will lose efficiency if the relative humidity within the room exceeds 60%.
- The ambient operating temperature range is from 5°C to 40°C. If used in low temperatures (as a humidifier) it is recommended to fill the water tank with warm (but not hot) water.
FEATURES
- Air Cooler with a 12-liter tank.
- Air Cooler, Humidifier, and Air Cleaner with ionizer for improved air quality.
- Slim design takes minimal space.
- The evaporative cooler is an economical solution saving energy with no need for venting.
- Ideal for rooms and spaces which cannot be sealed or traditionally air-conditioned.
- 3 fan speeds: Low, Medium, and High, allowing selection between maximum cooling and quiet operation.
- Oscillation setting for improved air distribution.
- Directional louvers allow spot cooling.
- Honeycomb Filter for improved cooling performance and air cleaning.
- Easy to use digital control panel and intelligent remote.
- Handle and wheels for great mobility.
- Powerful air throw with an auto-swing for faster cooling.
- Easy to fill tank and icebox.
- Pump protection.
SPECIFICATIONS
- Airflow: 350 m3/h
- Water tank: 12 Litres
- 3 speed fan: Low / Medium / High
- 7.5 hour timer
- High-efficiency honeycomb cooling pads
- Remote Control
- Oscillation
OPERATION
The air cooler cools the air by means of evaporation. When water evaporates into the air, the result is a mixture of air and water molecules. This chemical change requires heat which is taken from the water molecules, resulting in a spot cooling effect. 
The recommended relative humidity for optimum operation is 60% or lower. A drier climate makes for more noticeable cooling. The evaporative air cooler should not be used in enclosed or sealed spaces. It must be kept level and there must be water in the tank. Doors and windows should be open.. to allow free air flow. The evaporative air cooler works best when placed near an open window air current. The evaporative air cooler can also be used to humidify dry environments (during cool weather). To be used for humidification the windows and doors should be closed to allow the humidified air to accumulate. The evaporative air cooler is not an air conditioner as it does not use a compressor or refrigerant. It should not be expected to cool as effectively as a refrigerated air conditioner. When the product is used for the first time, the Honeycomb cooling media will have an odor, this should dissipate within a week of use. 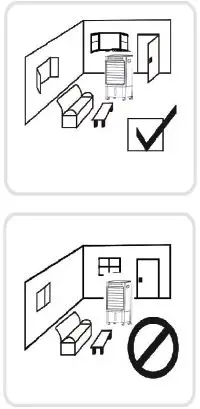
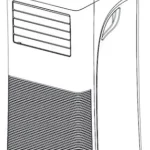
PARTS LIST
Please Note: Both water tanks are part of the main unit, and are not removable.
INSTALLATION
This unit can easily be moved from one room to another. While moving the unit please note that it must always be kept upright and then placed on an even surface.
- Remove all packaging while keeping the air cooler in a vertical position.
- Make sure that all parts are present and that the unit is assembled correctly-including the castor wheels (these need to be pushed into place on the base of the unit)
- Water tank: Fill the top water tank with water ensuring that the water tank does not to go above the MAX level visible on the front of the unit.
- When Cooling/humidifying, the water level must not be lower than the MIN water line.
- If you want to increase the cooling effect, you can put ice or the ice packs into the either water tank, but be sure that by adding ice or ice packs the water level does not go over the MAX limit. Empty some water if necessary via the drain pipe on the back of the unit.
- Make sure that the filter pad is properly inserted into the back of the unit.
- Connect the power plug to a working socket, and then press the power button.
Please note: When the unit is plugged in, the appliance will go through a diagnostic process to ensure it is ready for operation. When this operation is performed, the lights on the front will flash.
ICEBOX
The icebox can absorb the heat in the water, which in turn can lower the temperature of the water tank. This can make the air flow cooler.
- Remove the icebox and put it in the freezer until it is totally frozen.
- Put the frozen icebox into the top water tank.
CONTROL PANEL AND SETTINGS
CONTROL PANEL 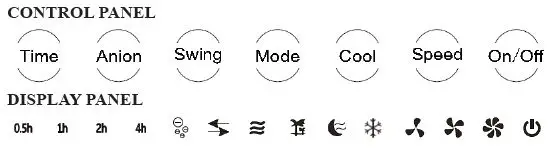
- POWER button: After connecting the power cord the air cooler is in standby mode. Press the ON/OFF button to turn the air cooler on or off.
- SPEED button: Press the SPEED button to cycle through the fan speeds. The currently selected fan Speed will be illuminated on the display.
- MODE button: Press this button to change between the three airflow styles. Standard: The fan will blow at maximum speed.
- Breeze: The fan speed will fluctuate to imitate a natural breeze.
- Sleep: The fan speed will decrease by one level per half hour and then continue to run at Low speed.
- TIMER button: The timer can be used as a shutdown with a duration between 1 hour and 7 hours. Repeatedly press the TIMER button to select the duration of the timer. The duration is calculated by adding up the lights illuminated. So if 1H, 2H and 4H are all lit then 7 hours is selected. If the timer lights are off, the timer is not activated.
Please note: These are single use timers, and cannot be combined or automatically repeated. - ANION button: Press the ANION button to activate the ionizer. Press the button again to turn the ionizer off. When activated the ANION button will illuminate on the display.COOL button: Press the COOL button to turn on the Humidifying function, which cools the air. Press the button again to turn it off. When the COOL function is turned off, the Air Cooler will operate as a fan, and the water will not be used to cool the air.
- SWING button: Press the SWING button to turn the oscillation function of the air outlet on or off. The swing indicator will be illuminated when the function is activated. The vertical direction of the airflow can be manually adjusted.
REMOTE CONTROL
The remote allows the same functions to be controlled as the main control panel on the air cooler. 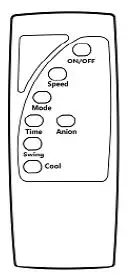
- Open the remote controller rear cover and install two AAA battery
- The buttons have the same function as the main control panel
- The remote has an effective control distance of 6 meters.
CLEANING AND MAINTENANCE
ATTENTION: Please shut off the unit and unplug from the mains before cleaning or performing any maintenance.
CLEANING THE SURFACE
Clean the plastic housing with a duster or a soft wet cloth. Do not use chemical solvents (such as benzene, alcohol or gasoline) as they may cause irreversible damage. Make sure no water enters the control panel.
CLEANING THE WATER TANK
Unplug the power cord and remove the honeycomb filter bracket. With a cloth (dipped in a mild detergent), wipe the water tank. Before using the unit, the tank should be rinsed by filling the tank and allowing it to drain through the drain port. Draining the water reservoir and refilling it with fresh water at least once a week will help reduce any mineral deposits and keep the filters clean. Do not run the unit in Humidify mode with stale water in the tank. We recommend emptying the tank and refilling it with fresh water if water has been standing in the tank for an extended period of time.
MAINTAINING AND CHANGING THE HONEYCOMB FILTER PADS
The appliance is supplied with Honeycomb cooling/filters pads. The cleaning frequency for the Honeycomb filter depends on local air and water conditions. In areas where the mineral content of water is high (hard water), mineral deposits may build up on the honeycomb cooling filter and restrict airflow. If mineral deposits remain on the Honeycomb pads, the filter should be removed and washed under fresh water. For a deeper clean a mild detergent should be used with a soft brush. Once cleaned the filter should be rinsed in clean water before leaving to dry. We recommend cleaning the honeycomb filter at least every two months, depending on your needs. For best results, allow the honeycomb filter to dry after each use by turning off the COOL function and running the unit as a fan for 15 minutes before turning the unit off.
END OF SEASON MAINTENANCE
- Empty the tank and clean it following the instructions above.
- Clean the Honeycomb pad.
- Store the Ice pack in the water tank.
- Cover the unit and keep it in a dry place.
TROUBLESHOOTING
Do not repair or disassemble the unit by yourself, unauthorized repair attempts will invalidate the warranty and may cause bodily harm.
| Issue | Possible Reason | Possible Reason |
| No power | 1. Power cord is unconnected
2. Honeycomb filter support is not installed correctly 3. The master switch is not turned on. 4. The power key is not pressed. |
1. Connect the power cord
2. Install the honeycomb filter correctly. 3. Turn on the master switch 4. Press the power key. |
| No dust elimination | 1. The honeycomb filter is
blocked. 2. The air inlet is blocked |
1. Remove the honeycomb
filter and clean it. 2. Remove the obstruction |
| Odour emission from unit | 1. New unit. When the unit is used for the first time, the Honeycomb cooling media will have an odour, which will dissipate within a week of use
2. Honeycomb filter may have developed mould or bacterial growth. |
1. No action required
2. Clean the filter pads with mild antibacterial solution. Dry before use. |
If the above solutions do not resolve the problem please contact the service center.
Disposal: Do not dispose of this product as unsorted waste. Collection of such waste must be handled separately as special treatment is necessary. Recycling facilities are now available for all customers at which you can deposit your old electrical products. Customers will be able to take any old electrical equipment to participate civic amenity sites run by their local councils. Please remember that this equipment will be further handled during the recycling process, so please be considerate when depositing your equipment. Please contact the local council for details of your local household waste recycling center.
TECHNICAL DATA
Model Number: ES10012US-WH
| Description | Symbol | Value | Unit |
| Water Tank | 12 | Litres | |
| Voltage | 120 | V | |
| Frequency | 60 | Hz | |
| Maximum fan flow rate | F | 3.6 | m3/min |
| Power | P | 65 | W |
| Standby Power Consumption | PSB | <0.3 | W |
| Fan sound power level | LWA | ≦56.6 | dB(A) |
| Maximum air velocity | c | 5.6 | Meters/sec |
| Size (LxWxH) | 11.4 x 11 x 27 | Inch | |
| Net weight | 11.7 | lbs | |