CREATE IKOHS Electric Towel Rack
WELCOME
Thank you for choosing our towel rack. Before using the appliance, carefully read these instructions to ensure it Is used correctly. The safety precautions enclosed will reduce the risk of death, Injury and electrical shock when correctly followed. Keep the manual In a safe place for future reference, along with the completed warranty card, purchase receipt and package. If applicable, pass these instructions on to the next owner of the appliance. Always follow basic safety precautions and accident prevention measures when using an electrical appliance. We assume no liability for customers failing to comply with these requirements.
SAFETY INSTRUCTIONS
When using any electrical appliance, basic safety precautions should always be observed.
- During the whole process of installing the appliance, please do not knock the glass and please handle with care during the installation.
- WARNING:
The heater must not be used if the glass panels are damaged. - The appliance must not be located immediately below a socket outlet.
- It is forbidden to cover the glass surface of the appliance with articles such as a towel or clothes.
- In normal working status, please do not touch the glass surface of the appliance.
- Always unplug heater when not in use.
- Choose the Installation position of the product according to the requirement, and the appliance shall be kept away from burning or explosive articles.
- If you are going to use the appliance in the bathroom, the appliance must be connected to a waterproof socket which must be installed where the people in the bath tank or the people in bathing area could not reach it.
- If the supply cord of this appliance Is damaged, It must only be replaced by a repair shop appointed by the manufac turer or its agent, as special purpose tools are required.
- This appliance is not intended for use by persons (including children) with reduced physical, sensory or mental capabilities, or lack of experience and knowledge, unless they have been given supervision or Instruction concerning use of appliance by a person responsible for their safety.
- Children should be supervised to ensure that they do not play with the appliance.
- Joists, beams and rafters shall not be cut or notched to Install the appliance.
- The fixed wire must be in accordance with the wiring rules, having a contact separation in all poles that provide full disconnection under overvoltage category 111 conditions.
- Children under 3 years old should be kept away unless continuously supervised.
- Children aged from 3 years old and under 8 years old shall only switch on/off the appliance provided that It has been placed or installed in its intended normal operating position and they have been given supervision or instruction concerning use of the appliance in a safe way and understand the hazards involved. Children aged from 3 years old and under 8 years old shall not plug in, regulate and clean the appliance or perform user maintenance.
- CAUTION:
Some parts of this product can become very hot and cause burns. Particular attention has to be given where children and vulnerable people are present. - This appliance can be used by children aged from 8 years old and above and persons with reduced physical,sensory or mental capabilities or lack of experience and knowledge If they have been given supervision or Instruction concerning use of the appliance in a safe way and understand the ha.zards involved. Children shall not play with the appliance. Cleaning and user maintenance shall not be made by children without supervision
- This product applies various safety protection measures. Since it has overheat protection device, when the appliance exceeds the range of normal working temperature because of the cover of external things, the built-In temperature sensing device will stop the working of the appliance, to avoid any danger.
- WARNING:
This appliance Is for household Indoor use only. In order to avoid overheating, do not cover the heater.
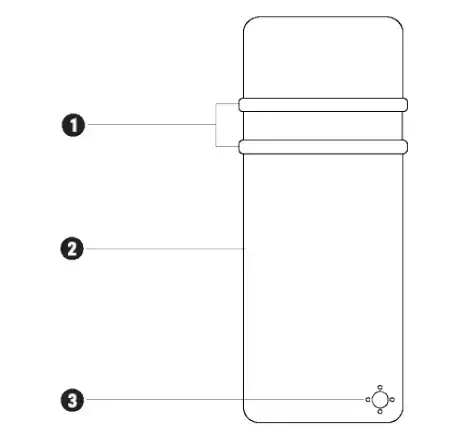
PARTS LIST
- Tower hanger
- Front panel
- control panel
INSTALLATION INSTRUCTIONS
- PROCEDURE 1: Before installing the appliance, make a mark of installation position on the wall (the wall needs to endure the weight of the appliance). When making the marks, they need to be parallel with the ground. Then drill four holes with bore of 10 mm and depth not smaller than 60 mm, make sure the hole to be vertical with the wall, and ensure the lateral distance and vertical distance between the holes is correct.
- The distance between the holes should be as below:
- WARNING:
In order to avoid a hazard for very young children, this appliance should be installed so that the lowest heated rail is at least 600 mm above the floor. - Fix the 3 supports on the wall with the expansion screw. Please note that the fixed supports can be moved to adjust the position in order to fix the glass panel.
- PROCEDURE 2:
Firstly remove the protective film at the back of the glass, then install the glass panel onto the fixed support on the wall. Please note that you can adjust the position of the fixed support on the wall to install the glass panel. Then tight the screws on the side of each support cover. - When finishing the Installation, It shall be firstly connected to the power to test the appliance, so as to ensure that Its function Is available. The test method is as below:
- Firstly remove the protective film on the front glass surface of the appliance and press the switch on the bottom of the appliance.
- TOWEL RAILS:
Get one of the towel rails and fix on the upper wall supports wtth 2 M4.,0 screws and tight the screws. Use the same way to fix another towel rail on the lower support wtth 2 M4*1 O screws and tight the screws.
HOW TO USE THE TOWER RACK
- Turn on the heater by pressing the power button. The LED will display room temperature, then please use touch COl} trol or remote control to set power, temperature and time.
- If the appliance is not used for a long time, switch the power button off and unplug the appliance.
CONTROL PANEL
Insert the plug a suitable power socket. The touch screen buttons located on the product correspond to the remote control functions.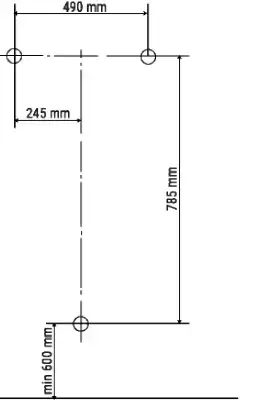
- Mode
- Temperature
- Power
- Timer
Power
When the product is on, press ·power•. The upper part of the display shows the temperature. The heater is working at low-power heating conditions.
Mode
It enters heating mode.
Temperature
Press the temperature button. The temperature can be set from 5 •c to 40 •c. Internal temperature is displayed every time the appliance is started up. The temperature can be set when the appli· ance is on stand-by or heating. When the room temperature reaches the set level, the high-temperature power stops and the low-temperature power remains active. When room temperature is two degrees over the set temperature, both the high and lower temperature powers will stop operating. The machine will begin operating again only when the temperature decreases two degrees with respect to the set temperature. 0Timer The timer button can be set to start or stop the appliance at the desired time, with a time interval between 1 and 24 hours.
OPERATION FOR REMOTE CONTROL
Insert the plug in a suitable power socket.The touch screen buttons located on the product correspond to the remote control functions.
- Power button
- Mode
- Temperature
- Timer
- Lock

child Lock
Press the child clock button for three seconds to lock the heater. After pressing the Child Lock button for three seconds again, the heater is unlocked. You can also press the mode button on the control panel for 3 seconds to lock the screen or unlock it.
APP CONNECTION
CREATE HOME application is available for Android and iOS (look for the app on Google Play or App Store or scan the QR code below). Depending on the provider, there may be costs involved in downloading the app. This appliance allows you to operate the appliance via your home network. A prerequisite is a permanent WIFi connection to your router and the free app CREATE HOME.We recommend disconnecting the appliance from the power supply when you are away from home to prevent unintentional switching on while you are away.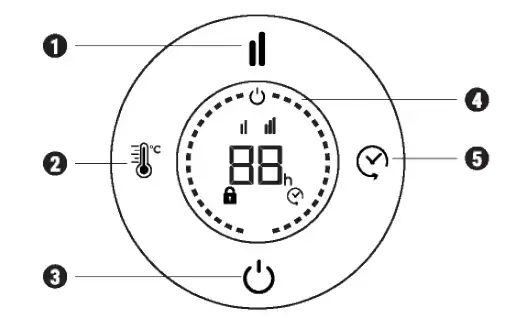
How to connect to the app
- Install the CREATE HOME app and create a user account.
- Select the time zone to enter the account and click to get the verification code.
- Enter the received verification code for verification.
- Set up a login password and log in the app.
- Click on “Add device•(+) and then on the category corresponding to the towel rack (heater).
- Click on •confirm• when the indicator light is blinking rapidly.
- Enter the password of your Wl·FI network and confirm.
- While connecting, make sure your router, mobile phone and device are as close as possible. Afterward, your towel rack will be successfully added to your CREATE HOME app.
CLEANING
- Clean the heater with a duster or a soft wet cloth. Do not use chemical solvents (such as benzene, alcohol or gasoline) as they may cause irreversible damage. Make sure no water enters the control panel or gaps in the casing.
- Do not run the unit until completely dry.
- Place the heater in its original box or cover to protect it from dust when not in use.
- Store it In a cool dry place.
Disposal
In compliance with Directives: 2012/19/EU and 2015/863/EU oo t’1e res1rlctioo of the use of dangerous substances in electric and electronic equipment as well as their wasle disposal. The symbol with the crossed dustbin shown oo the package Indicates that the product at 1he end of Its service Ille shall be collected as separate waste. The<efore, any products that have reached the end of their useful life must be given to waste disposal centers specializing In the separate collection of waste electrical and electronic equipment. or given back to the retailer at the time of purchasing new similar equipment oo a one-for-one basis. The adequate separate collection for the subsequent start·up of the equipment sent to be recycled, treated and disposed of in an environmentally compatible way contributes to preventing possible negative effects on the environment and health and optimizes the recycling and reuse of components making up the aP11aratus. Abusive disposal of the product by the user Involves the application of the administrative sanctions according to the laws.