cronusmax CRONUS ZEN User Guide
WHAT’S IN THE BOX
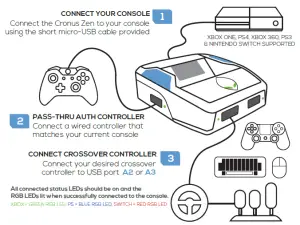
- CRONUS ZEN

- MICRO-USB CABLE SHORT

- MICRO-USB CABLE LONG

- MINI-USB CABLE LONG
visit cronusmax.com/downloads
- Download the Firmware Update Tool & update to the latest version
It is important that you complete this step first before anything else.
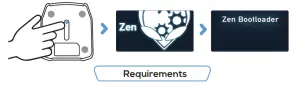
- Press and hold the Cronus Zen reset button
visit cronusmax.com/downloads Download the Firmware Update Tool & update to the latest version It is important that you complete this step first before anything else.
The OLED screen will display “Zen Bootloader” – you can now use the Firmware Update Tool.
Tip: If you get an E3001 error, hold the reset button down before plugging in the micro-USB cable.
- A wired, licensed controller that matches the console. Wireless controllers can be used with a full data USB cable (long micro USB cable provided).
- Note: XBOX 360 console support requires a fully wired X360 controller. The ‘Play and Charge Kit’ for wireless X360 controllers will not work.
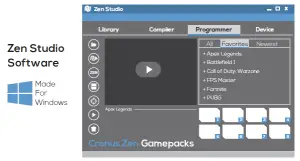
GETTING STARTED ZEN STUDIO SOFTWARE
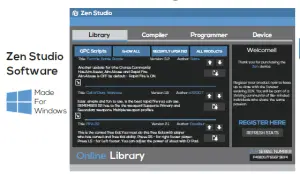
- Download & Install the Zen Studio Software for Windows.
Microsoft Windows 10 is recommended. Mac OS requires Bootcamp (See Online User Guide)
- Register Your Cronus Zen Click on “REGISTER HERE” and you will be asked to login to your Cronus Community account, or create an account if you don’t
yet have one. Get exclusive access to Zen owner areas
Troubleshooting
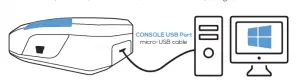
If you experience an error code because of a bad script or old firmware, unplug all cables from the Zen, hold down both the P1 and P2 buttons and then plug in the micro-USB cable to the rear CONSOLE USB port of the Zen. Wait a few seconds and the RGB LEDs will flash RED-GREEN-BLUE and the Collective Minds Gear Head logo will display on the OLED Message screen. Visit guide.cronusmax.com/help/ for more troubleshooting tips.
ENABLE SWITCH WIRED COMMUNICATION
Nintendo Switch
System Settings > Controllers & Sensors > Select: Pro Controller Wired Com.
WIRELESS CONTROLLER SETUP
- Turn on your controller.
- Hold the SYNC Button on the controller.
- Turn off your controller.
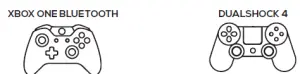
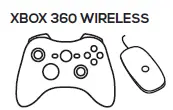
- Hold SHARE + PS until the DS4 Lightbar quickly flashes white.
Note: Only DUALSHOCK 4 model CUH-ZCT2 supports headsets and the built in speaker.

Connection instructions for these controllers available at guide.cronusmax.com.
XBOX ONE ALL MODELS

- Insert the XBOX ONE wireless adapter into USB port A3 of the Cronus Zen (adapter sold separately).
- Plug the controller into USB Port A2 of the Cronus Zen using the micro-USB cable. It will vibrate to indicate it’s connected.
- Unplug the controller from A2. The XBOX Home Button will begin to flash.
- Within a few seconds the wireless adapter’s LED will change to white and your controllers XBOX Home Button will stay solid, indicating pairing is complete.
- Your XBOX One controller is now connected to the Cronus Zen and ready to use. Tip: If the controller is not connected, make sure the the controller is unpaired from
the Xbox. Either connect the controller to a PC USB Port (this will reset the pair), or remove the batteries and repeat the above steps.
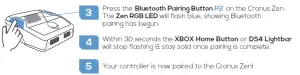
- Plug the XBOX 360 Wireless Gaming Receiver into USB Port A3 of the Cronus Zen (receiver sold separately).
- Turn on the XBOX 360 Wireless Controller.
- Hold the SYNC Button on your controller until the XBOX 360 Guide Button flashes.
- Press the SYNC Button on the XBOX 360 Wireless Gaming Receiver.
- Within a few seconds the lights on the Guide Button will stay solid, indicating pairing is complete and your controller is ready to use.
MOUSE and KEYBOARD SETUP
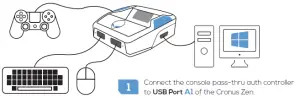
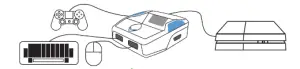
- Connect the console pass-thru auth controller to USB Port A1 of the Cronus Zen.
- Connect the Mouse and Keyboard to A2 and A3 of the Cronus Zen.
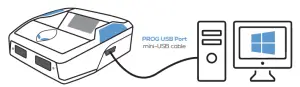
Tip: You can also use your main computer keyboard to map the keys without connecting it to Zen. - Connect the Cronus Zen to your computer using the mini-USB Cable.
- Open up the Zen Studio Software on your computer & load the M&K Settings Plugin
- Configure your Game Profile in M&K Settings and finalize the layout.
- Unplug the Cronus Zen from your PC and connect it to your console using the micro-USB cable (Remember to connect a keyboard to A2 or A3 if you didn’t in Step 2).
See online user guide for compatible devices, in-game settings & advanced instructions.
 SCRIPTS: Thousands of scripts are available in the GPC Script Library or you can write your own and share with the Cronus Community.
GO TO ZEN STUDIO > LIBRARY
 GAMEPACKS: Are pre-compiled mods designed by expert gamers, no scripting knowledge is required – we do all the hard work for you!
GO TO ZEN STUDIO > PROGRAMMER
Find Out More: guide.cronusmax.com/quick-start/gamepacks-and-scripts
FCC WARNING
This device complies with part 15 of the FCC Rules. Operation is subject to the following two conditions: (1) this device may not cause harmful interference, and (2) this device must accept any interference received, including interference that may cause undesired operation.
Any changes or modifications not expressly approved by the party responsible for compliance could void the user’s authority to operate the equipment.
NOTE: This equipment has been tested and found to comply with the limits for a Class B digital device, pursuant to Part 15 of the FCC Rules. These limits are designed to provide reasonable protection against harmful interference in a residential installation. This equipment generates, uses and can radiate radio frequency energy and, if not installed and used in accordance with the instructions, may cause harmful interference to radio communications. However, there is no guarantee that interference will not occur in a particular installation. If this equipment does cause harmful interference to radio or television reception, which can be determined by turning the equipment off and on,
the user is encouraged to try to correct the interference by one or more of the
following measures:
— Reorient or relocate the receiving antenna.
— Increase the separation between the equipment and receiver.
— Connect the equipment into an outlet on a circuit different from that to which the receiver is connected.
— Consult the dealer or an experienced radio/TV technician for help.
The device has been evaluated to meet general RF exposure requirement.
The device can be used in portable exposure condition without restriction.