

USE AND CARE GUIDE
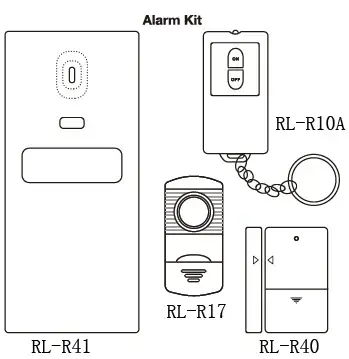
Package Contents
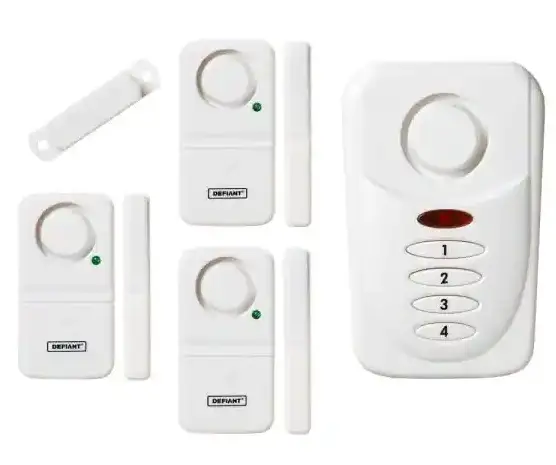
| Part | D- plian |
| A | Alann (Main Unit) x2 |
| B | Key lab (llansmllle x2 |
| C | Door/Window magnetic sensor (Transmitter] x4 |
| D | Vibration sensor (Transmitter with 3M slicker) x2 |
| E | Bracketx2 |
| F | Screw , Anchor and 3M sticker Pack x2 |
FCC Statement
WARNING: Changes or modifications to this unit not expressly approved by the party
responsible for compliance could void the user’s authority to operate the equipment
NOTE: This equipment has been tested and found to comply with the limits fora Class B digital device, pursuant to Part 15 of the FCC Rules. These limits are designed to provide reasonable protection against harmful interference in a residential installation. This equipment generates, uses and can radiate radio frequency energy and, if not installed and used in accordance with the instructions, may cause harmful interference to radio communications. However, There is no guarantee that interference will not occur in a particular installation. If this equipment does cause harmful interference to radio or television reception, which can be determined by turning the equipment off and on, the user is encouraged to try to correct the interference by one or more of the following measures:
- Reorient or relocate the receiving antenna.
- Increase the separation between the equipment and receiver.
- Connect the equipment into an outlet on a circuit different from that to which the receiverIS Connected.
- Consult the dealer or an experienced radio/TV technician for help
- The device must not be co-located or operating in conjunction with any other antenna or transmitter.
- This device complies with Part 15 of the FCC Rules. Operation is subject to the following two conditions: (1) this device may not cause harmful interference, and(2) this device must accept any interference received, including interference that may cause undesired operation.
Pre-Installation
PLANNING INSTALLATION LOCATION
- Place the alarm In an area where you want to discourage potentlal security threats.
Pairing the Transmitters to the Alarm
Preparing the alaim and transmitters
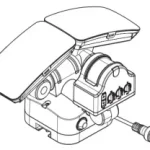
- Insert three AA batteries (not included into each Blann (A).
Remove plastic battery Insulation tab from the key lub (8), door/Window sensor (C), and vibration sensor (D). Key fob requires 1 CR2032 battery Oncluded).
90-DAY LIMITED WARRENTY
The manufacturer warrants this product to be free from manufacturing defects for a period of ninety days from the original date of consumer purchase. This warranty is imited to the repair or replacement of this product only and does not extend to consequential or incidental damage to otther products that may be used with this unit. This warranty does not cOver products which have been abused, altered or damaged. This warranty is in lieu of all other warranties express or implied. TO THE EXTENT PERMITTED BY LAW, THE MANUFACTURER DISCLAIMS ALL OTHER IMPLIED OR EXPRESS WARRANTIES, INCLUDING THE WARRANTY OF MERCHANTABILITY AND/OR FITNESS FORA PARTICULAR PURPOSE. LIMITATIONS OF LIABILITY: This limited warranty is your sole remedy and the manufacturer shall not be liable for any damages, whether direct, indirect, incidental, special, consequential, exemplary or otherwise, including lost revenue and lost profits, arising out of any theory of recover, including statutory, contract or tort. In no event will the manufacturer’s entire liability exceed the purchase price of this product. Some states and provinces do not allow the exclusion or limitations on how long an implied warranty lasts or permit the exclusion or limitations of incidental or consequential damages, so the above limitations or exclusions may not apply to you. This limited warranty gives you specific legal rights, and you may also have other rights which vary from state to state and province to province. If unit should prove defective within the warranty period, return prepaid with dated proof of purchase to the place of purchase. Contact the Customer Service Team at 1-866-308-3976 or visit www.HOMEDEPOT.COM.
Specifications
RECEIVER SPECIFICATIONS
| Working Voltage: | DC 4.5V(1.5V/AAII.Jl6″3) |
| Working Current: | s10DmA |
| Standby Cunont | s0.5mA |
| Low VOitage lndicalDr. | s3.3V |
| Alarm VOiume: | >100dB(30cm) |
| Wlreless Frequency: | 433.92MHz±250KHz |
| Infrared Detective Distance: | S6m |
| lnffflnod Alann Angle: | <100″ |
| Arm Mode Arming: | delays 30s each time |
| Alarm Mode: | Alarm once biggered |
| Alarmlime: | 30seachtime |
| Wireless Distance: | >3Dm (no banie |
TRANSMITTER SPECIFICATIONS
| Rmno!olloyFob | Door/Window
Magndc Sensar |
VlbratlonAlann | |
| WOrldng Vollago | DC 3.0V(Cll2032) | DC 3.0V(Cll2032) | 4.5 V (3x battery LR44) |
| Standby Current | <2llA | S10uA | S6uA |
| WOrldngCumont | <12mA | <15mA | RF:<15mA RF+ALARM: <100mA |
| WOrldng Froquoncy | 433.92MHz•250KHz | 433.92MHz•250KHz | 433.92MHzo250KHz |
| Warklng Dlllance | >30m (no bani• | >80m (no barrier) | BOm (no barrier) |
| A1InnYolum1
(311cm) |
– | – | >95dB |
| Time lnlllrvll or Eich Vibration | – | – | •58 |
Pairing the Transmitters to the Alarm (continued)
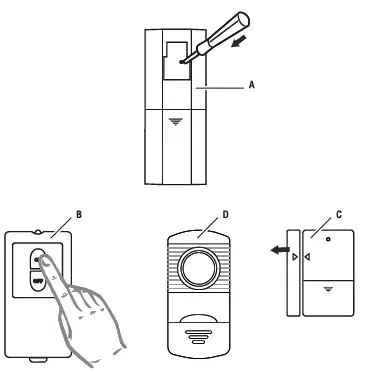
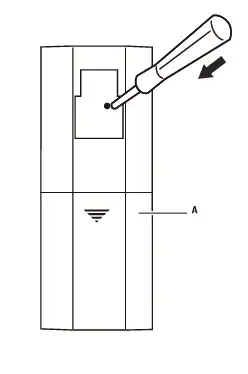
Pairing the transmitters
- Using a screwdriver, press and hold the Code button for 3 seconds on one of the alarms (A). A single beep sounds.
- Press any button on the key fob (8).
- Slide the switch on the vlbraHon Blann (D) to RF and then tap the vibration alarm to send a wireless signal to the alarm (A).
- separate the magnetic contact from the door/window sensors (C). The red indicator llghtb.irnson.
- The alann (A) beeps once to indicate the signal is received.
Pairing the Transmitters to the Alarm (continued)
Completing the pairing
- Using a scrawdrivar, press and hold the Code button on the alann (A) again. The Blann sounds two beeps.
Release the screwdriver. Palrtng Is now complete. Repeat these steps for the second alarm (A). You can add up to 32 transmitters to each alarm (A).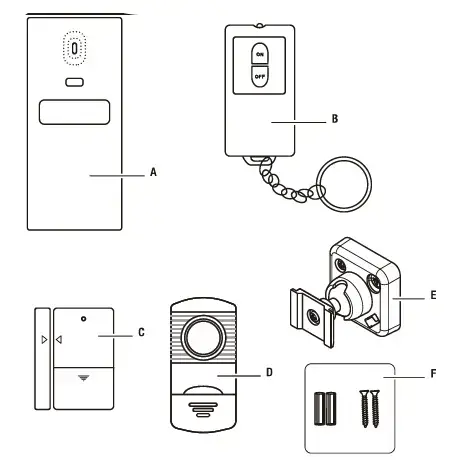
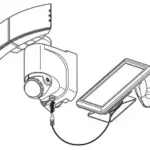
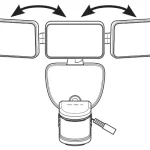
Installing the alanna
- Install the brackets (E} to the desired mounting location using the wall anchor screws(F).
Place an alarm (A) into ” ‘ bracket (E) and adjust the angle of the alarm (A) by loosening the scew in the bracket lighten the screw once the declion angle is set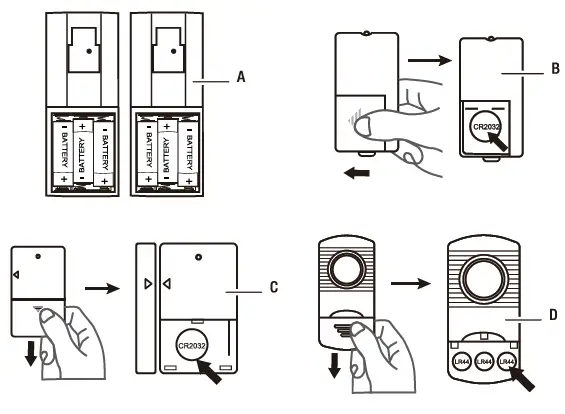
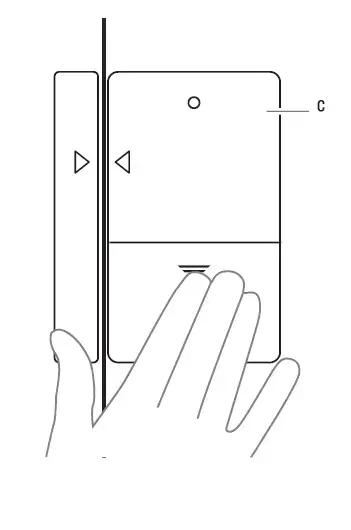
Installing the door/window magnetic sensors
- Maka sure the arrows of both the magnetic sb’ip and sensor are facing each others shown below.
- Install the door/window magnetic sensors (C) to a door or window using a 3M sticker.
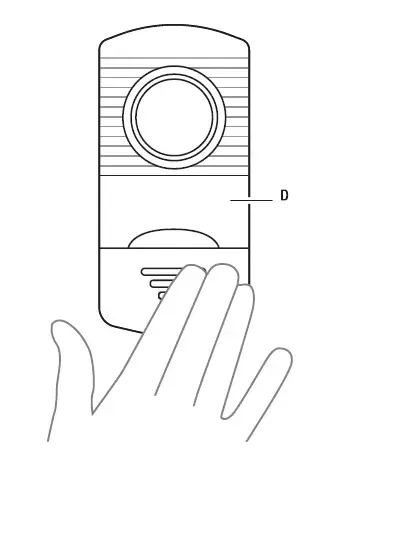
Installing the vibration sensors
- Place the 3M sticker on the back of the sensor.
- Install the vibration sensors (D) on a window using a 3M slicker.
Unpairing the Alarm
To clear codes and unpalr the Blann (transmitter) from the receivers, ensure the batteries are removed and press and hold the Code button on the Blann {A). 111en Insert the batteries. 111e alarm beeps twice to conflnn that the unpalrlng Is successful.
Troubleshooting
The alarm (receiver) false alarms.
Check if any animals are in the vicinity of the alarm. During warm weather, moving shadows may also activate the alarm. Make sure that the alarm is not positioned near a radiator or heat source. Check if any appliances within the property are emitting a strong electromagnetic field near the door/window magnetic contact. Strong electromagnetic fields may cause the door/window magnetic contact to false alarm.
The alarm (receiver) cannot receive the signal sent from the transmitter (remote key fob or door/window magnetic contact).
Check if the pairing between the transmitter and the receiver has been successful. If the pairing was successful, check the battery voltage for both the receiver and the transmitter. Low voltage will cause the product to fail.
The alarm detects movement, however, no alarm sounds.
Check if the low battery indicator is flashing (please replace batteries immediately). If the unit is armed and set in the HOME mode and the alarm detects an intrusion, the alarm will not sound. The PIR Sensor in the alarm is disabled in HOME mode. Check if the receiver is installed correctly.
Operation
Setting the Vibration Sensor
- The vibration sensor (D) has the following switch settings: off-The vibration sensor is off.
- RF-When triggered, the vibration sensor will not sound but instead sends a wireless signal to the alarm (receiver) (A).
- RF+Alarm-The vibration sensor beeps three times when turned on. When triggered, it sends a wireless signal to the alarm (receiver) and after 2 seconds the sensor sounds for 8 seconds.
- Install the vibration sensor on the upper corner to middle of the glass door or window, out of the reach of children and pets.

Using the System in AWAY Mode
- Slide the switch (1) on the key fob (B) up for AWAY mode and press ON (2).
- The alarm (receiver) beeps once. After 30 seconds, the unit enters ARM mode. The alarm sounds and flashes a light if:
- The door/window installed with the magnetic sensor (C) is opened.
- The window installed with the vibration sensor (D) is knocked.
- Someone enters the property and the alarm (A) detects the intrusion.
- To disarm the alarms press OFF (3) on the key fob (B). When the alarm (A) receives the DISARM command, it will beep twice. If it is in the ALARM status, the sound immediately turns off.
Using the System in HOME Mode
- In HOME mode, you are using the door/window magnetic sensors (C) or the vibration sensors (D). The PIR sensor in the alarm (A) is disabled in this mode. Therefore, your windows and doors are protected by magnetic sensors or vibration alarms whilst you are in the property. If a door or window is opened or knocked, the alarm will sound. To disarm the alarm press “OFF” on the remote key fob (B).
- Slide the switch (1) down on the key fob (B) to HOME mode and press ON (2). The
- alarm (receiver) beeps once. After 30 seconds, the unit enters into ARM mode. To disarm the alarm press OFF (3) on the key fob.
NOTE:The description above is only for the system with one alarm (A). If you want two alarms in the system and want them to be interlinked, they both must be paired to each other and be paired to the transmitters respectively. After, you must arm two alarms (A) with the key fob (B). Once armed, two alarms will sound if any transmitter is triggered. In the AWAY mode, no matter which alarm detects human movements, two alarms will sound.