DEFIANT DFI-0654-WH Motion Security Light User Guide
Safety Information
PRECAUTIONS
- This light fixture should be installed outdoors to a wall or eave.
- The light fixture should be mounted approximately 8 (2.4 m) above the ground.
- Do not cut the solar panel Discontinue use if the wire becomes frayed or broken.
- Do not immerse components in liquid.
- Do not use any other charging device other than the single solar charging panel provided with this Doing so may result in injury or damage to the light and voids any warranty.
- Position the cord so that it is securely fastened and will not result in a hazard (such as tripping).
- The maximum extension cord length to use with this product is 60
 NOTE: A 30 ft. extension cord is available for this product at HOMEDEPOT.COM.
 WARNING: To prevent possible SERIOUS INJURY or DEATH, never allow small children near batteries. If a battery is swallowed, immediately notify a doctor.
WARNING: DO NOT DISPOSE OF BATTERIES IN FIRE. BATTERIES MAY EXPLODE OR LEAK.
NOTICE: When replacing batteries, recycle used batteries or dispose of them in accordance with local regulations.
Warranty
1-YEAR LIMITED WARRANTY
WHAT IS COVERED
This product is guaranteed to be free of factory defective parts and workmanship for a period of 1 year from date of purchase. Purchase receipt is required for all warranty claims.
WHAT IS NOT COVERED
This guarantee does not include repair service, adjustment and calibration due to misuse, abuse or negligence. Unauthorized service or modification of the product or of any furnished component will void this warranty in its entirety. This warranty does not include reimbursement for inconvenience, installation, setup time, loss of use, unauthorized service, or return shipping charges. This warranty is not extended to other equipment and components that a customer uses in conjunction with this product.
No service parts available for this product. Contact the Customer Service Team at 1-866-308-3976 or visit www.HomeDepot.com.
Pre-Installation
| PLANNING INSTALLATION
Before installing the light fixture, ensure that all parts are present. Compare parts with the Hardware Included and Package Contents sections. If any part is missing or damaged, do not attempt to assemble, install, or operate this light fixture. Estimated installation time: 30 minutes |
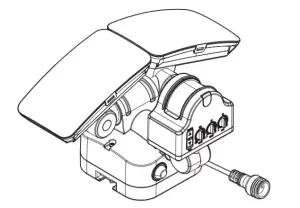
PRODUCT DESCRIPTION
This light operates from a battery charged from a solar panel. If the Lithium Ion battery voltage runs down to 3.6V, the light will automatically switch to ECO mode and dim down to reserve battery for a longer run time. When the solar panel has recharged the Lithium battery and voltage above 3.7V, the light will automatically switch back to AUTO mode, and normal brightness. |
| INITIAL BATTERY CHARGE
IMPORTANT: Clouds, rain, snow, and other weather conditions may not allow the solar panel to completely recharge the battery. Other obstructions such as buildings or trees may block the sun as well.
|
MOUNTING LOCATION
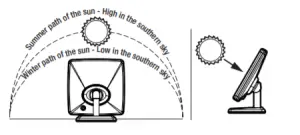
The most important thing to remember for the operation of your solar powered motion sensing light is that it works from the power received from direct sunlight. The solar panel works best when placed on the southern-facing portion, or the highest point, of a structure. The more direct sunlight the solar panel receives in a day, the longer the light will operate.
|
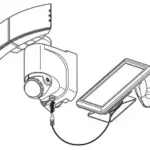
| SOLAR LIGHT FIXTURE
The main unit contains the LEDs, a motion sensor, and a rechargeable Lithium battery. When deciding where to mount this unit, keep in mind that the motion sensor that activates the light has a “field of vision” of 50 ft. (15 m) in front of the light and about 180° detection angle at a surrounding air temperature of 77°F (25°C). |

SOLAR PANEL
The solar panel converts the sun’s energy into electricity, thus charging the battery stored in the solar light fixture. The solar panel requires direct sunlight falling onto the face of the solar panel for as long as possible over the course of the day.
When choosing the location for the solar panel, make sure it is aimed toward the South and is tilted to a suitable angle to allow as much direct sunlight to fall upon it as possible. Make sure there is a minimum amount of obstructions between the solar panel and the sun. Also, make sure your solar panel location is not too far away from the solar light fixture for the wires to reach and connect.
NOTE: At high noon, adjust the solar panel so that it faces the sun. During any time of year, this adjustment will provide optimal positioning for collecting solar energy.
You can also angle the panel up by 45°, which should provide for adequate exposure.
SPECIFICATIONS
| Range | Up to 50 ft. (15 m) (Varies with surrounding temperature) |
| Sensing angle | Up to 180° |
| Lumens | Solar Power: 1000 LM |
| Power requirements | Solar panel and rechargeable Nickel-metal Hydride Batteries |
| Operating modes | Off and Auto |
| Time delay | 1 minute to 5 minutes |
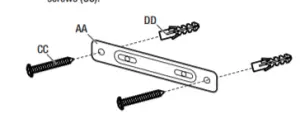
TOOLS REQUIRED
NOTE: Hardware not shown to actual size.
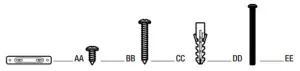
| Part | Description | Quantity |
| AA | Mounting plate | 1 |
| BB | Base screw | 1 |
| CC | Mounting screws | 6 |
| DD | Anchors | 6 |
| EE | Mounting bolts | 2 |
PACKAGE CONTENTS
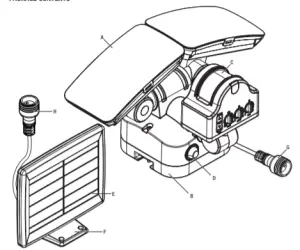
| Part | Description | Quantity |
| A | Lamp head | 2 |
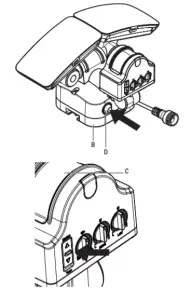
| B | Light fixture | 1 |
| C | Motion sensor | 1 |
| D | Power button | 1 |
| E | Solar panel | 1 |
| F | Solar panel cradle | 1 |
| G | Extendable cord (pre-assembled to light fixture (B)) | 1 |
| H | Extendable cord (pre-assembled to solar panel (F)) | 1 |
Installation
1 Determining the mounting location
NOTE: The light fixture should be mounted approximately 8 ft. (2.4 m) above the ground.
NOTE: Ensure the fixture and the solar panel are located close enough together for the cord to reach. You can also add on an extension cord. Ensure the solar panel faces South.
- Determine the mounting location – wall or eave mount.
- Position the lamp head (A) in the general direction of the desired light coverage.
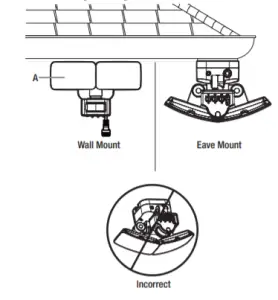
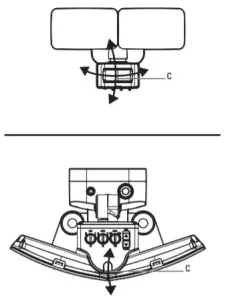
2 Setting the sensor for wall or eave mounting
NOTE: Adjust the sensor angle to a coverage desired.
- For wall mounting, tilt the sensor (C) down 10 degrees to cover up to a 50 range in front.
- For eave mounting, turn the sensor (C) either clockwise or counterclockwise to the desired
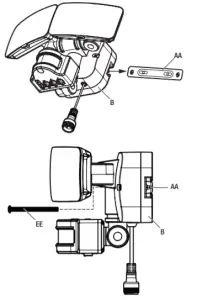
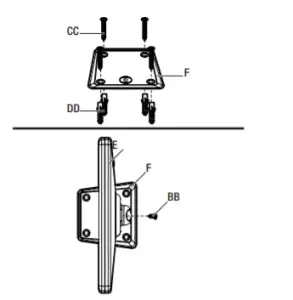
3 Installing the mounting plate
NOTE: Make sure there is enough vertical space above the mounting plate to allow the light fixture to be mounted.
Place the mounting plate (AA) against the mounting surface and ensure the mounting plate (AA) is level. Mark the hole locations on the mounting surface, through which the mounting screws (CC) will be threaded.
- If mounting to a wooden surface, drill two 3/32 holes into the mounting surface. Install the two mounting screws (CC) through the mounting plate (AA) and into the mounting surface.
- If mounting to wall board or brick, drill two 7/32 holes into the mounting surface. Insert the wall anchors (DD) and attach the mounting plate (AA) using the two mounting screws (CC).
4 Mounting the light fixture
- Slide the rear of the light fixture (B) onto the mounting plate (AA) until it snaps into
- Secure the fixture in place on the mounting plate using the mounting bolts (EE).
5 Mounting the solar panel
 RECOMMENDED: Caulk around the base and on top of the screw heads after installation
Place the solar base (F) against the mounting surface and mark the mounting holes.
- If mounting to a wooden surface, drill four 3/32 in. holes into the mounting surface. Install the four mounting screws (CC) through the solar panel base (F) and into the mounting surface.
- If mounting to wall board or brick, drill four 7/32 in. holes into the mounting surface. Insert the wall anchors (DD) and attach the solar panel base (F) using the four mounting screws (CC).
- Once the solar panel base (F) has been installed, position the solor panel (E) above it, adjusting the direction and angle of the panel to its desired position to receive optimal sunlight.
- Place the panel (E) into the base (F) and use the base screw (BB) to secure the panel (E) in place on the base (F).
6 Adjusting the solar panel
IMPORTANT: The solar panel (E) must receive as much direct sunlight over the course of the day as possible. Keep in mind that shadows may block the sunlight from reaching the solar panel (E) during the day.
- Rotate the solar panel (E) to the desired angle.

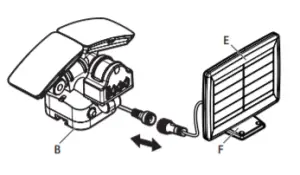
7 Connecting the solar panel to the light fixture
- Carefully connect the solar panel (E) cable to the light fixture (B). Screw the caps on the plugs firmly.
- Wrap any excess solar panel cable around the base (F) located on the rear of the solar panel (E). Leave enough loose cable to form a drip loop.
IMPORTANT: Push the switch to the OFF position and allow the battery to charge with 2 to 3 days of full sunshine before testing.
Operation
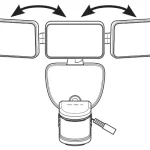
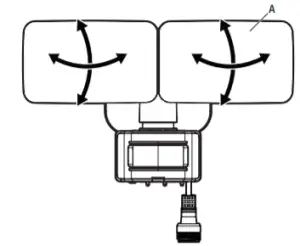
1 Adjusting the lamp heads
- If needed, gently grasp the lamp heads (A) and tilt them up or down or side-to-side to adjust the light coverage area
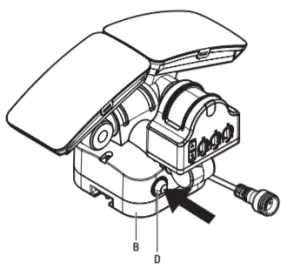
2 Using the OFF Control
- Press the power button (D) to turn the light (B) off and to conserve the battery life.
NOTE: Pushing the button in turns the light (B) ON (AUTO mode). Pushing again so that the power button is out and extended turns the light OFF.
3 Testing the light
NOTE: It is recommended that the light be tested before being placed in regular operation. Remember to set the switch from TEST to MOTION after testing the light.
NOTE: Testing the unit indoors or lower than 7 ft. from the ground may not enable the light to work optimally when mounted into its final outdoor position.
NOTE: With the Power button (D) in the OFF position, allow the unit to charge in direct sunlight for at least 6 hours before testing, or placing into normal operation.
Before placing the light in normal operation (Motion mode), it is best to test the light LEDs and motion sensor. Here is the process or doing so:
- Activate the light by pressing the Power button (D) to the ON
- Switch the Motion/Test switch to ‘Test’. The light will turn ON, and stay on continuously for 1 Use this time to adjust the LED light heads to where you would like them to shine when motion is detected.
- After the first minute, the light will turn OFF, but will activate for 5 seconds every time motion is Use this time to adjust the motion sensor (C) to where you want the light to detect motion and activate. While the switch is in ‘Test’ mode, the light will continue to activate in 5 second intervals. When finished with these adjustments, switch back to ‘Motion’, and the light will go into normal operation. Depending on your LUX setting and time of day, the light may turn OFF until it’s dark enough to activate.
4 Reading the indicator light
- The indicator light is located below the motion sensor (C), and shows the basic status of the
- If the indicator light flickers RED, the sensor is detecting This is an indication that the motion sensor is working, even if the LED light heads are not activating.
- If the indicator light is GREEN, the batteries are charging. This is an indication that the batteries are not depleted, and the transfer of solar energy to the rechargeable batteries is working.

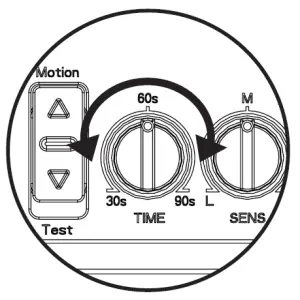
5 Adjusting the light timer
NOTE: The TIME dial controls the amount of time the light (B) will stay on full brightness after motion has been detected. The timer is adjustable from 30 to 90 seconds.
- To increase the time, turn the TIME dial towards the 90 second position.
- To decrease the time, turn the TIME dial towards the 30 second position.
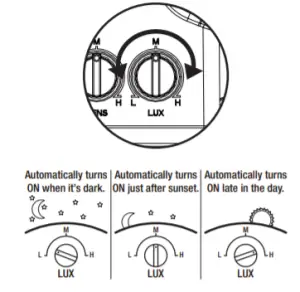
6 Adjusting the LUX
NOTE: Adjust the setting of the environmental light brightness to trigger the auto dusk-to-dawn photocell.
- To turn on the light in a very dark area, turn the LUX dial towards the “L” position.
- To turn on the light during daylight, turn the LUX dial towards the “H” position.
7 Adjusting the sensitivity
NOTE: The SENS dial adjusts the sensitivity of the motion sensor.
- To increase sensitivity, and increase the sensor range up to 50 ft., turn the SENS dial towards the “H” position.
- To decrease sensitivity, and reduce the sensor range, turn the SENS dial towards the “L” position.

Maintenance
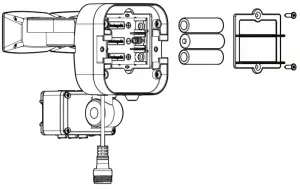
When the pre-installed, rechargeable Nickel-metal Hydride batteries have reached the end of their useful life, they can be easily replaced. Disconnect the light from the solar panel, and unmount from its position, placing the light on a sturdy surface. Unscrew and remove the back panel to access the batteries. Remove the batteries from the cradle, and disconnect the plug that attaches it to the light circuit board. Connect the new batteries at the plug, and place the batteries back in position. Replace the rear cover, screwing it securely into position. Remount the light, connect the solar panel, and follow the installation instructions. Please properly dispose of the depleted Nickel-metal Hydride batteries.
Care and Cleaning
- To prolong the original appearance, clean the light fixture with clear water and a soft, damp cloth only.
- Periodically clean the solar panel with a soft cloth and warm water. Do not hose spray. Keep the panel clear of snow and leaves. Make sure trees and other objects do not block sunlight from the panel.
- Do not use paints, solvents, or other chemicals on this light fixture. They could cause a premature deterioration of the finish. This is not a defect in the finish and will not be covered by the warranty.
- Do not spray the light fixture with a hose or power washer.
- If not to be used for several weeks, turn the unit OFF. Store it with the panel connected and where the panel can gather sunlight.
Troubleshooting
| Problem | Possible Cause | Solution |
| The light will not turn ON. | The power button is OFF. | Turn on the light. |
| The battery has run down. | Recharge the battery in the sunlight. | |
| The extension cord between the solar panel and light fixture is longer than 60 ft. | Connect to a shorter extension cord, or reposition the solar panel closer to light fixture. | |
| The battery is dead. | Replace with new rechargeable Nickel-metal Hydride batteries. | |
| The solar panel is not positioned correctly. | Adjust the panel angle to face southward for sufficient and direct sunlight. | |
| The solar panel location is not optimal. | The solar panel must face South and have clear exposure to the sun. If the panel cord is not long enough, an extension is available at Homedepot.com. | |
| The motion sensor position is not optimal. | Adjust the SENS dial between “Low-Medium-High” accordingly. | |
| Other surrounding light sources are triggering the photocell. | Adjust the LUX setting to compensate for other light sources such as street lamps and house lights. | |
| Surrounding air temperature is greater than 122°F (50°C) or less than -4°F (-20°C). | The light will operate normally within the specified temperature range. | |
| The green indicator light continues to flash but the light does not turn ON. | There is a program error. | Disconnect the battery and reconnect to perform a reset. |
| The light appears dimmer than normal. | The rechargeable Nickel-metal Hydride batteries are low and the unit switches to ECO mode automatically. | □ When the battery is charged back to 3.7V, the light will quit ECO mode and return to normal brightness. □ Adjust the TIME dial to a smaller amount of time to help save battery. |
| The light turns ON during the day. | The light is mounted in a dark location. | □ Adjust the LUX dial towards “L”. □ If still malfunctioning, relocate the light to a location away from shadows. |
| The light appears to “strobe” or flash. | The battery is low. | Turn OFF the light and charge the battery by direct sunlight. |
| Check if any surrounding light source illuminates or reflects ambient light towards the motion sensor. | Remove surrounding light sources that affect the motion sensor, or relocate the light to ensure no light reflects onto the motion sensor. | |
| There is a program error. | Turn OFF the light for 10 seconds. Turn ON thereafter. |
Questions, problems, missing parts? Before returning to the store, call Defiant Customer Service
8 a.m. – 7 p.m., EST, Monday-Friday, 9 a.m. – 6 p.m., EST, Saturday 1-866-308-3976
HOMEDEPOT.COM
Retain this manual for future use.