Manufactured by Dell
Page 2 of 4
« Previous Next »
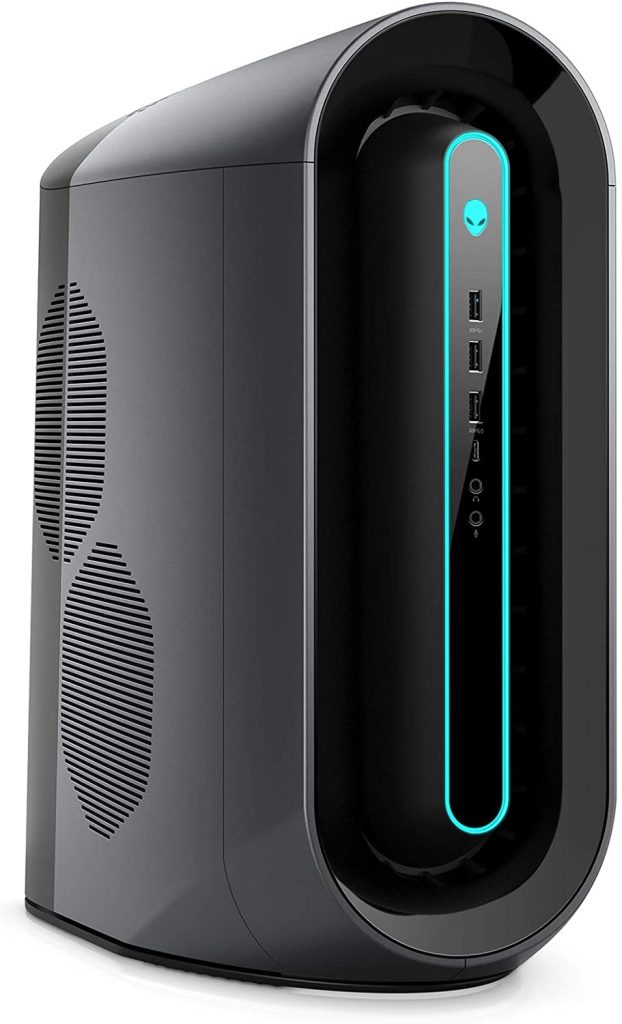
Views of Alienware Aurora R11
Front

- Power button (Alienhead)
Press to turn on the computer if it is turned off, in sleep state, or in hibernate state.
Press to put the computer in sleep state if it is turned on.
Press and hold for 4 seconds to force shut-down the computer.
NOTE: You can customize the power-button behavior in Power Options. - USB 3.2 Gen 1 ports (2)
Connect peripherals such as external storage devices and printers. Provides data transfer speeds up to 5 Gbps. - USB 3.2 Gen 1 port with PowerShare
Connect peripherals such as external storage devices and printers.
Provides data transfer speeds up to 5 Gbps. PowerShare enables you to charge connected USB devices.
NOTE: Certain USB devices may not charge when the computer is turned off or in sleep state. In such cases, turn on the
computer to charge the device. - USB 3.2 Gen 1 Type-C port with PowerShare
Connect peripherals such as external storage devices and printers.
Provides data transfer speeds up to 5 Gbps. PowerShare enables you to charge connected USB devices.
NOTE: Certain USB devices may not charge when the computer is turned off or in sleep state. In such cases, turn on the computer to charge the device. - Headphone port
Connect a headphone or speakers. - Microphone port
Connect an external microphone to provide sound input.
Back

- Back panel
Connect USB, audio, video, and other devices. - PCI-Express X16 (graphics slot 1)
Connect a PCI-Express card such as graphics, audio, or network card to enhance the capabilities of your computer.
For optimal graphics performance, use a PCI-Express X16 slot for connecting the graphics card.
NOTE: The PCI-Express X16 slot works at X8 lanes only.
NOTE: If you have two graphics cards, the card installed in PCI-Express X16 (graphics slot 1) is the primary graphics
card. - PCI-Express X4 slots (2)
Connect a PCI-Express card such as graphics, audio, or network card to enhance the capabilities of your computer.
NOTE: The PCI-Express X4 slot 3 works at X2 lanes only. - PCI-Express X16 (graphics slot 2)
Connect a PCI-Express card such as graphics, audio, or network card to enhance the capabilities of your computer.
For optimal graphics performance, use a PCI-Express X16 slot for connecting the graphics card.
NOTE: The PCI-Express X16 slot works at X8 lanes only. - Power-supply cage release-latches (2)
Allows you to remove the power supply unit from your computer. - Power-supply diagnostics button
Press to check the power‑supply state. - Power-supply diagnostics light
Indicates the power-supply state. - Power port
Connect a power cable to provide power to your computer. - Service Tag label
The Service Tag is a unique alphanumeric identifier that enables Dell service technicians to identify the hardware components in
your computer and access warranty information. - Side panel release latch
Allows you to remove the side panel from your computer. - Security-cable slot (for Kensington locks)
Connect a security cable to prevent unauthorized movement of your computer.
Back panel

- Coaxial S/PDIF port
Connect an amplifier, speakers, or a TV for digital audio output through a coaxial cable. - Optical S/PDIF port
Connect an amplifier, speakers, or a TV for digital audio output through an optical cable. - USB 2.0 ports (6)
Connect peripherals such as external storage devices and printers. Provides data transfer speeds up to 480 Mbps. - USB 3.2 Gen 2 (Type-C) port
Connect peripherals, such as external storage devices and printers. Provides data transfer speeds up to 10 Gbps.
NOTE: This port does not support video/audio streaming or power delivery. - USB 3.2 Gen 2 port
Connect peripherals, such as external storage devices and printers. Provides data transfer speeds up to 10 Gbps. - Side L/R surround port
Connect audio-output devices such as speakers and amplifiers. In a 7.1 speaker channel setup, connect the side-left and sideright
speakers. - Microphone port
Connect an external microphone to provide sound input. - Front L/R surround line-out port
Connect audio-output devices such as speakers and amplifiers. In a 2.1 speaker channel setup, connect the left and right
speakers. In a 5.1 or a 7.1 speaker channel setup, connect the front-left and front-right speakers. - Line-in port
Connect recording or playback devices such as a microphone or CD player. - Center/subwoofer LFE surround port
Connect the center speaker or the subwoofer.
NOTE: For more information about the speaker setup, refer the documentation that shipped with the speakers. - Rear L/R surround port
Connect audio-output devices such as speakers and amplifiers. In a 5.1 or a 7.1 speaker channel setup, connect the rear-left and
rear-right speakers. - USB 3.2 Gen 1 ports (3)
Connect peripherals such as external storage devices and printers. Provides data transfer speeds up to 5 Gbps. - Network port (with lights)
Connect an Ethernet (RJ45) cable from a router or a broadband modem for network or Internet access.
The two lights next to the connector indicate the connectivity status and network activity.
Page 2 of 4
« Previous Next »
[View Manual Contents]