User Manual
![]()

Model# 048-GM-48265
DELLA 14000 BTU Portable Air Conditioner
⚠ CAUTION! WARNING: Do not use this device before reading these instructions.
Congratulation on your purchase of this DELLA portable Air Conditioner.
NOTICE:
If you are missing any parts or have any questions or concerns regarding installation, please call DELLA customer service at 1-800-863-4143. Have this manual open and ready for reference
CUSTOMER SERVICE:
1-800-863-4143
9:00AM – 6:00PM PST (Monday – Friday)
[email protected]
www.dellausa.com
⚠ WARNING
When using electrical appliances, basic safety precautions should always be followed including the following:
READ ALL INSTRUCTIONS BEFORE USE
- DO NOT shake, hit, or damage the appliance.
- DO NOT place in outdoor or in damp environment.
- DO NOT use near bathtub, shower, washbowl or swimming pool.
- Keep unit away from direct sunlight and other heat sources such as stove, heater, etc.
- DO NOT spray insecticides or any combustible material near the unit.
- DO NOT operate unit near flammable gases.
- DO NOT block or cover the air inlet or vents.
- DO NOT insert any objects or put fingers into air inlet / outlet opening.
- DO NOT cover the unit while it is operating.
- DO NOT place power cord under carpet or cover it with throw rugs or furniture. Arrange power cord so it cannot be tripped over.
- DO NOT run power cord over sharp edges / corners or on any hot surface.
- DO NOT immerse cord, plug, or the appliance in water or other liquid.
- DO NOT spill water or any liquid on electrical components or connectors.
- DO NOT touch the power plug or handling the unit with wet hand to avoid electric shock.
- DO NOT unplug the unit by pulling the power cord.
- DO NOT operate any appliance with a damaged cord or plug or after the appliance malfunctions, or has been dropped or damaged in any manner.
- DO NOT use accessory attachments not recommended or sold by the manufacturer to prevent fire, electric shock or injury.
- Do not use this appliance near flammable gases, liquids or other combustibles.
- Always place appliance on a stable and level ground surface.
- Turn off and unplug the appliance before assembly, disassembly, moving, or cleaning.
- Make sure no other high current appliances are plugged into the same circuit to prevent overload.
- This appliance is not intended for use by individual (including children) with reduced physical, sensory, or mental capabilities, or lack of experience and knowledge unless they have been given supervision or instruction converning the use of appliance by a person responsible for their safety.
- Immediately unplug the product if the appliance is making unusual sounds or is emitting smoke or odor.
SAVE THESE INSTRUCTIONS
USER TIPS
Portable Air conditioner is ideal for spot cooling. The compressor, condenser, and evaporator are built in a compact unit. The air is dehumidified and cooled while a flexible hose release heat outside.
Permanent installation is not necessary, This portable air conditioner is easy to move from room to room and offers a wide range of air conditioning solution.
To ensure optimal efficiency of the product, keep all doors and windows closed when it is used as a air conditioner or dehumidifier.
Leave window open to improve air circulation when using in fan mode.

IMPORTANT:
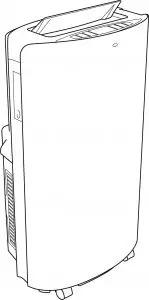
Before installation, place the unit in a upright position for 1 hour to allow the refrigerant to settle. Air outlet will open automatically when the unit is turned on, and closes when turned off.
Follow installation instructions to set up the unit.
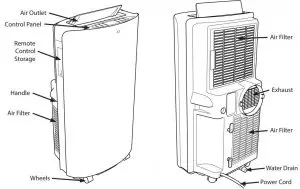
DIAGRAM
INSTALLATION GUIDE
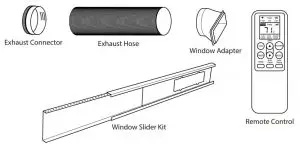
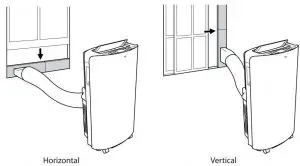
Exhaust Installation
The air conditioner needs to be installed next to a window and connect the exhaust hose from the unit to the window.
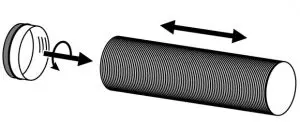
- Extend the exhaust hose and attach the connector to one end.
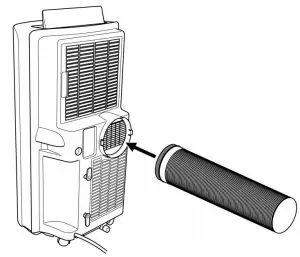
2. Attach the connector to the back of the unit.
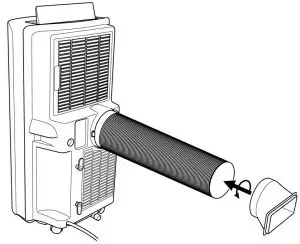
3. Attach the window adapter to the other end of the exhaust hose.
4. Attach the window adapter to the window slider kit.
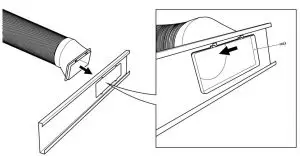
5. Adjust the length of the window slider kit according to your window.
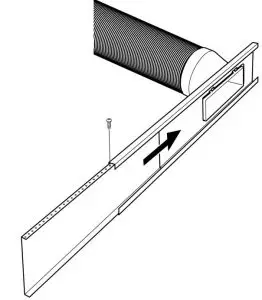
Window Kit Installation
- Open the window sash and place the window kit horizontally on the stool / vertically against the jamb. Adjust the length of the kit accordingly.
- Close the window sash on the window kit.
NOTE:
Cut the window kit if the window width is shorter than the minimum length of the window kit.
*Cutting the window kit will reduce the maximum length if can extend.
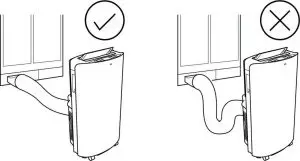
⚠ ATTENTION: Make sure the exhaust hose is not folded as this could cause the unit to have lower efficiency or malfunction.
Grounding
This product must be grounded. If it should malfunction or breakdown, grounding provides a path of least resistance for electric current to reduce the risk of electric shock. This product is equipped with a power supply cord that has a three-pronged grounded plug. It must be plugged into a mating grounding type receptacle in accordance with the National Electrical Code and applicable local codes and ordinances.
⚠ CAUTION! WARNING: Improper connection of the equipment grounding conductor can result in a risk of electric shock. Check with a qualified electrician or serviceman if you are in doubt as to whether the product is properly grounded.
⚠ CAUTION! WARNING: DO NOT modify the plug provided with the product if it does not fit the outlet. Have a proper outlet installed by a qualified electrician.
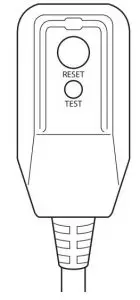
Routinely test the integrated circuit breaker.
- Plug the plug into a power socket. Press the “test” button and the “reset” button should pop up.
- Press the “reset” button to make sure the circuit breaker is engaged.
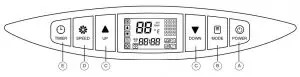
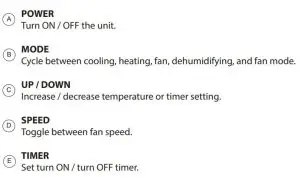
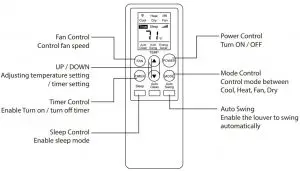
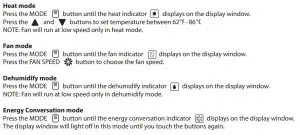
USER INSTRUCTION (CONTROL PANEL / REMOTE CONTROL)
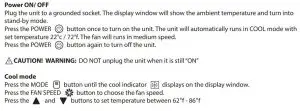
USER INSTRUCTION (OPERATING)

USER INSTRUCTION (REMOTE BATTERY)
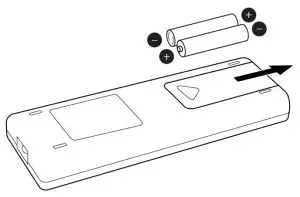
Insert or Replace Batteries on Remote Control
- Remove the cover on the back of the remote control. Replace the old batteries with two new AAA 1.5V alkaline batteries.
- Replace the cover.
- NOTE: Remove the batteries if the remote control is not use for an extended period of time.
⚠ CAUTION! WARNING:
- DO NOT mix old and new batteries.
- DO NOT mix alkaline batteries, carbon-zinc batteries, or rechargeable batteries.
- All batteries should be replaced at the same time.
- Remove batteries if the remote control is not used for a month or longer.
- DO NOT put batteries next to or in a heat source such as fire, electric heating device, etc.
- Rechargeable batteries should be charged under adult supervision only.
- DO NOT hit batteries against hard object.
Using the Remote Control
Point the remote control at the control panel on the unit.
The buttons on the remote control mimics the same control function as that on the control panel.
USER INSTRUCTION (WI-FI FUNCTION)
Wi-Fi function
Your air conditioner is built with a wi-fi function and you can control the unit using smart phone application.
Make sure your mobile device is connected to a Wi-Fi router and the internet.
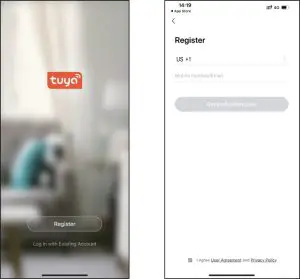
- Scan the QR code or search “Tuya Smart” in app store.

2. Register an account with your mobile number or e-mail following the in-app instruction.
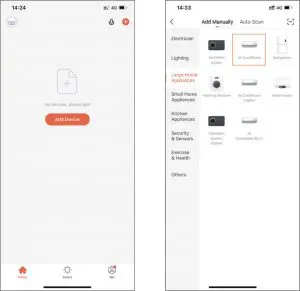
3. Add your device by selecting “Air Conditioner” in “Large Home Appliance” category .
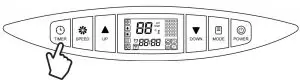
4. Touch the “Timer button” on the air conditioner control panel for 5 seconds. The wi-fi icon should blink rapidly.
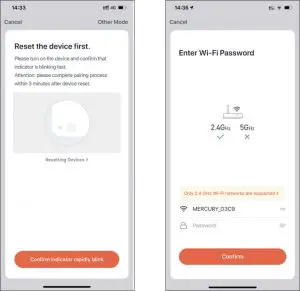
5. Tab “confirm indicator rapidly blink” on your phone.
6. Enter wi-fi password and confirm.
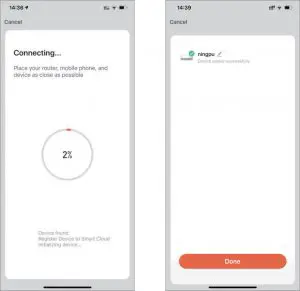
7. Wait until the device is successfully added.
8. Once completed, you can control your unit via your phone such as set timer, change mode, set temperature, and set some extra functions.
*Instruction on this manual regarding the wifi function is based on the ver. of the app at the time written. Follow the in-app instruction in the event of app update.
CARE AND MAINTENANCE (WATER DRAINAGE)
Condensate will residue inside the unit when operate. Tank full indicator  will display on the display windows once the tank is full.
Drain the water to keep the unit working properly.
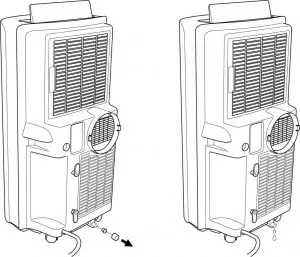
- Unplug the unit from all power source.
- Move the unit to a suitable drain location or place a empty container under the drain.
- Unscrew the drain cap and remove the plug to drain water from the unit.
- Replace the plug and s crew the drain cap back on the unit once the draining is completed.
NOTE: You may need to drain the unit more often if it is used in environments with higher humidity.
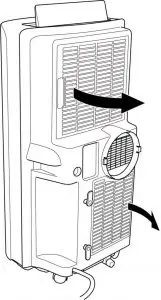
CARE AND MAINTENANCE (AIR FILTER)
Cleaning the air filter
Air filter need to be cleaned to keep the air conditioner working efficiently.
- Unplug the unit from all power source.
- Remove the filter from the unit.
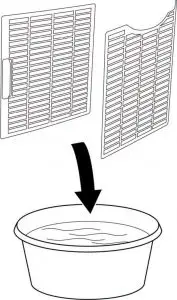
- Gentle immerse the filter in warm water.
- Mild detergent can be added to remove dirt, particles, and pollutants.
- Allow the filter to completely dry before placing back into the unit.
⚠ CAUTION! WARNING: DO NOT operate the unit without the air filter.
CARE AND MAINTENANCE (STORAGE)
Store your unit if not use for an extended period of time against wear and damage.
- Turn off and unplug the unit from all power source.
- Drain the water tank completely following the draining instruction.
- Clean the air filter following the cleaning instruction.
- Remove the battery from the remote control.
- Cover the unit with plastic sheet to protect from dust and debris.
- Store the unit in a dry, cool place.
NOTE: make sure you store your unit in location which is not subject to extreme temperature or direct sunlight.
Before using the unit again.
- Make sure the power cord and the unit housing are in good condition and without any crack or damage.
- Make sure air filter and drain cap are in place.
- Place new batteries in remote control.
- Install the unit following the installation instruction.
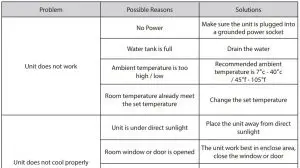
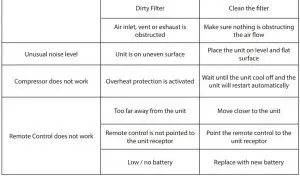
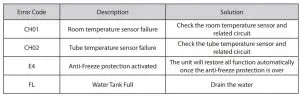
TROUBLESHOOTING
ERROR CODE CHART
![]()
Customer Service Center
Have any questions regarding your product? E-mail or call us at:
[email protected]
1-800-863-4143

WARRANTY
All items can be return for any reason within 60 days of purchase. Full refund will be process once item and accessories are returned in original packaging. Full refund will be issued to the orifinal payment method.
All returned items require a RA (Return Authorization) number. Which can only be provided by a DELLA customer service representative when the return request is submitted. Item received without an RA may not be aaccepted or may increase your return process time. Once an item has been received by DELLA, refunds or replacements will be processed within 5 business days.
All returns must be shipped back to DELLA return center at the customer’s expense. If the reason of return is a result of an error by DELLA, DELLA will provide a pre-paid shipping label via-email. Boxes for return will not be provided by DELLA. Customer will be responsible to use the original boxex or purchase new boxes. Pictures may be required for some returns to ensure an item is not damage prior to the return.
⚠ WARNING: Manufacturer and seller expressly disclaim any and all liability for personal injury, property damage or loss, whether direct, indirect, or incidental, resulting from not following user’s manual instruction, incorrect attachment, improper use, inadequate maintenance, or neglect of this product.