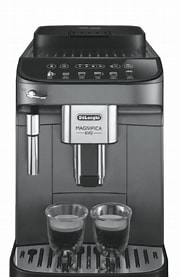
DeLonghi ECAM29X.2Y Magnifica Evo Automatic Coffee Machine
INTRODUCTION
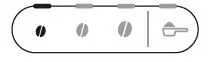
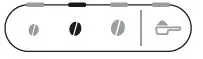
The principal functions of the machine are illustrated step by step in the Quick Guide.Take a few minutes to read this Instruction for Use. This will avoid all risks and damage to the appliance. The LEDs and indicator lights on the panel will help you interact with the machine and use the various functions correctly:
 |
Off | — |
 |
On steadily | Function available |
 |
Flashing | Function in progress |
 |
Fast blink | Attention required on the part of the user |
The same symbols are also used in the Quick Guide provided with the product.
SETTING UP THE APPLIANCE
- The instructions for setting up the appliance are given in the QUICK GUIDE.
- When using the machine for the first time, 4-5 coffees will need to be made before it starts giving satisfactory results.
- The first time you use the machine, the water circuit is empty and the appliance could be very noisy.The noise becomes less as the circuit fills.
- Possible traces of coffee in the mill are the result of set-tings tests performed on the appliance before sale, proof of the meticulous care and attention we invest in our products.
TURNING THE MACHINE ON AND OFF
- Each time the appliance is turned on, it performs an auto-matic preheat and rinse cycle which cannot be interrupt-ed. The appliance is not ready for use until the cycle has been completed.
- Whenever the machine is turned off after being used to make coffee, it performs an automatic rinse cycle.
- To turn the appliance on or off, press the button. If you will not be using the appliance for some time, unplug it from the mains socket:
MAKING COFFEE BEVERAGES
- Do not use green, caramelised or candied coffee beans as they could stick to the coffee mill and make it unusable.
- If “Energy Saving” mode is activated, there may be a few seconds delay before the first coffee is delivered.
Making coffee using pre-ground coffee
- Never add pre-ground coffee when the machine is off or it could spread through the inside of the machine and dirty it. This could damage the machine.
- Never use more than one level measure as it could dirty the inside of the machine or block the funnel.
- Making LONG coffee: halfway through prepara-tion, when the + lights come on, add one level measure of pre-ground coffee and press the Long button again.
Varying the coffee aroma
Press the button corresponding to the preferred aroma:
 |
Mild |
 |
Medium |
 |
Strong |
Select the desired coffee beverage. Please note:
- When the next coffee is made, the machine will propose the last aroma selected.
- In the event of power failure, the machine will revert to the medium default setting.
Rinsing
Use this function to deliver hot water from the coffee spouts to clean and heat the appliance’s internal circuit. To perform the rinse cycle, just press and hold the button for about 5 seconds. Delivery stops automatically (to interrupt delivery earlier, press the same button again).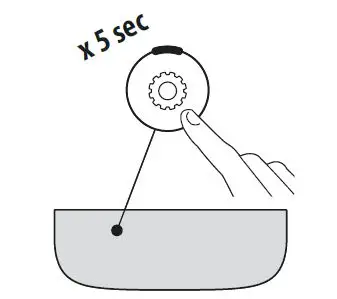
Tips for a hotter coffee
To make a hotter coffee, proceed as follows:
- perform a rinse cycle (see paragraph “Rinsing”);
- warm the cups by rinsing them first using the hot water function;
- increase the coffee temperature (see section “9. Settings menu”).
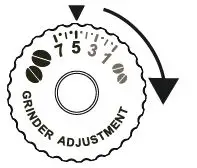
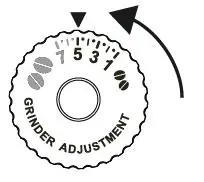
Adjusting the coffee mill
The coffee mill is set by default to prepare coffee correctly and should not require regulating initially. To adjust, while the cof-fee mill is in operation, turn the dial as follows:
- If the coffee is delivered too slowly, or not at all.
- This adjustment will not take ef-fect until at least 2 cups of coffee have been delivered.
- For a fuller bodied creamier coffee
- This adjustment will not take ef-fect until at least 2 cups of coffee have been delivered.
Please note:
The grinding adjustment dial must only be turned when the coffee mill is in operation during the initial phase of coffee preparation.
Customising the quantity in the cup
- Press the button relative to the beverage being pro-grammed and hold for a few seconds: the programming menu is accessed when the indicator switches to fast blink. Delivery begins;
- Once the cup is filled to the desired level, press the bev-erage button again. Delivery ceases and the quantity is stored in the memory.
| Beverage* | Default (ml) | Programmable (ml) | |
| Espresso | 40 | from ≃ 20 to ≃ 180 | |
| Coffee | 180 | from ≃ 100 to ≃ 240 | |
| Long | 160 | from ≃ 115 to ≃ 250 | |
| Doppio+ | 120 | from ≃ 80 to ≃ 180 | |
| Americano | Espresso: 40 | Espresso:
da ≃ 20 a ≃ 180 |
|
| Water:
110 |
Water:
da ≃ 50 a ≃ 300 |
||
| Long Black | Water: 120 | Water:
da ≃ 50 a ≃ 300 |
|
| Espresso:
80 |
Espresso:
da ≃ 40 a ≃ 360 |
||
| Over ice | 100 | from ≃ 40 to ≃ 240 | |
The numbers and types of beverages differ according to model.
Please note!
To cancel the current programme, press a button corresponding to another beverage
MAKING CAPPUCCINO
- Fill a container with about 100 grams of milk for each cappuccino to be made. When choosing the size of the container, bear in mind that the milk doubles or triples in volume.
- For a richer, denser froth, use skimmed or partially skimmed milk at refrigerator temperature (about 5°C). To ensure the heated milk does not end up with meagre froth or large bubbles, clean the cappuccino maker every time after use.
- The quality of the froth may vary depending on:
- the type of milk or vegetable beverage;
- the brand used;
- the ingredients and nutritional values.
MEASURING WATER HARDNESS
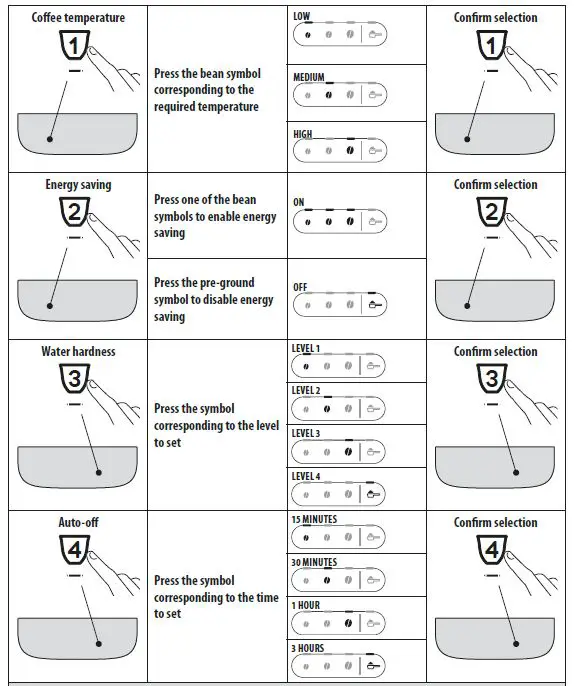
The descaling alarm is displayed after a period of time es-tablished according to water hardness. The machine is set by default for a hardness value of “4“. The machine can also be programmed according to the hardness of the water supply in the various regions, so that descaling is required less often.
- Remove the indicator paper from its packaging. If provid- ed with your model, you will find it attached to the Quick Guide.
- Immerse the paper completely in a glass of water for about one second.
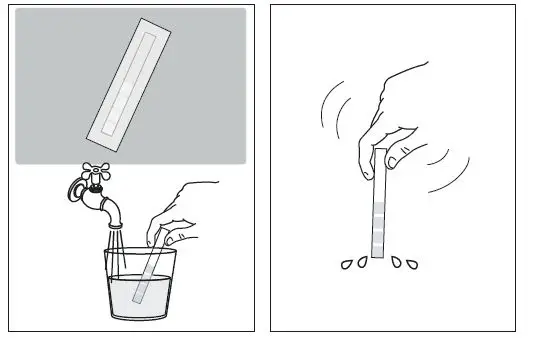
- Remove the strip from the water and shake lightly. After about a minute, 1, 2, 3, or 4 red squares appear, depend-ing on the hardSAness of the water. Each square corresponds to one level.
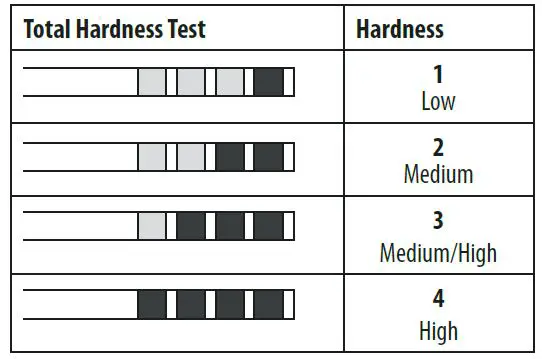
See instructions in section “9. Settings menu” to set the machine.
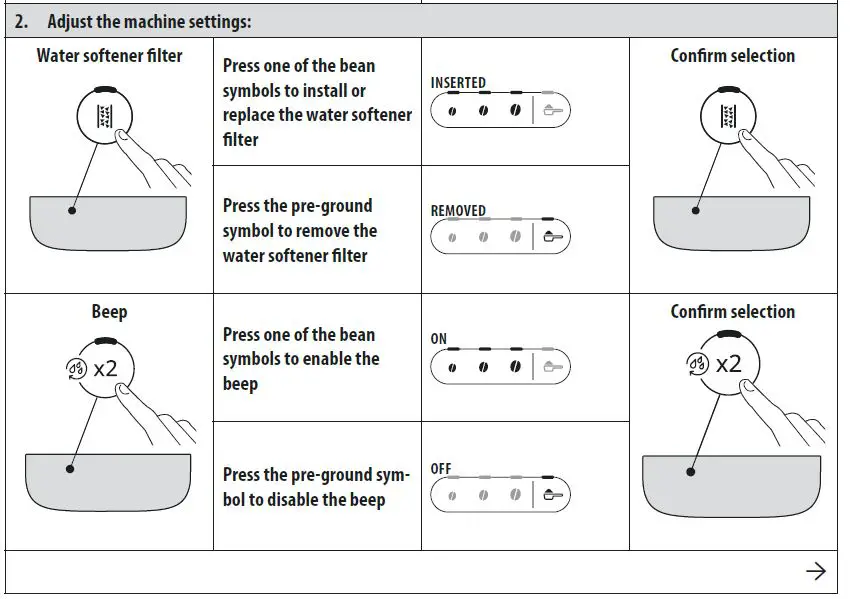
WATER SOFTENER FILTER
To ensure constant performance of the machine over time, we recommend using a De’Longhi water softener filter. For more information, visit the www.delonghi.com website.
- Remove the filter from the packaging and turn the date indicator to view the next two months;
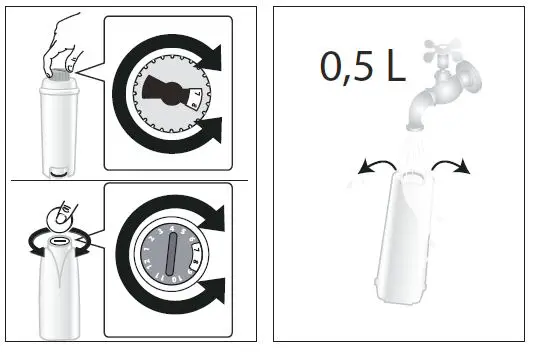
- To activate the filter, run tap water through the hole in the centre of the filter until water comes out of the openings at the side for more than a minute;
- Extract the water tank and fill with water; insert the filter in the water tank and immerse it completely for about ten seconds, sloping it and pressing it lightly to enable the air bubbles to escape;
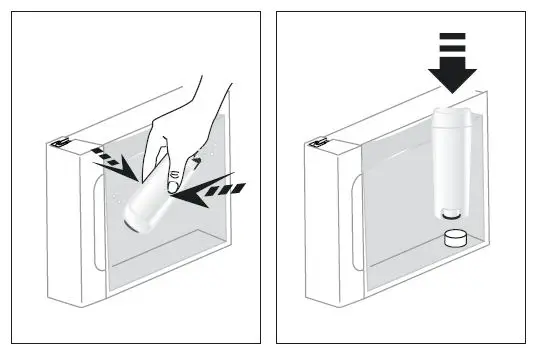
- Insert the filter in the filter housing and press as far as it will go;
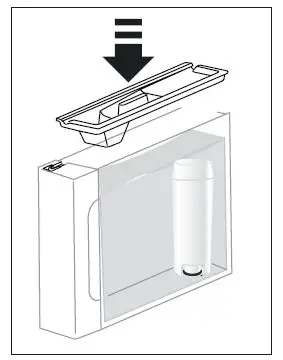
- Close the tank with the lid, then put the tank back in the machine;
- Place an empty container with a minimum capacity of 0.5 litres under the steam/hot water spout.
- See instructions in section “9. Settings menu” to install the filter.
- The appliance delivers hot water, then stops automatically;
- The filter is now active and you can use the coffee machine.
Replacing the filter
Replace the filter when the corresponding light comes on.
- Extract the water tank and exhausted filter;
- Follow the operations described in the previous section to activate the filter;
- See instructions in section “9. Settings menu” to set the machine.
Please note:
After two months (see date indicator) or when the appliance has not been used for 3 weeks, you should replace the filter even if the message has not yet been displayed.
Removing the filter
If you want to use the appliance without the filter, you must remove it and notify the appliance of its removal.
- Extract the water tank and exhausted filter;
- Please note!
After two months (see date indicator) or when the appliance has not been used for 3 weeks, you should replace the filter even if the message has not yet been displayed.
TIPS FOR ENERGY SAVING
- Set auto-off to 15 minutes (see “9. Settings menu”);
- Enable Energy Saving (see “9. Settings menu”);
- Always carry out the descaling cycle when prompted by the machine.
SETTINGS MENU
When in the menu, usAe the active buttons to select the corresponding functions: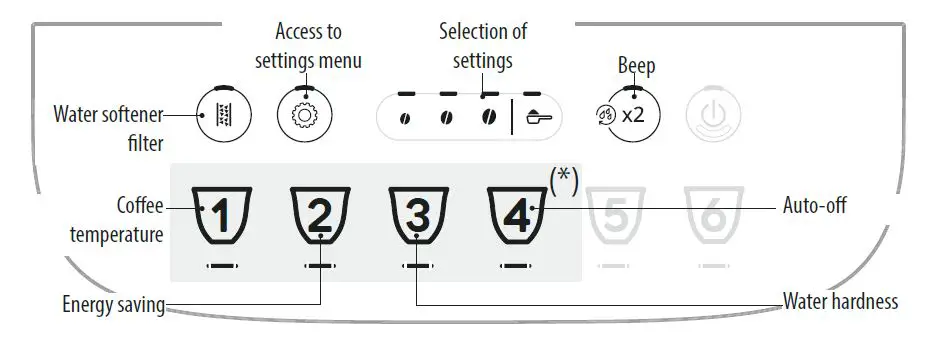
- Press and hold the button for a few seconds: the settings buttons light up.
- Proceed by pressing the button corresponding to the setting to be adjusted.
Reset default values
CLEANING THE MACHINE
- Do not use solvents, abrasive detergents or alcohol to clean the coffee machine. With De’Longhi superautomatic coffee machines, no chemical products are required for cleaning purposes.
- Do not use metal objects to remove encrustations or coffee deposits as they could scratch metal or plastic surfaces.
- When the light comes on, the grounds container must be emptied and the machine can no longer make coffee.
- Remove the drip tray, empty and clean.
- Empty the grounds container and clean thoroughly to remove all residues left on the bottom.
- Check the red condensate tray and empty if necessary.
- The appliance cannot be used to make coffee until you have cleaned the grounds container. Even if not full, the empty grounds container message is displayed 72 hours after the first coffee has been prepared. For the 72 hours to be calculated correctly, the machine must never be disconnected from the mains power supply.
- Drip tray components
- The drip tray is fitted with a level indi-cator (red) showing the level of water it contains.
Before the indicator protrudes from the cup tray, the drip tray must be emptied and cleaned - Check periodically (about once a month) that the inside of the appliance (accessi-ble by removing the drip tray) is not dirty.
- Remove coffee deposits with a brush or sponge;
- Remove all residues with a vacuum cleaner

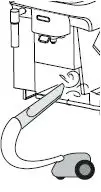
CLEANING THE INFUSER
- Press the button to turn the machine off;
- Remove the water tank;
- Open the infuser door on the right side of the machine;
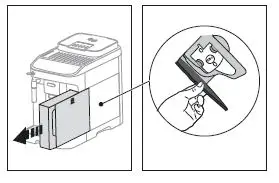
- Press the two coloured release buttons inwards, at the same time pulling the infuser outwards;
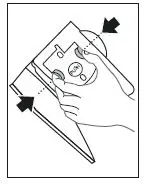
- Soak the infuser in water for about 5 minutes, then rinse
- Do not use detergents when cleaning the infuser, as they could damage it.
- Use the brush to remove any coffee residues left in the infuser housing, visible through the infuser door;
- After cleaning, replace the infuser by sliding it onto the internal support, then push the PUSH symbol fully in until it clicks into place;

- Once inserted, make sure the two coloured buttons have snapped out;
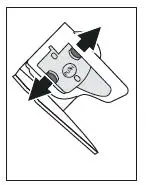
- . Close the infuser door;
- Put the water tank back.
DESCALING
To complete the descaling cycle correctly, pay close atten-tion to the quantities required in the water tank for each step: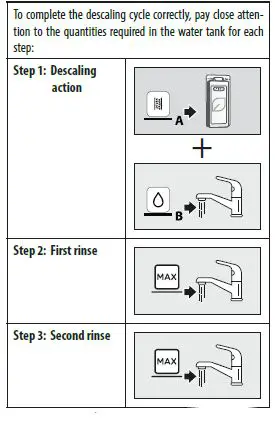
- Before use, read the instructions and the labelling on the descaler pack.
- Use De’Longhi descaler only. Using unsuitable descaler and/or performing descaling incorrectly may result in faults not covered by the manufacturer’s guarantee.
- Descaler can cause damage to delicate surfaces. If the product is accidentally spilt, dry immediately.
Important:
If the water softener filter is installed, it must be re-moved before adding the descaler solution. Put the filter back in the machine after the first tank of rinsing has been completed.
The descaling procedure is described in the Quick Guide. Please note:
- Once the descaling cycle has begun, it cannot be inter-rupted and must be completed with the entire rinse cycle.
- After descaling, it is normal for the grounds container to contain water.
- If the water tank has not been filled to the MAX level after descaling, the appliance prompts for a third rinse to en-sure that the descaler solution has been completely elimi-nated from the machine’s internal circuits. Before starting rinsing, remember to empty the drip tray.
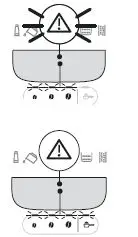
EXPLANATION OF INDICATOR LIGHTS
- The beverage lights flash
- The beverage and settings lights are on steadily
- The machine is warming up: wait
- The machine is ready for use: select the desired bev-erage and relative options
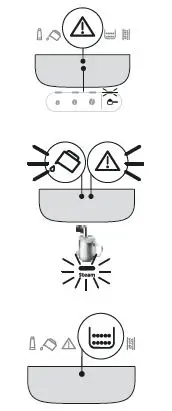
- Replace the filter (see section “7. Water softener filter”)
- Insufficient water in tank: fill the tank
- The water tank is missing, or is not positioned correctly: insert the tank correctly
- General alarm: the inside of the machine is very dirty. Clean the machine thor-oughly. If the message is still displayed after cleaning, contact De’Longhi Customer Services and/or an approved Service Centre
- The infuser has not been re-placed after cleaning: insert the infuser as described in section “11. Cleaning the infuser”
- No coffee beans: fill the beans container, then press any button to reset the alarm.
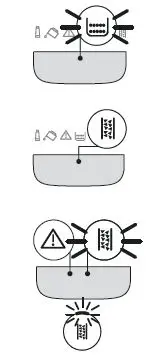
- The grinding is too fine and the coffee is delivered too slowly or not at all. Adjust the coffee mill (section “4.6 Adjusting the coffee mill”)
- Too much coffee has been used. Select a milder taste or reduce the quantity of pre-ground coffee
- Preparation with pre-ground coffee has been selected without placing any pre-ground coffee in the funnel. Make sure the funnel is not blocked, then add one level measure of pre-ground coffee and repeat delivery.
- The water circuit is empty. Deliver hot water by turning the dial to the posi-tion or pressing the “Steam” button
- The grounds container needs emptying
- The grounds container is missing, or not inserted correctly: insert the drip tray complete with grounds container and press as far as it will go
- Descaling is required (“12. Descaling” and the dedi-cated section of the Quick Guide)
- Descaling has been inter-rupted. To use the machine again:
- the O position, turn it to the position; delivery will begin and descaling will resume from Fig. 14, page 10.
TROUBLESHOOTING
| PROBLEM | POSSIBLE CAUSE | REMEDY |
| The appliance does not come on. | It is not plugged into the mains socket. | Plug into the mains socket. |
| The coffee is not hot. | The cups were not preheated. | Warm the cups by rinsing them with hot water (Please note: you can use the hot water function). |
| The internal circuits of the appliance have cooled down because 2-3 minutes have elapsed since the last coffee was made. | Before making coffee, press and hold the
button for a few seconds to perform a rinse cycle and warm the internal circuits. |
|
| Coffee temperature setting too low. | Set a hotter coffee temperature in the set- tings menu (see “9. Settings menu”). | |
| The machine must be descaled | Carry out the descale procedure. Next, check the water hardness (“6. Measuring water hardness”) and make certain the machine setting matches the local water supply hardness (“9. Settings menu”). | |
| → | ||
| PROBLEM | POSSIBLE CAUSE | REMEDY |
| The coffee is weak or not creamy enough. | The coffee is ground too coarsely. | Adjust the grinding level (“4.6 Adjusting the coffee mill”). The effect is not visible until at least 2 coffees have been made. |
| The coffee is unsuitable. | Use coffee for espresso machines. | |
| Coffee not fresh. | The coffee pack has been opened for too long and has lost its taste. | |
| The coffee is delivered too slowly or drop by drop. | The coffee is ground too finely. | Adjust the grinding level (“4.6 Adjusting the coffee mill”). The effect is not visible until at least 2 coffees have been made. |
| The machine does not make coffee | Impurities have been detected in the in- ternal circuits | Wait until the machine is ready for use again, and proceed to select the required beverage. Contact customer services if the problem persists. |
| Coffee does not come out of one or both spouts. | The coffee nozzles are blocked. | Clean the nozzles with a cloth. Any en- crusted deposits can be removed with a toothpick, if necessary. |
| The coffee delivered is watery. | The pre-ground coffee funnel is clogged. | Open the door and clean the funnel with the help of a brush. |
| The infuser cannot be extracted. | The machine has not been turned off. | Turn the machine off by pressing the button. |
| At the end of descaling, the appliance requests a third rinse | Water tank not filled to the MAX level during the course of the two rinse cycles | Empty the drip tray, fill the tank up to the MAX level and run the third rinse cycle. |
| The milk has big bubbles | The milk is not cold enough, or is not semi-skimmed or skimmed. | Use skimmed or semi-skimmed milk at refrigerator temperature (about 5° C). If the result is not as you wished, try chang- ing brand of milk. |
| Cappuccino maker dirty. | Remove the components and clean them thoroughly. | |
| Vegetable beverages have been used. | The effect varies widely depending on the nutritional properties of the beverages. | |
| The cup tray on top of the machine is hot | A number of beverages have been pre- pared in rapid succession | |
| The machine emits noises or small puffs of steam while not in use | The machine is ready for use, or has re- cently been turned off, and condensate is dripping into the hot vaporiser. | This is part of normal operation. To limit the phenomenon, empty the drip tray. |
| The appliance emits puffs of steam from the drip tray and/or there is water on the surface the appliance rests on. | The drip tray grille has not been replaced after cleaning. | Put the drip tray grille back in the drip tray. |