![]() Instructions
Instructions
25L Microwave Oven With Grill
AG925EA9(F)
Please read and retain these instructions for future reference
ELECTRICAL AND MICROWAVE SAFETY
- WARNING: It is hazardous for anyone other than a competent person to carry out any service or repair operation that involves the removal of a cover that gives protection against exposure to microwave energy. Servicing of this appliance must only be carried out by a qualified electrician.
- WARNING: If the door or door seals are damaged, the oven must not be operated until it has been repaired by a competent person. Do not operate this appliance if damaged or modified in any way.
- Keep the appliance and its cord out of reach of children less than 8 years.
- When operating in combination or grill modes, the oven becomes extremely hot. Do not allow children to use the appliance without adult supervision
- This appliance can be used by children aged 8 years and above and persons with reduced physical, sensory or mental capabilities or lack of experience and knowledge if they have been given supervision or instruction concerning use of the appliance in a safe way and understand the hazards involved. Children shall not play with the appliance. Cleaning and user maintenance shall not be made by children unless they are aged 8 years and above and supervised.
- Switch off and unplug before cleaning or servicing the appliance.
- Keep microwave, cable and plug dry and away from areas where it is likely to get splashed. Never immerse in water. Never clean with a steam cleaner.
- Do not pull on the cable to disconnect from the mains supply.
- This oven must be positioned so that the plug is accessible and the plug socket is within easy reach of the power cord.
- Do not operate the microwave if damaged or after it malfunctions. In the event the supply cord is damaged, it must only be replaced by a qualified service engineer, with a suitably approved part.
- Do not place items with naked flames or containers with liquids on this appliance.
- The mains plug shall be connected into a mains socket outlet with a protective earth connection.
- All microwaves are tested and approved in accordance with current electromagnetic safety and compatibility regulations and standards. As a precautionary measure, pacemaker manufacturers recommend wearers to keep a minimum distance of 20-30 cm between an operating microwave oven and the pacemaker in order to avoid possible interference with the pacemaker. If you suspect there may be interference, turn the microwave off immediately and contact the manufacturer of the pacemaker.
WARNING! - This appliance is not intended to be used in: staff kitchen areas in shops, offices and other working environments; farm houses; by clients in hotels, motels and other residential type environments; bed and breakfast type environments.
- This appliance must not be operated by a timer or a separate remote control system.
- Liquids and other foods must not be heated in sealed containers since they are liable to explode.
- Microwave heating of beverages can result in delayed eruptive boiling; therefore care must be taken when handling the container.
- If you are preparing food or liquid for a baby stir or shake the contents and check the temperature before consumption in order to avoid burns.
- Never cook or heat eggs in their shell or whole hard-boiled eggs, as they may explode even after cooking in the microwave has been completed.
- The oven should be cleaned regularly and any food deposits removed – see page 17 for details. Failure to maintain the oven and seals in a clean condition could lead to deterioration of the surface or seals, adversely affect the life of the oven and possibly result in a hazardous situation.
- Never operate the oven when empty and avoid leaving it unattended during use.
- Do not cover and allow adequate ventilation – see page 6 for clearance required.
 The surfaces of the oven and the containers inside will become hot during and immediately after use; wear oven gloves when handling.
- Check regularly during the cooking cycle especially when using plastic or paper containers to ensure food and containers do not ignite.
- If smoke is emitted, switch off or unplug the appliance and keep the door closed in order to stifle any flames.
- Do not use oven on, near or under flammable or heat-sensitive items.
- Do not place foil-wrapped food, metal containers or containers with metal parts or trim when using the microwave oven.
- Do not use with a cracked or missing turntable or without the turntable ring.
- The microwave oven is intended for heating food and beverages. Drying of clothing and heating of warming pads, slippers, sponges, damp cloth and similar may lead to risk of injury, ignition or fire.
- Always check for container and utensil suitability before using in the oven – see page 18 for advice.
FOOD SAFETY
- Do not cook raw meat or raw shellfish in a microwave, due to the possibility of uneven heating.
- Do not use the microwave for home canning or bottling. Improperly canned or bottled foods may spoil and be dangerous to eat.
- Always check the temperature of food before serving.
- Food cooking times will vary with microwave wattage (MAFF rating). When following recipes and on-pack cooking instructions always check the MAFF rating/wattage of the appliance being used (marked on the front of the microwave) and follow the corresponding cooking advice.
INSTALLATION
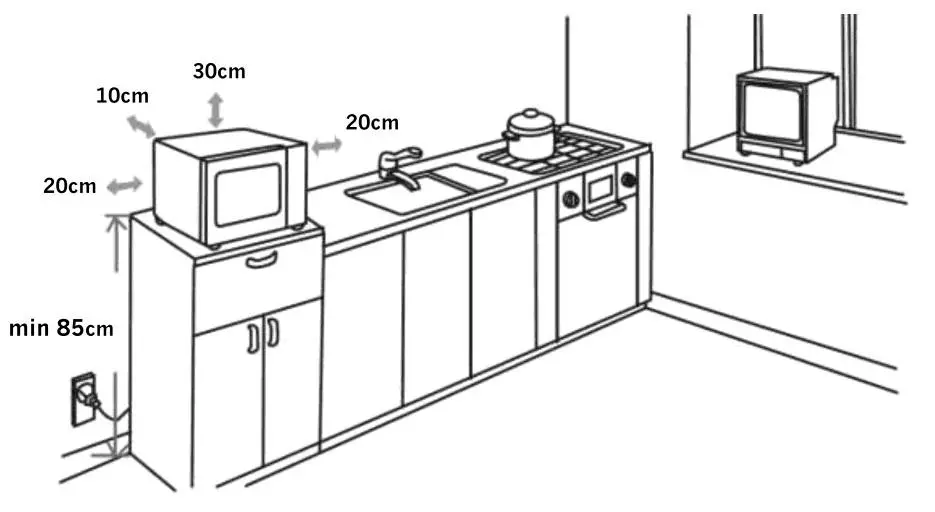
- This microwave is designed to be free-standing and is not intended to be used ‘built in’ or in a cabinet.
- Select a level surface away from televisions, cookers and other heat-producing appliances.
- Ensure adequate ventilation and allow a clearance of
• 20cm at each side of the oven
• 30cm clearance above the oven
• 10cm at the rear of the oven
• The minimum installation height is 85cm - Ensure that the cable is not close to any sharp or hot surfaces or where it is likely to cause a trip hazard.

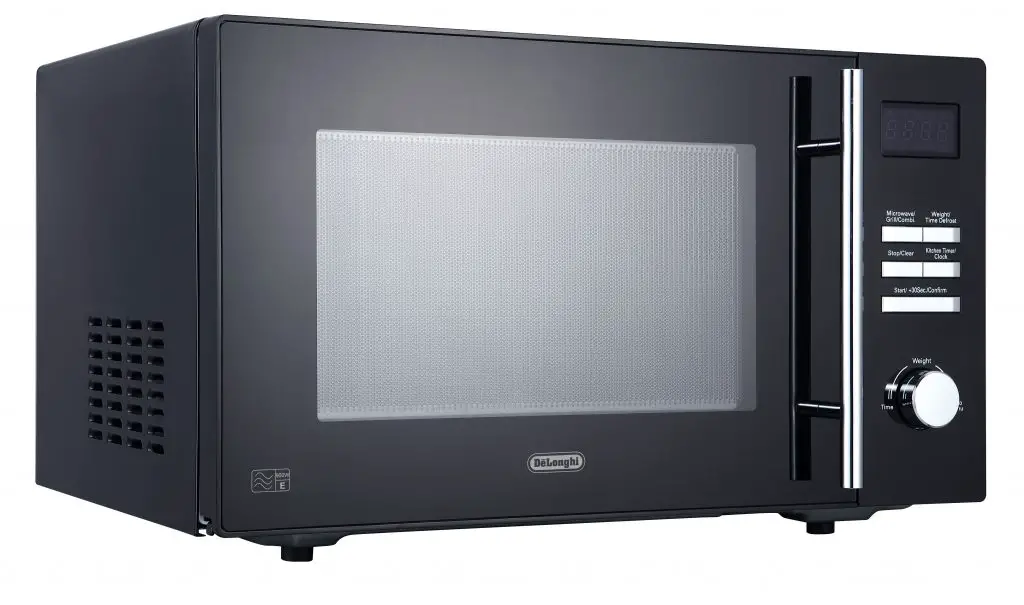
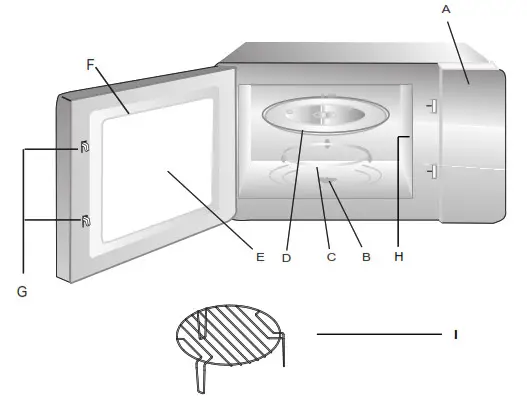
| A. Control panel B. Turntable shaft C. Turntable roller D. Glass turntable E. Door with viewing panel |
F. Seal G. Interlocking catches H. Waveguide cover I. Grill rack |
- Ensure all packaging materials, protective film and adhesive tape are removed and check the oven and door for any damage. Do not remove the waveguide cover.
- Assemble as shown above and ensure that the glass turntable is correctly positioned on the shaft and roller.
- Ensure all packaging materials, protective film and adhesive tape are removed and check the oven and door for any damage. Do not remove the waveguide cover.
- When using the microwave do not fit the grill rack.
- When using the grill, place the grill rack onto the glass turntable.
- When using the combination modes the grill may be used as required.
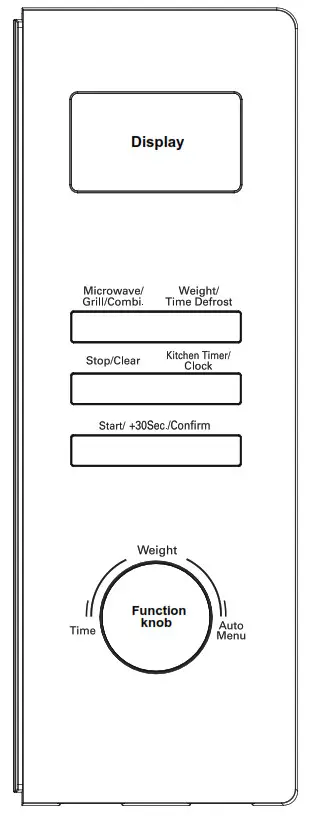
CONTROL PANEL
 |
 |
TIME INCREMENTS
| Cooking time | Increments |
| 0 – 1 min | 5 sec |
| 1 – 5 min | 10 sec |
| 5 – 10 min | 30 sec |
| 10 – 30 min | 1 min |
| 30 – 95 min | 5 min |
SETTING THE CLOCK
- Fully unwind the cable, plug in and switch on. The microwave will emit a single bleep and the display will show 0:00.
- Press the KITCHEN TIMER / CLOCK button TWICE (the hour digit will flash) and then turn the FUNCTION knob until the correct hour is displayed.
- Press the KITCHEN TIMER / CLOCK button again (the minute digits will flash) and turn the FUNCTION knob until the correct minute is displayed.
- Press the KITCHEN TIMER / CLOCK button again to save the setting.
Note: If the oven is unplugged or turned off at the mains the clock setting will be lost.
SELECTING THE OVEN POWER LEVEL AND COOKING MODE
The default on the microwave oven is set to cook at full power unless otherwise changed. To select a lower power setting or to select grill or combination cooking modes, either
- Press the MICROWAVE / GRILL / COMBI button repeatedly or alternatively
- Press the MICROWAVE / GRILL / COMBI once and turn the FUNCTION knob to scroll through the options available.
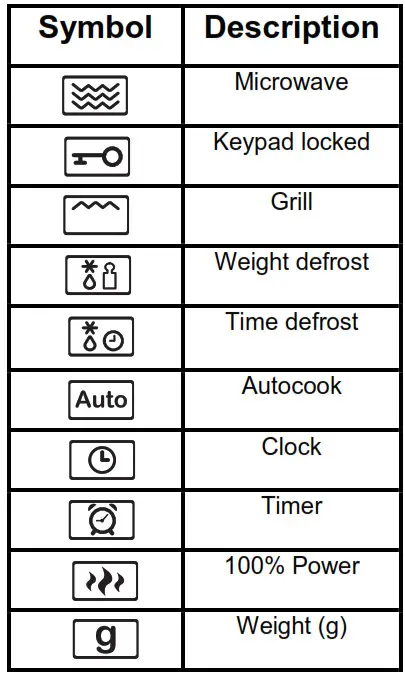
The power or cooking mode selected will be shown in the display.
| Display | Cooking mode | Power level / Cooking method |
| P100 | Microwave | 100% |
| P80 | Microwave | 80% |
| P50 | Microwave | 50% |
| P30 | Microwave | 30% |
| P10 | Microwave | 10% |
| G | Grill | Grill |
| C-1 | Combination | Microwave (55%) and grill (45%) |
| C-2 | Combination | Microwave (36%) and grill (64%) |
TO STOP COOKING PROCESS OR CANCEL SETTINGS
- The oven can be paused at any time by briefly pressing the STOP / CLEAR button during operation or by opening the door.
- The oven can be stopped at any time by pressing the STOP / CLEAR button TWICE.
CHILD LOCK
This function helps prevent accidental operation during cleaning or unsupervised operation of the oven by children.
To activate the lock
Press and hold the STOP / CLEAR button until the display shows[ ] (approx. 3 seconds), a single long bleep is heard.
To deactivate the lock
Press and hold the STOP / CLEAR button until a single long bleep is heard (approx. 3 seconds).
KITCHEN TIMER
The clock can be used to set a countdown timer.
- Press the KITCHEN TIMER / CLOCK button ONCE and the display will show 00:00.
- Turn the FUNCTION knob until the required time interval is displayed (5 seconds to 95 minutes) and press the START / +30SEC / CONFIRM button to save.
- The timer will now start to count down. When the set time has elapsed the oven will bleep five times.
MICROWAVE COOKING (uses the microwave)
- Place the food to be cooked in a suitable microwave-safe container and cover.
- Pull open the door, place the container in the center of the glass turntable and securely close the oven door.
- Press the MICROWAVE / GRILL / COMBI button, and select the microwave power level of choice (see ‘Power levels’ table for options).
- Press the START / +30SEC / CONFIRM button to save the setting and turn the FUNCTION knob until the required cooking time is displayed (5 seconds to 95 minutes). Please note that the increments that the timer increases varies depending on the length of cooking time required (see ‘Time increment’ table) For example, when choosing a cooking time between 1 and 5 minutes the timer will increase in increments of 10 seconds.
- Press the START / +30SEC / CONFIRM button. A bleep will be heard, the microwave will start to cook and the timer will start to count down.
- Cooking can be interrupted to stir the contents or check cooking progress by opening the door. Settings will be retained and cooking will restart when the door is closed and the START / +30SEC / CONFIRM button is pressed.
- After the cooking time has finished, five bleeps will sound and the microwave will turn off automatically.
- Allow food to stand for 30 seconds to one minute before stirring or serving.
- The oven can be stopped at any time by pressing the STOP / CLEAR button, or by opening the door. Pressing the STOP / CLEAR button twice will clear settings and stop the cooking program.
Notes:
- To check the time during oven operation, press the KITCHEN TIMER / CLOCK button and the time will briefly be displayed before returning to the countdown timer.
- To check the power level during oven operation, press the MICROWAVE / GRILL / COMBI button and the time will briefly be displayed before returning to the countdown timer.
EXPRESS MICROWAVE MODE (uses the microwave)
This function allows the oven to be set quickly at 30 seconds increments.
- Place the item to be cooked in a suitable microwave-safe container. Open the door and position the container in the center of the glass turntable. Securely close the microwave door.
- Press the START / +30SEC / CONFIRM button to cook on full power for 30 seconds. Each successive press of the button will increase the cooking time by 30 seconds. The microwave will start to cook and the timer will start to count down as normal.
GRILL COOKING (uses the grill)
- Place the food to be cooked in a suitable grill-safe container. Pull open the door and place the container in the center of the oven or alternatively place the food directly on the grill rack with a grill safe collecting tray beneath.
- Securely close the oven door.
- Press the MICROWAVE / GRILL / COMBI button and turn the FUNCTION knob or press the button repeatedly until ‘G’ is shown in the display.
- Press the START / +30SEC / CONFIRM button to save the setting and turn the FUNCTION knob until the required cooking time is displayed (5 seconds to 95 minutes).
- Press the START / +30SEC / CONFIRM button. A bleep will be heard, the grill will start to cook, the timer will start to count down.
- Cooking can be interrupted to stir contents or check cooking progress by opening the door. Settings will be retained and cooking will restart when the door is closed and the START / +30SEC / CONFIRM button is pressed.
- Approximately halfway through the grill program, two beeps will be heard as a reminder to turn food over if two side grilling is required.
- After the cooking time has finished, five beeps will sound, and the grill turns off automatically.
- The oven can be stopped at any time by pressing the STOP / CLEAR button, or by opening the door. Pressing the STOP / CLEAR button twice will clear settings and stop the cooking program
COMBINATION COOKING (uses the microwave and grill)
- This function combines both cooking methods and two preset programs are available.
•Combination mode 1 – 55% of cooking time is by microwave and 45% by the grill
•Combination mode 2 – 36% of cooking time is by microwave and 64% by the grill - Place the food to be cooked in a suitable microwave and grill-safe container. Pull open the door and place the container in the center of the oven or alternatively place the food directly on the grill rack with a microwave and grill safe collecting tray beneath.
- Press the MICROWAVE / GRILL / COMBI button and select the desired combination mode (C-1 or C-2).
- Press the START / +30SEC / CONFIRM button to save the setting and turn the FUNCTION knob until the required cooking time is displayed (5 seconds to 95 minutes).
- Press the START / +30SEC / CONFIRM button. A bleep will be heard, the grill will start to cook and the timer will start to count down.
- The oven will start to cook and the timer will start to count down.
- After the cooking time has finished, five beeps will sound and the oven will turn off automatically.
- Allow food to stand for 30 seconds to one minute before serving.
- The oven can be stopped at any time by pressing the STOP / CLEAR button, or by opening the door. Pressing the STOP / CLEAR button twice will clear settings and stop the cooking program.
DEFROSTING
- Weight defrost
1.1. Weigh the item to be defrosted and place in a suitable microwave-safe container. Open the door and position the container in the center of the glass turntable. Securely close the microwave door.
1.2. Press the WEIGHT / TIME DEFROST button and the display will show dEF 1,
1.3. Enter the weight of the item (100 – 2000g) by turning the FUNCTION knob until the corresponding weight is displayed.
1.4. Press the START / +30SEC / CONFIRM button. The microwave will start to defrost and the timer will count down.
1.5. After the cooking time has finished, five beeps will sound and the microwave will turn off automatically. - Time defrost
Where the maximum weight is above 2000g the time defrost function can be used.
2.1. Place the item to be defrosted in a suitable microwave-safe container. Open the door and position the container in the center of the glass turntable. Securely close the microwave door.
2.2. Press the WEIGHT / TIME DEFROST button TWICE and the display will show dEF 2.
2.3. Enter the defrost time (maximum 95 minutes) using the FUNCTION knob.
2.4. Press the START / +30SEC / CONFIRM button. The microwave will start to defrost and the timer will count down.
2.5. After the cooking time has finished, five beeps will sound and the microwave will turn off automatically.
MULTISTAGE COOKING (uses the microwave and/or grill function)
The oven can be programmed to carry out up to two consecutive functions. For example, if you wish to microwave at 50% power for 5 minutes and then grill for 7 minutes.
- Place the item to be defrosted in a suitable microwave and grill-safe container. Open the door and position the container in the center of the glass turntable. Securely close the microwave door.
- Press the MICROWAVE / GRILL / COMBI button and select ‘P50’ and press the START / +30SEC / CONFIRM button.
- Turn the FUNCTION knob to until 5:00 minutes is displayed. DO NOT press START / +30SEC / CONFIRM button.
- Press the MICROWAVE / GRILL / COMBI button and select ‘G’ and turn the FUNCTION knob to select grilling time (e.g. 7minutes).
- Press the START / +30SEC / CONFIRM button, the microwave will start to cook immediately and then work through the cooking sequence.
- A bleep is heard at the end of each stage and if the grill option is used two beeps will be heard approximately halfway through this step to prompt a user to turn item over.
- Cooking can be interrupted to stir the contents or to check the cooking progress by opening the door. Settings will be retained and cooking will restart when the door is closed and the START / +30SEC / CONFIRM button is pressed.
- After the cooking time has finished, five beeps will sound and the microwave will turn off automatically.
- Allow food to stand for 30 seconds to one minute before stirring or serving.
- The oven can be stopped at any time by pressing the STOP / CLEAR button, or by opening the door. Pressing the STOP / CLEAR button twice will clear settings and stop the cooking program.
Note: Defrost function (time or weight) can only be programmed at the start of this function.
EXTENDING THE COOKING TIME DURING USE
If additional cooking time is anticipated during operation in any of the cooking (not weight defrost) modes press the START / +30SEC / CONFIRM button to extend the cooking time by 30 seconds. Each successive press of the button will extend the cooking time by 30 seconds.
AUTO MENU FUNCTION (uses the microwave)
The oven has a pre-programmed cooking menu that can be used immediately from start-up just by turning the FUNCTION knob clockwise.
- Place the item to be cooked in a suitable microwave-safe container. Open the door and position the container in the centre of the glass turntable. Securely close the microwave door.
- Turn the FUNCTION knob to the RIGHT and select the auto-cooking program of choice (see table below). Press the START / +30SEC / CONFIRM button to save the setting.
- Turn the FUNCTION knob to select the weight / or volume corresponding to the item being cooked.
- Press the START / +30SEC / CONFIRM button. The microwave will start to cook and the timer will start to count down from the preset time.
- After the cooking time has finished, five bleeps will sound. Allow food to stand 30 seconds to one minute before stirring or serving.
| Display | Food | Weight / quantity | Instructions |
| A-1 | Pizza | 200g 400g |
To warm chilled pizza. |
| A-2 | Meat | 250g 350g 450g |
For even cooking, cut meat into small equally sized pieces and place onto a microwave-safe plate. Turn meat over halfway through the cooking cycle.
The cooking times are guidelines only —check that meat is cooked through before consuming. |
| A-3 | Vegetable | 200g 300g 400g |
Boiled or steamed vegetables. Prepare vegetables and place in bowl.
If boiling — cover vegetables with boiling water. If steaming – add 2 tablespoons of water per 100g of vegetables. Cover bowl with microwave-safe cling film and pierce the cling film before operation. |
| A-4 | Pasta | 50g 100g |
Place pasta in a bowl with eight times the quantity of water and cover.
If using pasta with longer cooking times (e.g. fusilli) additional cooking may be required. |
| A-5 | Potato | 200g 400g 600g |
For best result, use potatoes at room temperature and once the potatoes are cooked, wrap them in tin foil for at least 5 minutes to cook through. Larger or cold potatoes may need additional cooking. |
| A-6 | Fish | 250g 350g 450g |
Place food in a bowl and cover. Check that fish is cooked through before consuming. |
| A-7 | Beverage | 1 cup (120m1)2 cups (240m1) 3 cups |
Heating liquid from 5-10°C. Use a wide neck cup/mug and do not cover. |
| A-8 | Popcorn | 50g 100g |
To avoid damage to the microwave oven, do not use regular paper bags or glassware. Follow the manufacturer’s instructions when using a microwave popcorn popper |
CLEANING
Clean the oven and seals to remove food debris on a weekly basis and more often if required. Failure to maintain the oven and seals in a clean condition could lead to deterioration of the surface or seals, adversely affect the life of the oven and possibly result in a hazardous situation (possible release of microwave energy). Clean the oven after each use, if food is cooked uncovered and especially if fatty foods are cooked and the grill function is used.
1. Switch off, unplug the oven and allow the oven to cool completely.
2. Wipe surfaces and seals with a soft damp cloth (not wet). Do not use abrasive cleaning products or metal scrapers to clean the glass door of the oven as this could damage the surface and cause breakage. Do not immerse in water. Do not use a steam cleaner.
3. The grill rack, glass turntable and turntable roller can be washed in hot water with a little washing-up liquid. NOT SUITABLE FOR
DISHWASHERS.
4. Always allow surfaces to fully dry before using the oven again.
GUIDE FOR MATERIALS SUITABLE FOR USE IN THE OVEN
| Material | Suitability for use in | ||
| Microwave | Grill | Combination | |
| Glassware | Heat resistant only | Heat resistant only | Heat resistant only |
| Ceramicware | Heat resistant only | Heat resistant only | Heat resistant only |
| Plastic containers Not melamine |
Microwave-safe only Avoid using with food with high fat or sugar contents |
No | No |
| Plastic film | Microwave-safe only | No | No |
| Kitchen paper | Only for reheating do not leave unattended |
No | No |
| Metal tray or
rack |
No | Yes | Yes |
| Aluminium foil & foil containers | No | No | No |
| Browning dishes | Place upturned plate on the glass turntable (to prevent heat stress) before using | No | No |
DO NOT use metallic containers for food and beverages, aluminium foil, or any other metal trimmed packaging in the oven.
GENERAL MICROWAVE COOKING ADVICE
- Food cooking times will vary with microwave wattage (MAFF rating). When following recipes and on pack cooking instructions always check the MAFF rating / wattage of the appliance being used (marked on the front of the microwave) and follow the corresponding cooking advice.
- Beverages can result in delayed eruptive boiling; therefore care must be taken when handling the container.
- Remove lids from containers before placing in the microwave, pierce plastic films and do not use vessels with sealed or restricted openings since they are liable to explode.
- Pierce the skin or membranes of food (e.g. potatoes, apples, fish, chicken, eggs) in several places before cooking. Never cook or heat eggs in their shell or whole hard-boiled eggs, as they may explode even after cooking has been completed.
- Ensure food is similar size and density. Large dense items take longer to cook than small ones e.g. potatoes take longer to cook than peas.
- Food quantity will affect the cooking time, e.g. two potatoes take longer than one.
- The shape of food will affect the cooking time; place the thickest part of food on the outside of the plate.
- Leave food to stand for a short period after cooking or defrosting to allow the temperature to become uniform.
TROUBLESHOOTING
| Observation | Potential cause / solution |
| Oven will not start | Plug not fully inserted into the mains socket or not switched on |
| Door is open | |
| Incorrect operation | |
| Do you have a power cut? | |
| Arcing or sparking | Unsuitable materials used when using microwave. |
| Oven is operated when empty | |
| Spilled food remains in oven cavity | |
| Unevenly cooked food | Unsuitable materials used when using microwave. |
| Food not fully defrosted before cooking | |
| Power setting for cooking time is incorrect | |
| Food was not turned or stirred during cooking | |
| Uneven sized food | |
| Overcooked food | Power setting for cooking time is incorrect |
| Cooking period set too long | |
| Undercooked food | Food not fully defrosted before cooking |
| Unsuitable materials used when using microwave | |
| Ventilation ports restricted | |
| Power setting for cooking time is incorrect | |
| Incomplete defrosting | Unsuitable materials used when defrosting |
| Defrost time too short | |
| Food was not turned or stirred during defrosting | |
| Uneven sized food | |
| Noisy turntable | Food residue between turntable roller and base of cavity |
| Glass turntable not correctly positioned on roller | |
| Oven light does not illuminate | Bulb has burnt out |
| Start button has not been pressed |
TECHNICAL SPECIFICATION
| Delon hi 25 Litre Microwave Oven With Grill | |||
| Model | AG925EA9(F) | ||
| Rated Voltage & Frequency | 230 – 240V AC 50Hz | ||
| Rated Power Input | Microwave | 1400 – 1450W | |
| Grill | 950 – 1000W | ||
| Rated Microwave Output | 850 – 900W | ||
| MAFF rating | E | ||
| Rated Microwave Frequency | 2450MHz | ||
| Capacity | Overall | 25 litre | |
| Useable | 16 litre | ||
| Class rating | 1 (earthed) | ||
| BS 1362 fuse | 13A | ||
| Diameter of glass turntable | 315mm | ||
 This appliance complies with European regulation no. 1935/2004 of 27/10/2004 on food contact materials. The product is classified as a Group 2, Class B, ISM appliance. Group 2 includes all ISM (Industrial, Scientific or Medical) appliances in which radio frequencies are generated intentionally and/or used in the form of electromagnetic radiation to treat materials, together with electroerosion equipment. Class B includes equipment for domestic use or on-premises directly connected to low voltage electricity supply for supplying buildings for residential use.
RECYCLING ELECTRICAL PRODUCTS
PLUG / WIRING ADVICE
The wires in this mains lead are coloured in accordance with the following UK electrical code:
BLUE = NEUTRAL
BROWN = LIVE
GREEN + YELLOW = EARTH
Non-rewireable plug
This appliance may be fitted with a “non‐rewireable” plug. If you need to change the fuse in a “non‐rewireable” plug, the fuse cover must be refitted. If the fuse cover is lost or damaged, the appliance must not be used.
Rewireable plug
The colors of the wires in the mains lead of this appliance may not correspond with the coloured markings identifying the terminals in a rewireable plug. Rewireable plugs should only be replaced by a suitably competent person. If in doubt, consult a qualified electrician.
The BLUE wire must be connected to the terminal marked with the letter N
The BROWN wire must be connected to the terminal marked with the letter L
The GREEN & YELLOW wire must be connecting to the terminal marked with the letter E or the earth symbol .
| If you encounter any problems with this product please call our customer care team on 0345 640 30 30 |
Produced in China for Argos Limited, 489 – 499 Avebury Boulevard Central Milton Keynes MK9 2NW. UK. |
![]()
This product is guaranteed against manufacturing defects for a period of

This product is guaranteed for twelve months from the date of original purchase.
Any defect that arises due to faulty materials or workmanship will either be replaced, refunded or repaired free of charge where possible during this period by the dealer from whom you purchased the unit.
The guarantee is subject to the following provisions:
- The guarantee does not cover accidental damage, misuse, cabinet parts, knobs or consumable items.
- The product must be correctly installed and operated in accordance with the instructions contained in this manual. A replacement copy of this instruction manual can be obtained from argos-support.co.uk
- It must be used solely for domestic purpose.
- The guarantee will be rendered invalided if the product is re-sold or has been damaged by inexpert repair.
- Specifications are subject to change without notice.
- The manufacturer disclaims any liability for the incidental or consequential damages.
- The guarantee is in addition to, and does not diminish your statutory or legal rights.
Guarantor: Argos Ltd
489 – 499 Avebury Boulevard
Central Milton Keynes
MK9 2NW
www.amos-support.co.uk