DEYE SUN300 Microinverter SUN

Product Information
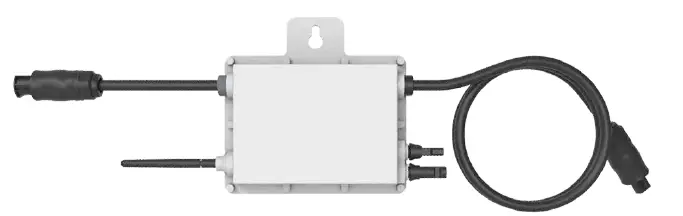
The DEYE Microinverter SUN is a solar energy product manufactured by Offgridtec GmbH. It is designed to convert the direct current (DC) generated by a PV module into alternating current (AC) for use in electrical systems. The microinverter is equipped with a status LED that provides visual indications of its operation.
Components
- Microinverter
- PV Module
- WiFi Antenna
- Solarman App
Contact Information
Offgridtec GmbH
Im Gewerbepark 11
84307 Eggenfelden
Tel: +49 8721 91994-00
Email: [email protected]
Website: www.offgridtec.com
Christian & Martin Krannich
Installation and Configuration
- Assemble the microinverter and the PV module according to the connection diagrams provided in the user manual.
- Screw the WiFi antenna to the microinverter.
- Connect the PV module and the AC connection cable to start up the microinverter.
- Observe the status LED for the following indications:
- Start procedure: 3-fold fast red flashing intervals
- Test procedure: 2-fold slow red flashing intervals
- Feeding process: blue flashing intervals (slow = low output power / fast = high output power)
- After the start-up and test procedure (approximately 15 seconds), the inverter will start feeding power, provided that the PV module generates the required start-up voltage of 20V under load.
Monitoring Device
- Download and install the Solarman Smart smartphone app from the following links:
- iOS: DownloadApp
- Android:
Download App
- Grant all necessary app permissions for proper function, including notifications, Bluetooth, and location services.
Just read and follow the safety and installation instructions below. You can find and download the instructions or other technical documents on the manufacturer’s website: www.offgridtec.com
Components
| Microinverter | PV Module | Solarman App |

Installation and configuration
Install the microinverter and the PV module.
Screw the WiFi antenna to the microinverter.
Start up the microinverter by connecting the PV module and the AC connection cable.
The status LED signals the start-up of the microinverter.
- Start procedure: 3-fold fast red flashing intervals
- Test procedure: 2-fold slow red flashing intervals
- Feeding process: blue flashing intervals (slow = low output power / fast = high output power)
After the start-up and test procedure (about 15 seconds), the inverter starts feeding, provided that the PV module generates the start-up voltage of 20V required by the inverter (under load!).
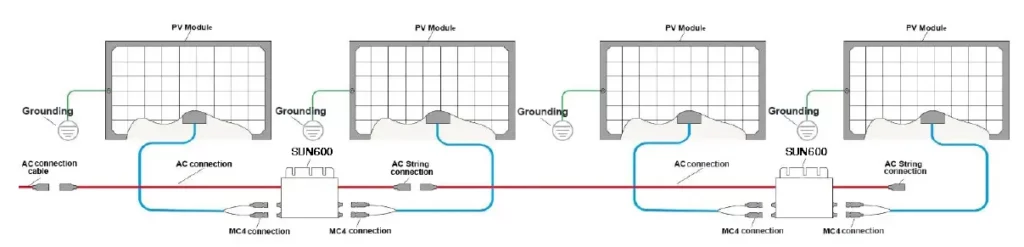
Installation
Assemble the microinverter(s) according to the following connection diagrams.
DEYE SUN300:

2x DEYE SUN300: 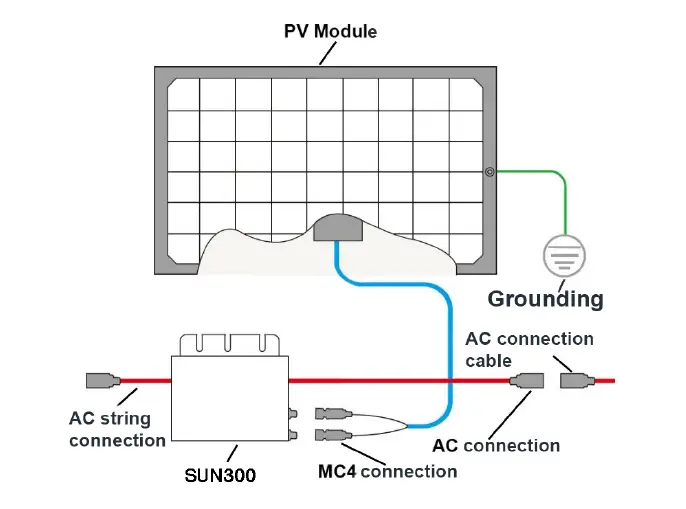
DEYE SUN600: 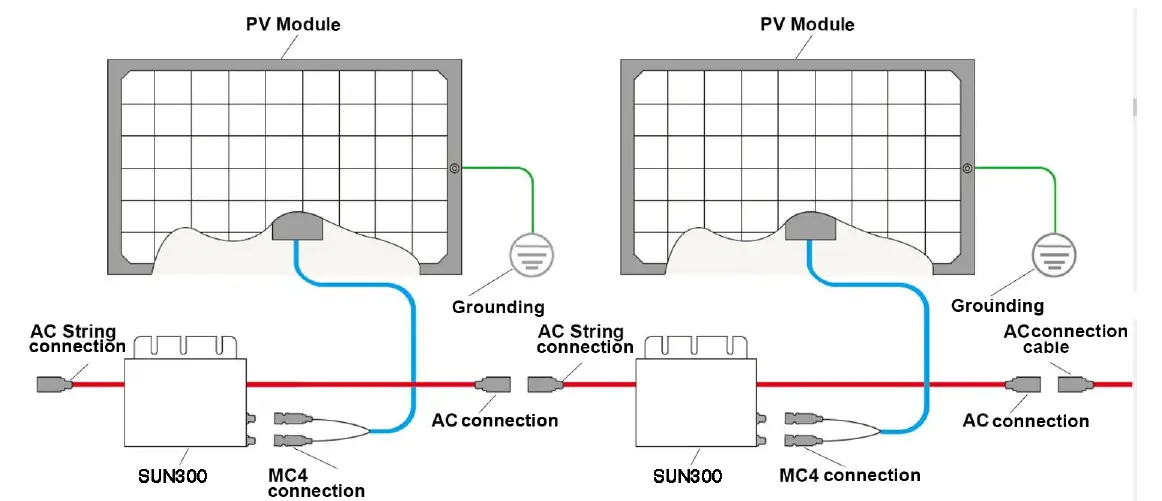
2x DEYE SUN600 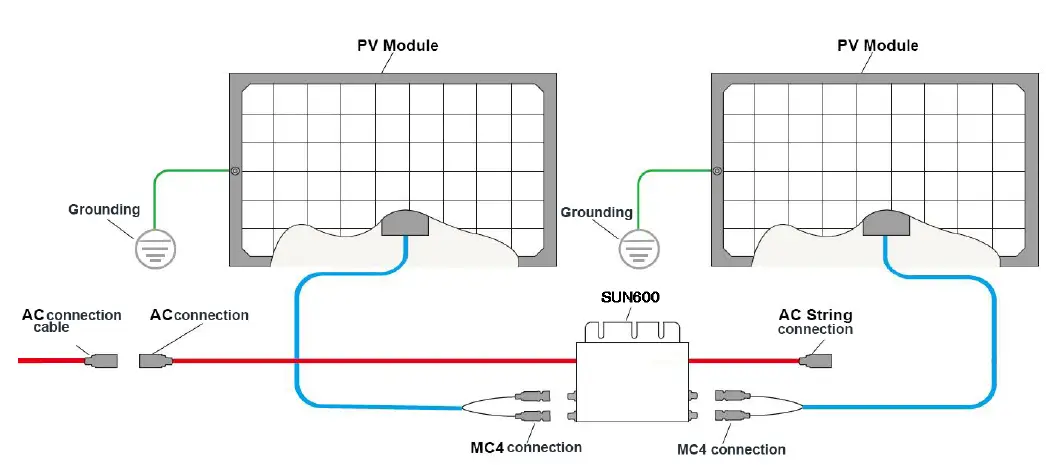
Monitoring device
- Download and install the Solarman Smart smartphone app.
 https://apps.apple.com/de/app/solarman-smart/id1469487897
Demo: https://www.solarman.cn/download/video/iOS_DemoVideo_AP_EN.MP4
https://play.google.com/store/apps/details?id=com.igen.xiaomaizhidian&hl=de&gl=US
Demo: https://www.solarman.cn/download/video/Android_DemoVideo_AP_EN.mp4
NOTE:
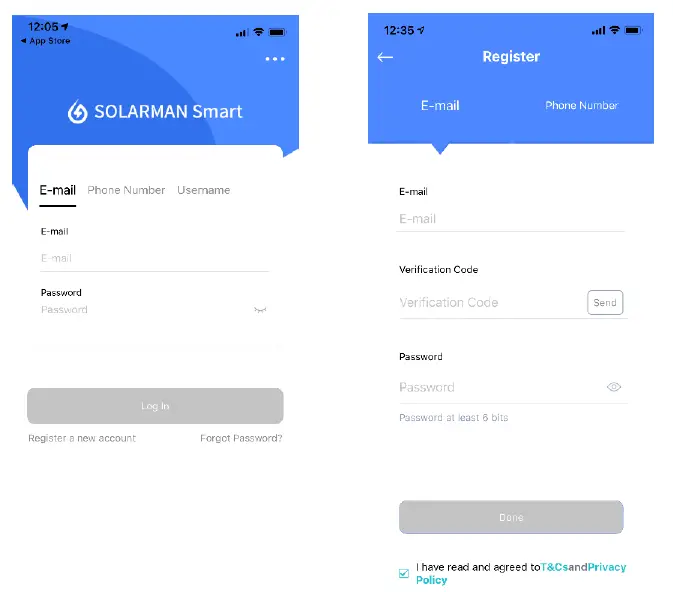
All app permissions must be granted for proper function (notifications, Bluetooth, location services, etc.). - Start the smartphone app and create a new profile by selecting „Register a new account“.
- Enter your email address and press the “Send” button under Verification Code. You will now find a message with a 6-digit code in your e-mail inbox. Enter this code in the app under “Verification Code”. Then enter a password and click on
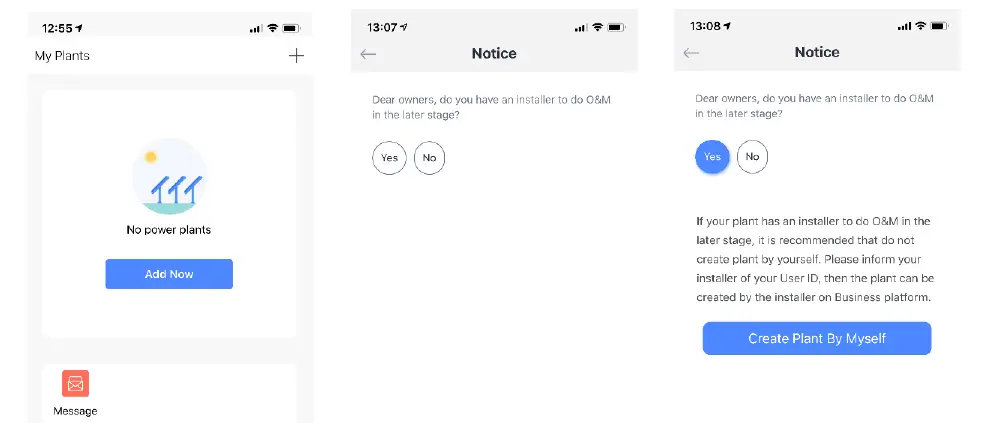
“Done”. - Now press the “Add Now” button and select “Yes” for the O&M request. Then click on “Create Plant By Myself”.
- The Solarman Smart App will automatically detect your location. Then press the “Next” button.
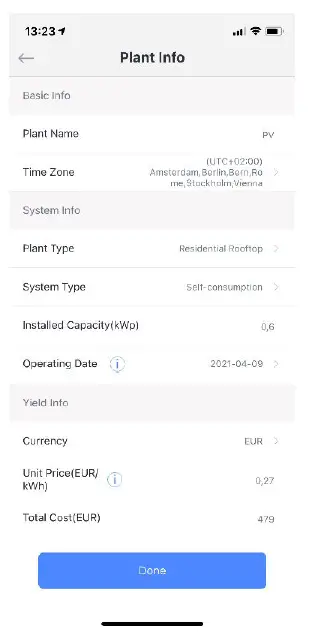
- Now fill in all information of your PV system and press “Done”:
- Plant Name
- Time Zone
- Plant Type
- System Type: PV plant type
- All on Grid: the generated power is fed directly into the public power grid.
- Self-consumption: the generated power is used by yourself and a surplus is fed into the public power grid.
- Storage System: the PV system can store the generated energy (batteries).
- Installed Capacity (kWp): Max. total capacity (Decimal numbers are indicated with a dot!)
- Operating Date: Installation date
- Currency:
- Unit Price (EUR/kWh): Savings / kWh of your energy supplier
- Total Cost (EUR): Assets Acquisition cost
 The setup of your PV system in the Solarman Smart App is now complete.
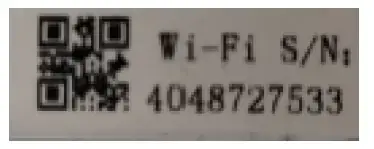
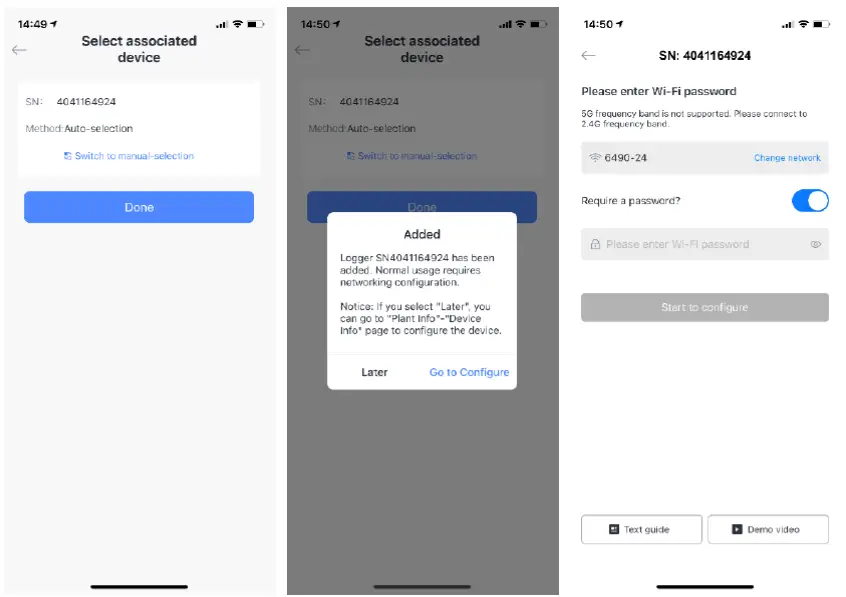
- Press the “Go to Add” button to add the WiFi interface (logger) of the inverter (not the serial number of the inverter!). The WiFi serial number can be entered manually or scanned with the smartphone camera.
- After you have added the WiFi interface via “Add” and “Done”, go to “Go to Configure”. Select your WiFi network and enter the corresponding password. Finally, go to “Start to configure”.
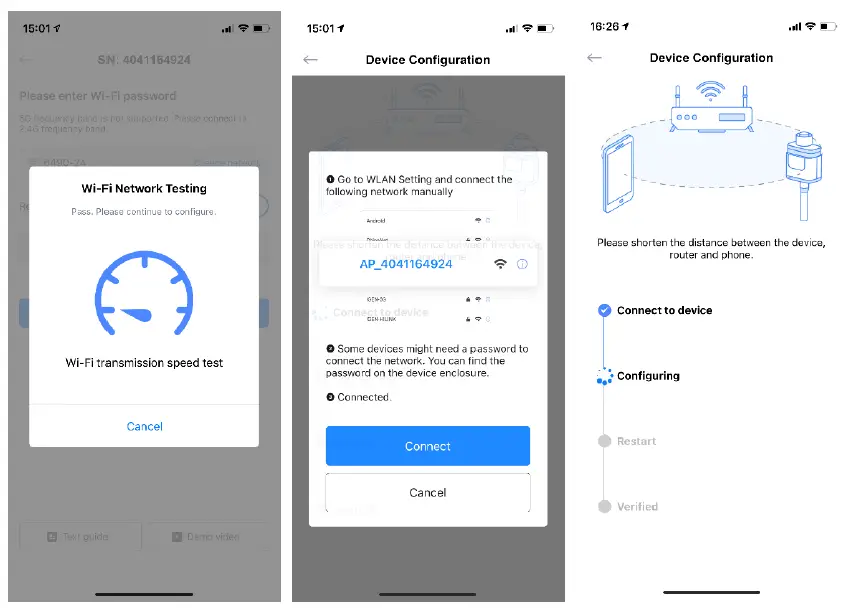
- Your network speed is checked and a prompt appears to switch to the WiFi settings of your smartphone and connect to the WiFi interface of the inverter. To do this, simply press the “Connect” button. In the list of WiFi devices within range, select the device “AP_XXXXXXX” (XXXXXXX stands for the WiFi serial number of the inverter). The password is “12345678”. Once the WiFi connection is established, go back to the app, which tests the settings and transfers them to the logger.
- The logger will be added to your PV system and after about 10 minutes the data will be displayed in the Solarman Smart App.
Note:
The illustrations of the monitoring device refer to the IOS version of the Solarman Smart App. The illustration may differ for the Android version.
If any of the steps listed cannot be completed successfully, exiting and relaunching the app may help. It may be necessary to exit the app and restart it. Please make sure you have a current version of your smartphone operating system to avoid possible compatibility problems.
Annex 1 – Disclaimer
The warranty does not apply under the following conditions:
- Damage is caused by improper use or an unsuitable environment.
- Damage is caused by improper use or an unsuitable environment.
- Damage due to exceeding the operating temperature.
- Arcing, fire, explosion and other accidents caused by failure to observe the destination or operating instructions.
- Disassemble and repair the inverter without authorization.
- Damage caused by force majeure.
- Damage caused by transport or handling.
- Consequential damage due to connected devices
Changes without prior notice! Version No. V1
Offgridtec GmbH
Im Gewerbepark 11 84307 Eggenfelden Germany
Contact:
Tel +49 (0) 8721 9199400 Mail [email protected]
Onlineshop: www.offgridtec.com
General information Offgridtec GmbH
Im Gewerbepark 11 84307 Eggenfelden WEEE-Reg.-Nr.DE37551136
Contact information
Tel: +49 8721 91994-00
Email: [email protected]
web: www.offgridtec.com Christian & Martin Krannich
Account Sparkasse Rottal-Inn Account: 10188985
BLZ: 74351430
IBAN: DE697435143000188985
BIC: BYLADEM1EGF (Eggenfelden)
Seat and local court
HRB: 9179 Register Court Landshut
Tax number: 141/134/30045 Ust-IdNr: DE287111500 Court of jurisdiction: Mühldorf am Inn