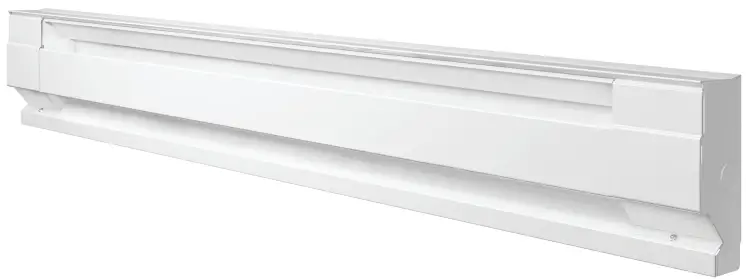
Dimplex 720001 Electric Baseboard Heater

Thank you for your purchase! Question or problem? Let us solve it with a single phone call, email or online chat! We’ll save you a trip back to the store!
CONTACT
- Customer Service
- Phone: 888.346.7539 (from US or Canada)
- email: [email protected]
- gdaheat.com
IMPORTANT INSTRUCTIONS
When using electrical appliances, basic precautions should always be followed to reduce the risk of fire, electric shock, and injury to persons, including the following
- Read all instructions before installing or using this heater.
- A heater has hot and arcing or sparking parts inside. Do not use it in areas where gasoline, paint, or flammable liquids are used or stored.
- This heater is hot when in use. To avoid burns, do not let bare skin touch hot surfaces. Keep combustible materials, such as furniture, pillows, bedding, papers, clothes, and curtains away from heater.
- To prevent a possible fire, do not block air intakes or exhaust in any manner. Do not use on soft surfaces, like a bed, where openings may become blocked.
- Do not insert or allow foreign objects to enter any ventilation or exhaust opening as this may cause an electric shock or fire, or damage the heater.
- Use this heater only as described in this manual. Any other use not recommended by the manufacturer may cause fire, electric shock, or injury to persons.
- This heater must be installed in a fixed, permanent location.
- CAUTION – High Temperature. Keep electrical cords, drapes, and other furnishings away from heater.
- Extreme caution is necessary when any heater is used by or near children or invalids and whenever the heater is left operating and unattended.
SAVE THESE INSTRUCTIONS
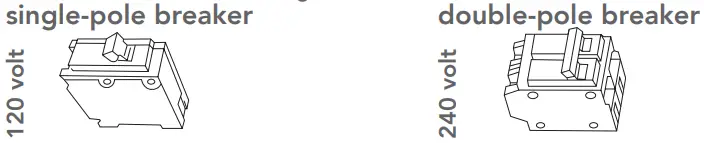
KNOW YOUR VOLTAGE!
If you are uncomfortable working with electricity, running electrical supply wire or installing a circuit breaker, please consult a licensed electrician. Make sure power to the heater is turned off at the main disconnect panel prior to doing any work on a heater. Serious injury or electrocution can result from electric shock.
CHECK YOUR BREAKER! If you’re replacing an existing heater, check the labels of the old heater and use the same voltage
WARNING: Connecting a heater to a voltage higher than what’s listed on its rating label will destroy the heater and could start a fire. A heater will not heat properly when connected to a voltage lower than what’s listed on its rating label
TOOLS REQUIRED OR YOU MAY NEED
INSTALLATION INSTRUCTIONS
- All electrical work and materials must comply with the National Electric Code (NEC), the Occupational Safety and Health Act (OSHA), and all state and local codes.
- Use copper conductors only.
- Do not install below an electrical receptacle.
- Do not install the heater against combustible low-density fiberboard.
- CAUTION – High temperature. Keep electrical cords, drapes, and other furnishings away from heater.
- To reduce the risk of fire, do not store or use gasoline or other flammable vapors and liquids in the vicinity of the heater.
- Maintain at least 12 inches minimum clearance from all objects above and in front of baseboard, and 6 inches minimum on both sides.
NOTE: All baseboard heaters require a thermostat (sold separately). A double pole thermostat has an OFF setting; a single-pole thermostat does not. Electric heaters must be installed on a circuit dedicated to electric heaters, they cannot share a circuit with outlets, lights, or other appliances.
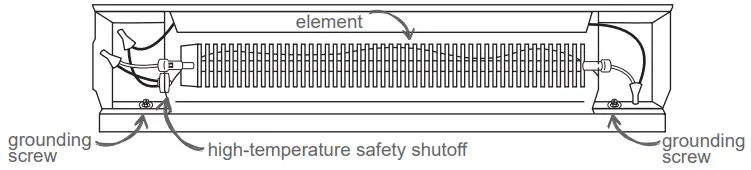
PARTS OF YOUR HEATER
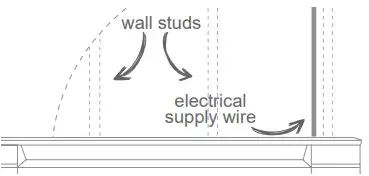
STEP 1 Locate or route electrical supply wires
- For best results, install your baseboard heater under a window, along an outside wall, or as close as possible to an outside door.
- Install only in a horizontal position, not in a vertical position.
- Remove any floor base trim or molding so the heater will set flush against the wall. It can sit directly on any floor surface, including carpet.
- If you’re wiring a WALL thermostat, route the electrical supply wire from the circuit breaker to the wall thermostat, and then to the heater. If you’re wiring a BUILT-IN model BTF thermostat, route the electrical supply wire from the circuit breaker directly to the heater.
- Turn off the electrical power supply. Locate wall studs and electrical supply wires. DON’T CUT ANY FACTORY CONNECTIONS UNTIL YOU’RE READY TO WIRE
- Remove only the wiring compartment cover. Wire connections can be made on either side of the baseboard heater
- Remove one of the slotted knockouts in the wiring compartment

- Install a cable clamp connector (not included). Pull supply wires through the cable clamp connector leaving 6-inch wire leads.
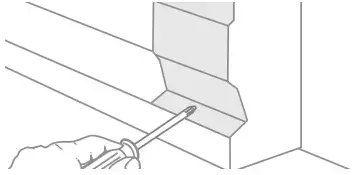
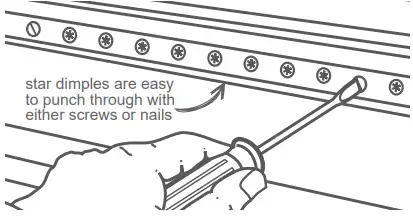
STEP 2 Mount heater to wall
- Mount the heater securely to two or three wall studs
- Connect the grounding lead to the green grounding screw on the side you’re wiring
STEP 3 Baseboard wiring
- KNOW YOUR VOLTAGE and CHECK YOUR BREAKER!
- All baseboard heaters require three supply wires. For 120 volt baseboard wiring you will have 1 hot, 1 neutral and 1 ground. For 240 and 208 volt baseboard wiring you will have 2 hots and 1 ground; no neutral needed.
- If you’re wiring a model 8F2025, go to page 5 now.
- Cut ONLY ONE factory connection and ONLY on the side you will be wiring! If your heater is a 120
volt model, cut ONLY the factory connection that has one black and one white wire!
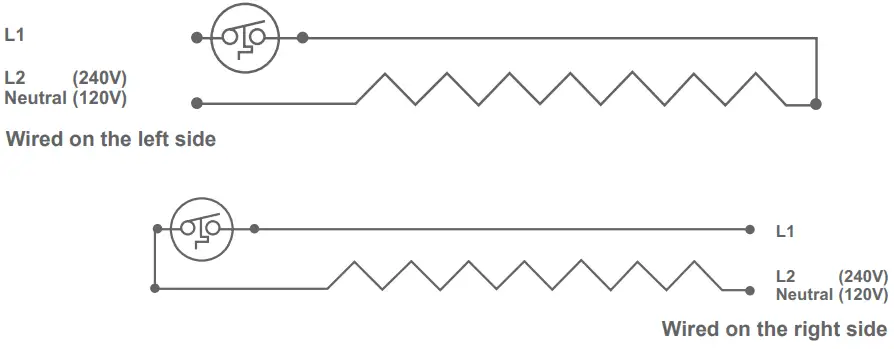
LEFT SIDE WIRING
If you’re wiring on the left side, CUT ONLY THE ONE FACTORY CONNECTION SHOWN.
RIGHT SIDE WIRING
If you’re wiring on the right side, CUT ONLY THE FACTORY CONNECTION ON THIS SIDE.

- If you’re wiring a BUILT-IN model BTF or Smart-Base thermostat for your heater, go to those instructions now and follow that installation. When complete, proceed to OPERATING INSTRUCTIONS
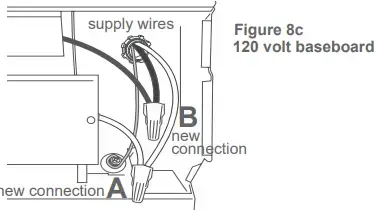
- If you’re wiring a WALL thermostat for your heater, follow the instructions and diagrams below or on page 5, for your voltage and the side you’re wiring. Route your electrical supply wires from the circuit breaker to the wall thermostat, and then to the baseboard heater.
240/208 or 240 VOLT ONLY
LEFT SIDE WIRING
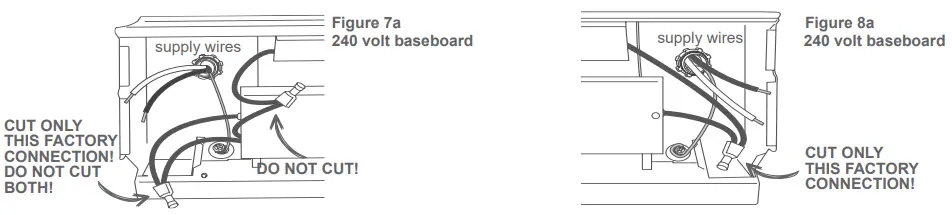
RIGHT SIDE WIRING
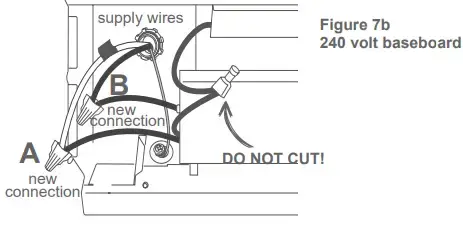
- Connect one supply wire to one of the heater wires with a wire connector (not included). For 240 and 208 volts, it doesn’t matter which heater wire. Both supply wires (black and white) are hot.
- Connect remaining supply wire to remaining heater wire with a wire connector (not included).
120 VOLT ONLY
LEFT SIDE WIRING

RIGHT SIDE WIRING
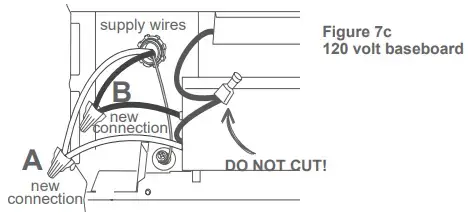
- For 120 volts, connect the neutral (white) supply wire to the white heater wire.
- Connect remaining supply wire to remaining heater wire with a wire connector (not included).
Proceed to STEP 4 Finish installation
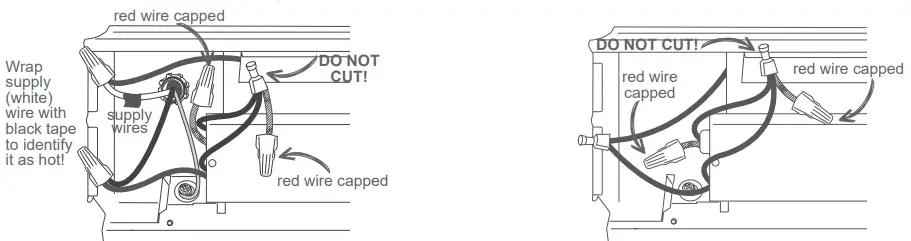
8F2025 ONLY
- If you’re wiring a BUILT-IN model BTF or Smart-Base thermostat for your heater, go to those instructions now and follow that installation. When complete, proceed to OPERATING INSTRUCTIONS.
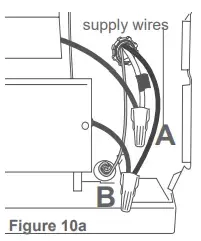
- If you’re wiring a WALL thermostat for your heater, FOLLOW THE INSTRUCTIONS BELOW and the diagrams in Figures 9a or 10a, depending on which side you’re wiring. Route your electrical supply wires from the circuit breaker to the wall thermostat, and then to the baseboard heater.
LEFT SIDE WIRING
Cut the factory connection without the red wire.
- Connect one supply wire to one heater wire.
- Connect the remaining supply wire to the remaining heater wire.
RIGHT SIDE WIRING

Cut the factory connection. Do not cut any connections on the left side.
- Connect one supply wire to one heater wire.
- Connect the remaining supply wire to the remaining heater wire.
Wrap supply (white) wire with black tape to identify it as hot!
8F2025 ONLY – CHANGING WATTAGE
All model 8F2025 model baseboard heaters are factory set for 2500 watts. If you want to change to 2000 watts, follow the diagrams in Figure 9b or 10b, depending on which side you’re wiring. If you do not want to change your baseboard heater’s wattage, proceed to STEP 4 Finish installation.
- For 2000 watt applications: Cut red wire and cap both loose ends with wire connectors, or wrap loose ends with electrical tape. Proceed to STEP 4 Finish installation.
STEP 4 Finish installation
Screw wiring compartment cover(s) back on. Turn power back on at the main disconnect panel. Proceed to OPERATING INSTRUCTIONS
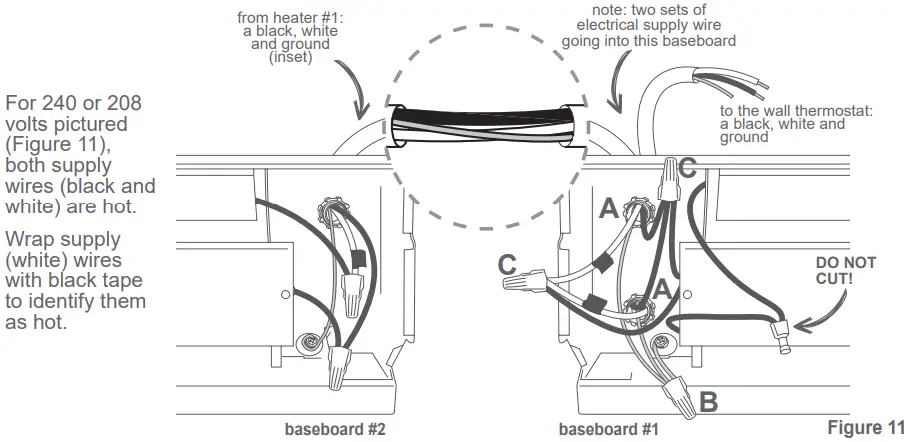
MULTIPLE BASEBOARD HEATERS WITH ONE THERMOSTAT
- Multiple baseboard heaters can be wired in parallel on the same circuit breaker (check national and local codes for safety requirements). Additional electrical supply wire and cable clamp connectors are required. The thermostat and heaters must be in the same room. If you’re using a BTF, follow those instructions.
- The maximum amperage load you can put on one circuit breaker is limited to either 80% of the circuit breaker capacity, or the maximum amperage rating of the thermostat, whichever is lower.
- A. Two sets of electrical supply wire go through two cable clamp connectors of baseboard #1. One set goes to the thermostat and the other set goes to baseboard #2.
- B. The two supply ground wires need another short piece of copper wire to make the 3-wire connection with the ground screw in baseboard #1.
- C. For baseboard #1, connect each of the cut baseboard wires to one of the supply wires going to the thermostat, and one of the supply wires going to the other baseboard. They both must have a 3-wire connection.
- For baseboard #2, make the connections as shown on pages 4 and 5.
- Screw wiring compartment covers back on. Turn power back on at the main disconnect panel. Proceed to OPERATING INSTRUCTIONS
WARRANTY
For more effective and safer operation and to prolong the life of the heater, read the Owner’s Guide and follow the instructions. Failure to properly maintain the heater will void any warranty and may cause the heater to function improperly.
LIMITED LIFETIME WARRANTY:
Manufacturer will repair or replace any Electric Baseboard (F) heater found to be defective at any time. These warranties do not apply:
- Damage occurs to the product through improper installation or incorrect supply voltage;
- Damage occurs to the product through improper maintenance, misuse, abuse, accident, or alteration;
- The use of unauthorized accessories or unauthorized components constitutes an alteration and voids all warranties. Refer to Manufacturer website or call customer service at 888.346.7539 for list of authorized accessories and components.
- Manufacturer’s warranty is limited to repair or replacement.
- In the event Manufacturer elects to replace any part of your product, the replacement parts are subject to the same warranties as the product. The installation of replacement parts does not modify or extend the underlying warranties. Replacement or repair of any product or part does not create any new warranties.
If you believe your product is defective, please contact Manufacturer during the warranty period, for instructions on how to have the repair or replacement processed.
Parts and Service
- Visit gdaheat.com/parts for information on where to obtain parts and service.
- To register your product, visit gdaheat.com/register
OPERATING INSTRUCTIONS
- Make sure all wires are properly connected and installation is complete before you turn on the heater.
- Do not tamper with the high temperature safety shutoff.
Complete installation
- After installation, turn your heater to the highest setting and let it run for 30 minutes. Some smoking may occur as the element initially burns off residue from manufacturing.
- If your heater shows signs of overheating, such as glowing red or repeatedly getting unusually hot and shutting off, immediately turn off the circuit breaker and review the “KNOW YOUR VOLTAGE” section or call us.
How to operate your heater
- The room temperature is controlled by a thermostat located either on the wall, or on the heater. Once installation is complete and power has been restored, follow the steps below for your thermostat.
- If you have a mechanical wall or built-in thermostat:
- Turn the thermostat knob all the way to the right.
- When the room reaches a comfortable temperature, turn the knob to the left, just until it clicks and the heater turns off. The heater will automatically keep the room at this setting.
- To reduce the room temperature, turn the knob to the left. To increase the room temperature, turn the knob to the right.
- If you have an electronic thermostat, follow the instructions in the programming and operating guide included with your thermostat.
High-temperature safety shutoff
All baseboard heaters come with a built-in high-temperature safety shutoff that stops electricity flowing to the heater if it gets too hot inside. This automatically resets after cooling.
Reduce-Reuse-Recycle
This product is made primarily of recyclable materials. You can reduce your carbon footprint by recycling this product at the end of its useful life. Contact your local recycling support center for further recycling instructions.
TROUBLESHOOTING
| Symptom Problem Solution | ||
| Heater is
making noise. |
1. Heater makes creaking, popping or humming noises. | 1. Baseboard heater cabinet may need slight adjustment. Call technical support team toll free at 888.346.7539. |
| Heater doesn’t
work at all. |
1. Circuit breaker is faulty.
2. Supply connections are loose. |
1. Call a licensed electrician.
2. Turn off power at main disconnect panel. Inspect and/or tighten all the wire connectors inside the heater at connection points inside junction boxes or at the wall thermostat. |
| Heater doesn’t turn off. | 1. Thermostat is defective.
2. No thermostat hooked up to control heater. 3. Incorrect heater wattage for room size. |
1. Replace thermostat.
2. A thermostat is required for all heaters. Purchase a built-in or wall thermostat for your heater. 3. Install a higher wattage model or additional heaters if circuit allows. |
| Heater doesn’t
get hot. |
1. Circuit breaker is 120 volts and heater is 240 volts.
2. Multiple baseboard heaters wired in series. |
1. Double check voltage of the heater to make sure it matches voltage of the circuit. Replace heater with a model that is 120 volts.
2. Wire baseboard heaters in parallel (see MULTIPLE BASEBOARD HEATERS WITH ONE THERMOSTAT on Page 6). |
More frequently asked questions on our website here: gdaheat.com/FAQ
MAINTAINING YOUR HEATER
Clean heater at least every 24 months or as required.
- It is important that you verify power has been turned off and the element is cool.
- Wipe cover with damp cloth and dry.
- Use a vacuum with an attachment to clean the heater. Do not touch the element.
- Turn power back on at the main disconnect panel.
Any service other than cleaning should be performed by an authorized service representative.
INTERNAL HEATER WIRING DIAGRAMS
INTERNAL HEATER WIRING DIAGRAMS 8F2025 ONLY