DirecTV Sat-Go Manual
Package Contents
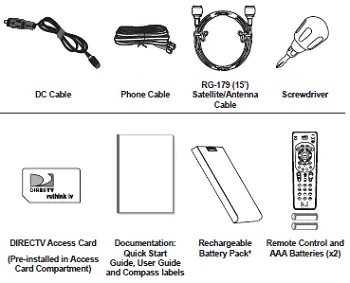
The following items are included with your Sat-Go portable TV and antenna:
A full charge of the rechargeable battery pack can take as much as 8 hours. It is recommended that you charge the batteries overnight before the fi rst use.
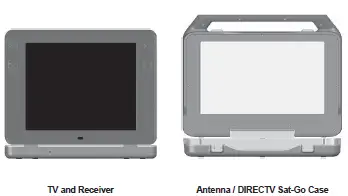
Inside the DIRECTV Sat-Go Case
When you open the case, you’ll notice the DIRECTV Sat-Go case is the antenna and contains the easily removable TV.

DIRECTV Sat-Go TV Display
2 DIRECTV Sat-Go! TV Receiver
3. DIRECTV Sat-Go Case Cover / Antenna
Sat-Go Case / Antenna
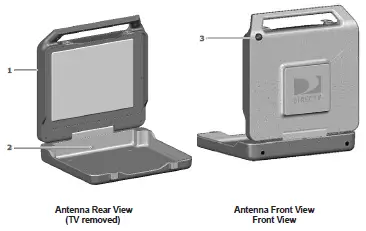
1. DIRECTV Sat-Go Case Cover / Antenna
2. Antenna Connector
3. Compass, which also shows elevations
Sat-Go TV
An integrated TV receiver is stored inside the DIRECTV Sat-Go case.
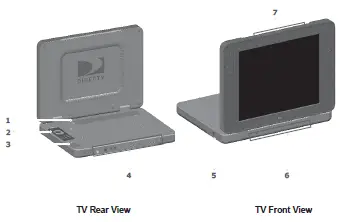
1. Cable Compartment : The Cable compartment stores the AC power cable (permanently attached).
2. Remote Control
3. Access Card Slot : The DIRECTV access card is pre-installed. The access card allows you to view DIRECTV®
programming. The slot also contains a RESET button.
4. TV Connector Panel
5. DC Power Connector
6. DIRECTV Receiver Panel
7. TV Display Panel
TV Display Panel
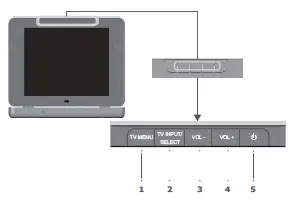
1. TV MENU Displays the TV Menu to adjust TV settings. This menu automatically times out after a few
seconds.
2. TV INPUT / SELECT Changes the input source, or selects the highlighted TV MENU item when the TV MENU is on.
3. VOL – – Decreases volume. – Moves the highlight bar up or down to move through menu items when the TV MENU is on.
4. VOL + – Increases volume. – Moves the highlight bar up or down to move through menu items when the TV MENU is
on.
5. (POWER) Turns the TV on or off.
TV Receiver Panel
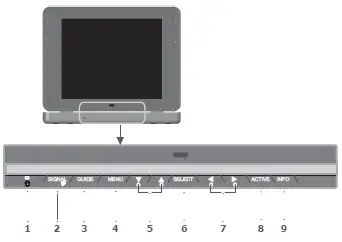
1. (Earphones). Connects personal earphones to the TV for personal listening.
2. SIGNAL Displays the Signal Strength Meter. This is used for pointing the antenna for the strongest possible signal. Press and hold this key for 1 second to exit the Signal Strength Meter display.
3. GUIDE Displays the onscreen program guide.
4. MENU Displays the DIRECTV Menu, a compact menu of settings and services.
5. ▼ ARROW ▲ / – CH + Moves the highlight bar up or down to move through the onscreen menus. In live TV, changes the channel up or down; in the Menu or Guide, scrolls up or down.
6. SELECT Selects the item highlighted.
7. ◀ ARROW ▶ Moves the highlight bar left or right to move through the onscreen menus.
8. ACTIVE Displays the DIRECTV Interactive Home Page—local weather and more!
9. INFO Displays the channel banner or info to a highlighted program or channel cell.
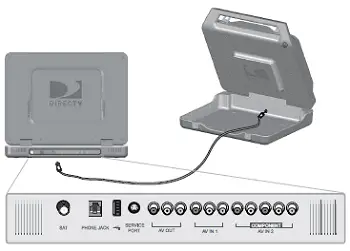
TV Rear Connector Panel
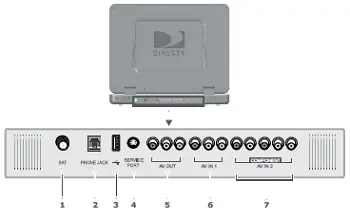
1. SAT Connects the DIRECTV Sat-Go TV to the DIRECTV Sat-Go antenna or a residential DIRECTV antenna.
2. PHONE JACK Connects the TV to a telephone wall jack. We require a land-based telephone connection to communicate periodically with your TV.
3. (USB Port) For future use.
4. SERVICE PORT (RS232) Used as a service port for upgrading the DIRECTV Sat-Go software.
5 AV OUT (Composite video and audio output) Connects the TV to equipment with a composite AV input, such as a VCR or DVD player.
6. AV IN 1 (Composite video and audio input) Connects the TV to equipment with a composite AV output, such as a VCR or DVD player. 7. COMPONENT AV IN 2 (Component video and audio input) Connects the TV to equipment with a component AV output, such as a DVD player.
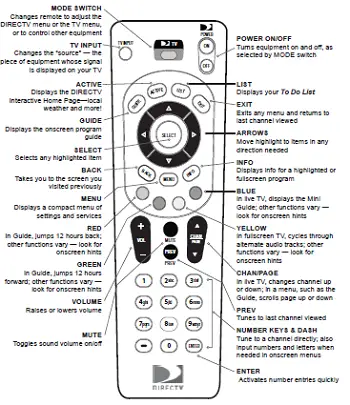
Remote Control
1) Remote Control in DIRECTV Mode All the functions for DIRECTV® service can be controlled with the Remote control. Some function can also be adjusted with the buttons on the TV display panel.
NOTE: To use your remote control in DIRECTV mode, the MODE switch on the
remote control should be set to the DIRECTV logo
NOTE: Don’t worry about getting stuck in a menu. You can always press EXIT to return to video.
2) Remote Control in TV Mode All the functions for TV mode can be controlled with the Remote control. Some function can also be adjusted with the buttons on the front panel of the LCD.
NOTE: To use your remote control in TV mode, the MODE switch on the remote
control should be set to TV.
NOTE: Don’t worry about getting stuck in a menu. You can always press EXIT to return to video.
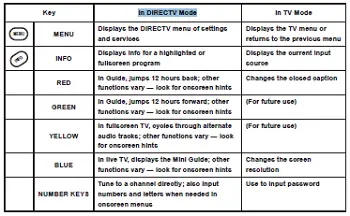
Difference of key operation in TV mode and DIRECTV mode – The following buttons are operated differently in TV mode and DIRECTV mode.
Inserting the Batteries
You must insert or replace the batteries in the remote control when you:
+ Purchase the DIRECTV Sat-Go.
+ Find that the remote control is no longer operating correctly.
1. Remove cover from the battery compartment by sliding it downward.
2. Insert 2 AAA batteries (supplied), matching the positive (+) and negative (–) at each end.
3. Slide the cover back on to complete installation.
CAUTIONS:
– Insert two 1.5V AAA-type batteries. Don’t mix used batteries with new batteries.
– Remove batteries when you don’t use the remote control for long periods. Liquid
leakage from old batteries may cause operation failure.
– Make sure there are no objects between the remote control and its sensor.
– Don’t place the remote control near a heater or damp place. Strong impact on
remote controller may cause operation failure.
– The signal from the remote control may be subjected to interference from sunlight or other strong light.
Inserting Battery into the TV
You must insert or replace the batteries in the DIRECTV Sat-Go system when you:
+ Purchase the DIRECTV Sat-Go system.
+ Find that the DIRECTV Sat-Go TV is no longer operating correctly.
TIP: The Low Portable Battery symbol displays onscreen when the portable battery is
low. The power light will also blink every second for 10 minutes before switching the DIRECTV Sat-Go to standby mode automatically. (Battery usage time is about 1 hour; battery charging time is about 8 hours.)

1. Open the DIRECTV Sat-Go case and remove the TV by lifting the TV from the DIRECTV Sat-Go case.
2. On the back of the TV, unscrew the two screws holding the battery cover in place.
3. Remove the cover from the battery compartment by sliding it outward.
4. Insert lithium battery pack (supplied).
5. Slide the cover over the battery compartment to replace the battery cover.
6. Replace the two screws to hold the battery cover in place and complete the installation.
A full charge can take as much as 8 hours. It is recommended that you charge the batteries overnight before the fi rst use.
CAUTIONS:
– Remove batteries when you don’t use the DIRECTV Sat-Go system for long periods. Liquid leakage from old batteries may cause operation failure.
– Don’t place the TV near a heater or damp place. Strong impact on the TV may cause operation failure.
This section describes how to set up the DIRECTV Sat-Go TV and antenna. Select the most appropriate procedure depending on your requirements.
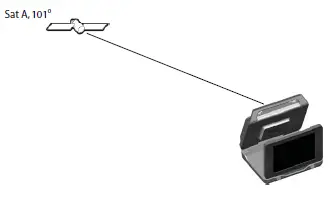
Finding a Suitable Antenna Site
When selecting a site to obtain a satellite signal, choose a location with an unobstructed view of
the southern sky–no trees, leaves, or buildings can be in the line of sight between the antenna
and the satellite. A suitable site requires the antenna have an unobstructed view of the southern sky and a fl at, stable surface.
The satellite is always located south of Texas. This means if you live in Miami, you must have a
clear line of sight to the southwest; if you live in San Francisco, you must have a clear line to the southeast.
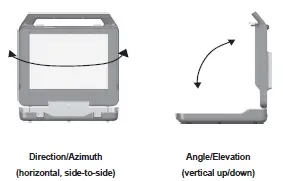
Depending on where you live, the antenna should be at an elevation angle between 30 and 60 degrees. Southern states point more toward 60 degrees; northern states point more toward 30 degrees.
TIP: The antenna case has an integrated compass to help you obtain the correct direction and angle based on your location.
Setting Up the DIRECTV Sat-Go TV and Antenna
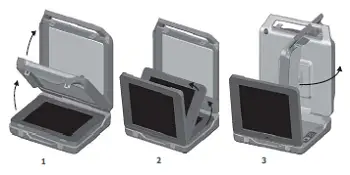
1. Open the DIRECTV Sat-Go case and antenna by opening the latches and lifting the handle.
2. Lift the TV display to an upright position allowing space to rotate the antenna. After rotating the antenna, you may remove the integrated TV/Receiver. (The antenna may fall over if not rotated prior to removing the TV/Receiver.) You may leave the TV in the case, or lift and remove it from the case, then move it a suitable viewing position.
3. Rotate the antenna counter-clockwise toward satellites in the southern sky.
TIP: Use the compass on the outer antenna case to fi nd the approximate antenna direction and to point the antenna towards the satellites in the southerly skies.
Connecting the DIRECTV Sat-Go TV to the Antenna
The DIRECTV Sat-Go comes pre-assembled with the Antenna cable connected to the SAT connector on the TV rear connector panel and to the SAT connector on the rear antenna base.
Note: You can place the antenna up to 15’ from the DIRECTV Sat-Go TV for remote viewing, and up to a maximum of 100’ with an optional RG-6 cable. A residential DIRECTV dish can also be connected via an optional RG-6 cable for in-home viewing.
Connecting the DIRECTV Sat-Go to Power
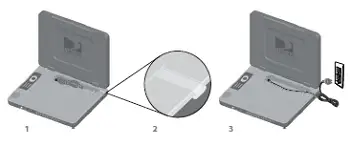
For AC power
1. Remove the cable cover from the cable compartment located in the TV receiver. The AC power cable is permanently connected to the receiver.
2. Remove the soft plastic cover plug from the top of the case and lay the AC power cable into the provided groove.
3. Plug the AC power cable into a grounded 3-prong outlet.
4. Replace the cable cover.
For DC power
1. Remove the DC cable from the DIRECTV Sat-Go case.
2. Remove the TV from the DIRECTV Sat-Go case.
3. Connect the DC cable to the DC connector on the side of the receiver and to a DC power source such as a cigarette lighter in a car or boat. The DC power cable is not permanently connected to the TV.
Note: The AC and DC cables should never be plugged into a power source at the same time.
Hibernation Mode
If you fold down the Liquid Crystal Display (LCD) when TV power is on, the LCD and speakers are turned off automatically. (The power to the TV is not turned off.)
Guided Setup and Activation
Now that your DIRECTV Sat-Go is hooked up and plugged in, you’re ready to fi nish all the details to begin receiving your DIRECTV® service.
1 Make sure the MODE SWITCH on the remote control is set to DIRECTV.
2 Press TV POWER ON. The DIRECTV Sat-Go TV will turn on.
3 Simply follow the onscreen directions to complete your setup functions. You’ll be guided though various selections and functions for setting up and optimizing your antenna signal and setup — including positioning your antenna and a system test.
Throughout the remainder of the Guided Setup, use the arrow keys on the remote control to move to an option or desired selection and then press SELECT.
a Select the desired language and press SELECT.
b Select antenna type Round Dish and press SELECT.
c Enter the ZIP Code for your location and press SELECT.
d Align the antenna, see “Aligning the Antenna” on page 25.
e Select Continue and proceed through the remainder of the Guided Setup.
4 Once completed, you will see a Welcome screen and now you’re ready to watch TV.
Important:
In order to protect your TV screen from burn-in (a side-effect caused when a stationary image is displayed for too long), the DIRECTV Sat-Go system interface automatically goes into screen saver mode, and displays a black screen with a moving logo when no key is pressed for 5 minutes or more while a stationary image is displayed on the TV. To dismiss the screen saver and return to what you were doing, press any key on the remote. Burn-in may cause permanent damage to your TV and DIRECTV is not liable for any damages that may be caused to your TV.
After Guided Setup: Getting a Satellite Signal
If the antenna is already aligned to the satellite, the TV automatically comes on when you press (POWER). If the antenna is not aligned to the satellite, a message displays on the screen, “Searching for Satellite.” You can easily realign the antenna using the Signal Strength Meter. If you need additional support, you can use antenna coordinates to help you point your antenna towards the satellites.
TIP: If you have already aligned the antenna using the coordinates for your region, you do not need to re-enter your ZIP code to get the coordinates for your location. Only if you leave the region would you have to re-enter your ZIP code to get the coordinates for the new location.
Determining Antenna Coordinates
Antenna coordinates (Direction and Angle numbers) are based on the ZIP code of your location. You can use these coordinates when aligning your antenna to the satellites.
1. Turn on the DIRECTV Sat-Go, press the (POWER) button on the TV display.
2. Select Repeat Satellite Setup in the Satellite menu. The ANTENNA INSTALLATION screen menu appears.
3. Select the antenna type Round (1 or 2 LNB).
4. Enter the ZIP code of your location. Select Continue and then select Signal Meter. The appropriate direction (azimuth) and angle (elevation) display on the screen.
5. Write down the antenna coordinates that display (Direction and Angle) on the line below each illustration
Note: Antenna coordinates will vary based on your location
6. Now align the antenna using these coordinates; go to view the signal meter (see “Aligning the Antenna with the Satellite” on page 25.
Aligning the Antenna with the Satellite
• The Signal Strength Meter will help you to fi ne-tune the antenna signal. It is important to obtain the strongest (peak) signal possible.
• The higher the signal, the less likely you are to experience signal outages during adverse weather.
Good Signal Strength = 60%
Minimum Signal Strength = 50%
1. Turn the DIRECTV Sat-Go on. Press (POWER) button on the TV display panel.
2. Press the Signal button on the receiver to display the Signal Strength Meter on the Test Signal Strength screen.
a. Point the antenna to the general southerly direction using the compass and/or use the Direction and Angle coordinates that display on the Signal Strength Meter screen to guide you as you rotate the antenna.
Set the antenna to the angle/elevation for your ZIP code as noted on the previous page.
b. Very slowly move the antenna from side-to-side horizontally to get the highest number, then slightly tilt the antenna angle up and down to obtain the optimum signal strength.
c. Pause for 3-5 seconds during antenna rotation to allow the Signal Strength Meter to update, which will show your current Direction and Angle coordinates and signal strength. An audible beep sounds and the beeps become faster as your signal strength becomes stronger.
d. Once you scan and obtain the optimal signal strength (60-70%), stop. Write down the actual angle and duration from the compass on the compass label included with the DIRECTV Sat-Go.
TIP: You may want to rotate the antenna past the peak signal a couple of times to make sure you stop on the strongest signal.
e. Press and hold the Signal button on the receiver to exit and watch live TV You have now successfully set up the DIRECTV Sat-Go and are receiving the DIRECTV satellite signal.
3. On the Signal Strength screen, Highlight Done and press SELECT.
Note: If this is a new setup, the Receiver will gather satellite information for a few minutes.
Moving the antenna after attaining signal lock may cause the antenna to lose signal lock and require you to realign the antenna.
Set Up Checklist
If the signal is not found, check the following to be sure the TV and antenna set-up have been properly followed:
• Verify all cable connections are correct and each connection is seated properly.
• Inspect the inside of each cable connector for dirt or damage to connector case/shield causing a possible short.
• Verify the antenna Direction and Angle coordinates for your location by ZIP code.
• Make sure there are no obstructions (trees, buildings, windows, corner or roof overhang, including your body or hands) – the signal does not pass through leaves, branches, glass, etc.
• Make sure the access card from your receiver is fully inserted into the access card slot and oriented correctly.
• Verify the antenna cable:
– Using the 15’ cable (provided), connect the antenna and receiver
– To place the TV and Receiver more than 15’ from the antenna RG-6 cable is highly recommended. Use of an RG-59 cable is not recommended and may cause performance problems.
• Some after-market, off-the shelf add-on components may not be as advertised. They might not work or could cause additional DC drops and signal amplitude attenuation. Remove such components, go back to the basic connections described in this manual and re-verify. • If you’ve verifi ed the above checklist items and the signal is still not found, change the Angle adjustment of the antenna slightly (+/-2 degrees, then +/- 4 degrees from the calledfor coordinate setting) and repeat the antenna alignment procedure.
Connecting Your DIRECTV Sat-Go to other Equipment
There are several ways to connect your DIRECTV Sat-Go to match your particular equipment setup and to gain optimum signal quality. The basic steps are as follows:
• Connect your DIRECTV Sat-Go to your VCR or DVD player
• Connect your DIRECTV Sat-Go to a telephone line
• Connect your DIRECTV Sat-Go to your second TV or monitor
• Plug in all power cords.
The following pages give detailed instructions on the types of connections you can make, depending on the equipment you have, in order to get the best picture and sound quality. Note that the back panels of your equipment may not exactly match those illustrated.
NOTE: Not all cables come with your DIRECTV Sat-Go you may need to purchase additional cables depending on your setup.
TIP: When working with cables, be sure to connect corresponding outputs and inputs (Video OUT to Video IN, Right Audio OUT to Right Audio IN, etc.). Never connect an IN to an IN or an OUT to an OUT. All A/V jacks and inputs are color coded. Always match the color of the plug to the same color of the jack.
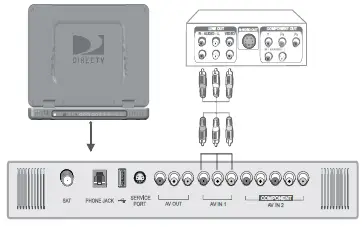
Connecting DIRECTV Sat-Go to a VCR, DVD player or PMP (personal media player) Depending on the connections on the back of your VCR or DVD player, you have the following options:
• Component Connection (Best Quality)
• A/V Connection (Better Quality)
These connections are described on the following. Component Connection (Best Quality)
1. Connect the Component video cable to the component video output jacks (Y/Pb/Pr) on the VCR or DVD Player and to the component video input jacks (COMPONENT AV IN 2) on the DIRECTV Sat-Go TV rear connector panel.
2. Connect the audio cable to the audio output jacks (L/R) on the VCR or DVD Player and to the COMPONENT AV IN 2 jacks (L/R) on the DIRECTV Sat-Go TV rear connector panel.
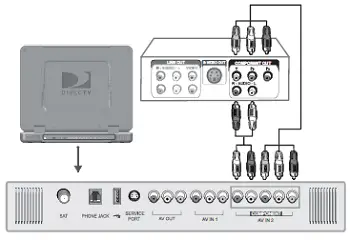
A/V Connection (Better Quality)
1. Connect the video cable to the video output jack on the VCR or DVD Player and to the
video input jack (AV IN 1) on the DIRECTV Sat-Go TV rear connector panel.
2. Connect the audio cable to the audio output jacks (L/R) on the VCR or DVD Player and to
the audio input jacks (AV IN 1) on the DIRECTV Sat-Go TV rear connector panel.