DR POWER Ton Electric log Splitter

Conventions used in this manual

This indicates a hazardous situation, which, if not avoided, result in death or serious injury.

This indicates a hazardous situation, which, if not avoided, result in minor or moderate injury.
NOTICE
This information is important in the proper use of your machine. Failure to follow this instruction could result in damage to your machine or property.
Serial Number and Order Number
A Serial Number is used to identify your machine and is located on the Serial Number Label on your machine. An Order Number is used to check and maintain your order history and is located on your packing slip. For your convenience and ready reference, enter the Serial Number and Order Number in the space provided on the front cover of this manual.
Additional Information and Potential Changes
DR Power Equipment reserves the right to discontinue, change, and improve its products at any time without notice or obligation to the purchaser. The descriptions and specifications contained in this manual were in effect at printing. Equipment described within this manual may be optional. Some illustrations may not be applicable to your machine.
General Safety Rules
Read this safety & operating Instructions manual before you use the DR 5 TON ELECTRIC LOG SPLITTER. Become familiar with the operation and service recommendations to ensure the best performance from your machine. If you have any questions or need assistance, please contact us at www.DRpower.com or call toll-free 1-800 DR-OWNER (376-9637) and one of our Technical Support Representatives will be happy to help you.
Labels
Your DR 5-TON ELECTRIC LOG SPLITTER carries prominent labels as reminders for its proper and safe use. Shown below are copies of all the Safety and Information labels that appear on the equipment. Take a moment to study them and make a note of their location on your Electric Log Splitter as you set up and before you operate the unit. Replace damaged or missing safety and information labels immediately.


Protect Yourself and Those Around You
This is a high-powered machine, with moving parts operating with high energy. You must operate the machine safely. Unsafe operation can create a number of hazards for you, as well as anyone else in the nearby area. Always take the following precautions when using this machine:
- Keep in mind that the operator or user is responsible for accidents or hazards occurring to other people, their property, and themselves.
- Always wear protective goggles or safety glasses with side shields while using the Electric Log Splitter to protect your eyes from possible thrown debris.
- Avoid wearing loose clothing or jewelry, which can catch on moving parts.
- We recommend wearing gloves while using the Electric Log Splitter. Be sure your gloves fit properly and do not have loose cuffs or drawstrings.
- Wear shoes with non-slip treads when using your Electric Log Splitter. If you have safety shoes, we recommend wearing them. Do not use the machine while barefoot or wearing open sandals.
- Wear long pants while operating the Electric Log Splitter.
- Use ear protectors or ear plugs rated for at least 20 dba to protect your hearing.
- Keep bystanders at least 50 feet away from your work area at all times. Stop the engine when another person or pet approaches.
Hydraulic Safety
Escaping pressurized fluid from hydraulic system leaks can have enough force to penetrate skin and cause serious injury or death.
Hydraulic fluid can remain pressurized while the motor is off due to the return spring force on the ram. Always follow these precautions:
- Always release residual energy from pressurized hydraulic fluid and allow the fluid to cool before doing any maintenance or repair work on the Electric Log Splitter.
- Please follow these steps to depressurize the system and release residual hydraulic energy before starting any repairs:
o Unplug the Electric Log Splitter from the power source.
o Move the operating handle down and up from one limit of travel to the other at least four times. Hold the handle for three seconds at each limit of travel. The ram should not move during the 4th cycle and should remain fully retracted.
o Visit our website at www.drpower.com, call 1-800-DR-OWNER (376-9637), or call a qualified hydraulic mechanic for assistance to replace worn components. - Never use your hand or any part of your body to check for hydraulic system leaks while the system is pressurized.
- Never remove the fill/dipstick cap from the hydraulic fluid port while the motor is running or while the tank is still warm after the motor is off. Hot pressurized fluid can cause serious injury, so wait for the hydraulic tank to cool before removing cap.
- The Electric Log Splitter must be operated on a level surface.
- Periodically check for hydraulic fluid leaks by placing a sheet of cardboard under the Electric Log Splitter while the system is running.
- Get professional medical help at once if hydraulic Fluid penetrates anyone’s skin.
- Never adjust the hydraulic system.
Safety for Children and Pets
Tragic accidents can occur if the operator is not alert to the presence of children and pets. Children are often attracted to the machine and the splitting activity. Never assume that children will remain where you last saw them. Always follow these precautions:
- Keep children and pets at least 50 feet from the working area and ensure they are under the watchful care of a responsible adult.
- Be alert and turn the machine off if children or pets enter the work area.
- Never allow children to operate the Electric Log Splitter.
Safety with Electric – Powered Machines
Never overlook the hazards of electricity. Always follow these precautions:
- Never open the switch box or motor cover. Never attempt any electrical repairs yourself. If in doubt, consult a qualified electrician, visit our website at www.DRpower.com or contact DR Power Equipment for toll-free support at: 1-800-dr-owner (376-9637) for help or information.
- Never use an extension cord that is not rated for outdoor use.
- Never operate the Electric Log Splitter if there is an electrical hazard present.
- Never operate the Electric Log Splitter in wet conditions.
- Never operate the Electric Log Splitter with a damaged electrical cord or damaged extension cord.
- Never pull on the electrical cord to move the machine.
- Always grasp the electrical cord plug when unplugging the cord from the outlet; never pull the plug out by the cord. Make sure your fingers do not touch the metal prongs when plugging or unplugging.
- Never operate the Electric Log Splitter unless the electrical cord is plugged into a properly grounded outlet, which supplies 110-120v power, and is protected by a 15-amp circuit breaker.
- Never tamper with safety devices. Check their proper operation regularly.
- If you will use an extension cord, keep the connection between the electrical cord and the extension cord well away from any water.
- Never use an extension cord longer than 25 feet and smaller than 12 awg in diameter, or longer than 50 feet and smaller than 10 awg in diameter; the cord will produce a voltage drop that will prevent the motor from supplying full power and may cause damage to the motor. Use of a smaller diameter (larger awg number) extension cord could result in melting of the insulation or even create a fire.
- Always keep the electrical cord and/or extension cord away from excessive heat, oil, and sharp objects.
General Safety
Operating this Electric Log Splitter safely is necessary to prevent or minimize the risk of death or serious injury. Unsafe operation can create a number of hazards for you. Always take the following precautions when operating this Electric Log Splitter:
- Your Electric Log Splitter is a powerful tool, not a plaything. Exercise extreme caution at all times. The machine is designed to Split Logs. Do not use it for any other purpose.
- Know how to stop the Electric Log Splitter quickly; see “stopping the Electric Log Splitter” in Chapter 3.
- Never operate your unit on a slippery, wet, muddy, or icy surface. Exercise caution to avoid slipping or falling.
- Check the Electric Log Splitter before turning it on. Never use the machine without ensuring that all guards and shields are in place. Replace damaged, missing or failed parts before using the Splitter.
- Never, under any conditions, remove, bend, cut, fit, weld, or otherwise alter standard parts on the Electric Log Splitter. This includes all shields and guards. Modifications to your machine could cause personal injuries and property damage and will void your warranty.
- Allow only one person to operate the Electric Log Splitter at any time.
- If the machine should start making an unusual noise or vibration, turn the machine off and unplug the electrical cord, then inspect for damage. Vibration is generally a warning of trouble. Check for damaged parts and clean, repair and/or replace as necessary.
- Never tamper with safety devices. Check their proper operation regularly.
- Never allow people who are unfamiliar with these instructions to use the Electric Log Splitter. Allow only responsible individuals who are familiar with these rules of safe operation to use your machine.
- Do not operate the Electric Log Splitter from ground level. Place Electric Log Splitter at a comfortable height (24-32 inches), on a stable, flat, and level work surface where there is plenty of room for handling material. Secure the Electric Log Splitter to the work surface if it tends to slip, walk, or slide.
- Never overload or attempt to split logs beyond the manufacturer’s recommendation. Personal injury or damage to the machine could result.
- While using the Electric Log Splitter, don’t hurry or take things for granted. When in doubt about the equipment or your surroundings, stop the machine and take the time to look things over.
- Never operate the machine when under the influence of alcohol, drugs, or medication.
- Use the machine only in daylight.
- Keep all nuts and bolts tight and keep the equipment in good operating condition.
- Always cut the ends of the log you are splitting as squarely as possible.
- Never split more than one log at a time unless you fully extended the ram and you need a second log to complete the split of the first log.
- Never put anything between the log guiding plates and the side of a log; logs spread as they are forced against the wedge.
- Never operate the ram in a stalled position for more than five seconds. The hydraulic fluid may overheat and damage the machine. If the wood being split is excessively hard, stop the machine, rotate the log 180 and try again. If you still cannot split the log, REJECT THE LOG AS IT EXCEEDS THE CAPACITY OF THE MACHINE.
- Never leave the Electric Log Splitter unattended while plugged in. If you leave the area, unplug the power source.
- Clean up as you work; accumulated split wood and wood chips can create a hazardous work environment.
- Keep your hands and feet away from the splitting area while the ram is in motion.
- Use only your hands to operate the Electric Log Splitter controls.
- Do not place your hands at pinch points where they can catch between a log and the wedge, log guiding plates or the ram.
- Do not put any part of yourself, your clothing, or your personal protective equipment into a crack in a log that you are splitting; it might close suddenly with great force.
- Never split anything other than logs free of nails, wires, and branches. Maximum log length is 20″ with a maximum diameter of 10″ for the DR 5-Ton Electric Log Splitter.
- Never operate the Electric Log Splitter in an area of natural gas or flammable liquids.
- Always operate the Electric Log Splitter from the operator zone (Chapter 3). Never stand on, straddle, or climb over the Electric Log Splitter at any time.
- Do not handle logs by their ends when you position them on the Electric Log Splitter.
- Always unplug the Electric Log Splitter from the power source before adjusting or servicing the machine. If you have to stop to remove any debris from the machine, always retract the ram and unplug the machine.
- Do not move or reposition the Electric Log Splitter with its motor running
A Note to All Users
No list of warnings and cautions can be all-inclusive. If situations occur that are not covered by this manual, the operator must apply common sense and operate this DR 5-TON ELECTRIC LOG SPLITTER in a safe manner. Contact us at www.DRpower.com or call 1-800-DR-OWNER (376-9637) for assistance.
Setting Up The DR 5-TON ELECTRIC LOG SPLITTER
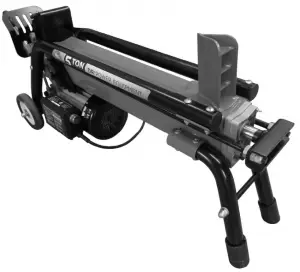
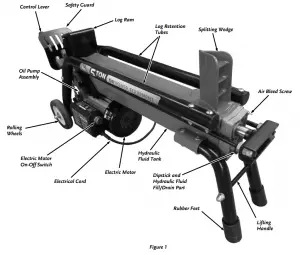
It may be helpful to familiarize yourself with the controls and features of your DR 5-TON ELECTRIC LOG SPLITTER as shown in Figure 1 before beginning these procedures. If you have any questions at all, please feel free to contact us at www.DRpower.com.
DR 5-TON ELECTRIC LOG SPLITTER Controls and Features
Specifications
For your own safety, do not connect the log splitter to the power source until the machine is completely assembled and you read and understand the entire instruction manual
| Motor | |
| Electrical requirements | 115V, 60Hz |
| Power output | 1300W |
| Rated Current | 12A |
| Motor Speed | 3400 RPM |
| Power Cable | SJTW 14 AWG (2.08mm²) |
| Log Capacity | |
| Length | 20.5 inches |
| Max Diameter* | 10 inches |
| Splitting Force | 5 ton |
| Hydraulic Pressure | 2,700 psi |
| Hydraulic Fluid Capacity | 3.8 L |
| Hydraulic Fluid Type (or equivalent) | SHELL Tellus 22, MOBIL DTE 11, ARA Vitam GF 22, BP Energol HLP-HM 22 |
| Machine Dimensions | 39.5″L x 13.5″W x 20″H |
| Machine Weight | 104 lbs |
*The diameter of the log is indicative – a small log can be difficult to split when it contains knots or a particularly tough fiber. On the other hand, it may not be difficult to split logs with regular fibers even if its diameter exceeds the 10″ max. indicated above.
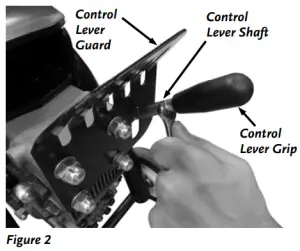
Installing the Control Lever
Tools Needed:
- 10mm Wrench
- Place the Control Lever Shaft through the Guard and Screw the threaded end into the Rotating Mount (Figure 2). Tighten with a 10mm Wrench using the flats of the Shaft.
Operating The DR 5-TON ELECTRIC LOG SPLITTER
It may be helpful to better familiarize yourself with the features of your Electric Log Splitter by reviewing Figure 1 in Chapter 2 before beginning the steps outlined in this chapter. This Splitter has been designed as a home use model only. It is designed for operating under ambient temperatures between 40° F. and 105° F. The Electric Log Splitter can be stored or transported under ambient temperatures between -10° F. and 130° F.
Read and understand the warnings listed in “Chapter 2 General Safety Rules” before operating this Electric Log Splitter.
Before Splitting Wood
Inspect the area in which you will be working.
- Place the Electric Log Splitter only on a firm, level, supported surface 24-32 inches above the ground.
- NEVER operate the Electric Log Splitter on the ground as there is risk of injury and would not be comfortable for the operator while in use.
- The site must be free of slippery surfaces and potentially hazardous obstacles. Also, make sure there won’t be people or animals within a six-foot radius around the Electric Log Splitter.
Plan your work before you start.
- Have the logs that you are splitting positioned where you can easily reach them. Remember, the maximum log length is 20″ and the maximum diameter is 10″ for this Electric Log Splitter.
- Have a site located where the split wood can be stacked or loaded onto a truck or nearby carrier.
- Always make certain that the machine is on a firm level surface and off the ground at a comfortable height (24-32 inches).
- It is important that the Air Bleed Screw is open when you use the Electric
Log Splitter (Figure 3). Open the Air Bleed Screw by turning it counterclockwise three to four times. Failure to open the Air Bleed Screw before using could damage the Electric Log Splitter. - Use care, do not over tighten and strip the Air Bleed Screw threads when screwing in for transport.
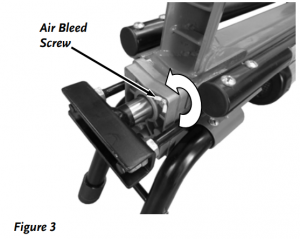

- Prior to using the Electric Log Splitter, open the Air Bleed Screw by turning the Thumbscrew counter-clockwise three to four times (Figure 3). Leave the Air Bleed Screw open in this position while using the machine. We recommend closing the Air Bleed Screw after each use, but you can leave the Air Bleed Screw open when you are finished.
NOTE: If you are going to transport the machine you should close the Air Bleed Screw - Connect the Electrical Cord from the Electric Log Splitter to a standard electrical, 110-120VAC, grounded power source fused at 15 AMPS. If using an extension cord, it must be 12AWG and less than 25 feet long or 10AWG and less than 50 feet long with a rating of 15 AMPS. Route the cord from the Electric Log Splitter to the power source in such a way that safeguards against damaging the cord during the wood splitting session. Be sure to avoid wet conditions.
Tip: In cold weather, see “Specifications” in Chapter 2 for hydraulic fluid information and cycle the Ram to warm up the hydraulic fluid. This will provide full power from your DR 5-TON ELECTRIC LOG SPLITTER.
- Read and understand all instructions, safety precautions, and/or
warnings listed in “Chapter 1 General Safety Rules” before operating this
DR Dual-action electric log splitter. If any doubt or question arises about
the correct or safe method of performing anything found in this manual,
please contact our Customer Service Representatives at our toll free
number: 1-800-DR-OWNER (376-9637). - When operating the Log Splitter, make sure you are positioned in the safe operating area (OPERATOR ZONE) as shown in Figure 4. You must stay in the safe operating area at all times when the splitting wedge is in motion (whether extending or retracting). Never place any part of your body into a position that causes an unsafe operating condition.
- Before loading and operating the Log Splitter, always wear protective gear, INCLUDING safety goggles, hearing protection, tight-fitting gloves without draw strings or loose cuffs, and steel-toed shoes.
- Use the following photos for the correct and incorrect methods of splitting logs. Never split a log using an incorrect or unsafe method.


- Never force pressure on the log splitter for more than 5 seconds in order to split excessively hard wood.
- For best splitting results, place log flat on the beam between the log guides with butt end against the leading edge of the wedge.
Operating the DR 5-TON ELECTRIC LOG SPLITTER
NOTE: Before starting the splitting operation, the log Ram should be cycled 3 to 4 times back and forth (with the Air Bleed Screw open). This will remove any air that may have mixed into the hydraulic fluid from transporting. See “Before Splitting Wood” on previous page for the Air Bleed Screw Operation.
Tip: In cold weather, cycle the Ram to warm up the hydraulic fluid. This will provide full power from the DR 5-TON ELECTRIC LOG SPLITTER. See “Specifications” in Chapter 2 for hydraulic fluid information.
- Make sure the Log Splitter is plugged into a properly grounded 15 Amp, GFCI protected outlet.
- Push the On/Off Switch all the way in and then pull finger away to start the Motor (Figure 5).
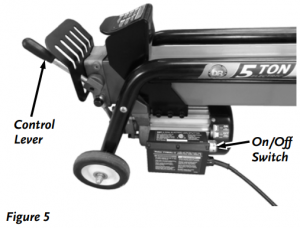

- Push the On/Off Switch all the way in and then pull finger away to stop the Motor.
- When not using the Splitter unplug the Cord.
Note: All logs should be no longer than 20.5″.
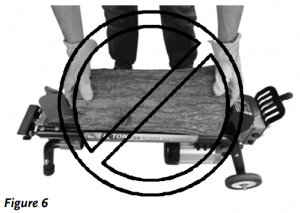
- Do not place your hands on the ends of the log when loading the Log Splitter. This is a very UNSAFE method and could result in injury to your hands (Figure 6).
- Do not reach or step across the rail while the Log Splitter is running. This is a very UNSAFE method which could cause personal injury or even death.

- Never attempt to split wood across the grain. The Log Splitter was not designed for cross-grain splitting. Doing so could damage the Log Splitter and may cause personal injury (Figure 7).

- Make sure both ends of the log you are splitting are cut as square as possible. This will prevent the log from sliding out of position while under pressure (Figure 8)


NOTICE
Never run the Log Splitter unless the hydraulic fluid tank is at the proper level.
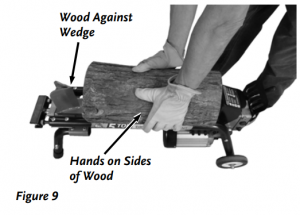
- Grasp the log on the sides near the middle of the block as you place the log on the Log Splitter. (Figure 9). Center the log, side-to-side, on the rail of the Log Splitter, making sure that one end is against the Splitting Wedge.
- Using only your hand, push the Control Lever down (Figure 10). If the log moves before it is contacted by the Wedge, release the Handle and then reposition the log.
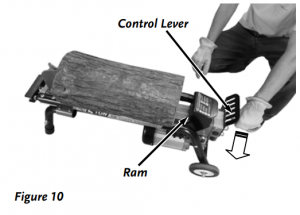
NOTICE
If the log does not split immediately, do not continue the forward thrust of the ram for more than five seconds. This can damage the splitter. Try repositioning the log on the splitter or set the log aside. - Hold the Control Lever, moving the Wedge towards the Log until the log is split or the cylinder rod stops at its maximum travel position. Stop the Log Splitter (forward movement), at any point in the splitting process, if you feel an unsafe splitting condition is occurring. As the log is being split, DO NOT reach forward and attempt to catch the split wood — let it fall.
- Once the Wedge reaches its full forward travel, let go of the Control Lever and the Wedge will return to the retracted position.
Depending on the type of wood being split, a log may not always split into two pieces. If a log sticks to the wedge, stop the motor, and carefully remove the log from the wedge. If the log is stuck onto the wedge and you can’t remove it by hand, a piece of wood cut into a wedge shape can be used between the log and base to lift the log from the machine as you actuate the lever.


Maintaining The DR 5-TON ELECTRIC LOG SPLITTER
Regular maintenance is the way to ensure the best performance and long life of your machine. Please refer to this manual for maintenance procedures.
Before performing any repairs or maintenance procedure, unplug the Electric Log Splitter power cord from the power source.
Regular Maintenance Checklist
| PROCEDURE | BEFORE EACH USE | EVERY 150 HOURS |
| Clean the log Ram and Guides. |  |
|
| Check the Splitting Wedge for sharpness. | |
|
| Check the general condition of the Electric Log Splitter (e.g. nuts, bolts, welds, etc). | |
|
| Check the Ram for smooth travel. | |
|
| Check the condition of the electrical cord. | |
|
| Check the hydraulic fluid level (See “Adjusting the Hydraulic Fluid Level”). | |
|
| Change the hydraulic fluid (See “Changing the Hydraulic Fluid”). | |
Adjusting the Hydraulic Fluid Level
NOTE: Check the hydraulic fluid level every few months if the Troubleshooting Table in Chapter 5 suggests that the fluid level may be off
Tools and Supplies Needed:
- 6mm Allen Wrench
- Small Funnel
- Clean Rags
- Check the hydraulic fluid level by tipping the machine up vertical on the Wheels and Control Lever Guard (place a block under the Control Lever Guard so the weight is not on the Control Lever). You may need to have someone support the Electric Log Splitter to prevent tipping over. Clean the area around the Hydraulic Fluid Fill/Drain Port (Figure 11) and then, using a 6mm Allen Wrench, unscrew and remove the Dipstick located in the Hydraulic Fluid Fill/Drain Port.
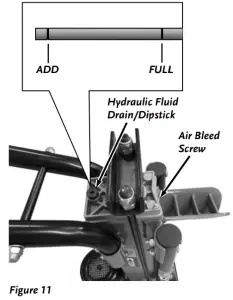
- Clean the Dipstick with a Rag, insert the Dipstick (do not screw the Dipstick down when checking), remove and check the level; it should be between the two marks on the Dipstick. If the fluid is too high, simply pour out a little at a time into a suitable container by tilting the Electric Log Splitter. If the fluid is too low, insert a small Funnel and add Hydraulic Fluid (See “Specifications” in Chapter 2 for Fluid type) a little at a time, until the level falls between the two marks on the Dipstick.
- Clean the Dipstick and the Copper Washer thoroughly and reinstall, being careful not to damage the threads of the aluminum Hydraulic Fluid Cylinder End Cover.
- Lower the machine to the ground, open the Air Bleed Screw and cycle the Ram back and forth 3 or 4 times to purge any air from the hydraulic system (see “Operating The DR 5-TON ELECTRIC LOG SPLITTER” in Chapter 3).
Changing the Hydraulic Fluid
Tools and Supplies Needed
- 6mm Allen Wrench
- Clean Rags
- Small Funnel
- Hydraulic Fluid
- Approved Container (1 gallon or more capacity)
Replace the Hydraulic Fluid in the Electric Log Splitter after every 150 hours of use. Take the following steps to replace the Fluid.
- Make sure the Air Bleed Screw is screwed down tight.
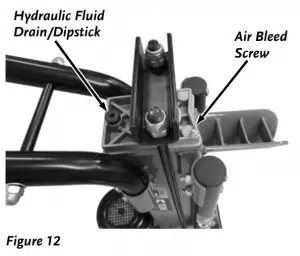
- Tip the machine up vertical on the Wheels (you may need to have someone support the splitter to prevent tipping over). Clean the area around the Hydraulic Fluid Fill/Drain Port (Figure 12) and then, using a 6mm Allen Wrench, unscrew and remove the Dipstick located in the Hydraulic Fluid Fill/Drain Port.
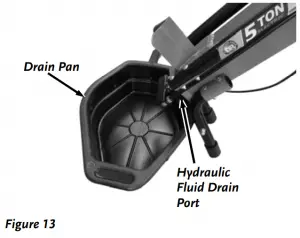
- Tip the Splitter down onto the Legs as you drain the Fluid into an approved Container (1 gallon or more capacity) and continue tipping the machine until the Tank is empty (Figure 13).
- Tip the Splitter up vertical onto the Wheels again and insert a Small Funnel into the Dipstick opening.
- Refill the Tank with 3.4 quarts of fresh Hydraulic Fluid.
- Clean the Dipstick with a Rag, insert the Dipstick (do not screw the Dipstick down when checking), remove and check the level; it should be between the two marks on the Dipstick. If the fluid is too high, simply pour out a little at a time into a suitable container by tilting the Electric Log Splitter. If the fluid is too low, insert a small Funnel and add Hydraulic Fluid (See “Specifications” in Chapter 2 for Fluid type) a little at a time, until the level falls between the two marks on the Dipstick.
- Clean the Dipstick and the Copper Washer thoroughly and reinstall the Dipstick, being careful not to damage the threads of the aluminum Hydraulic Fluid Cylinder End Cover.
- Lower the machine to the ground, loosen the Air Bleed Screw three or four turns counterclockwise and cycle the Ram back and forth 3 or 4 times to purge any air from the hydraulic system (See Operating The DR 5-TON ELECTRIC LOG SPLITTER in Chapter 3).
- Periodically check fluid level to ensure it is between the 2 grooves around the dipstick. If the level is below the lower limit, fill until level is correct.
Sharpening the Wedge
Tools needed:
- Fine-Toothed Flat File
- Before each splitting session, check the sharpness of the Wedge. As required, remove any burrs or flat spots on the Wedge using a fine-toothed flat file.
Troubleshooting
Most problems are easy to fix. Consult the Troubleshooting Table below for common problems and their solutions. If you continue to experience problems, contact us at www.DRpower.com or call toll free 1-800-DR-OWNER (376-9637) for support.
Before performing any repairs or maintenance procedure, unplug the Electric Log Splitter power cord from the power source.
Troubleshooting Table
| SYMPTOM | POSSIBLE CAUSE |
| Ram will not move or is slow to respond. |
|
| Log fails to split. |
|
| Ram advances with a jerky motion or with strong vibrations. |
|
| Hydraulic fluid leaking from the Air Bleed Screw. |
|
| Hydraulic fluid leaking from the ram or other external parts. |
|
Parts Lists, Schematic Diagrams And Warranty
Parts List – DR 5-TON ELECTRIC LOG SPLITTER
NOTE: Part numbers listed are available through DR Power Equipment.
2. 33483 Ram Cap & Shaft
3. 33484 Upper Nylon Cushion
4. 33485 Lower Nylon Cushion
6. 33486 Flat Washer, M8*1
7. 33487 Spring Washer, M8*2.3
17. 33488 Nut , M14
18. 33489 Lock Nut , M14
22. 33490 Front Reservoir Cover
23. 33491 O Seal Ring , Ø6*1
24. 33492 Vent Plug , M4*10
25. 33493 Copper Seal Washer , M14*1
29. 33494 Flat Washer , M10*1
30. 33495 Spring Washer , M10*2
31. 33496 Nut , M10
32. 33497 Position Shield
33. 33498 Copper Seal Washer , M10*2
34. 33498 Snap Head Nut, M10
35. 33499 Torsion Spring
40. 33493 Copper Seal Washer , M14*1
41. 33500 Oil Tube Screw , M14*30
42. 33501 Inner Hex Head Bolt , M8*20
43. 33487 Spring Washer , M8*2.3
44. 33502 Hydraulic Pump
45. 33503 O Seal Ring , Ø18*1.9
46. 33504 Oil Tube , Ø14 – Ø10*100*1
47. 33493 Copper Seal Washer , M14*1
48. 33500 Oil Tube Screw, M14*30
50. 33510 Inner Hex Head Bolt, M8*35
51. 33487 Spring Washer, M8*2.3
52. 33486 Flat Washer, M8*1
53. 33505 Electric Motor
54. 33506 Fan
56. 33507 Fan Cover, Ø162
59. 33508 Connecting Box (Bottom)
60. 33509 Connecting Box (Rubber Ring)
61. 33511 Connecting Box (Cover)
62. 33512 Cross Recess Pan Head Screw, M4*10
63. 33513 Power Switch
64. 33514 Capacitor, 60uf
65. 33515 Cable Fastener Nut
66. 33516 Cable Fastener
67. 33517 Cable Fastener Bolt
68. 33518 Cable Bushing
69. 33519 Power Cable, STJW 3/C 14AWG, Ø2.08*1600
70. 33520 Cross Recess Pan Head Screw, M8*55
71. 33521 Front Leg
72. 33522 Flat Washer, M8*1
73. 33523 Spring Washer, M8*2.3
74. 33524 Lock Nut, M8
75. 33498 Copper Seal Washer, M10*2
76. 33498 Snap Head Nut, M10
80. 33525 Hex Head Bolt, M8*55
81. 33523 Spring Washer, M8*2.3
82. 33522 Flat Washer, M8*1
83. 33526 Joint Leg and Log Holder
84. 33524 Lock Nut, M8
86. 33522 Flat Washer, M8*1
87. 33523 Spring Washer, M8*2.3
88. 33524 Lock Nut, M8
90. 33527 Wheel Axle, Ø12.7*337
91. 33528 Axle Bushing, Ø16*160
92. 33529 Flat Washer, M13*2
94. 33530 Lock Nut, M10
33326 Label, Warning, Avoid Serious Injury or Death
33328 Label, Warning, Electrical Safety
33371 Label, Warning, Operating Instructions
33327 Label, On/Off
33372 Label, Specification
Schematic – DR 5-TON ELECTRIC LOG SPLITTER
NOTE: If you have a question about a part shown here but is not listed on the previous page, call 1-800-DR-OWNER (376-9637)

Daily Checklist for the DR 5-TON ELECTRIC LOG SPLITTER
To help maintain your DR 5-TON ELECTRIC LOG SPLITTER for optimum performance, we recommend you follow this checklist each time you use your Electric Log Splitter.
Before performing any repairs or maintenance procedure, unplug the Electric Log Splitter power cord from the power source.
[ ] Clean the log Ram and Guides.
[ ] Check the Splitting Wedge for damage and sharpness.
[ ] Check the general condition of the Electric Log Splitter, e.g.; nuts, bolts, welds, etc.
[ ] Check the Ram for smooth travel.
[ ] Check the condition of the electrical cord.
[ ] Check the hydraulic fluid level
End of Season and Storage
Before performing any repairs or maintenance procedure, unplug the Electric Log Splitter power cord from the power source.
- Wipe down the DR 5-TON ELECTRIC LOG SPLITTER to remove any moisture, wood chips, and dirt that may have accumulated on the Log Guides and Operating Handle.
- Apply a thin coating of oil or #2 Lithium Grease to the leading edge of the Splitting Wedge.
- Relieve any internal air pressure by turning the Air Bleed Screw counter clockwise 4 times to open, and then retighten by turning clockwise prior to storing the machine (Figure 3 above). DO NOT OVER TIGHTEN!
- If possible, store the Electric Log Splitter in a dry, protected place. If it is necessary to store the Electric Log Splitter outside, cover it with a protective material (especially the Motor).

©2013 Country Home Products, Inc. All rights reserved