
![]()
DREMEL Cordless Pet Nail Grooming Kit User Guide

CORDLESS PET NAIL GROOMING KIT
For customer service support and to learn more about what you can do with your new Dremel
rotary tool go to Dremel.com


WELCOME TO DREMEL!
Thank you for purchasing the Dremel Paw Control! We hope that you find it to be one of the handiest and most versatile tools you’ll awn. This guide has what you need to start grooming your pet’s nails in a few easy steps.
GETTING TO KNOW THE TOOL
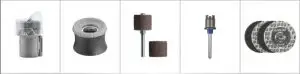
The kit includes Pet Grooming accessories & attachments for both the novice and the experienced groomer. We recommend using the combination that feels most comfortable for you and your pet. For freehand grooming for the experienced groomer, we recommend using the 407 sanding band & mandrel (Figure 1). For the novice groomer, we recommend using the Nail Grooming Attachment with SD60-PGA Sanding Disc & EZ 402 mandrel (Figure 2).
BEYOND PET GROOMING!
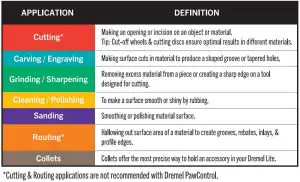
Dremel is known for its versatility, and your Pet Grooming kit is no different! Dremel Rotary Tools can tackle a variety of tasks outside of grooming your pet’s nails. These handy tools allow you to sand, grind, polish, or engrave, depending on the type of accessory being used.
Learn more about the types of applications you can do with a Drernel In the chart or visit Dremel.com to learn more about our tools, accessories, and find project Inspiration.
GETTING STARTED
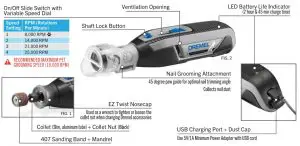
- CHARGE IT! Fully charge the tool before use (approximately 2 hours & 45 minutes). A green light will illuminate from the indicator while charging, which will turn off once fully charged. A red light will turn on when battery is low. For optimal run-time, charge tool using a 5V/1a minimum power adapter.

TIP: A red LED light will turn on when the tool stalls. If this happens, remove the tool from the material, shut the tool off, & resume use without excess pressure. If stalling persists, consider using a different accessory, technique, or tool for the job.
2. SELECT THE RIGHT ACCESSORY
Your kit includes two combinations of nail grooming accessories to use with your pet.

*Recommended maximum operating speed for pet grooming applications is 10,000/min. Use extreme caution for higher speeds and limit the amount of time that the nail is exposed to the sanding surface. Use of higher operating speeds may cause heat buildup and injury to the pet. Always monitor pet for signs of discomfort and stop grooming if observed. Refer to Operating Speeds’ section of instructional manual for proper tool speed setting.
3a. CHANGING THE SANDING DISC WITH THE PET GROOMING ATTACHMENT

- A. Detach the clear cap from the attachment by running the small knobs on the inside of the clear cap up along the height adjustment guide
- B. Unlock the clasp and open the attachment.
- C. Pull down the spring-loaded sleeve (1) and remove sanding disc (2,3).
- D. Pull down the spring-loaded sleeve (1), place sanding disc on the mandrel (2) and align bow tie interface on bottom of sanding disc (3). Sanding disc should lock in place.
- E. Close the attachment around the threaded nose & ensure it is securely tightened.
- F. Put clear cap back on the attachment by running the small knobs along the height adjustment guide until it is at Position 2. You will hear the cap click into place when fully installed.
3b. INSTALLING THE SANDING BAND AND OTHER ACCESSORIES
Loosen the collet nut by pressing down on the shaft lock button & rotate collet nut by hand until the collet opens up to allow an accessory to be placed in it. Once the accessory is placed in the collet, hold the shaft lock button down & use the included collet wrench or EZ Twist Nose Cap (with integrated wrench) to tighten the collet nut & secure the accessory in the collet (Figure 3).
TIP: Dremel has 4 different size collets, your kit includes a 1/8″ shank size collet. Visit Dremel.com to find other accessories that can be used with the Lite.
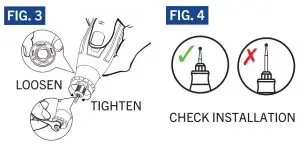
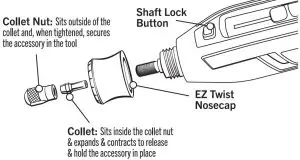
When changing accessories, insert the new one into the collet as far as possible to minimize run out & unbalance. Avoid excessive tightening of the collet nut when there is no bit inserted (Figure 4). Always check that the accessory is securely installed before operating the tool.
TIP: If the collet is stuck to the collet nut & does not open up, preventing the accessory from being
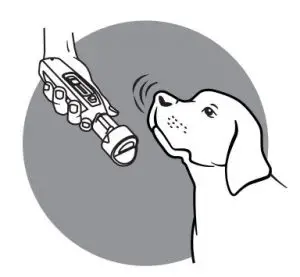
4. FAMILIARIZE YOUR PET WITH THE TOOL
If you and your pet are new to Dremel pet nail grooming, start by easing into the process. Train your pet to feel comfortable with the tool running and work your way up to nail trimming. This process may take a couple of days or weeks. Every pet is unique. Rest assured that both you and your pet will be able to relax and even enjoy the grooming time that you share together.

Tip: Before trimming your pet’s nails, identify where the nail quick starts. Avoid cutting into the quick (Figure 5). inserted, use the shank of the accessory to gently loosen the collet from the collet nut.
5. START GROOMING
If your dog has long fur, band it back to avoid it getting caught during trimming. If your dog has long fur on its paws or between the foot pads, trim the hairs first to lessen the risk of catching on the sanding accessory. Alternatively, you can use an old sock to cover your pet’s toe, foot, and leg and isolate the nail.
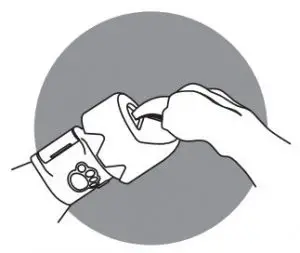
Support the toe and nail in one hand. Pushing gently on the bottom of the paw’s pad extends the nail slightly for easier grooming. Set the tool speed to 1. Briefly trim the tips of each nail on one paw, and then the other, in several passes as needed. Spend no longer than three seconds on each nail, allowing time for the nails to cool. Don’t apply excess pressure; let the speed of the tool to do the work.
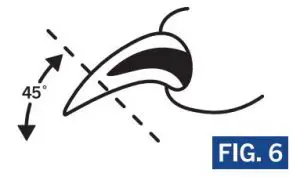
TIP: Rule of thumb for the proper angle to trim a pet’s nail is 45 degrees upwards from the bottom of the paw (Figure 6).
6. GIVE YOUR PET A TREAT
Create a positive association with the nail grooming experience by praising & rewarding your pet with their favorite treat!
BEST PRACTICES and ADDITIONAL TIPS
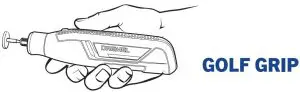
- For more control during the grooming process, use the “Golf Grip” method to hold the tool.
- To prevent overheating the tool, whenever possible, do not grip the tool where it wouId block the ventilation openings.
- A red LED light will turn on when the tool stalls. If this happens, shut the tool off – & resume use without excess pressure.
- Avoid engaging the shaft lock button while tool is in operation. Doing so will result in severe internal damage of the tool.
- Turn off tool before making any adjustments or changing accessories.
- Wear personal protective equipment. Depending on application, use dust mask, safety glasses, or work gloves.
- To maximize the run time, apply minimal pressure on the tool & use recommended speed setting for the application.
- Visit https://twww.dremel.com/en_US/support/product-registration or submit the registration card included In your kit for the most up-to-dlate product and warranty Information.
NEW TO DREMEL?
Sign up for the Dremel Newsletter through our website for exclusive content, project inspiration, tips and more!

Our Dremel Experts are happy to help.
U.S.A.: 1-800-437-3635
Check out WWW.DREMEL.COM
for project ideas, tips, & much more.
REVIEW US! * * * * * Share your review of this product on your retailer’s website.