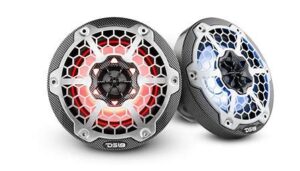

NXL6/NXL8/ CF65/CF8
Owner’s Manual
FEATURES
| MODEL | TYPE | RMS/PEAK POWER |
| NXL6 | 6.5” 2-WAY COMPONENT COAXIAL | 100W/300W |
| NXL8 | 8” 2-WAY COMPONENT COAXIAL | 125W/375W |
| CF65 | 6.5” 2-WAY COMPONENT COAXIAL | 125W/375W |
| CF8 | 8” 2-WAY COMPONENT COAXIAL | 150W/450W |
NXL6&NXL8 CF6&CF8 Features
Marine/UTV 2-Way Speaker
Continous Power Handling 100W/125W 125W/150W RMS
Peak Music Power 300W/375W 375W/450W MAX
25mm Titanium Dome PEI Surround Tweeter
IP65 Marine Grade Compliant Specifications, 100% UV Stable
Integrated RGB LED Lighting
High Temp injection Molded Composite High Gloss Basket With UV Coating
High Gloss Injection Molded Composite ASA Grilles With UV Coating (NXL6&NXL8)
High Temp injection Molded Composite Grilles Black Carbon Fiber Texture with 316 Metal Mesh (CF6&CF8)
Motor Structure Use Y35 Ferrite Main Magnet And Reverse Neodymium Magnet
Sensitivity: 91dB /93dB at 1W/1M
Nominal Impedance: 4-Ohm
Copper Ring Utilized In Motor Structure For Far-Field Performance
Injection Molded, UV-Compliant, Polypropylene Cone, Butyl Surround
RF Remote LED Controller Or WIFI Controller Option Available For
Multi-Function RGB LED Lighting (Optional)
PACKING INCLUDE
One Pair Marine/UTV Grade Speaker
2X1.5M #18 Speaker Input Wires With Fast Terminal
2X1.5M #22 RGB LED Power Input Wires With Fast Terminal
12XM4 Philips Inner Hex Head 304 Stainless Screw(3mm Hex Tool)
Owners Manual
INSTALLATION
Installation Considerations before attempting Install,
- Be sure to carefully read and understand the instructions before attempting to install these speakers.
- For safety. disconnect the negative battery terminal from the battery prior to beginning the installation.
- For easier assembly, we suggest you run all wires prior to mounting speakers in place
- Use high-quality connectors for a reliable installation and to minimize signal or power loss.
- Think before you drill! Be careful not to cut or drill into gas tanks, fuel lines, brake or hydraulic lines, vacuum lines or electrical wiring when working on any vehicle. If installation in a boat, take care not to cut or drill through the main hull.
- Never run wires underneath the vehicle. Running the wires inside the vehicle or hull area provides the best protection.
- Avoid running wires over or through sharp edges. Use rubber or plastic grommets to protect any wires routed through metal, especially the firewall.
Mounting
- Determine where the speakers will be mounted. Ensure an area large enough for the speaker to mount Be sure that the mounting location is deep enough for the speaker to fit: only mount to a flat surface. Use extra caution when mounting on panels with urethane foam.
- Refer to the specification chart to determine the proper diameter hole to cut for your speaker model.
- Mark the locations for the mounting mews. Drill the holes with a 118″ bit.
- Feed the speaker wires through the cutout and connect to the speaker terminals. Be sure to observe proper polarity when connecting the wires. The speaker’s positive terminal is indicated with a” +”.
- Fit the speaker and mount into place using six (6) screws.
- Tighten the screws until the speaker is snug in place
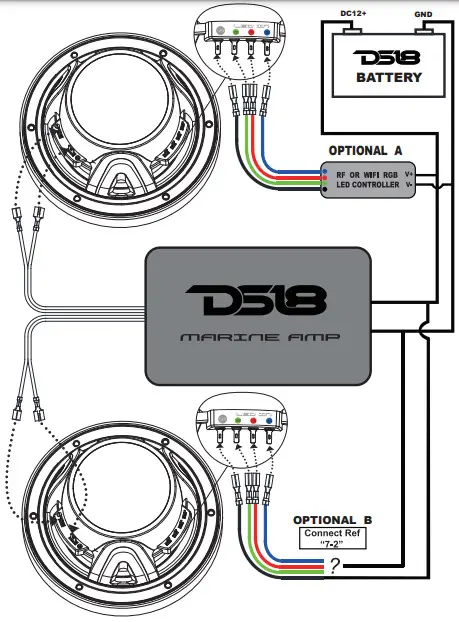
- LED CONNECTIONS: There are two options to choose from:
7.1, Connect RGB Wires To RF RGB LED Controller Or WIFI RGB LED Controller (Optional) 7.2, Connect To Battery(DC12V), Speaker RGB LED Fast Terminal ‘ °Connect To Battery Positive.
- Green ColorFast Terminal Cave: Ito Battery Negative
- Red Color: ‘FY Fast Terminal Connect to Battery Negative
- Blue I” Fast Terminal Connect to Battery Negative
- Purple Color.” and t Fast Terminal Connect to Battery Negative
- Yellow Color And ‘G’ Fast Terminal Corned so Battery Negative
- Cyan Color. AntI• Fast Terminal Connect to Battery Negative
- While Color.•R’ And ‘B’ And ‘G’ Fast Tontine] Connect to Battery Negative
SPECIFICATIONS
| MODEL | NXL6 | NXL8 | CF65 | CFB |
| Nominal Diameter | 6.5 (165) |
8 (203) |
6.5 (165) |
8 (203) |
| Type | 2-Way | 2-Way | 2 -Way | 2 -Way |
| Nominal Impedance ( Ohms ) |
4Ω | 4Ω | 4Ω | 4Ω |
| Frequency Response c
( Hz ) |
45_231ft | 35-23kHz | 45-23kHz | 35-23kHz |
| Voice Coil Diameter | 1.2 ” (30.5mm) |
1.2′ (30.5mm) |
1.2′ (30.5 mm) |
1.2′ (305mm) |
| Power Handling RMSIPEAK | 100W/300W | 125W/375W | 125W/375W | 150w/450w |
| Fs-Free Air Resonance (Hz) | 65 | 50 | 65 | 50 |
| Ots | 0.622 | 0.532 | 0.622 | 0532 |
| Vas – cu.ft (Liter) | 0.3 (8.5) |
0.795 (22.5) |
0.3 (8 5) |
0.795 (22 5) |
| Sensitivity(1W/1M) | 91dB | 93dB | 91dB | 93dB |
| Xmax | 0.16′ (4mm) | 0.16″ (4mm) | 0.16″ (4mm) | 0.16′ (4mm) |
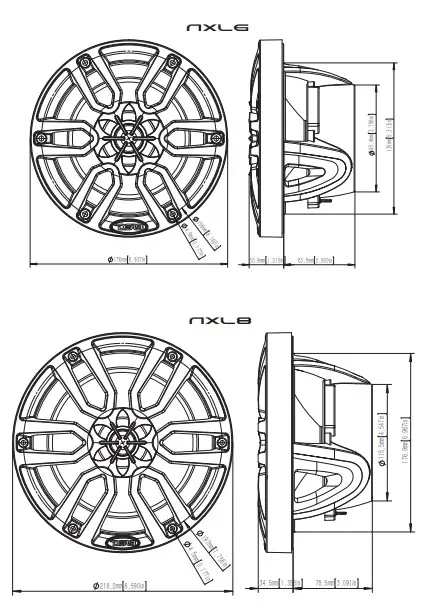
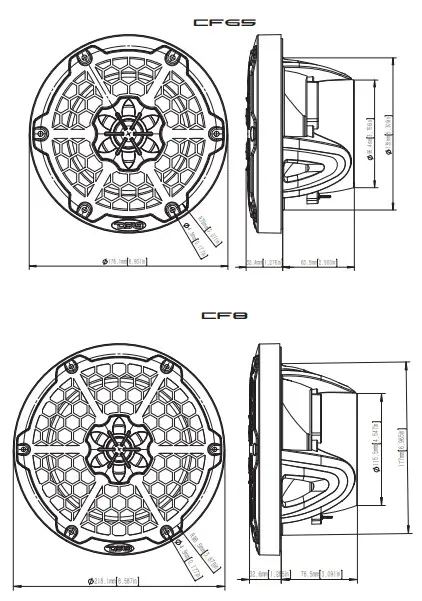
| Mounting Hole | 5.31′ (135m) | 6.97″ (177mm) |
5.31′ (135m) | 6.97″ (177mm) |
| Mounting Depth | 25′ (63.5mm) |
3.09″ (78.5mm) |
2.5′ (EU mm) |
3.09 (78.5m) |
We Reserve The Right To Change Products And Specifications At Any Time Without Notice. Images May Or May Not Include Optional Equipment
INSTALLATION
Installation Considerations before attempting Install,
- Be sure to carefully read and understand the instructions before attempting to install these speakers.
- For safety. disconnect the negative battery terminal from the battery prior to beginning the installation.
- For easier assembly, we suggest you run all wires prior to mounting speakers in place
- Use high-quality connectors for a reliable installation and to minimize signal or power loss.
- Think before you drill! Be careful not to cut or drill into gas tanks, fuel lines, brake or hydraulic lines, vacuum lines or electrical wiring when working on any vehicle. If installation in a boat, take care not to cut or drill through the main hull.
- Never run wires underneath the vehicle. Running the wires inside the vehicle or hull area provides the best protection.
- Avoid running wires over or through sharp edges. Use rubber or plastic grommets to protect any wires routed through metal, especially the firewall.
Mounting
- Determine where the speakers will be mounted. Ensure an area large enough for the speaker to mount Be sure that the mounting location is deep enough for the speaker to fit: only mount to a flat surface. Use extra caution when mounting on panels with urethane foam.
- Refer to the specification chart to determine the proper diameter hole to cut for your speaker model.
- Mark the locations for the mounting screws. Drill the holes with an Ur bit.
- Feed the speaker wires through the cutout and connect to the speaker terminals. Be sure to observe proper polarity when connecting the wires.The speaker positive terminal is indicated with a” +”.
- Fit the speaker and mount into place using six (6) screws.
- Tighten the screws until the speaker is snug in place
- LED CONNECTIONS: There are two options to choose from:
7.1,Connect RGB Wires To RF RGB LED Controller Or WIFI RGB LED Controller (Optional) 7-2,Connect To Battery(DC12V), Speaker RGB LED Fast Terminal ‘ V+ “Connect To Battery Positive.
- Green Color: “G” Fast Terminal Connect to Battery Negative
- Red Color: “R” Fast Terminal Conned to Battery Negative
- Blue Color: “B” Fast Terrrinal Conned to Battery Negative
- Purple Color: “R” And “B” Fast Terminal Conned to Battery Negative
- Yellow Color: ‘Fr And “G” Fast Terminal Conned to Battery Negative
- Cyan Color: 13′ And “G” Fast Terminal Conned to Battery Negative Activate Wind.
- While Color: R And 13′ And “G” Fast Terminal Connect to Battery Negative Go to Settings to a
Dimensions
for more information please visit
www.ds18.com
