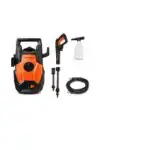
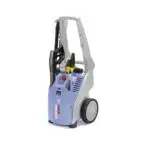
DUCAR Gasoline Pressure Washer
 SAVE THIS MANUAL FOR FUTURE REFERENCE SAVE THIS MANUAL FOR FUTURE REFERENCEThis manual contains important information regarding safety, operation, and maintenance. |
INTRODUCTION
Thank you for purchasing this superior quality pressure washer from Ducar. When operating and maintaining this product as instructed in this manual, your pressure washer will give you many years of reliable service.
Product Specifications
| Type | GSW01A | ||
| Rated pressure | 22.8 MPa | ||
| Allowable pressure | 24.8 MPa | ||
| Rated flow | 590 l/h | ||
| Max. flow | 590 l/h | ||
| Max. water intake temperature | 50°C | ||
| Max. inlet water pressure | 0.55 MPa | ||
| Net weight | 35 kg | ||
| Water hose diameter | Min. ø12.7mm | ||
| Kickback force on lance | 28 N | ||
| DECLARED SINGLE-NUMBER NOISE EMISSION VALUES (In accordance with EN ISO 4871:1996) | |||
| The guaranteed A-Weighted sound power level, LWAd (ref. 1 pW) | 105 dB(A) | ||
| Values determined according to noise test code given in Annex CC of EN 60335-2-79:2012, using the basic standard EN ISO 3744:2010. NOTE: Declared single-number noise emission values are the sum of measured values and the associated uncertainty, and they represent upper boundaries of the range of values which is likely to occur in measurements. |
|||
| DECLARED VIBRATION EMISSION VALUES OF A SINGLE MACHINE (In accordance with EN ISO 12096:1997) | |||
| Measured vibration emission value α | |||
| Handle of trigger gun | 0.828 m/s² | ||
| Middle of trigger gun | 2.068 m/s² | ||
| Values determined according to vibration test code given in Annex DD of EN 60335-2-79:2012, using the basic standard ISO 5349-1:2001. | |||
| Engine | |||
| Model | DH212 | ||
| Displacement | 212cc | ||
| Power | 4.5kW/3600rpm | ||
| Fuel tank capacity | 3.6 L | ||
The emissions control system for this pressure washer is compliant with all standards set by the Environmental Protection Agency.
Product Applications:
- This pressure washer is designed to remove dirt and mold from house siding, decks, garage floors, brick patios, and cement walkways
- This unit can be used to clean cars, motorcycles, boats, RV’s outdoor furniture, lawn equipment, and grills.
Record the following information bellow for service or warranty assistance.
| Date of Purchase: | |
| Model Number: | |
| Serial Number: |
SAFETY RULES
Safety Symbols
 Indicates a potentially hazardous situation which could result in serious injury or death if not avoided.
 Indicates a potentially hazardous situation which could result in damage to equipment or property
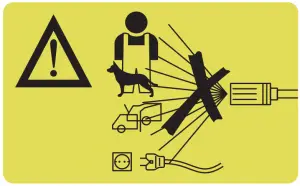
Never point the jet at people, animals, the device itself or live electrical devices.

Safety Instructions
This machine must be attended during operation. The manufacturer cannot anticipate every possible hazardous circumstance that the user may encounter. Therefore, the Warnings in this manual, on tags, and on affixed decals are not all-inclusive. To avoid accidents, the user must understand and follow all manual instructions and use common sense.
 Read and understand this manual in its entirety before operating this pressure washer. Improper use of this pressure washer could result in serious injury or death. Read and understand this manual in its entirety before operating this pressure washer. Improper use of this pressure washer could result in serious injury or death. |
 This machine has been designed for use with the cleaning agent supplied or recommended by the manufacturer. The use of other cleaning agents or chemicals may adversely affect the safety of the machine. This machine has been designed for use with the cleaning agent supplied or recommended by the manufacturer. The use of other cleaning agents or chemicals may adversely affect the safety of the machine. |
 Do not use the machine within range of persons unless they wear protective clothing. Do not use the machine within range of persons unless they wear protective clothing.
|
| Do not direct the jet against yourself or others in order to clean clothes or foot-wear. |
| Risk of explosion – Do not spray flammable liquids. |
| High pressure cleaners shall not be used by children or untrained personnel. |
| High pressure hoses, fittings and coupling are important for the safety of the machine. Use only hoses, fittings and couplings recommended by the manufacturer. |
| To ensure machine safety, use only original spare parts from the manufacturer or approved by the manufacturer. |
| Water that has flowed through backflow preventers is considered to be non-potable. |
| The machine shall be disconnected from its power source during cleaning or maintenance and when replacing parts or converting the machine to another function. |
| Do not use the machine if a supply cord or important parts of the machine are damaged, e.g. safety devices, high pressure hoses, trigger gun. |
 Do not use combustion engine powered machines indoors unless adequate ventilation is assessed by national labour authorities. Do not use combustion engine powered machines indoors unless adequate ventilation is assessed by national labour authorities.
|
| Ensure that any exhaust emissions are not in the vicinity of air intakes. |
| For gas or oil-heated machines it is important to provide adequate ventilation and make sure that the flue gases are properly discharged. |
| Incorrect fuels shall not be used as they may prove hazardous |
 Never spray near a power source such as an electrical outlet. Making contact with a power source could cause an electric shock or burn. Never spray near a power source such as an electrical outlet. Making contact with a power source could cause an electric shock or burn. |
| Stay alert and use common sense. Do not operate this unit if you are under the influence of alcohol, drugs, medication or you feel tired. |
High pressure jets can be dangerous if subject to misuse. The jet must not be directed at persons, live electrical equipment or the machine itself.
|
 Avoid contacting hot areas of this unit. Avoid contacting hot areas of this unit.
|
Moving parts can catch on clothing, jewelry, and hair
|
Keep engine away from flammable objects other hazardous materials
|
| This machine can be used by people with reduced physical, sensory or mental capabilities or lack of experience and knowledge if they have been given supervision or instruction concerning use of the machine in safe way and understand the hazards involved. |
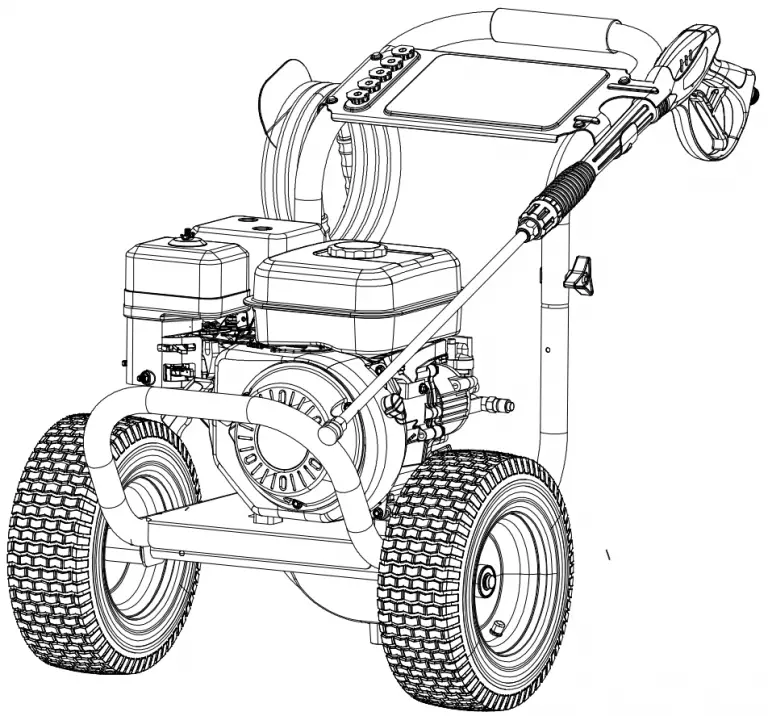
PRESSURE WASHER FEATURES
A – High Pressure Hose
B – Fuel Tank
C – Choke
D – Fuel Valve Lever
E – Soap Tank
F – Handle
G – Spray Gun
H – Locking Trigger
I – Pull Cord
J – Engine Switch
K – Dipstick
L – No Flat Foam Filled Tires
M – High Pressure Hose Outlet
N – Water Inlet

PRESSURE WASHER PARTS ASSEMBLY


PRESSURE WASHER PARTS LIST
| NUMBER | ITEM NAME | QTY |
| 1 | Engine | 1 |
| 2 | Bolt M6 | 7 |
| 3 | Shim | 9 |
| 4 | M6 Self-Lock Nut | 9 |
| 5 | Lower “A” Frame assembly | 1 |
| 6 | M8 Self-Lock Nut | 1 |
| 7 | Rubber Feet | 1 |
| 8 | Cap, Soap Tank | 1 |
| 9 | Soap Tank | 1 |
| 10 | Lower “A” Frame assembly Board | 1 |
| 11 | Gun Hook | 1 |
| 12 | M6 Self-Lock Nut | 8 |
| 13 | Engine Mount, Vibration Isolator | 4 |
| 14 | Wheels | 2 |
| 15 | Axle | 2 |
| 16 | Hair Pin | 2 |
| 17 | Handle Pivot Lock | 2 |
| 18 | Plastic expansion screw | 2 |
| 19 | Panel | 1 |
| 21 | Gun Hook | 2 |
| 22 | Nozzle Holder | 4 |
| 23 | Handle | 1 |
| 24 | Foam Grip | 1 |
| 25 | Bungee Cord Knob | 1 |
| 26 | Bungee Cord | 1 |
| 27 | Siphone Tube | 1 |
| 28 | Pump | 1 |
| 29 | Bolt M8 | 4 |
| 30 | Shaft Key | 1 |
| 31 | Wand | 1 |
| 32 | Spray Gun | 1 |
| 33 | Nozzle Cleaner | 1 |
| 34 | Smart cover | 1 |
| 35 | High Pressure Hose | 1 |
| 36 | Red Nozzle 0° | 1 |
| 37 | Green Nozzle 25° | 1 |
| 38 | White Nozzle 40° | 1 |
| 39 | Black Soap Nozzle | 1 |
| 40 | Spark plug wrench | 1 |
| 41 | funnel | 1 |
ASSEMBLY
Packing List
- Pressure washer
- Spark plug wrench
- Operator’s manual and product registration card
- Engine manual
- Spray gun
- Extension wand with quick-connect fitting High
- pressure hose
- Spray nozzles (5) – 0°, 15°, 25°, 40° and soap nozzle
- funnel
- Nozzle cleaner
| Do not attempt to assemble or operate this pressure washer until you have read and understood this entire manual. If you have any problems assembling or operating this unit contact your dealer or a qualified service center. |
| Do not operate this pressure washer if any of the parts are damaged or missing until the part is replaced. Using this product with damaged or missing parts can cause damage to the machine or result in serious injury or death. |
Unpacking
- Remove the high pressure hose from box.
- After the high pressure hose has been removed, carefully open product by cutting down the sides of the box.
- Remove the product, parts, and all accessories. Make sure all items listed on the packing list are included and not damaged.
Install Handle
(See fig 1)
- Install upper frame (handle) onto the lower frame by sliding the handle over the two upright tubes on the lower frame and pressing down firmly until the handle is seated and the two detent pins snap in place.

Attaching the Spray Gun
(See fig 2 & 3)
- Screw the spray wand and the trigger handle together until they are secure.
- Insert the inlet coupler of the spray hose into the threaded fitting on the high pressure spray gun and thread the back nut on by turning clockwise until it is hand tight.
Adding / Checking Engine Oil
(See fig 4)
- Place pressure washer on a level surface.
- Remove one or both of the crankcase dipsticks to ensure you do not overfill engine.
- Carefully add between 520 ml (17.6 oz) of 4-Cycle engine oil (SAE10W30) to empty reservoir until oil reaches the outer edge of the oil fil hole (Crankcase Dipstick hole).
- Be sure to replace both dipsticks before attempting to start the engine.
- To check oil, set pressure washer on a level surface, wipe dipstick clean, then reinsert dipstick without re-threading.
Adding Fuel
(See fig 5)
- Set pressure washer on a clean and level surface in an area that is well ventilated.
- Remove fuel cap.
- Insert a funnel into the fuel tank and carefully pour gasoline into the tank until fuel level reaches 1 1/2 inches below the top of the neck.

Connecting Garden Hose to Pressure Washer
(See fig 6)
Run water through the hose for a few seconds to flush any debris from the hose.
- Inspect inlet screen and remove any debris.
- Connect hose to water inlet and tighten by hand. There must be a minimum of 10 feet of unrestricted hose between pressure washer and faucet or shut off valve.
- Turn on water.
- Purge the system’s pump of air by releasing the safety and squeezing the trigger of the spray gun.
| Do not run pump without connecting to the water supply and turning water on. Failure to do so could damage the pressure washer. Failure to follow these instructions will void product warranty. The unit is not suitable for use with a drinking water supply! |

Connect High Pressure Hose to Pump
(See Fig 7)
- Attach end of high pressure hose to the high pressure outlet on pump.
- Follow the same procedure with opposite end to attach high pressure hose to spray wand.

OPERATION
Pre-Operation Check List
- Read and understand this operator manual in its entirety before operating pressure washer.
- Check oil level and add oil to the proper level if low.
- Check fuel level and add fuel if needed.
- Check connections of handle and all hoses to make sure they are secure.
- Check all hoses for kinks and damage.
- Check flow of water supply and make sure it is adequate (2.8 – 5.6bar).
Do not operate indoors or in a conf1ined space preventing dangerous carbon monoxide gas from dissipating.
|
| Do not run pressure washer with a damaged hose. Do not run pressure washer without first connecting and turning on water supply or damage to the pressure washer could result. FAILURE TO FOLLOW THESE INSTRUCTIONS WILL VOID PRODUCT WARRANTY. |
Starting Pressure Washer
(See Fig 8-9)
- Place pressure washer on a level surface.
- Turn on water.
- Purge the system’s pump of air by releasing the safety and squeezing the trigger of the spray gun.
- Attach wand/lance to spray gun.
- Turn fuel valve to the ON position.
- Slide the choke lever to the “Choke” position.
- Turn the engine OFF/ON switch to the “ON” position.
- Holding the machine with your hand, pull the recoil handle (starter cord) slowly until resistance is felt, then pull rapidly.
Squeeze the Gun trigger and release the pressure after every failed attempt to start the pressure washer (This will reduce the back pressure). - Let engine run for several seconds and then gradually slide the choke lever to the RUN position as the engine warms up until the choke is fully slid to the RUN position.


Pull cord recoils rapidly and pulls arm towards engine faster than you can let go which could result in injury.
|
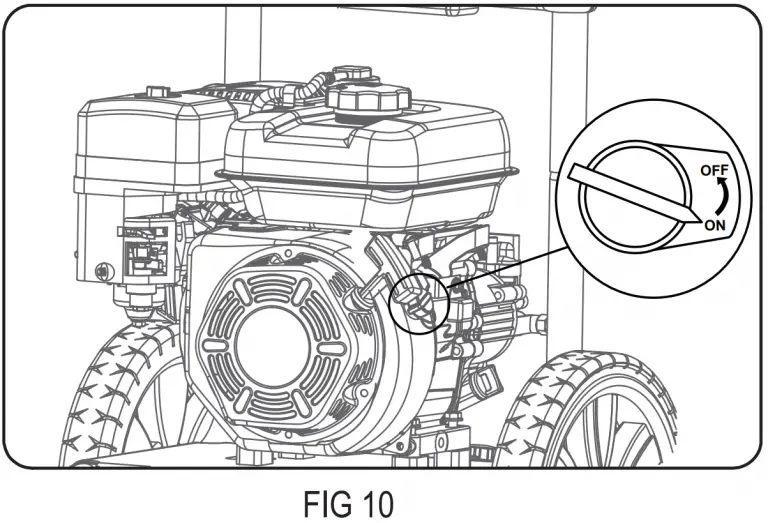
Stopping Pressure Washer
(See Fig 10)
- Turn the on/stop switch to the OFF position.
- Turn the fuel valve to the OFF position.
- Turn off water and squeeze the trigger handle to release all water pressure.

Using the Spray Gun
(See Fig 11 – 12)
- Flip the lock tab behind the trigger up or down until it clicks to apply or remove the safety. Pull back on the trigger to begin operating pressure washer.
- To stop water flow, release trigger.


| Kickback forces result from pressing the trigger! Therefore, always hold the spray gun with both hands! Pay attention to safe posture! Improper handling can lead to injuries! |
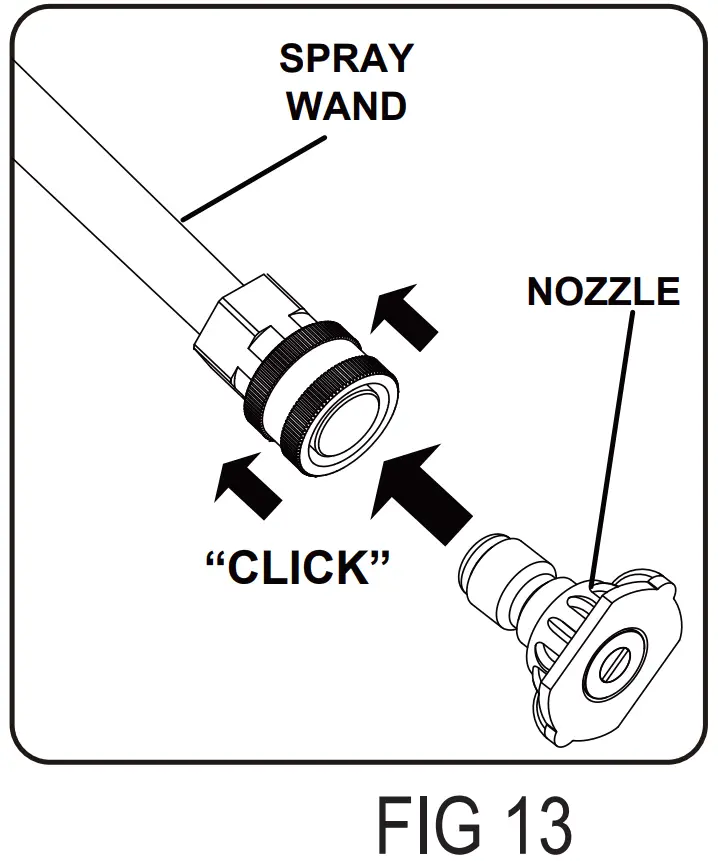
Using Spray Nozzle
(See fig 13-14)
- To connect or disconnect spray tip, pull back on the quick-connect collar. Insert or remove spray tip then release collar.
- When spray tip is connected, pull on the spray tip to make sure it is secured.
- For general cleaning use the 40° spray tip. This option is for cement walkways.
- For stripping, spot cleaning, blasting, and hard to reach areas use the 25° spray tip. This option is for removing paint, rust, mildew, marine growth off boats, or grease stains. This option can be used for reaching second story surfaces, or for the removal of paint, rust, oil stains, tar, gum, and other stubborn substances. Use extreme caution when using this nozzle.
- For applying pressure washer safe detergent, use the black soap nozzle.
- The angle of the nozzles shown indicates the spray “fan shape” projected from the nozzle when the trigger of the spray gun is pulled and high pressure water is passing through the nozzle. The pressure and flow will not change significantly due to the various fan patterns (Nozzles).


Applying Detergent
- Rinse surface with cool water before applying cleaner.
- Prepare detergent as required by job. For best results follow detergent directions as supplied from manufacturer.
- Remove cap from detergent container and fill.
- Spray detergent on surface. For best results use long, even, and overlapping strokes. Allow detergent to set for about
3 minutes before rinsing, but do not allow detergent to dry on surface or it may cause streaking or cause damage to the surface. Use good judgment. - To clean equipment after use, flush water through the spray nozzle for 1-2 minutes then shut off engine. Soak nozzle in a bucket of clean water to remove detergent.
| Only use mild, environmentally friendly detergents intended for use in pressure washers. Ask at your specialist dealer about these special products. Never use aggressive chemicals (eg bleach), abrasive detergents or similar to avoid damage to your health, the product and the environment. |
| Avoid skin contact with detergents, in particular contact with eyes! If detergents gets in your eyes flush your eyes with clean water and seek immediate medical attention! |
Rinsing with the Pressure Washer
- Test a small area first to avoid surface damage.
- Rinse from top to bottom using long, overlapping strokes.
Moving the Pressure Washer
- Turn the pressure washer off.
- Tilt unit towards you until it is balanced on its wheels.
- Roll machine to desired location.
MAINTENANCE
Regular maintenance will extend the life of this pressure washer and improve its performance. The warranty does not cover items that result from operator negligence, misuse, or abuse. To receive full value from the warranty, operator must maintain the pressure washer as instructed in this manual, including proper storage.
| Before inspecting or servicing this machine, make sure the engine is off and no parts are moving. Disconnect the spark plug wire and move it away from the spark plug |
Pre-operation Steps
Before starting the engine, perform the following pre-operation steps:
- Check the level of the engine oil and the fuel tank level
- Make sure the air filter is clean.
- Remove any debris that has collected on the pressure washer.
- Check water inlet screen for damage. Clean inlet screen if it is clogged.
- Check high pressure hose for damage.
- Briefly run garden hose to flush out any debris or insects.
- Inspect the work area for hazards.
Remove Debris
- Clean any debris that has collected around or behind the muffler, cleaning system, and controls.
- Use a damp cloth to wipe exterior surfaces. If dirt is caked on, use a soft bristle brush.
After Each Use
Follow the following procedure after each use:
- Shut off engine and turn off water supply. Release water pressure by pointing spray gun in a safe direction and squeezing the trigger.
- Disconnect high pressure hose, spray gun, and nozzle. Drain water from items and use a rag to wipe down the outside of the hose and spray gun.
- Empty the water from the pump by pulling the recoil starter 6 times.
- Store unit in a clean and dry area.
- Use of a pressure washer pump conditioner is recommended, follow the instructions provided by the manufacturer of the pump conditioner.
Maintenance Schedule
| After First 5 Hours | Change Engine Oil |
| After Each Use | Check and Clean Water Inlet screen |
| Check High Pressure Hose | |
| Check and Clean Detergent Siphoning Tube | |
| Check Spray Gun for Leaks | |
| Clean Debris | |
| Check Engine Oil Level before starting | |
| Annually (20 hr Use) | Change Engine Oil (Service more often under dirty or dusty conditions) |
| Annually (50 hr Use) | Check and Clean Air Filter |
| Annually (100 hr Use) | Service or Replace Spark Plug |
Changing Engine Oil
Engine oil will drain better if the engine is still warm, but not hot.
- Shut off engine.
- Clean the area around the oil fill cap/dipstick to keep out debris then remove oil fill cap/dipstick.
- Place an oil pan on the ground to catch oil. Remove oil plug then tilt pressure washer back and to the side to empty out the oil from the crankcase.
- Once oil is completely drained, return the pressure washer to a level position and install the oil drain plug. Refill the engine with new oil as instructed earlier in this manual under Adding/Checking Oil.

Checking Detergent Siphoning Tube
- Check the detergent siphoning tube for clogs, leaks, or tears.
- Make sure the tube fits tightly to pump fitting.
- Replace siphoning tubes if damaged.
| Never repair high pressure hose or use unit if hose is damaged. If hose is damaged replace with identical Ducar part. |
High Pressure Hose
- Inspect hose for cuts, bulges, or leaks which can develop from kinking or wear. If damage is found, immediately replace hose.
- Inspect couplings for damage. Immediately replace hose if damage is found.
Spray Gun
- Make sure the spray gun is connected securely.
- Inspect the spray gun safety and make sure the spray gun trigger springs back upon release.
Spray Nozzle
If a pulsing sensation is felt while squeezing the trigger, the spray nozzle may be dirty or clogged and should be cleaned immediately.
- To clean the nozzle, shut off the engine and turn off the water.
- Remove the nozzle from the spray wand making sure that the nozzle is pointing away from you and in a safe direction.
- Use the nozzle cleaner or a small paper clip to dislodge any foreign materials which are clogging or restricting the spray tip.
- Flush debris out of the nozzle by back flushing with a garden hose 30-60 seconds.
- Reconnect the nozzle to the spray wand.
- Turn the water supply back on and start engine.

Checking Spark Plug
- Disconnect the spark plug wire from the spark plug.
- Before removing the spark plug, clean the area around its base to prevent debris from entering the engine.
- Clean carbon deposits off the electrode with a wire brush.
- Check the electrode gap and slowly adjust to 0.80mm (0.031in.) if necessary.
- Reinstall spark plug and tighten to Torque 22.0 – 26.9 Nm (16-20 ft-lb).
- Reconnect spark plug wire.
- If spark plug is worn replace only with an equivalent replacement part. Spark plug should be replaced annually.
Water pressure produced by this unit can cut through skin and tissue leading to serious injury and possible amputation.
|
Repairing Leaking Connections
• Purchase O-Ring / Maintenance kits through the nearest authorized service center and follow instructions provided with kit.
Air Filter
A dirty air filter will reduce the life span of the engine, make starting the engine difficult, and reduce the unit’s performance.
- To clean, remove the air filter cover.
- Carefully pull the air filter out by lifting up along the edges.
- Remove dirt from filter by tapping on it or having it blown out.
- Reinstall air filter so that it seals and replace air filter cover.
| Storage cover could be flammable. Let engine cool before covering pressure washer. |
Storing Pressure Washer
If storing pressure washer for 30 days or more follow the procedures below:
- Add fuel stabilizer to gasoline to keep gasoline from going stale and to prevent gum deposits from forming on the carburetor. Run engine for a couple of minutes to circulate the fuel stabilizer.
- Add PumpSaver to protect pump from freezing or damage caused by mineral deposits.
- Empty fluid from all hoses and pump.
- Disconnect the spark plug wire and clean the spark plug. Leave spark plug wire disconnected.
- Clean the air filter.
- Cover unit with a suitable protective cover to keep unit dry.
- Store unit in a frost-free area.
TROUBLESHOOTING
| PROBLEM | CAUSE | SOLUTION |
| Engine does not start |
|
|
| Engine hard to start |
|
|
| Engine lacks power and vibrates excessively |
|
|
| Engine quits during operation |
|
|
| Engine loses power when load is added | 1. Engine speed is too slow |
|
| Water pressure is weak |
|
|
| Detergent and spray do not mix |
|
|
| Pump fails to produce pressure or pressure is inconsistent |
|
|
DIAGRAMS
