DURACELL Lithium-Ion Jump Starter User Manual
1. Features
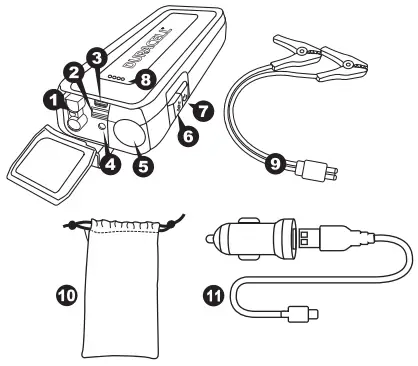
- Jump-start port connects to jump-start cable.
- USB port (2.4 Amps) charges smartphones, tablets and other devices.
- Charging port connects to USB cable to recharge the Jump-starter.
- LED status light Indicates state of the Jump-Starter connection (see Section 7).
- LED flashlight features steady beam and emergency strobe.
- Light button activates the LED flashlight.
- Power button displays battery level
- LED fuel gauge displays current Jump-starter battery level.
- Jump-start cable with Safejump™ feature.
- Carry bag fits into most vehicle glove boxes..
- DC charger and USB cable recharges the Jump-starter in the car or with your own AC wall charger (wall charger not included).
2. Important safety information
Misusing or incorrectly connecting the DURACELL® Jump-starter may damage the equipment or create hazardous conditions for users.
3. Charging the Jump-starter

WARNING: SHOCK HAZARD
Disconnect jump-start cables before charging the Jump-starter.
CAUTION
Do not attempt to recharge the Jump-starter battery if it is frozen. Gradually warm the frozen battery to 32 °F (0 °C) before recharging.
![]()
Charging before first use
IMPORTANT:
Prior to using the Jump-starter for the first time, ensure that the battery of the Jump-starter is fully charged. If the battery has been fully discharged, charging with a USB charger may take up to 4 hours.
![]()
Charging the Jump-Starter
Charging times: Partially discharged (or after using jump-starter) – 30-60 minutes; fully discharged jump-starter battery – up to 4 hours
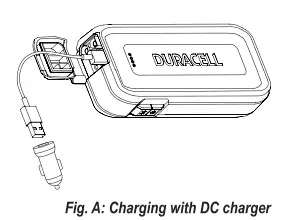
Charging with the included DC charger:
- Disconnect any cables from the Jump-starter and USB ports.
- Plug the DC charger into a 12V vehicle socket and connect your USB cable (not included) to the ‘IN’ port.
- It is best to have the vehicle started during charging.
Charging with an AC charger (not included):
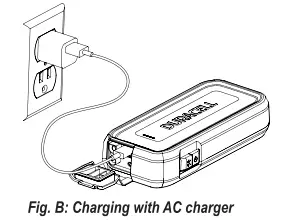
- Disconnect any cables from the Jump-starter and USB ports.
- Plug the USB cable (included) into your USB wall charger (not included).
- For safety we recommended using a certified USB wall charger bearing UL, TUV, CSA or ETL logo.
- Charging will only take 30 to 60 mins. after jump-starting or partial use. If completely empty a full re-charge may take up to 4 hours.
IMPORTANT
If you keep the Jump-starter in storage, the battery will discharge over time. Remember to recharge the battery after every use to make sure it is ready when you need it, and at least once a year. Re-charging more often will not harm the Jump-starter.
4. Checking the Jump-starter’s battery level
To check the battery’s charge level, press the power button on the Jump-starter. The LED lights will illuminate and display the current level of available battery power.
When all four lights are lit, this indicates that your Jump-starter is fully charged. It is recommended to maintain a full charge on the Jump-starter at all times for optimal jump starting and device charging.
IMPORTANT
Your Jump-starter will perform best when its battery Is fully charged. If the LED Fuel Gauge shows less than 100% charge, it is recommended to fully recharge your battery (see Section 3: “Charging the Jump-starter” above).
5. Using the LED Light / USB Port
![]() Using the LED light
Using the LED light
The DURACELL® Jump-starter has a built-in emergency light to provide a safe, bright work light on the roadside and in other outdoor environments.
- Press and release the LIGHT button – high mode
- Press and release the LIGHT button – low mode
- Press and release the LIGHT button – SOS mode
- Press and release – off
- Press and hold 3 seconds – off from any mode
![]()
Using the USB port
The USB port provides up to 2.4 Amps of current to charge cell phones, smartphones, tablets and other devices.
To charge USB devices:
- Open the protective cover over the USB port.
- Connect your USB device (smartphone, tablet, etc.) to the USB port using the USB cable supplied with your device.
- Press and release the POWER button.
- Charging will start and up to 2.4 Amps of current can be supplied by the port. The USB device controls the amount of current supplied. The Jump-starter never “pushes” more than required by the devices.
- When done, press and release the POWER button to turn the USB port off. If you remove the USB cable, the port will also turn off automatically after 30 seconds to conserve power.
6. Jump-starting a vehicle
You can use the DURACELL® Jump-starter with the supplied jump-start cable to jump-start a vehicle or boat engine that has a 12V starting battery.
WARNING: FIRE HAZARD
Do not crank the engine for more than 4 seconds. The jump-start feature is designed for short term operation only. Operating the jump-start feature for more than 4 seconds may cause damage to the unit. Allow the Jump-starter to cool down for at least 30 seconds after each jump-start.
![]()
To jump-start a vehicle engine:
- Turn OFF the vehicle or boat ignition and all accessories.
- Engage the park or emergency brake and place the transmission in park for an automatic or neutral for a manual.
- If jump-starting a boat engine, purge the engine compartment and bilge of all fumes.
- Position the jump-starter on a flat, stable surface near the battery and away from all moving parts of the engine. Make sure the battery terminals or other attachment points are clear of dirt and grease to allow proper electrical contact.
- Connect the red positive (+) clamp of the cables to the positive (+) terminal of the engine battery. The battery’s positive terminal is usually larger in diameter than the negative terminal. In most vehicles, the battery’s positive terminal has a red wire connected to it. (Refer to your vehicle’s owner manual).
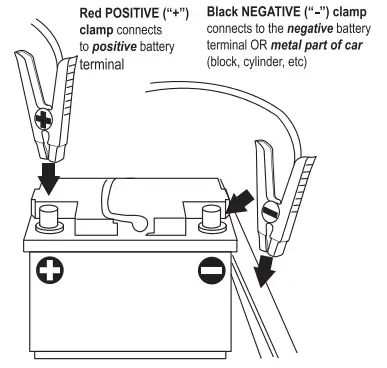
- Connect the black negative (-) clamp of the cables to the negative battery terminal, engine block, cylinder head, or other stationary heavy metal part of the motor.
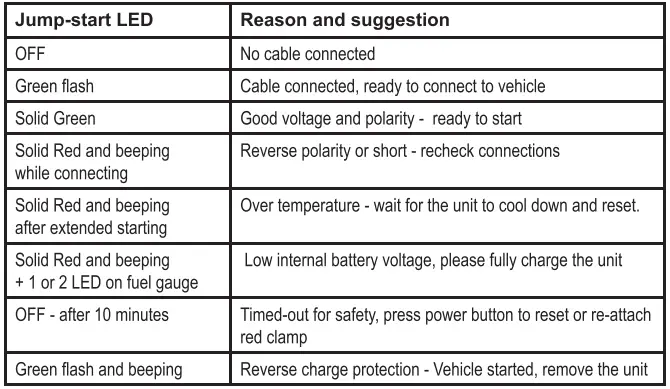
- After a good connection the SafeJump™ feature will automatically verify polarity, voltage of vehicle and jump-starter, cell and circuit temperatures before displaying the green light to start the vehicle. See LED Status section for error conditions that may arise and corresponding suggestions.
- Before starting the engine, make sure the jump-starter and the cables are clear of belts and fans then crank for no more than 4 seconds each time with 30 seconds of rest in between starts.
7. LED status light function
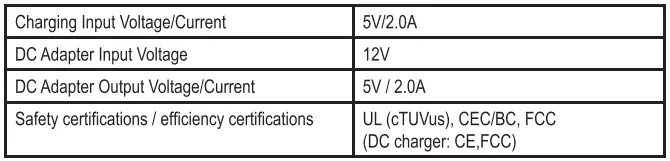
8. Specifications
Electrical specifications
Physical specifications

9. Important Safety Warnings
IMPORTANT: Please read these general usage-related warnings and cautions thoroughly before using this Jump-starter.
WARNING: When using this product, basic precautions should always be followed, including the following:
- Read all the instructions before using the product.
- To reduce the risk of injury, close supervision is necessary when product is used near children.
- Do not insert fingers or foreign objects into the product.
- Do not use this product with any application of which it was not intended.
- Use of an attachment no recommended or sold by the manufacturer may result in risk of fire, electric shock or injury.
WARNING: Medical equipment
This product is NOT tested, designed nor intended to be used with life support systems or any other medical devices.
WARNING: Proper application
Do not use the product if it is damaged or modified. Damaged or modified batteries may exhibit unpredictable behavior resulting in fire, explosion or risk of injury.
Do not operate the power pack with a damaged cord or plug.
Do not disassemble the power pack, contact the manufacturer when service or repair is required. Incorrect reassembly may result in a risk of fire.
WARNING: Risk of explosive gases
WORKING IN THE VICINITY OF A LEAD ACID BATTERY IS DANGEROUS. BATTERIES GENERATE EXPLOSIVE GASES DURING NORMAL BATTERY OPERATION. FOR THIS REASON, IT IS OF THE UTMOST IMPORTANCE THAT YOU FOLLOW THE INSTRUCTIONS EACH TIME YOU USE THE POWER PACK.
To reduce risk of vehicle battery explosion, follow these Instructions In vicinity of the battery. Review cautionary marking on this product and on vehicle engine
WARNING: Personal precautions
- Consider having someone close enough by to come to your aid when you work near a lead-acid battery.
- Have plenty of fresh water and soap nearby in case battery acid contacts skin, clothing, or eyes. o Wear complete eye protection and clothing protection. Avoid touching your eyes while working near a vehicle battery.
- If battery acid contacts skin or clothing, wash immediately with soap and water. If acid enters eye, Immediately flood eye with running cold water for at least 10 minutes and get medical attention Immediately.
- NEVER smoke or allow a spark or flame in vicinity of a vehicle battery or engine.
- Be extra cautious to reduce risk of dropping a metal tool onto the vehicle battery. It might spark or short-circuit battery or other electrical part that may cause an explosion.
- Remove personal metal items such as rings, bracelets, necklaces, and watches when working with a lead-acid battery. A lead-acid battery can produce a short-circuit current high enough to weld a ring or the like to metal, causing a severe burn.
- When charging the internal battery, work in a well ventilated area and do not restrict ventilation in any way.
- Under abusive conditions, liquid may be ejected from the battery, avoid any contact with this material. If contact accidentally occurs, flush with water. If liquid contacts eyes, additionally seek medical help. Liquid ejected from the battery may cause irritation or burns.
- Do not expose a power pack to fire or excessive temperature. Exposure to fire or temperature above 265°F (130°C) may cause an explosion.
- Attach output cables to a battery and chassis as indicated in these instructions. Never allow the output clamps to touch one another.
IMPORTANT: SAVE THESE INSTRUCTIONS
10. Recycling
DURACELL® is committed to environmental responsibility and recommends that electronic devices be disposed of properly. Please contact your local city offices for information on recycling and disposal programs for e-waste.
For instructions on how to recycle this product visit http://www.call2recycle.org.
11. Contacting Customer Support
If you experience any problems or have any questions regarding your DURACELL® product, free technical support is available. Prior to calling, please review the technical support tips below. Call from a phone where you have access to your mobile device
Be prepared to provide the following information:
- Name, address and telephone number
- Name of the DURACELL® product
- Make and model of your device
- Symptoms of the problem(s) and what led to them
Technical Support is available by telephone:
U.S. and Canada to 1-800-300-1857
Outside of the US/Canada: 1-805-437-7781
Written inquires should be directed to:
DURACELL® Product Inquiry
1380 Flynn Road, Camarillo, CA 93012, USA
Email inquires should be directed to:
WARNING
This product contains chemical(s) known to the State of California to cause cancer, birth defects, or other reproductive harm.
FCC Statement
This device complies with Part 15 of the FCC Rules. Operation of this product is subject to the following two conditions: (1) this device may not cause harmful interference, and (2) this device must accept any interference received, including interference that may cause undesired operation.
This equipment has been tested and found to comply within the limits for a class B digital device, pursuant to Part 15 of the FCC Rules. These limits are designed to provide reasonable protection against harmful interference in a residential installation. This equipment generates, uses, and can radiate radio frequency energy and, if not installed and used in accordance with the instructions, may cause harmful interference to radio communications. However, there is no guarantee that interference will not occur in a particular installation. If this equipment does cause harmful interference to radio or television reception, which can be determined by turning the equipment off and on, the user is encouraged to try to correct the interference by one or more of the following measures:
- Reorient or relocate the receiving antenna.
- Increase the separation between the equipment and receiver
- Connect the equipment into an outlet on a circuit different from that to which the receiver is connected.
- Consult the dealer or an experienced technician for help.
Changes or modifications not expressly approved by the party responsible for compliance with the FCC Rules could void the user’s authority to operate this equipment.
Canada ICES-003 Statement
This Class B digital apparatus complies with Canadian ICES-003.
- Under Industry Canada regulations, this radio transmitter may only operate using an antenna of a type and maximum (or lesser) gain approved for the transmitter by Industry Canada. To reduce potential radio interference to other users, the antenna type and its gain should be so chosen that the equivalent isotropic ally radiated power (e.i.r.p.) is not more than that necessary for successful communication.
- This equipment complies with IC radiation exposure limits set forth for an uncontrolled environment. This equipment should be installed and operated with minimum distance 20cm between the radiator and your body.
- “This device complies with Industry license-exempt RSS standard(s). Operation is subject to the following two conditions: (1) this device may not cause interference, and (2) this device must accept any interference, including interference that may cause undesired operation of the device.”