1100 Amp Li-Ion Jump-Starter
(DRLJS110B/DRBTLC) ![]()
Misusing or incorrectly connecting the DURACELL® Jump-Starter may damage the equipment or create hazardous conditions for users.
1. Download the PowerHub™ app
The PowerHub™ app enables advanced features:
- Battery monitoring and alerts
- Interactive step-by-step guide
- Live support
► Download the  app to get started:
DuracellPower.com/App


Scan for app download
2. Product details


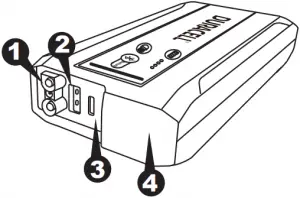
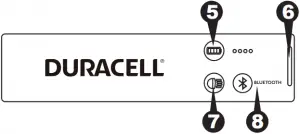
1: Jump-start port connects to jump-start clamps.
2: USB port (2.4 Amps) charges smartphones, tablets and other devices.
3: Charging ‘IN’ port connects to USB cable to recharge the Jump-starter.
4: LED flashlight features high beam, low beam and emergency/SOS mode.
5: Battery level button and LED gauge displays battery charge level.
6: LED status light bar indicates state of the Jump-Starter connection (see Section 7).
7: Light button activates the LED flashlight.
8: Bluetooth button Hold 3 seconds for pairing mode (requires Duracell Power App).
9: Jump-start clamps with SafeJump™ feature.
10: Carry bag fits into most vehicle glove boxes.
11: DC charger and USB cable for recharging the Jump-Starter.
3. Charging the Jump-starter
Disconnect jump-start clamps before charging the Jump-starter.
Do not attempt to recharge the Jump-starter battery if it is frozen.
Gradually warm the frozen battery to 32 °F (0 °C) before recharging.
Prior to using the Jump-starter for the first time, ensure that the battery of the Jump-starter is fully charged. If the battery has been fully discharged, charging with a USB charger may take up to 4 hours.
For fastest possible recharging time, please be sure to use an AC or DC charger with a rating of 2.0 Amps or higher. The charge times shown assume the usage of a charger with a 2.0A or higher power rating.
The included DC charger is for charging only Li-Ion type rechargeable batteries. Other types of batteries may burst causing personal injury or damage.

► Charging/re-charging the Jump-Starter
Charging times: Partially discharged (or after using jump-starter) – 30-60 minutes; fully discharged jump-starter battery – up to 4 hours
Charging with the included DC charger:
- Disconnect any cables from the Jump-starter and USB ports.
- Plug the DC charger into the included 12V vehicle socket (Fig. A) and connect the small micro USB end of the included USB charging cable to the ‘IN’ port. (Fig. B)
- It is best to have the vehicle running while charging.
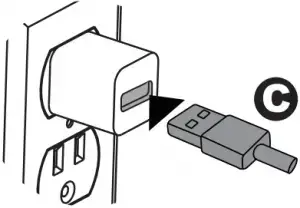
Charging with an AC charger (sold separately):
- Disconnect any cables from the Jump-starter and USB ports.
- Plug the USB cable into your USB wall charger (Fig. C – wall charger sold separately) and connect the small micro USB end of the included USB charging cable to the ‘IN’ port (Fig. B).
If you keep the Jump-starter in storage, the battery will discharge over time. Remember to recharge the battery after every use to make sure it is ready when you need it, and at least once a year. Re-charging more often will not harm the Jump-starter.
4. Checking the Jump-starter’s battery level
To check the battery’s charge level, press the battery level button on the JumpStarter. The LED fuel gauge will illuminate and display the current level of available battery power. Four lights indicate a 100% charge.
Your Jump-starter will perform best when its battery is fully charged. If the LED Fuel Gauge shows less than 100% charge, it is recommended to fully recharge its battery (see Section 4: “Charging the Jump-starter”).
5. Using the LED flashlight and USB port
► Using the LED light
The DURACELL® Jump-Starter has a built-in emergency light to provide a safe, bright work light on the roadside and in other outdoor environments.
Press and release the light button to cycle through the 3 light modes. (High beam, Low Beam and SOS)
► Using the USB port
The USB port provides up to 2.4 Amps of current to charge cell phones, smartphones, tablets and other devices.
- Open the protective cover over the USB port.
- Connect your USB device (smartphone, tablet, etc.) to the USB port using the USB cable supplied with your device.
- Charging will automatically start.
6. Jump-starting a vehicle
You can use the DURACELL® Jump-Starter with the supplied jump-start clamps to jump-start a vehicle or boat engine. The Jump-Starter is compatible with 12V vehicles.
Do not crank the engine for more than 4 seconds. The jump-start feature is designed for short term operation only. Operating the jump-start feature for more than 4 seconds may cause damage to the unit. Allow the Jump-starter to cool down for at least 30 seconds after each jump-start.
► To jump-start a vehicle engine:
1. Connect the jump-start clamps to the Jump-Starter
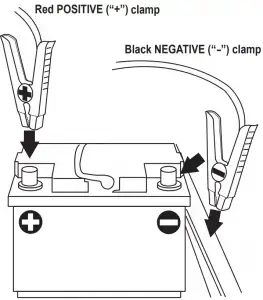
2. Connect the red (+) clamp to the positive (+) terminal on the vehicle battery and the black (-) clamp to the negative (-) terminal on the vehicle battery
3. Verify that the Jump-Starter and clamps are clear of any moving engine parts.
4. Start your engine, Be sure to crank for no more than 4 seconds at a time and allow for 30 seconds in between starting attempts.
5. After starting the vehicle remove the Jump-starter and recharge it.
Red POSITIVE (“+”) clamp connects to positive battery terminal
Black NEGATIVE (“-”) clamp connects to the negative battery terminal OR metal part of car (block, cylinder, etc)
7. Jump-Start LED bar function
| Jump-start LED bar | Reason and suggestion |
| OFF | No clamp cable connected |
| Green flash | Clamp cable connected, ready to connect to vehicle |
| Green flash (still flashing after 5 seconds of connection to battery) | 1. Turn off all vehicle accessories and lights; wait 5-10 minutes before reconnecting and try again. 2. If still flashing, the car battery may be below 3V and is unsafe to use with this jump-starter. |
| Solid Green | Good voltage and polarity – ready to start |
| Solid Red and beeping while connecting | Reverse polarity or short – recheck connections |
| Solid Red – OR – 4 Fuel Gauge LEDs flashing – After extended starting | Over temperature – wait for the unit to cool down and reset. |
| Solid Red + 1 or 2 LED on fuel gauge | Low internal battery voltage, please fully charge the unit |
| OFF – after 10 minutes | Timed-out for safety, press power button to reset or re-attach red clamp |
| Green flash after vehicle starts | Reverse charge protection – Vehicle started, remove the unit |
8. Specifications
Electrical specifications
| Charging Input Voltage/Current | 5V/2.0A |
| DC Adapter Input Voltage | 12V |
| DC Adapter Output Voltage/Current | 5V / 2.1 A |
| Safety certifications / efficiency certifications | UL (cTUVus), CEC/BC, FCC
(DC charger: CE,FCC) |
Physical specifications
| Length | 7.66 in (19.45 cm) |
| Width | 3.31 in (8.40 cm) |
| Height | 1.40 in (3.55 cm) |
| Weight (product only) | 1.47 lbs (490 g) |
9. Important safety instructions
IMPORTANT: Please read these general usage-related warnings and cautions thoroughly before using this Jump-starter.
- Read all the instructions before using the product.
- To reduce the risk of injury, close supervision is necessary when the product is used near children.
- Do not insert fingers or foreign objects into the product.
- Do not use this product with any application of which it was not intended.
- Use of an attachment not recommended or sold by the manufacturer may result in risk of fire, electric shock or injury to persons.
This product is NOT tested, designed nor intended to be used with life support systems or any other medical devices.
- Do not use the product if it is damaged or modified. Damaged or modified batteries may exhibit unpredictable behavior resulting in fire, explosion or risk of injury.
- Do not operate the power pack with a damaged cord or plug.
- Do not disassemble the power pack, contact the manufacturer when service or repair is required. Incorrect reassembly may result in a risk of fire or electric shock.
WORKING IN THE VICINITY OF A LEAD ACID BATTERY IS DANGEROUS. BATTERIES GENERATE EXPLOSIVE GASES DURING NORMAL BATTERY OPERATION. FOR THIS REASON, IT IS OF THE UTMOST IMPORTANCE THAT YOU FOLLOW THE INSTRUCTIONS EACH TIME YOU USE THE JUMP-STARTER.
To reduce risk of vehicle battery explosion, follow these instructions in vicinity of the battery. Review cautionary marking on this product and on vehicle engine.
- Consider having someone close enough by to come to your aid when you work near a lead-acid battery.
- Have plenty of fresh water and soap nearby in case battery acid contacts skin, clothing, or eyes. Wear complete eye protection and clothing protection. Avoid touching your eyes while working near a vehicle battery.
- If battery acid contacts skin or clothing, wash immediately with soap and water. If acid enters eye, immediately flood eye with running cold water for at least 10 minutes and get medical attention immediately.
- NEVER smoke or allow a spark or flame in vicinity of a vehicle battery or engine.
- Be extra cautious to reduce risk of dropping a metal tool onto the vehicle battery. It might spark or short-circuit battery or other electrical part that may cause an explosion.
- Remove personal metal items such as rings, bracelets, necklaces, and watches when working with a lead-acid battery. A lead-acid battery can produce a short-circuit current high enough to weld a ring or the like to metal, causing a severe burn.
- When charging the internal battery, work in a well ventilated area and do not restrict ventilation in any way.
- Under abusive conditions, liquid may be ejected from the battery, avoid any contact with this material. If contact accidentally occurs, flush with water. If liquid contacts eyes, additionally seek medical help. Liquid ejected from the battery may cause irritation or burns.
- Do not expose a power pack to fire or excessive temperature. Exposure to fire or temperature above 265°F (130°C) may cause an explosion.
- Attach output clamps to a battery and chassis as indicated in these instructions. Never allow the output clamps to touch one another.
10. Recycling
DURACELL® is committed to environmental responsibility and recommends that electronic devices be disposed of properly. Please contact your local city offices for information on recycling and disposal programs for e-waste.
For instructions on how to recycle this product visit http://www.call2recycle.org.
11. Contacting Customer Support
If you experience any problems or have any questions regarding your DURACELL® product, free technical support is available. Prior to calling, please review the technical support tips below. Call from a phone where you have access to your mobile device
Be prepared to provide the following information:
– Name, address and telephone number
– Name of the DURACELL® product
– Make and model of your device
– Symptoms of the problem(s) and what led to them
Technical Support is available by telephone:
U.S. and Canada to 1-800-300-1857
Outside of the US/Canada: 1-805-437-7765
Written inquires should be directed to:
DURACELL® Product Inquiry
1380 Flynn Road, Camarillo, CA 93012, USA
Email inquires should be directed to:
[email protected]
12. Warranty and return information
Two Year Limited Warranty
The DURACELL® product carries a limited warranty against defects in material and workmanship under normal use and service for two years from the original date of purchase. The manufacturer or distributor, at its option, shall repair or replace the defective unit covered by this warranty. Please retain the dated sales receipt as evidence of the date of purchase as it will be required for any warranty service. In order to keep the warranty in effect, the product must have been handled and used as described in the instructions accompanying this warranty. This warranty does not cover any damage due to accident, misuse, abuse or negligence
Disclaimer Of Warranty
The limited warranty described herein is your sole remedy. To the extent permitted by law, the manufacturer and distributor disclaim all other implied or express warranties including all warranties of merchantability and/or fitness for any particular purpose.
Limitation Of Liability
Except to the extent of repairing or replacing this product as expressly stated in the limited warranty described herein, the manufacturer and distributor shall not be liable for any damages, whether direct, indirect, incidental, special, consequential, exemplary, or otherwise, including lost revenues, lost profits, loss of use of software, loss or recovery of data, rental of replacement equipment, downtime, damage to property, and third-party claims, arising out of any theory of recovery, including statutory, contract or tort. Not withstanding the term of any limited or implied warranty, or in the event that any limited warranty fails of its essential purpose, in no event will the manufacturer’s and distributors entire liability exceed the purchase price of this product. Some states and provinces do not allow the exclusion or limitation of incidental or consequential damages so the above limitations or exclusions may not apply to you. This limited warranty gives you specific legal rights. You may have other rights which vary from state to state and province to province.
FCC Statement
This device complies with Part 15 of the FCC Rules. Operation of this product is subject to the following two conditions: (1) this device may not cause harmful interference, and (2) this device must accept any interference received, including interference that may cause undesired operation.
This equipment has been tested and found to comply within the limits for a class B digital device, pursuant to Part 15 of the FCC Rules. These limits are designed to provide reasonable protection against harmful interference in a residential installation. This equipment generates, uses, and can radiate radio frequency energy and, if not installed and used in accordance with the instructions, may cause harmful interference to radio communications. However, there is no guarantee that interference will not occur in a particular installation. If this equipment does cause harmful interference to radio or television reception, which can be determined by turning the equipment off and on, the user is encouraged to try to correct the interference by one or more of the following measures:
- Reorient or relocate the receiving antenna.
- Increase the separation between the equipment and receiver.
- Connect the equipment into an outlet on a circuit different from that to which the receiver is connected.
- Consult the dealer or an experienced technician for help.
Changes or modifications not expressly approved by the party responsible for compliance with the FCC Rules could void the user’s authority to operate this equipment.
Canada IC Statement
This equipment complies with Industry Canada radiation exposure limits set forth for an uncontrolled environment.
This device contains license-exempt transmitter(s)/receiver(s) that comply with Innovation Science and Economic Development Canada’s license-exempt RSS(s). Operation is subject to the following two conditions:
1. This device may not cause interference.
2. This device must accept any interference that may cause undesired operation of the device.
13. Product Registration
For complete warranty coverage, please register your Duracell product within fourteen days of purchase.
Visit DuracellPower.com/Register
or scan the QR code below to register.

© 2019 Duracell. Bethel, CT 06801. DURACELL® is a registered trademark of Duracell U.S. Operations, Inc., used under license. All rights reserved. All logos and trademarks are used for identification purposes only and may be trademarks or registered trademarks of their respective holders.
The Bluetooth® word mark and logos are registered trademarks owned by Bluetooth SIG, Inc. and any use of such marks by Battery-Biz Inc. is under license. Other trademarks and trade names are those of their respective owners.
UM-DRLJS110B/DRBTLC Rev 20190807