DURACELL 6 Amp Battery Charger / Maintainer
1. Features
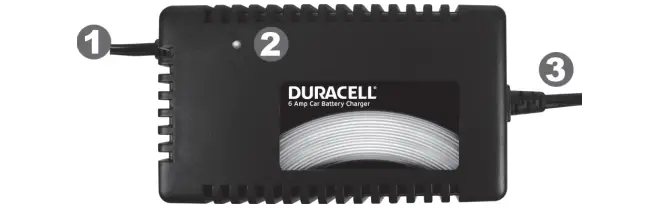
6 Amp Battery Charger

1: DC Output Cable connects to the charging cables (shown below), providing power to the battery being charged
2: LED Charging Indicator shows the status of the charging process (see “LED Charging Indicator” section)
3: AC Power Input Cord connects the battery charger to a standard AC wall outlet
Quick-Connect Charging Cables (included)

Battery charging clamps connect to battery terminals for fast direct charging
Ring terminals permanently attach to battery for easy frequent recharging
2. Important Safety Information
- Warnings identify conditions that may result in personal injury or loss of life.
- Cautions identify conditions or practices that may damage the unit or other equipment

FCC INFORMATION TO THE USER
This equipment has been tested and found to comply with the limits for a Class B digital device, pursuant to part 15 of the FCC Rules. These limits are designed to provide reasonable protection against harmful interference in a residential installation. This equipment generates, uses and can radiate radio frequency energy and, if not installed and used in accordance with the instruction guide, may cause harmful interference to radio communications. Operation of this equipment in a residential area is likely to cause harmful interference in which case the user will be required to correct the interference at his own expense.
IMPORTANT
This guide contains important safety and operating instructions in how to use the battery charger to recharge 12V vehicle batteries.
- Do not expose the battery charger to moisture, rain, or snow.
- Use of an attachment not recommended by the battery charger manufacturer may result in a risk of fire, electric shock, or injury to persons.
- To reduce risk of damage to electric plug and cord, pull by plug rather than cord when disconnecting the battery charger.
- Do not operate the battery charger with damaged cord or plug — have the cord or plug replaced.
- Do not operate the battery charger if it has received a sharp blow, been dropped, or otherwise damaged in any way; contact the manufacturer for repair or replacement.
- Do not disassemble the battery charger. Incorrect reassembly may result in shock or fire hazard.
- To reduce risk of electric shock, unplug the battery charger from the electric outlet before attempting any maintenance or cleaning.
WARNING: RISK OF EXPLOSIVE GASES
Working in the vicinity of a lead-acid battery is dangerous. Batteries generate explosive gases during normal battery operation. For this reason, it is of utmost importance that each time before using a battery charger, you read this guide and follow the instructions exactly. To reduce risk of battery explosion, follow these instructions and those published by battery manufacturer and manufacturer of any equipment you intend to use in the vicinity of the battery. Review cautionary marking on these products and on any engine.
Personal Precautions
- Someone should be within range of your voice or close enough to come to your aid when you work near a lead-acid battery.
- Have plenty of fresh water and soap nearby in case battery acid contacts skin, clothing, or eyes.
- Wear complete eye protection and clothing protection. Avoid touching eyes while working near battery.
- If battery acid contacts skin or clothing, wash immediately with soap and water. If acid enters eye, immediately flood eye with running cold water for at least 10 minutes and get medical attention immediately.
- NEVER smoke or allow a spark or flame in the vicinity of battery or engine.
- Be extra cautious to reduce risk of dropping a metal tool onto a battery. It might spark or short-circuit the battery or other electrical part that may cause an explosion.
- Remove personal metal items such as rings, bracelets, necklaces, and watches when working with a lead-acid battery. A lead-acid battery can produce a short-circuit current high enough to weld a ring or the like to metal, causing a severe burn.
- Use 6 AMP Battery Charger for charging a 12 V LEAD-ACID battery only. It is not intended to supply power to a low voltage electrical system. Do not use 6 AMP Battery Charger for charging dry-cell batteries that are commonly used with home appliances. These batteries may burst and cause injury to persons and damage to property.
- NEVER charge a frozen battery.
Charger Location
- Place the battery charger as far away from the battery as the output DC cable permits.
- Never place the battery charger directly above a battery being charged; gases from battery will corrode and damage the charger.
- Never allow battery acid to drip on the charger when reading specific gravity or filling battery.
- Do not operate the charger in an enclosed area. Do not restrict ventilation in any way.
- Do not set a battery on top of the charger.
DC Connection Precautions
- Connect and disconnect the DC cable only after removing the AC cord from the electric outlet.
- When attaching the clips to the battery posts, twist or rock back and forth several times to make a connection. This tends to keep the clips from slipping off the terminals and helps to reduce the risk of sparking.
Failure to follow these safety guidelines may cause personal injury and/or damage to the 6 AMP Battery Charger. It may also void your product warranty.
3. Preparing To Charge
- If necessary to remove the battery from the vehicle to charge, always remove the grounded terminal from the battery first. Make sure all accessories in the vehicle are off, so to minimize chances of an arc.
- Be sure the area around the battery is well-ventilated while the battery is being charged. Gas can be forcefully blown away by using a piece of cardboard, other nonmetallic material or a fan.
- Clean battery terminals. Be careful to keep corrosion from coming in contact with eyes.
- Study all battery manufacturer’s specific precautions such as removing or not removing cell caps while charging and recommended rates of charge.
- Add distilled water in each cell until battery acid reaches level specified by the battery manufacturer. This helps purge excessive gas from cells. Do not overfill. For a battery without cell caps, carefully follow manufacturer’s recharging instructions.
- Determine the voltage of battery by referring to the vehicle owner’s manual and make sure it matches the output rating of the battery charger. If the charger has a variable rate of charge, begin charge at lowest rate initially.
4. Three Stage Battery Charging Process
Multi-stage charging ensures batteries receive optimum charging, but with minimal wear and tear, regulating the voltage and current delivered to the batteries in three automatic stages.
- Bulk: Replaces 70-80% of the battery’s state of charge at the fastest possible rate.
- Absorption: Replenishes the remaining 20-30% of charge, bringing the battery to a full charge at a slow, safe rate.
- Float: Voltage is reduced and held constant in order to prevent damage and keep batteries at a full charge.
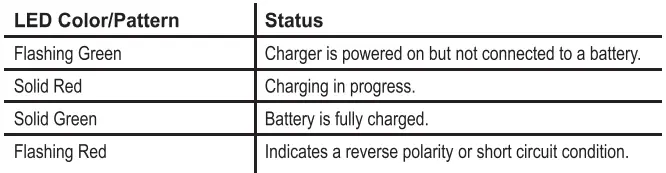
5. LED Charging Indicator
6. Using Your Charger
It is possible to use the 6 AMP Battery Charger to charge most engine starting batteries when the battery is installed in a vehicle. Before attempting to charge a vehicle battery, make sure the battery is a 12 volt, lead-acid type.
NOTE
The battery charger will not produce an output voltage until it senses at least 8 Volts from the battery. It must be connected to a battery with the correct polarity before it will start charging a battery. Therefore, if you plug the AC power cord into an AC power outlet, and if the output alligator clips or ring terminals are not connected to a battery, and if you touch the alligator clips or ring terminals together, there will be no electrical spark.
WARNING: EXPLOSION HAZARD
A spark near the battery may cause an explosion. Follow instructions carefully to reduce the risk of spark near the battery. Do not face the battery when making the final connection.
Preparing To Charge
- Turn off any lights, audio equipment, or other 12 volt accessories that are connected to your vehicle’s electrical system. Make sure your vehicle is in the park position and secured by the emergency brake.
- Position the AC and DC cords to reduce the risk of damage by a hood, door, or moving engine part.
- Stay clear of fan blades, belts, pulleys, and other parts that can cause injury to persons.
- Check the polarity of the battery posts. The POSITIVE (POS, P, +) battery post usually has a larger diameter than the NEGATIVE (NEG, N, -) post.
- Determine which battery post is grounded (connected) to the chassis.
Charging Cable Quick-Connect Feature
This charger includes two types of charging cables:
- Battery Clamps connect directly to your vehicle battery for manual charging. This is often used for typical single-use charging in an everyday situation.
- Ring Terminals can be installed onto your vehicle battery for convenient repeated charging, and for maintaining your battery charge in a vehicle (such as a watercraft, ATV or snowmobile) which may be stored for long periods of time between uses.
To conveniently switch between these charging types, the charger features a Quick-Connect mechanism which allows you to quickly select and install the proper charging cable.
To connect the charging cable:
- Select the battery clamp or ring terminal cable and locate the quick-

connect terminal (as shown above). - Find the corresponding quick-connect terminal on the battery charger’s attached output cord.
- Line up the silver connection post on each quick-connect terminal with its corresponding opening on the other cable’s terminal.
- Push gently but firmly to interlock the two cables. When you can no longer push and no longer see a gap between the two quick-connect terminals, the cables have been properly connected.
![]() Using The Battery Clamps (Typical Single-Use Charging)
Using The Battery Clamps (Typical Single-Use Charging)
This method is typically used for normal one-time replenishment of a discharged battery.
- Once you have connected your battery clamps to the charging cable using the steps above (see Charging Cable Quick-Connect Feature), determine which terminals are positive and negative, and which one is grounded to your vehicle chassis (see “Preparing To Charge”). If the negative battery post is grounded to chassis (as in most vehicles), see (2) below. If the positive post is grounded to the chassis, see (3) below.
- For a negative-grounded vehicle, connect the POSITIVE (RED) clip from the battery charger to the POSITIVE (POS, P, +) ungrounded post of battery. Connect the NEGATIVE (BLACK) clip to a heavy-gauge metal part of the frame or to the engine block away from the battery. Do not connect the clip to the carburetor, fuel lines, or sheet-metal body parts.
- For a positive-grounded vehicle, connect the NEGATIVE (BLACK) clip from the battery charger to the NEGATIVE (NEG, N, -) ungrounded post of battery. Connect the POSITIVE (RED) clip to a heavy-gauge metal part of the frame or to the engine block. Do not connect clip to carburetor, fuel lines, or sheet-metal body parts.
- Plug the 6 AMP Battery ChargerAC cord into a standard AC wall outlet.
- When fully charged, the LED charging indicator light turns solid green.
- Once the vehicle’s battery is fully charged, disconnect the AC cord, remove the clip from the vehicle’s chassis and then remove the clip from the battery terminal.
- Disconnect the battery clamps from the battery charger by pulling gently on each quick-connect terminal to disengage.
CAUTION: EQUIPMENT DAMAGE
To avoid damaging your charging and battery charger cables, grasp each quick-connect terminal directly. Do not pull directly on either cord.
CAUTION: EQUIPMENT DAMAGE
Do not start the vehicle’s engine while the charger is still connected to the battery. This will damage the charger and void the warranty.
![]()
Using The Ring Terminals (Extended Installation and Battery Maintenance)
Ring terminals can be left attached to the battery of any vehicle that may require frequent recharging, or if you wish to maintain a float charge that keeps the battery fully charged and ready for use. This is especially useful for motorcycles, ATVs, watercraft and other vehicles that are often stored for extended periods of time.
- Determine which terminals on your battery are positive and negative. Typically, the positive terminal has a red protective cap and/or is marked with the plus “+” sign, and the negative terminal has a black protective cap and/or is marked with the minus sign..
- Unscrew the POSITIVE (RED) cap from the positive battery terminal to expose the battery post.
- Place the POSITIVE (RED) ring terminal over the battery post and replace the cap.
- Repeat the same process for the NEGATIVE (BLACK) terminal, attaching the NEGATIVE (BLACK) ring to the battery post.
- You may now connect the ring terminals to the battery charger. Using the steps outlined in the Charging Cable Quick-Connect Feature section on Page 1, connect the ring terminals to the charger cable.
- Plug the 6 AMP Battery Charger AC cord into a standard AC wall outlet.
- When fully charged, the LED charging indicator light turns solid green.
- Once the vehicle’s battery is fully charged, disconnect the AC cord.
- Disconnect the battery clamps from the battery charger by pulling gently on each quick-connect terminal to disengage.
- You may leave the ring terminals attached to your battery for quick reconnection next time that you wish to recharge your vehicle. Simply tuck the remainder of the ring terminal cord into the battery compartment of your vehicle next to your battery, or into a similar safe place on your vehicle, to avoid damage to the cord.
CAUTION: EQUIPMENT DAMAGE
To avoid damaging your charging and battery charger cables, grasp each quick-connect terminal directly. Do not pull directly on either cord.
CAUTION: EQUIPMENT DAMAGE
Do not start the vehicle’s engine while the charger is still connected to the battery. This will damage the charger and void the warranty.
7. Specifications
DC Output Specifications

Protection Features

Approvals

8. Recycling Information
Battery-Biz is committed to environmental responsibility and recommends that electronic devices be disposed of properly. Please contact your local city offices for information on recycling and disposal programs for e-waste.
For instructions on how to recycle this product visit http://www.call2recycle.org.
9. Quality Guarantee
Battery-Biz guarantees each Duracell® product to be free of defects due to faulty materials or workmanship. This Duracell® charger carries a 3-year limited warranty from the date of purchase.
If found to be defective, the charger will be replaced without charge when returned to Battery-Biz. This guarantee does not apply to damage from misuse or abuse beyond normal usage. This guarantee gives you specific legal rights, and you may also have other rights which vary from state to state. Should any device be damaged by the charger due to defects in the product arising from faulty materials or workmanship, Battery-Biz will repair or replace (at our option) the device, provided both device and product usage instructions have been followed.
Send your device, along with the DURACELL® charger, to: Battery-Biz Inc.; 1380 Flynn Road, Camarillo, CA 93012; Attention: Duracell® Product Returns
If you would like additional information on Duracell® products call 1-800-300- 1857 or 1-805-437-7765 (7:30 AM-4:30 PM PST)
10. Contacting Customer Support
If you experience any problems or have any questions regarding your DURACELL® charger, free technical support is available. Prior to calling, please review the technical support tips below. Call from a phone where you have access to your mobile device
Be prepared to provide the following information:
- Name, address and telephone number
- Name of the DURACELL® product
- Make and model of your device
- Symptoms of the problem(s ) and what led to them
Technical Support is available by telephone:
U.S. and Canada 1-800-300-1857
Outside of the US/Canada: 805-437-7765
Written inquires should be directed to: Battery-Biz Inc.;
DURACELL® Product Inquiry
1380 Flynn Road, Camarillo, CA93012, USA
WARNING
This product contains chemical(s) known to the State of California to cause cancer, birth defects, or other reproductive harm.