Electrolux Washing Machine Front-Load
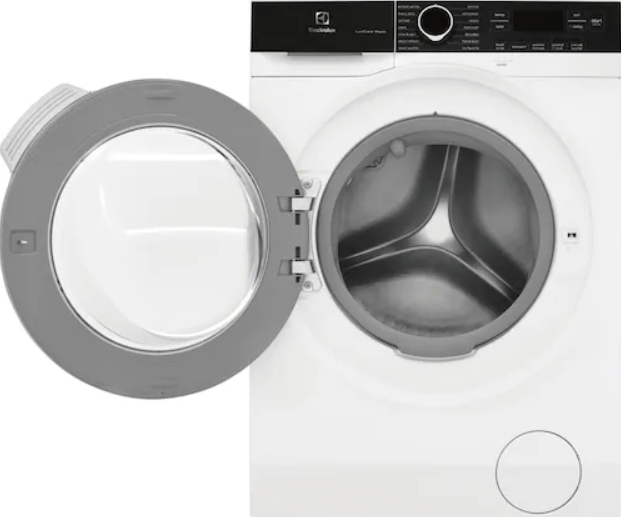
Electrolux Washing Machine Front-Load
Please note your model may look slightly different than pictured.

- Double-check that all shipping materials are removed from your new washer.
- Read your Use & Care Manual to familiarize yourself with your new washer.
- Run the washer through a complete cycle and check for water leaks and proper operation.
Care and cleaning
- Detergent and fabric softener may build up in the dispenser drawer.
Clean the drawer by removing and rinsing under hot tap water. - Run the Clean Washer cycle with bleach or PureAdvantage™ Probiotic Washer Cleaner once a month to clean and freshen the washer. See your Use & Care Manual for additional cleaning instructions.
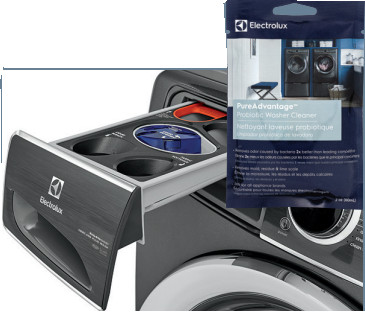
Important to note: Your washer will remind you to run the clean washer cycle every 50 cycles. It is a good practice to clean the dispenser drawer at this time as well. Leaving the washer door and dispenser drawer open after use will allow condensation to dry and temper odors and residue.
? FAQs
- How do I use my detergent dispenser?
Take care not to fill any compartment in your dispenser beyond the maximum line. If your washer is equipped with an Adaptive Dispenser™, add liquid bleach, fabric softener, and stain treating additives to the labeled compartments as needed, taking care not to overfill any compartment or use more than 2 detergent packs in the compartment. - Is it normal for my washer to make sounds?
Some sounds are part of your washer’s normal operations. You may hear the drain hose, water valves or pumps moving water through the cycle. Check your Use & Care Manual to learn more. - Can I open the washer door during a cycle?
If you need to add a forgotten item, press PAUSE and wait for the door to unlock. Add your item, close the door, and press START to resume the cycle.
Remember to select PODS® on the display options when using detergent packs. This option will stay selected until you press to deactivate.

* Your model may look slightly different than pictured. See your Use & Care Manual for more information on each cycle, setting & option.
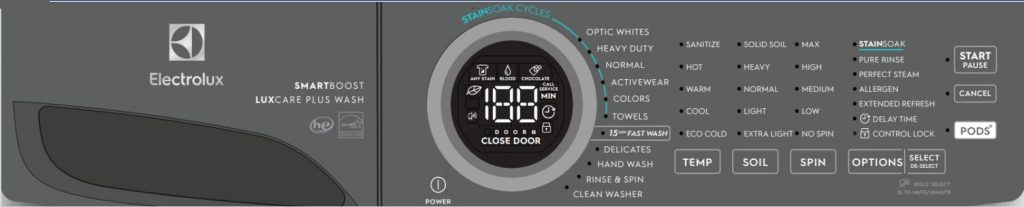
Press the POWER button to turn on your unit.
 Select a cycle
Turn the cycle selector in either direction or press the cycles button (depending on your model) to scroll to the desired cycle.
WHITES/WHITEST WHITES/OPTIC WHITES
Select for white and light-colored fabrics.
This cycle varies by model.
HEAVY DUTY
Select for heavily soiled, durable garments.
NORMAL
Select to wash cotton, linen, towels, sheets, denim and mixed loads.
ACTIVEWEAR
Available on 500 & 600 series, select for lightweight synthetic apparel.
COLORS
Available on 500 & 600 series, select for lightly soiled dark or dyed fabrics susceptible to dye loss.
TOWELS
Available on 500 & 600 series, select for loads of towels or durable garments.
FAST WASH
Washes a small, lightly soiled load in 15, 18, or 20 minutes depending on your washer series.
DELICATES
Select for lightly soiled knits and delicates.
HAND WASH
Available on 600 series, select for small loads of lightly soiled and very delicate fabrics.
RINSE & SPIN
Select to run a cold rinse or to add fabric softener missed in a regular cycle.
CLEAN WASHER
Select to clean the washer tub.
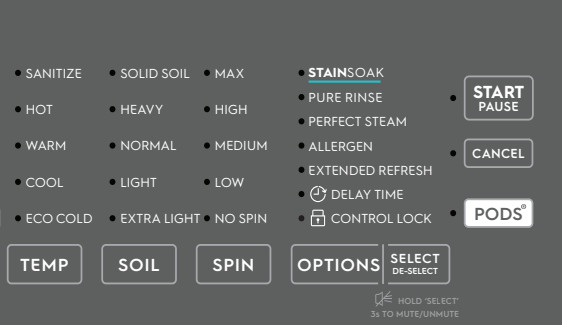
TEMP
The water temperature is determined by the chosen cycle. Press the TEMP button to change the temperature setting. Not all temperatures are available with every cycle.
SANITIZE
Available on 400, 500 & 600 series, select to clean and sanitize heavily soiled, colorfast fabrics such as bedding and children’s clothing.
ECO COLD
Uses cold tap supply during the wash and rinse cycle. For use with fabrics and colors that are prone to dye transfer.
SOIL
Press the SOIL button to adjust the wash time based on the soil level of the load.
SPIN
Press the SPIN button to adjust the spin speed. Increasing the spin speed will extract more water, decrease drying time, and conserve energy.
Press the OPTIONS button to scroll through the options until the indicator light for the desired option flashes, then press SELECT.
STAIN TREAT/STAINSOAK
Available on 400, 500 & 600 series, select this option to add an initial wash period to available cycles using the stain treatment additives in the stain soak/treat compartment. The load will advance to the main wash cycle once this phase is complete.
PERFECT STEAM™
Available on 400, 500 & 600 series, select this option to add approximately 20 minutes of tumbling in steam.
ALLERGEN
Available on 500 & 600 series, uses a higher wash temperature to remove dust mites and dander from washable items.
EXTRA RINSE/PURE RINSE
Available on 400, 500 & 600 series, use this option when additional rinsing is desired to remove excess dirt and detergent residue.
EXTENDED REFRESH
Select extended refresh if you will be unable to remove the load right after the cycle is complete. The washer will rinse and spin to keep the load fresh for up to 12 hours.
Press cancel to end the cycle and open the door.
PODS®
Select the PODS® option when using the detergent pack compartment. This option will remain active until you press PODS® again to deselect it.
CONTROL LOCK
To lock the controls between cycles, scroll to the CONTROL LOCK option and press select. The control lock icon will show on the LED display.
DELAY TIME
Use delay time to delay the start of the washing cycle from 30 minutes to 12 hours.
Close the door and press the START/PAUSE button.

We recommend familiarizing yourself with product features and terminology in your Use & Care Manual.

Peace of Mind & Protection
Unlock exclusive benefits by registering your product with us. Review your registration card for all the ways to register or visit us online directly.
| electroluxappliances.com (877) 435-3287 10200 David Taylor Drive Charlotte, NC 28262 |
electroluxappliances.ca (800) 265-8352 5855 Terry Fox Way Mississauga, ON L5V 3E4 |
How do I use my detergent dispenser?
Take care not to fill any compartment in your dispenser beyond the maximum line. If your washer is equipped with an Adaptive Dispenser™, add liquid bleach, fabric softener, and stain treating additives to the labeled compartments as needed, taking care not to overfill any compartment.
How do I use my bleach dispenser?
Add liquid bleach to the bleach dispenser only. Do not overfill.
How do I use my fabric softener dispenser?
Fabric softener can be added directly to the washer drum during the rinse cycle. If you prefer to use a fabric softener sheet, place it on top of the clothes in the washer drum before adding clothes and starting the cycle. Do not overfill.
How do I use my detergent dispenser with PureAdvantage™ Probiotic Cleaning Technology?
Fill your detergent compartment with PureAdvantage™ Detergent Pacs or PureAdvantage™ Powder Detergent as directed on the package. Add liquid bleach and/or stain treating additives as desired to the labeled compartments in your detergent dispenser. Use only PureAdvantage™ Detergent Pacs or Pure Advantage™ Powder Detergent with your washer and Pure Advantage™ Clean Washer Cycle. Using other detergents may cause damage to your washer and will void your warranty.
Does Electrolux front load washer have a filter?
In your Electrolux washer model EWFLS70JSS, the tub filter, also known as a coin trap, is found inside the tub to pump hose. The filter prevents foreign objects from entering the drain pump.
Why is my Electrolux washer dryer not drying?
Check the outlet: Electrolux dryers require a 240V outlet for adequate power. A standard, 120V outlet won’t deliver enough power, elongating drying times. Inspect the power cord: A frayed or damaged cord can cause power shortages that interrupt the drying cycle and requires replacement
Why is my Electrolux washer not working?
To fix your Electrolux washer control board, you can try to reset the unit by unplugging the appliance from the power outlet, waiting a few minutes, and then plugging the washer back into the outlet. If this doesn’t resolve the problem, contact a professional appliance repair service.
Why does my Electrolux dryer stop after 5 minutes?
If your dryer stops after only a few minutes, it may be caused by the motor overheating. The most common cause a dryer motor will overheat is it’s faulty and needs to be replaced.
How do I get my washer to spin only?
Press. The special use selection button and choose spin only at this time selected the desired spin speed by pressing a spin speed selection.
Does spin only drain water?
The unit will drain any excess of water before it spins. So give it a few minutes to drain. To activate the spin only feature on your Electrolux top load washer, press the Special Use selection button. And choose spin only
Does high spin damage clothes?
Busted: False! Delicate items are more likely to be damaged when you’re using the maximum spin speed. Fabric such as wools, silks and lace are going to get more wear and tear when spun at 1600rpm, or when put on a quick wash cycle
Why do I have to spin my clothes twice?
Check the drain pump debris filter or coin trap, objects may be blocking the water flow. – Check inside drain pump and all hoses connected to drain pump for foreign debris or small pieces of clothing. – Be sure the wash load of clothing is balanced, balance out the wash load if you see all clothing to one side.
]]>![]()
A Quick Guide to Getting Started
![]() Before you begin
Before you begin
- Remove all packaging material and tape.
- Make sure your oven racks are in place prior to operating.
- Set your clock:
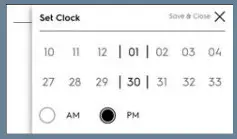
• Touch Menu Options • Scroll and select Clock• Set time using graph - Prepare your wall oven for first-time use by setting Bake at 350° / 177°C for about 30 minutes. It’s normal to experience some smoke and noises during this time.
![]()
Download the Electrolux App
to your smartphone to connect and program your wall oven for remote cooking. Refer to your Let’s Get Connected card in this packet for more information.

 Start Cooking
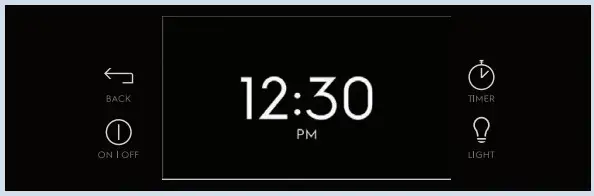
- Press ON/OFF button or touch the screen to get started.
- Select UPPER OVEN or LOWER OVEN.
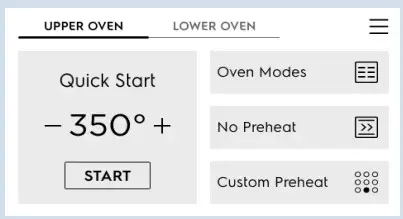
- Select Start to begin a bake cycle at 350° or select a different Oven Mode or temperature.
- If you select Oven Mode, scroll down to see all of the options.
- The default temperature for the Oven Mode you choose will appear. Use the keypad to change the temperature if needed.
- Touch Start. To cancel cooking anytime, touch Cancel.
NOTE: Use the Timer or the Cook Time feature to help monitor your cooking time. Setting Cook Time shuts the oven off once the set time is complete. For best results, allow your oven to preheat before using Cook Time.
 Oven Mode Highlights
 Use Air Sous Vide to create dishes that you would have made using traditional sous vide water bath or a slow cooker.
Steam Bake & Roast uses the power of steam for fluffier baked goods and juicy meats that are tender on the inside and crispy on the outside.
Bake with ease with the Air Fry feature. Get crispier foods without all the oil.
- For best results, use the Air Fry Tray on rack position 3. Place a cookie sheet on rack position 1 to catch any crumbs.
- For more cooking and rack position tips, refer to your Use & Care Manual.
A20415710 (Oct 2020)
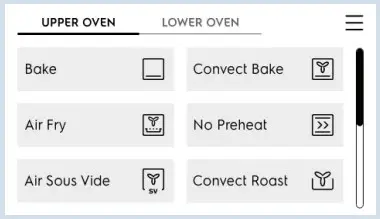
Oven Modes
BAKE surrounds food with gentle, rising heat to cook delicate foods. CONVECT BAKE uses a fan to circulate heat for quick and even baking.
AIR FRY uses the Air Fry Tray to quickly and evenly circulate heated air to deliver crispy, golden results with little to no oil. NO PREHEAT is for single rack baking with packaged and convenience foods. AIR SOUS VIDE uses hot circulating air to preserve nutrients and flavors as your food cooks slowly at low temperatures. CONVECT ROAST uses a convection fan to gently brown meats and seal in the juices. BROIL is for broiling and grilling foods under direct, high heat.MULTI-RACKS is for two rack baking. STEAM BAKE is recommended for baking moist and flavorful bread and pastries for improved browning and flaky crusts. STEAM ROAST is recommended for roasting meat or poultry that results in a crispy outside and juicy inside. BREAD PROOF creates the perfect environment to activate yeast when baking homemade bread. KEEP WARM is used to keep cooked foods at serving temperature (140°F / 60°C to 200°F / 93°C) in the oven. DEHYDRATE uses the Air Fry Tray to circulate air around the food for faster preservation. DELAY START allows a delayed starting time only for Bake, Convect Bake, No Preheat, Convect Roast, Steam Clean, and Self Clean. FOOD PROBE monitors the internal temperature of large cuts of meat with a probe. An alert will sound once the desired set target temperature is reached. COOK TIME counts down your set cooking time and shuts off the oven when complete. NOTE: Monitor foods when using Air Fry and Steam Bake and Roast since they may cook foods faster than traditional bake.
 Sustainability, together We’re committed to more sustainable eating from how we store foods to how we prepare them.
 Care and Cleaning
Protect your range by quickly cleaning up spills when they happen.
FOR LIGHT SOILS, USE STEAM CLEAN
- Clean with a soft cloth, mild dish detergent, and water or a 50/50 solution of vinegar and water. Steam Clean is a chemical-free method that uses 1 cup of water poured into the oven cavity to clean light soils.
- Avoid spraying large amounts of water or cleaners directly on the oven control and display area. Excess moisture on the control area may cause damage.
- Avoid using scouring pads or paper towels – they will damage the finish.
 Choose Your Clean
FOR LIGHT SOILS, USE STEAM CLEAN
Steam Clean is a chemical-free method that uses 1 cup of water poured into the oven cavity to clean light soils.
FOR HEAVY SOILS, USE SELF CLEAN
Self-Clean uses high temperatures to eliminate heavier soils and reduces them to powdered ash you can wipe away.
 Remember to remove all racks and accessories from your wall oven before starting a Self Clean cycle. Always refer to your Use & Care Manual for more tips and instructions.
 FAQs
FAQs
- Why does my wall oven make noises when I’m cooking? Temperature changes during preheating and cool-down can make parts of the wall oven expand and contract. The controls click as they work to create even cooking temperatures. Different fans run to heat up the oven or cool down different parts of the oven, even when it’s off. These sounds are normal.
- This oven doesn’t work like my old one. Is this normal? As you get used to a new wall oven, you may need to test and adjust cooking times and temperatures for your recipes. Your Use & Care Manual has rack position and bakeware recommendations to help you get the best baking results. For instructions on oven temperature calibration, consult your Use & Care Manual or call us if you need help.
- Why does my oven smoke when I use Air Fry? Air Fry circulates super-heated air all-around food and bakeware. Some smoke is normal. Drippings from high-fat or greasy foods combined with hot air from the oven can cause smoke to occur. Visit ElectroluxAppliances.com for additional FAQs and Air Fry Tips.

 Peace of Mind & Protection Discover more benefits by registering your appliance. Text the photo icon on your appliance or registration card, or visit us online to register.
ElectroluxAppliances.com
(877) 435-3287 10200 David Taylor Drive Charlotte, NC 28262
ElectroluxAppliances.ca (800) 265-8352
5855 Terry Fox Way Mississauga, ON L5V 3E4
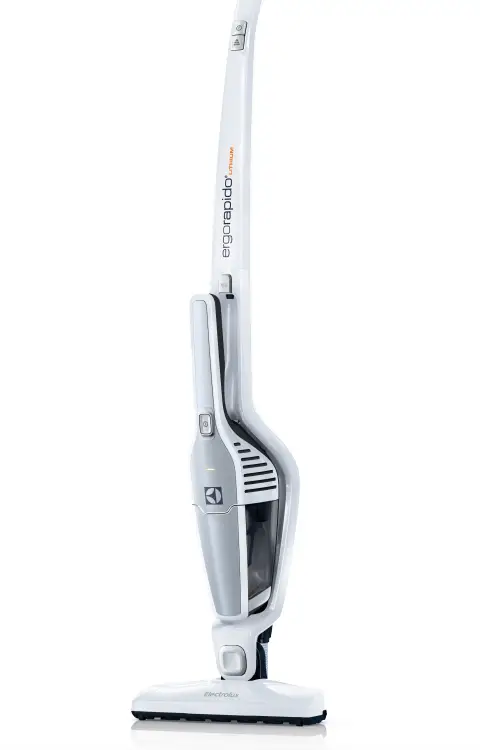
Electrolux EL2050 to EL2059 Series ergorapido User Manual
IMPORTANT SAFEGUARDS
When using an electrical appliance, basic precautions should always be followed, including the following:
READ ALL INSTRUCTIONS BEFORE USING THIS VACUUM CLEANER.
WARNING
To reduce the risk of fire, electric shock, or injury:
- Do not use outdoors or on wet surfaces.
- Do not operate the vacuum cleaner or charger if it has been damaged in any way. If cleaner is not working as it should, has been dropped, damaged, left outdoors, or dropped into water, return it to a service center.
- To avoid excessive heat and damage to the unit or batteries, do not operate the vacuum cleaner while charging.
- Do not allow to be used as a toy. Close attention is necessary when used by or near children.
- Use only as described in this manual.
- Use only the charger provided to recharge: SSA-135045US
- Do not pull or carry by the cord, use cord as a handle, close door on cord, or pull cord around sharp edges or corners. Keep cord away from heated surfaces.
- Do not use extension cords or outlets with inadequate current carrying capacity.
- Do not unplug by pulling on cord. To unplug, grasp the charger, not the cord.
- Do not handle charger, including charger plug, and charger terminals with wet hands.
- DO NOT MUTILATE OR INCINERATE BATTERIES AS THEY WILL EXPLODE AT HIGH TEMPERATURES.
- Leaks from battery cells can occur under extreme usage or temperature conditions. If the liquid gets on skin, wash quickly with water. If the liquid gets into the eyes, flush them immediately with clean water for a minimum of 10 minutes. Seek medical attention.
- While there is no shock hazard from electrical terminals located on the vacuum, a burn could result from metal objects being inserted into the terminal areas. Vacuum cleaner terminals should always be kept free of objects.
- This vacuum cleaner creates suction and has a revolving brushroll. Keep hair, loose clothing, fingers, and all parts of body away from openings and moving parts.
- Do not pick up anything that is burning or smoking, such as cigarettes, matches, or hot ashes.
- Do not use without a filter in place. When servicing the unit, never put fingers or other objects into the fan chamber in case the unit would accidentally be turned on.
- Use extra care when cleaning on stairs.
- Do not use to pick up flammable or combustible liquids such as gasoline, or use on areas where they may be present.
- Locate charger indoors in a cool, dry area, not exposed to weather to avoid electrical shock and/or cleaner damage.
- Keep your work area well lighted.
- Unplug electrical appliances before vacuuming them.
- Use only manufacturer’s recommended attachments.
- Do not put any object into openings. Do not use with any opening blocked; keep free of dust, lint, hair and anything that may reduce airflow.
- Do not charge the vacuum cleaner outdoors.
- Do not incinerate the vacuum cleaner even if it is severely damaged. The batteries can explode in a fire.
- WARNING: This product contains chemicals known to the State of California to cause cancer, birth defects or reproductive harm. WASH HANDS AFTER HANDLING
SAVE THESE INSTRUCTIONS
FOR HOUSEHOLD USE ONLY
Consumer Information
Electrolux declines all responsibility for all damages arising from any improper use of the appliance or in cases of tampering with the appliance. This product is designed with the environment in mind. All plastic parts are marked for recycling purposes. For details, see our web site: www.electrolux.com If you are interested in purchasing additional accessories for your Electrolux Ergorapido, please visit our website at www.electroluxappliances.com (USA), www.electrolux.ca (Canada) or call 1.800.896.9756.
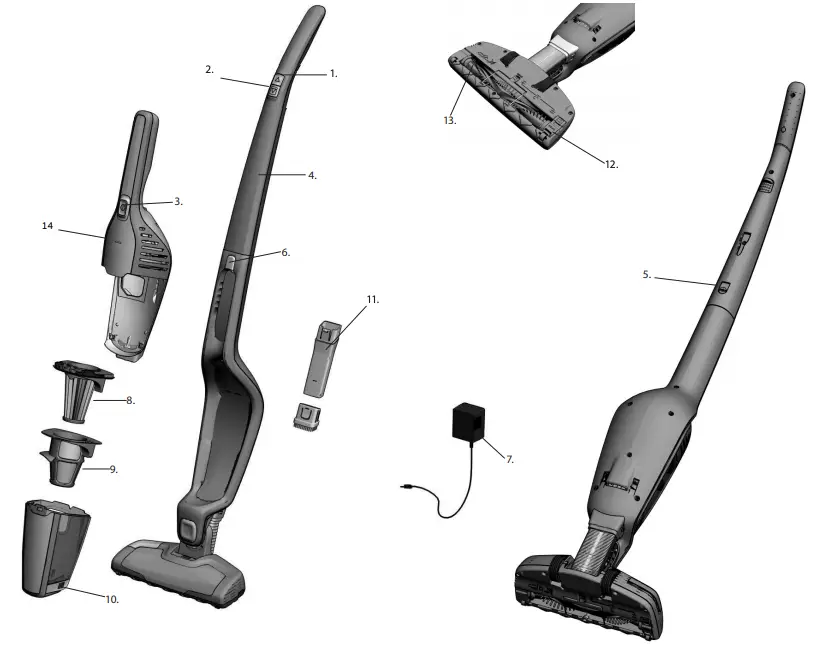
COMPONENTS AND ACCESSORIES
- On/off button, power setting
- Power Setting High/Low button
- On/off button, hand unit
- Handle
- Locking screw
- Release button, hand unit
- Charging adapter
- Fine filter (inner filter)
- Pre filter (outer filter)
- Release button, dust container
- Brush/Crevice tool
- Brushroll release buttons
- Brush roll
- Charging Light Indicator
UNPACK AND CHECK CARTON CONTENTS
Check all accessories against the “Components and Accessories” list
CAUTION: Do not leave cleaner turned on and unattended. Store cleaner in a cool, dry area.
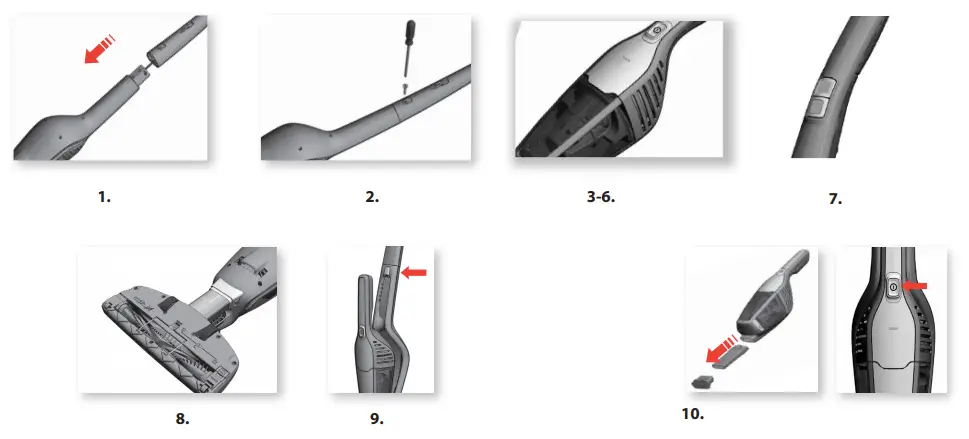
Assembly
1. Remove screw from main body. Fit the handle carefully inserting it into the lower main body. Make sure that the cable does not jam.
2. Secure the handle by tightening the locking screw supplied. Use a screwdriver or a coin.
Charging
Before First use: Charge up to 24 hours. Leave Ergorapido on charge when not in use. Warm adaptor is normal.
3. When fully discharged, to regain full battery capacity, position the charging adapter away from heat sources, direct sunlight or wet places. Insert the adapter into the outlet and connect it to the Ergorapido.
- Approximately 4 hours’ charging is required
4. The charging indicator light, will come on when the machine begins to charge once it is correctly plugged in.
5. If light is lit: Machine is charging.
6. If light is blinking:
Machine is fully charged and in standby mode, indicated with one blink per minute.
Start/Stop
7. Start the Ergorapido by pushing the top button.
The bottom button can be used to switch between High Speed (for maximum cleaning power) and Normal Speed (for longer use).
Vacuuming floors and carpets
8. Avoid scratching hard wood floors areas by checking that nozzle wheels and brushroll are clean.
Using the Hand Vac
9. Remove the hand unit by pressing the release buttons.
The crevice nozzle and small brush are stored together as one piece. Push on middle tab to separate.
10. Attach the crevice nozzle to facilitate cleaning of areas difficult to reach, or attach the brush for dusting. Start/stop the hand unit by pushing the start button.
 CAUTION: For service not described in this manual, take to Electrolux Authorized Service Center for repair. Ergorapido’s dust container must be emptied regularly and the dust container and the filters need to be cleaned to maintain a high suction power
Never wash dust containers or filters in a dishwasher.
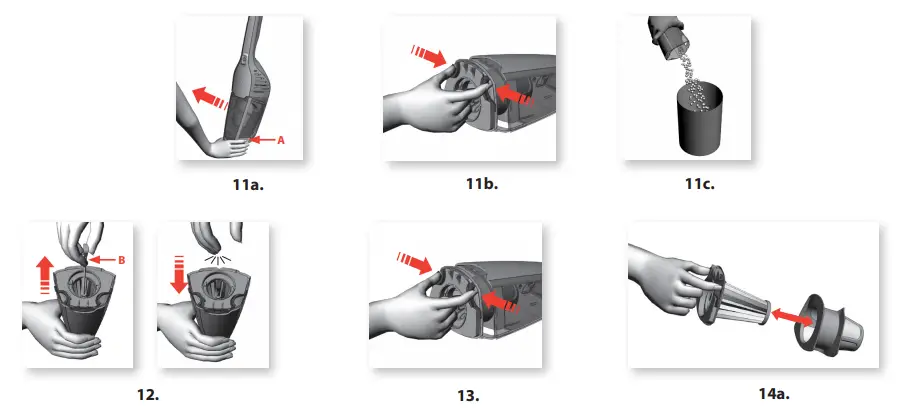
Emptying and cleaning
11. Emptying of the dust container. Remove the filters, empty the contents into a dust container. Return filter and click dust container back into place.
12. Quick cleaning of the fine filter. (Recommended every cleaning). Release the dust container, pull/release spring 5-6 times to dislodge dust.
13. Cleaning of dust container and filters. (Recommended every 5th cleaning). Release dust container, take out both filters by pressing release buttons.
14. Separate both filters. Dust container and filters can be shaken clean or rinsed in warm water (never in dishwasher). All parts must be dry before reassembled in reverse order.
Cleaning the hose and wheels
15. Loosen the hose catch and pull the hose from the attachment. Remove any debris. Put the hose back, lock using the catch.
16. Remove objects that may have become jammed in the wheel shafts.
Cleaning the brushroll
17. If the brushroll becomes blocked or jammed for any reason. The brushroll may need to be cleaned. First turn Ergorapido® off. Push the brushroll release button. The hatch cover will come slightly free and the brushroll can now be removed.
18. Lift out the brushroll and clean it. Carefully use a pair of scissors or a sharp knife to remove any items such as threads that may have become entangled. Replace the brushroll and make sure that it fits into its guiding tracks, and that it can spin freely. Replace the hatch cover.
Water has entered the vacuum cleaner
It will be necessary to replace the motor at an authorized Electrolux service center. Damage to the motor caused by the penetration of water is not covered by the warranty.
If you can’t find accessories for your Electrolux vacuum cleaner, please visit our website at www.electroluxappliances.com (USA), www.electrolux.ca (Canada) or call 1-800-896-9756
Removing batteries
CAUTION: Only remove batteries if product is to be scrapped. Improper handling of the batteries may be hazardous. Batteries must be removed from the appliance before it is scrapped or recycled. Never dispose used batteries with household waste. Batteries should always be completely discharged before removal. Ergorapido must be disconnected from the power source when removing the batteries.
- Undo the screws. Carefully lift the hood.
- Cut the connecting cables, remove the batteries, put tape over the visible metal areas. Place batteries in suitable packaging.
To locate nearest recycling center please call 1.877.273.2925 or visit www.call2recycle.org
Troubleshooting
The brushroll stops spinning
- Turn off power.
- Remove any obstructing objects from the brushroll.
- Allow 5 minutes for motor to cool before powering on.
Unit is too hot
- Clean filters, brush roll, hose and put on charge.
Motor is overloaded, causing the vacuum to turn off
- Clear obstruction from brushroll and turn unit on.
If Ergorapido turns itself off while in use or will not stay on
- Unit may have run out of charge. Make sure you are charging your unit for the correct amount of time, and that the outlet you are using is receiving power.
- Unit may be too hot. Clean filters, brushroll, hose, and put on charge.
- Motor may be overloaded. Clear obstruction from brushroll and turn unit on.
- Check if there are large carpet fibers, heavy threads, or wires in the brushroll – the self-cleaning brush feature will not be able to remove these obstructions.
ELECTROLUX DISHWASHERS

WARRANTY
This document sets out the terms and conditions of the product warranties for Electrolux Appliances. It is an important document. Please keep it with your proof of purchase documents in a safe place for future reference should there be a manufacturing defect in your Appliance. This warranty is in addition to other rights you may have under the Australian Consumer Law.
- In this warranty:
- ‘ACL’ or ‘Australian Consumer Law’ means Schedule 2 to the Competition and Consumer Act 2010;
- ‘Appliance’ means any Electrolux product purchased by you and accompanied by this document;
- ‘ASC’ means Electrolux’s authorised serviced centres;
- ‘Electrolux’ is the brand controlled by Electrolux Home Products Pty Ltd of 163 O’Riordan Street, Mascot NSW 2020, ABN 51 004 762 341 in respect of Appliances purchased in Australia and Electrolux (NZ) Limited (collectively “Electrolux”) of 3-5 Niall Burgess Road, Mount Wellington, in respect of Appliances purchased in New Zealand;
- ‘Warranty Period’ means the period specified in clause 3 of this warranty;
- ‘you’ means the purchaser of the Appliance not having purchased the Appliance for re-sale, and ‘your’ has a corresponding meaning.
- Application: This warranty only applies to new Appliances, purchased and used in Australia or New Zealand and is in addition to (and does not exclude, restrict, or modify in any way) other rights and remedies under a law to which the Appliances or services relate, including any non-excludable statutory guarantees in Australia and New Zealand.
- Warranty Period: Subject to these terms and conditions, this warranty continues for in Australia for a period of 24 months and in New Zealand for a period of 24 months, following the date of original purchase of the Appliance.
- Repair or replace warranty: During the Warranty Period, Electrolux or its ASC will, at no extra charge if your Appliance is readily accessible for service, without special equipment and subject to these terms and conditions, repair or replace any parts which it considers to be defective. Electrolux may, in its absolute discretion, choose whether the remedy offered for a valid warranty claim is repair or replacement. Electrolux or its ASC may use refurbished parts to repair your Appliance. You agree that any replaced Appliances or parts become the property of Electrolux.
- Travel and transportation costs: Subject to clause 7, Electrolux will bear the reasonable cost of transportation, travel and delivery of the Appliance to and from Electrolux or its ASC. Travel and transportation will be arranged by Electrolux as part of any valid warranty claim.
- Proof of purchase is required before you can make a claim under this warranty.
- Exclusions: You may not make a claim under this warranty unless the defect claimed is due to faulty or defective parts or workmanship. This warranty does not cover:
- light globes, batteries, filters or similar perishable parts;
- parts and Appliances not supplied by Electrolux;
- cosmetic damage which does not affect the operation of the Appliance;
- damage to the Appliance caused by:
- negligence or accident;
- misuse or abuse, including failure to properly maintain or service;
- improper, negligent or faulty servicing or repair works done by anyone other than an Electrolux authorised repairer or ASC;
- normal wear and tear;
- power surges, electrical storm damage or incorrect power supply;
- incomplete or improper installation;
- incorrect, improper or inappropriate operation;
- insect or vermin infestation;
- failure to comply with any additional instructions supplied with the Appliance;
- In addition, Electrolux is not liable under this warranty if:
- the Appliance has been, or Electrolux reasonably believes that the Appliance has been, used for purposes other than those for which the Appliance was intended, including where the Appliance has been used for any non-domestic purpose;
- the Appliance is modified without authority from Electrolux in writing;
- the Appliance’s serial number or warranty seal has been removed or defaced
- How to claim under this warranty: To enquire about claiming under this warranty, please follow these steps:
- carefully check the operating instructions, user manual and the terms of this warranty;
- have the model and serial number of the Appliance available;
- have the proof of purchase (e.g. an invoice) available;
- telephone the numbers are shown below.
- Australia: For Appliances and services provided by Electrolux in Australia: Electrolux goods come with guarantees that cannot be excluded under the Australian Consumer Law. You are entitled to a replacement or refund for a major failure and for compensation for any other reasonably foreseeable loss or damage. You are also entitled to have the Appliance repaired or replaced if the Appliance fails to be of acceptable quality and the failure does not amount to a major failure. ‘Acceptable quality’ and ‘major failure’ have the same meaning as referred to in the ACL.
- New Zealand: For Appliances and services provided by Electrolux in New Zealand, the Appliances come with a guarantee by Electrolux pursuant to the provisions of the Consumer Guarantees Act, the Sale of Goods Act and the Fair Trading Act. Where the Appliance was purchased in New Zealand for commercial purposes the Consumer Guarantee Act does not apply.
- Confidentiality: You accept that if you make a warranty claim, Electrolux and its agents including ASC may exchange information in relation to you to enable Electrolux to meet its obligations under this warranty.
Important Notice
Before calling for service, please ensure that the steps listed in clause 8 above have been followed.
AUSTRALIA
- FOR SERVICE
or to find the address of your nearest authorised service centre in Australia PLEASE CALL 13 13 49
OR EMAIL [email protected] - FOR SPARE PARTS
or to find the address of your nearest spare parts centre in Australia PLEASE CALL 13 13 50
OR EMAIL [email protected]
![]() User Manual
User Manual
Refrigeration
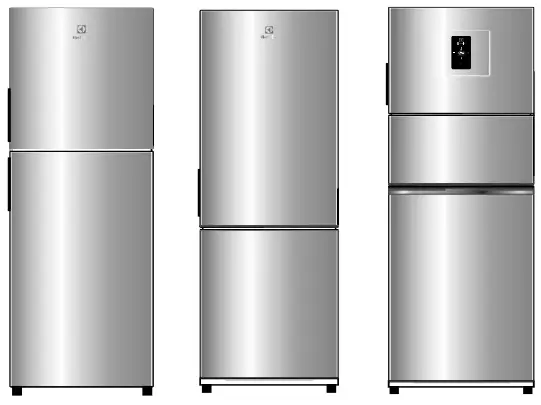
ETB2502H-A, ETB2502H-H, ETB2302H-A,
ETB2302H-H, ETB2802H-A, ETB2802H-H,
ETB3400H-A, ETB3400H-H, ETB3700H-A,
ETB3700H-H, EBB2802H-A, EBB2802H-H,
EBB3400H-A, EBB3400H-H, EBB3700H-A,
EBB3700H-H, EME2800H-A, EME2800H-H,
EME3700H-A, EME3700H-H
EASY WAY TO REGISTER YOUR
PRODUCT WITH YOUR SMARTPHONE
- Photograph the camera icon located on your product’s serial tag, including the 4 dots
 .
.
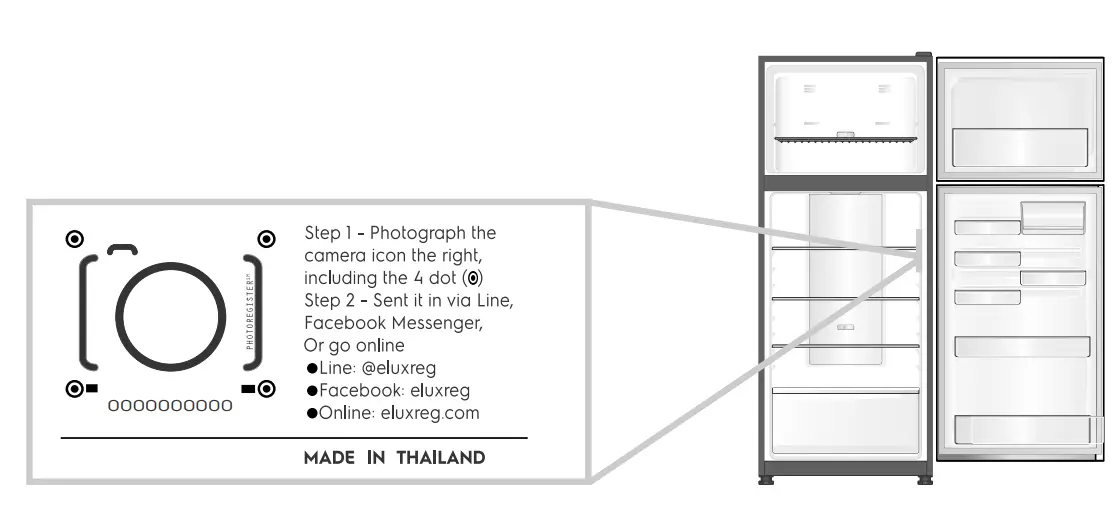
- Send it in via Line, Facebook Messenger, or go online.
 @eluxreg
 eluxreg
 eluxreg.com
 - Enjoy many privileges.*
“Terms and conditions apply.
Thank You for choosing Electrolux!
Congratulations and thank you for choosing an Electrolux refrigerator/freezer. We are sure you will find your new appliance a pleasure to use. Before you start using the appliance, we recommend you read through the entire user manual which describes the appliance and its many functions. To avoid any unnecessary risks, misuse, or hazards that may be present when using a new electrical appliance, it is important you read the safety instructions carefully. We recommend you keep this user manual for future reference and pass it on to future owners. After unpacking the appliance, please check that it is not damaged. If in doubt, do not use the appliance but contact your local Electrolux Customer Care Centre.

RoHS compliant
Being ensured the permissible content of some toxic chemicals (RoHS compliant) (According to the Circular No. 30/2011/TT-BCT, Vietnam, dated 10th August 2011)
 ENVIRONMENTAL TIP
Disposal information for users
Most of the packing materials are recyclable. Please dispose of these materials through your local recycling depot or place them in appropriate collection containers.
If you wish to discard this appliance, please contact your local authorities and ask for the correct method of disposal. These products are RoHS compliant.
Conditions of use
This appliance is intended to be used in household and similar applications such as,
- Staff kitchen areas in shops, offices, and another working environment;
- Farmhouse and by clients in hotels, motels, and other residential type environments;
- Bed and breakfast type environments;
- Catering and similar non-retail applications;
Please read the user manual carefully and keep it in a handy place for later reference. The symbols you see in this manual have the following meanings:
 WARNING
This symbol indicates information concerning your personal safety.
CAUTION
This symbol indicates information on how to avoid damaging the appliance.
 TIPS AND INFORMATION
This symbol indicates tips and information about the use of the appliance.
ENVIRONMENTAL TIP
This symbol indicates tips and information about the economical and ecological use of the appliance.
MEANING OF SYMBOLS
 This symbol indicates to never do this.
 This symbol indicates to always to this.
TIPS AND INFORMATION
Important: Check for any damages or marks. If you find that the refrigerator is damaged or marked, you must report this within 7 days if you wish to claim for damages/marks under the manufacturer’s warranty. This does not affect your statutory rights.
WARNING
 If pressurized aerosol containers bear the word ‘Flammable’ and/or a small flame symbol, do not store them inside any refrigerator. If you do so, you may cause an explosion.
When you dispose of refrigerators and freezers, remove all doors. Children can suffocate if they get trapped inside. This refrigerator contains insulation formed with flammable blowing gases. Avoid safety hazards by carefully disposing of this appliance.
WARNING
This appliance must be plugged into its own dedicated 220-240V, 50/60Hz AC electrical outlet
Ensure that the electrical outlet is properly earthed to the ground. Consult a qualified electrician if you are unsure.
Do not use an extension cord or adapter plug.
If the power cord is damaged, it must be replaced by the manufacturer, its service agent, or similarly qualified personnel in order to avoid a hazard.
Unplug the appliance before cleaning and before changing the light bulb to avoid electric shock.
Never unplug the appliance by pulling on the power cord. Always grip the plug firmly, and pull straight out of the receptacle to prevent damaging the power cord. Choose a location that is not too cold for installation.
The temperature should be above 10 degrees°C.
Put the appliance in a dry place, avoiding areas of high moisture or humidity.
Do not place the appliance in frosty or unprotected areas, such as in a garage or on a verandah.
Do not place the appliance in direct sunlight.
Do not place the appliance near stoves, fires, or heaters.
The plug must be accessible when the appliance is in position.
WARNING
This appliance is not intended for use by persons (including children) with reduced physical, sensory or mental capabilities, or lack of experience and knowledge unless they have been given supervision or instruction concerning the use of the appliance by a person responsible for their safety. Children should be supervised to ensure that they do not play with the appliance.
Please follow these tips;
Never let children play with the refrigerator.
Never store fizzy drinks in the freezer compartment.
Never try to repair the refrigerator on your own.
Never use electric heaters or dryers to defrost the freezer because you can receive an electric shock.
Never use electrical appliances inside the storage areas.
WARNING
Stability Foot
When your refrigerator is in place, wind down the stability foot to the floor to stabilize it. Lift the front of the refrigerator to take the weight off the stability foot, then turn it 1/4 turn further to ensure firm contact with the floor. If you do move the refrigerator, remember to wind it back up, to allow the refrigerator to roll. Remember to reset it when reinstalling.

R600A REFRIGERANT WARNING
- This appliance contains flammable R600a refrigerant. Avoid safety hazards by carefully installing, handling, servicing, and disposing of this appliance. If the appliance contains R600a it will be indicated on the rating plate inside the appliance.
- Ensure that the tubing of the refrigerant circuit is not damaged during transportation and installation.
- In the event, any damage accidentally occurs, keep the appliance away from open fires and any devices that produce sparks or arcs and luminaries during normal or abnormal operation, and unplug the appliance at the PowerPoint. Call authorized service for necessary action and advice.
- Leaking refrigerant may ignite the vent area if a leak occurs.
- The room for installing appliances must be at least 1m3 per 8g of refrigerant. The amount and type of refrigerant in the appliance can be found on the rating plate inside the appliance.
- Do not damage the refrigerant circuit.
- Do not use electrical appliances inside the food storage compartments of the appliance, unless they are of the type recommended by the manufacturer.
- Keep ventilation openings, in the appliance enclosure or in the built-in structure, clear of obstruction.
- Do not use mechanical devices or other means to accelerate the defrosting process, other than those recommended by the manufacturer.
WARNING
- Do not use a steam cleaner. If live components come in contact with the condensing steam, they may short circuit or cause an electric shock.
- Do not plug the appliance into a timer fitted to the PowerPoint.
- Do not put your appliance on an uneven surface.
- Do not store explosive substances such as aerosol cans with flammable propellant in the appliance.
- Do not store fizzy drinks in the freezer compartment.
- Never try to repair the refrigerator on your own. Use only a qualified or authorized service person for repairs.
- Never use electric heaters or dryers to defrost the freezer because you can receive an electric shock.
Installing Your New Refrigerator
Clean the refrigerator thoroughly according to instruction, and wipe away any dust that has accumulated during shipping.
Check that the floor is level. If it is not then adjust the provided leveling leg so the product is level and stable.
We recommend that you let your refrigerator run for two to three hours before you put any food in it. This will allow you to check that it is operating properly and that enough cool air is going to the freezer. Clearance around your Top and Bottom Mount refrigerator
- Allow a minimum of 30mm clearance on both sides of the refrigerator.
- Allow 50mm clearance at the back of the refrigerator.
- Allow a minimum of 10mm clearance above the hinge cover.
- If you do not have a cupboard with an allowance for airflow above the refrigerator, the recommended clearance area on top increases to 90 mm.
- When positioned in a corner area, spacing of 350mm on the hinge side will allow the doors to open enough to enable the removal of bins and shelves.
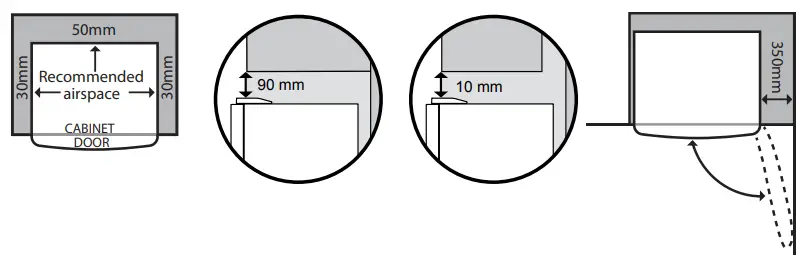
NOTE: In an installation where both sides and the rear of the refrigerator are not enclosed by cabinetry eg the refrigerator is placed against a wall, the clearance between the rear of the refrigerator and the wall should not be greater than 75mm.
You refrigerator uses energy efficient components that may produce different noises (Refer to “Noises” page for examples) to your old refrigerator. Occasionally a gurgling sound of refrigerator flowing or the sound of parts expanding and contracting can be hard. These noises are quite normal.
Cleaning Your Refrigerator
Exterior
You should only clean your refrigerator with lukewarm soapy water and a soft cloth. Rinse with clean water and then wipe the surface with a soft clean cloth to remove any soap residue.
Interior
You should clean the refrigerator interior regularly. Wash the interior with a soft cloth and lukewarm soapy water. Thoroughly dry all surfaces and removable parts. Avoid getting water on refrigerator controls. If you have taken out any removable parts, replace them and switch the power on before restocking the refrigerator with food. Naturally, you should keep the interior of your refrigerator Hygenic by promptly and thoroughly wiping up any food spills.
WARNING
Naver uses hot water, solvents, commercial, caustic or abrasive cleaners, or scourers to clean this appliance as they will damage it. Many commercially available cleaning products and detergents contain solvents that will damage your refrigerator. When cleaning, use only a soft cloth and lukewarm soapy water.
TEMPERATURE CONTROL
When you first turn on the refrigerator, set both the refrigerator and freezer temperature control to normal. Please refer to the below section for information on adjusting refrigerator and freezer temperature.
TIPS AND INFORMATION
Changing setting
When you change the temperature settings, make small adjustments and wait 24 hours before assessing whether you need to make any further changes.
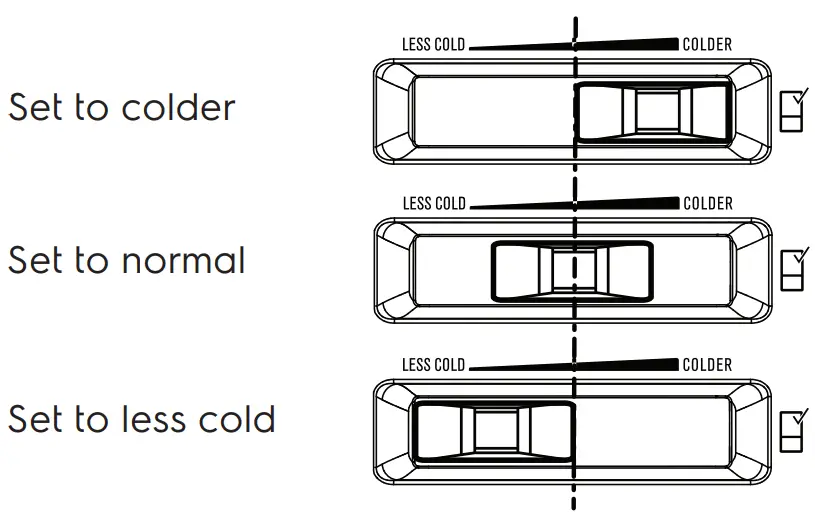
For Top Freezer models
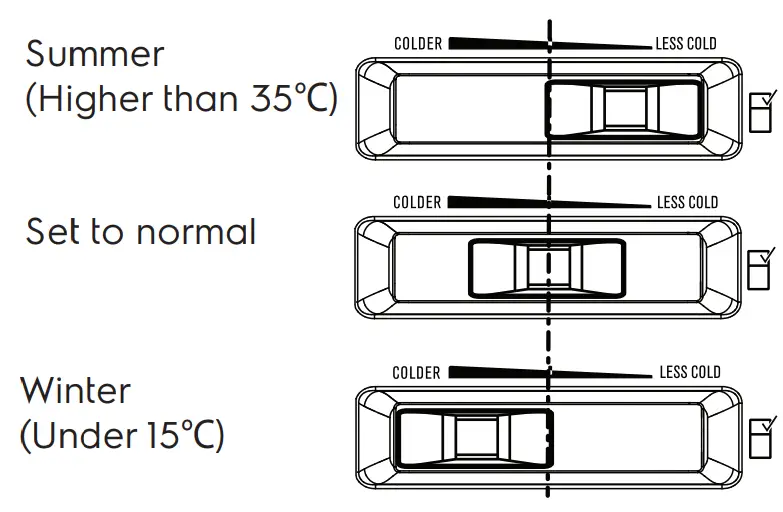
Freezer temperature setting recommendation
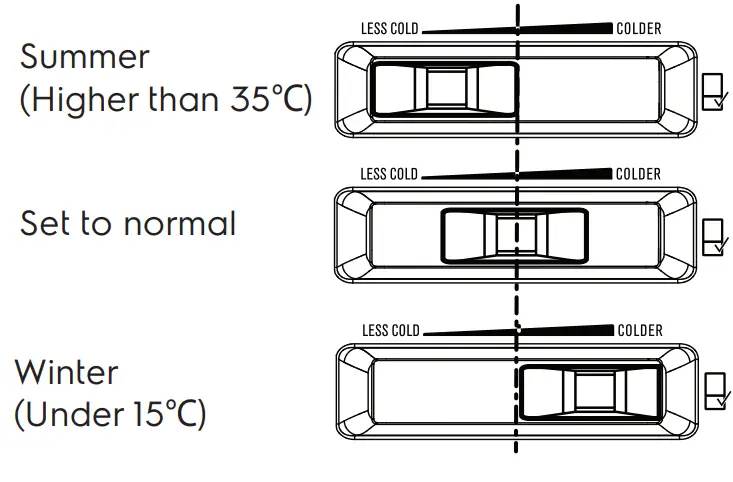
Refrigerator temperature adjustment
- Select the refrigerator control
- Slide the control to the left to set it to colder
- Slide the control to the right to set less cold
Refrigerator temperature setting recommendation
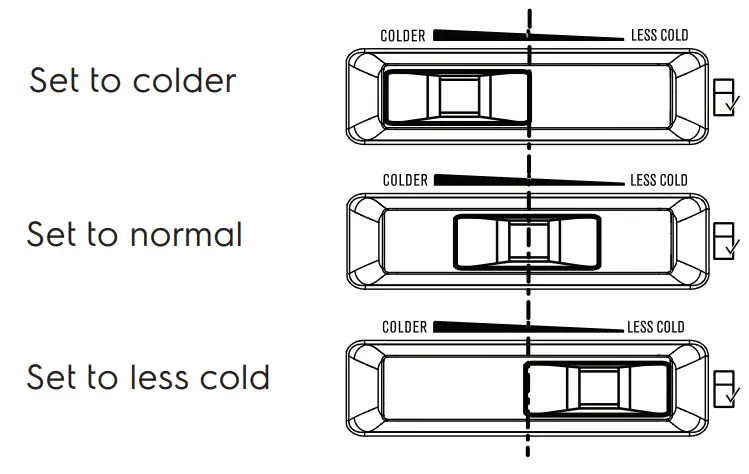
For Bottom Freezer models
Freezer temperature setting recommendation
Refrigerator temperature adjustment
- Select the refrigerator control
- Slide the control to the left to set it to less colder
- Slide the control to the right to set cold
TIPS AND INFORMATION
Setting the freezer temperature to colder is not recommended for normal or very hot climate conditions as this will limit the cooling capacity to other sections of the refrigerator. In a very cold climate, the freezer will need to be set colder.
DOOR ALARM
If the refrigerator door is left open longer than two minutes, a buzzer will sound. Re-set the alarm by pressing the Light switch or closing the door.
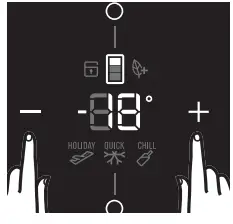
TEMPERATURE CONTROL
For Multi Top Freezer models
We recommend that when you start your refrigerator for the first time, the temperature for the refrigerator is set to 3°C and the freezer to -18°C. If you want to change the temperatures, use the instructions below. You should make only small adjustments and wait 24 hours to see whether you need to make further changes.
TIPS AND INFORMATION
When you set a temperature, you set an average temperature for the whole appliance cabinet. Temperatures inside each compartment vary, depending on how much food you store and where you place it. High or low room temperature may also affect the actual temperature inside the appliance.
How to select the compartment to set temperature
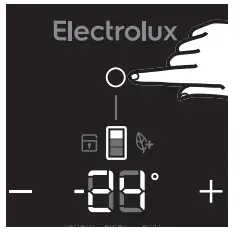
Use the “Compartment Select” button to highlight the freezer, middle or fresh food compartment temperature setting.
| Compartment Icon Display | ||
Freezer Selected |
Middle Selected |
Food Selected |
Adjusting the freezer temperature
- Press the left “<” arrow button to make the freezer colder in 1°C steps.
- Press the right “>” arrow button to make the freezer warmer in 1°C steps.
The Freezer temperature range: -23°C to -14°C
Adjusting the middle temperature
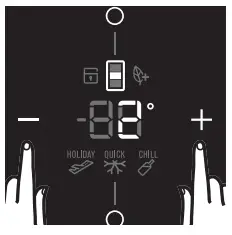
- Press the left “<” arrow button to make the middle colder in 1°C steps.
- Press the right “>” arrow button to make the middle warmer in 1°C steps.
The Middle-temperature range: -12°C to 3°C
Adjusting the refrigerator temperature
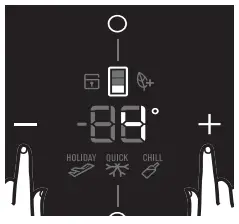
- Press the left “<” arrow button to make the middle colder in 1°C steps.
- Press the right “>” arrow button to make the middle warmer in 1°C steps.
The Refrigerator temperature range: 0°C to 7°C
TIPS AND INFORMATION
Coldest freezer setting is not recommended in normal and very hot climates as this will limit the cooling to the refrigerator sections. In very cold climates the freezer will need to be set colder.
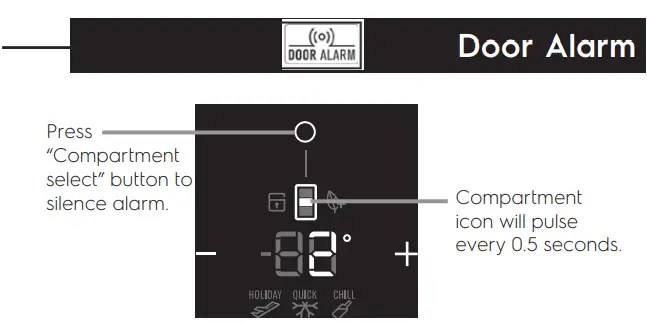
If the fresh food door is left open longer than two minutes. The buzzer will sound and the “Compartment icon” and “Compartment select button” will pulse every 0.5 seconds. Press “Door Switch” or close the door to stop the alarm. Press any button to silence the alarm. The alarm sound will mute for 8 minutes if the door is still open. If the alarm resounds then pressing the button again will silence the alarm for a further 8 minutes. When door alarm is activated, all other functions are locked out.
Energy efficiency
Your appliance has been designed with energy efficiency in mind and can operate in any of three modes (NORMAL, ECO, HOLIDAY), depending on the level of efficiency sought.

When the green “ECO” icon is illuminated, it means your the appliance is set to run in an ecologically
The “ECO” icon will appear when setting Freezer compartment temperature from -18°C to -17°C, Middle compartment temperature from -2°C to 4°C, and Fresh food compartment temperature from 3°C to 7°C.
If any compartment temperature setting is outside of this range, or the Quick Freeze function is active, the “ECO” icon will disappear.
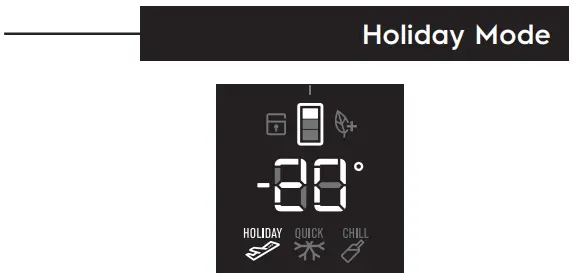
Holiday mode is designed to take advantage of maximum energy efficiency when you will be away from your appliance for an extended period. Press the “Modes” button to select holiday mode until the “HOLIDAY” icon illuminates. The “ECO” icon stays on if the temperature setting is still in the Eco mode range. Holiday mode can be activated while the door is opened. Manually enabled Holiday mode must be manually deactivated. Automatic Holiday mode (30hours of human interaction) deactivates if the button is pressed on the display or the door is opened.
NOTE: Holiday mode is designed to operate with minimum door opening (e.g. if the fridge is used for long-term storage), frequent door opening in Holiday mode could lead to food spoilage.
Drink Chill Mode
Use the Drink Chill Model for chilling drinks in the freezer, sounding an alarm after 20 minutes (default) to remind you to remove the bottles. Press the “Modes” button to select drinks chill mode. “CHILL” icon will illuminate. The numerical display will change to “20”

The minimum time adjustment is 5 minutes and the maximum time is 30 minutes.
Adjust the timer by using the arrow buttons “<” and “>”.
Each button touch will add or decrease 5 minutes to the chill time.
Suggested chilling times:
- 10 minutes for cans of drink
- 20 minutes for bottles of wine
- 30 minutes for bottles of soft drink
NOTE: When the drinks chill alarm is activated, all other functions are locked out.
Quick Freeze Mode
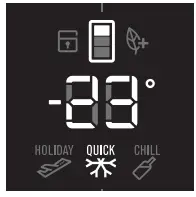
Use the quick freezer mode when you add a large amount of food to the freezer compartment. The freezer compartment temperature will show -23°C. (This temperature cannot be changed while pressing the “Modes” button to select quick-freeze will now operate for 90 minutes then switch to normal operation.)
LED Lighting
Your refrigerator is fitted with long-life LED lighting. In the unlikely event, the LED lights should ever fail, then the LED lights need to be serviced by a qualified technician. Refer to page 14 for contact details.
FEATURES
This section tells you how to make the most of the many useful features of the refrigerator and how to clean them. You can adjust the refrigerator bins to meet different storage needs.
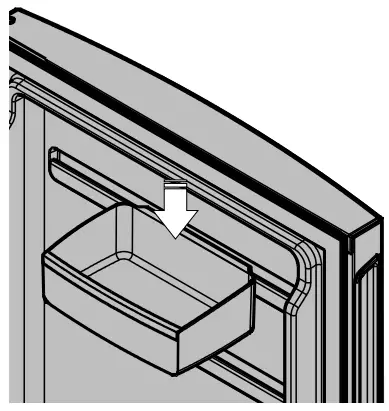
Door storage bins (shelves)
Both the refrigerator and freezer have door storage bins. You can adjust the refrigerator bins to meet different storage needs. All the door bins are completely removable for cleaning. If you want to remove or adjust a bin, lift and tilt to remove. To replace, tilt the top and push the bin down until the support lugs lock it in place.
Store safe compartment (where fitted)
You can use this compartment to store food and other items. To operate the lock, push up to open and down to lock.
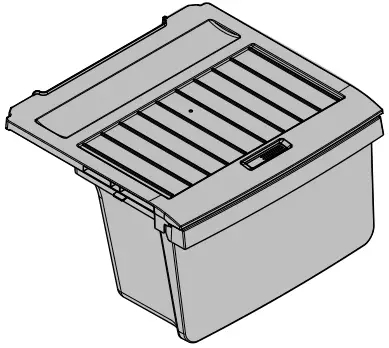
Crisper bin
Storing vegetables
Use the crisper bin to store vegetables, fruits, or small items. You can adjust the humidity inside the bin by sliding the humidity control.
Storing fruits and small items
You can store fruits in the crisper bin, but do remember to lower the humidity via the humidity can be adjusted by sliding the lever on the humidity control.
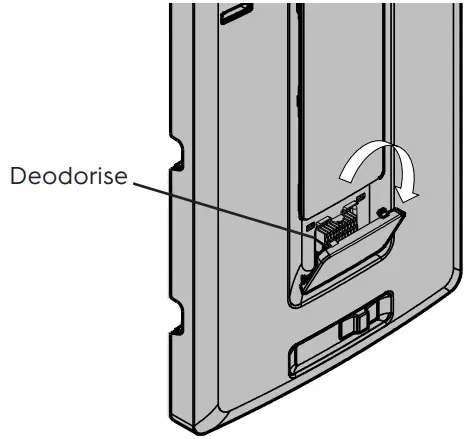
Deodorizer
Your refrigerator is fitted with a Nano copper deodorizer to assist with the removal of food odours inside your refrigerator. Keeping the food covered and wrapping it in plastic will also help to reduce the odors inside your refrigerator.
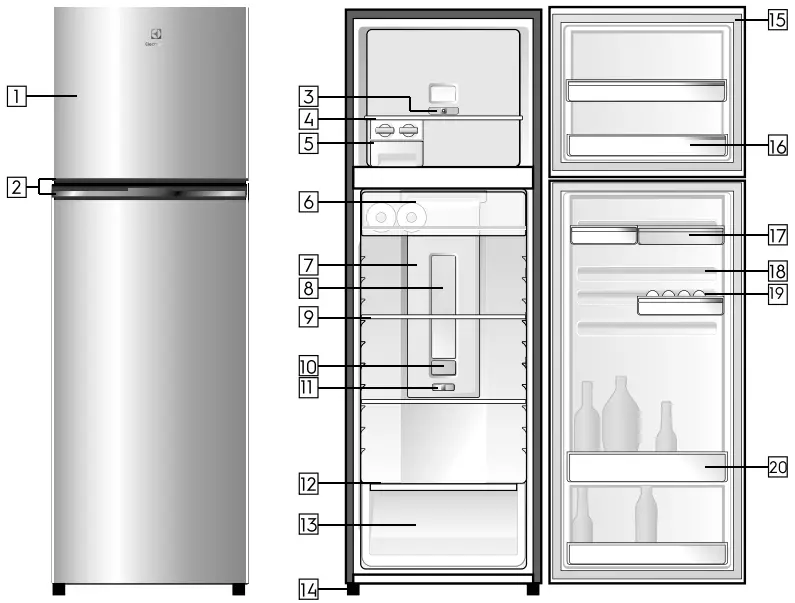
TTOP FREEZER FEATURES
- ETB2302H-A
- ETB2302H-H
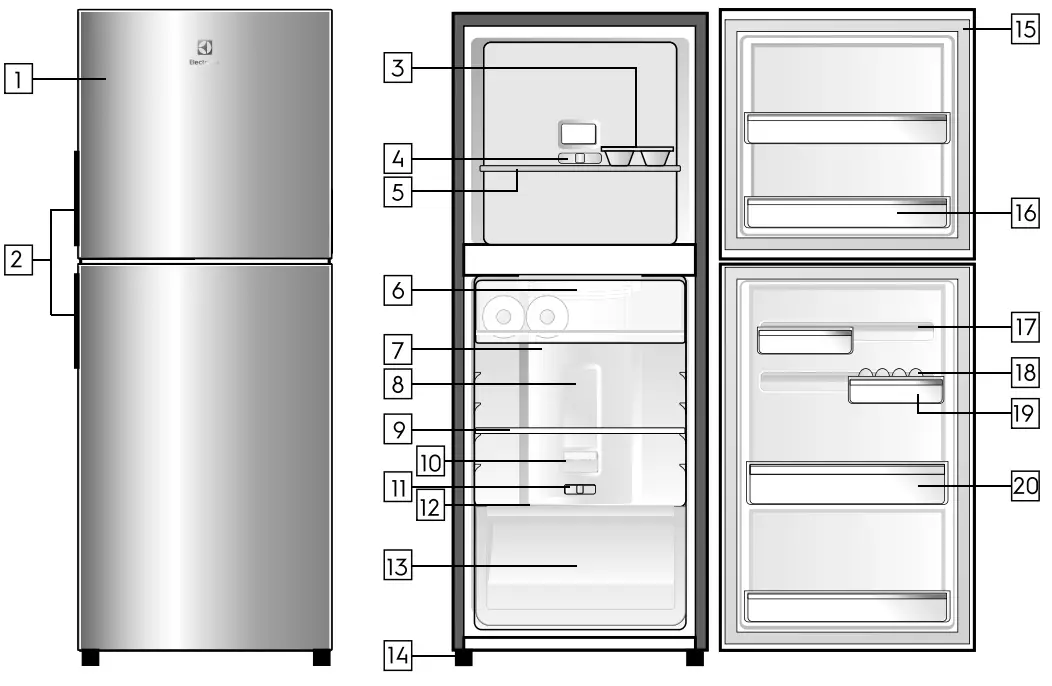
The details of the refrigerator feature:
- Doors
- Door Handles
- Ice Tray
- Slide Control Freezer
- Freezer Shelf
- Chill room
- Multi Flow
- Refrigerator Light
- Shelf
- Deodoriser Cover Refrigerator
- Slide Control Refrigerator
- Humidity Slide
- Crisper
- Feet
- Gaskets
- Door Bins
- FlexStor Rails
- Egg Tray
- Bottle Bins
- FlexStor Bins
- ETB2502H-A
- ETB2502H-H
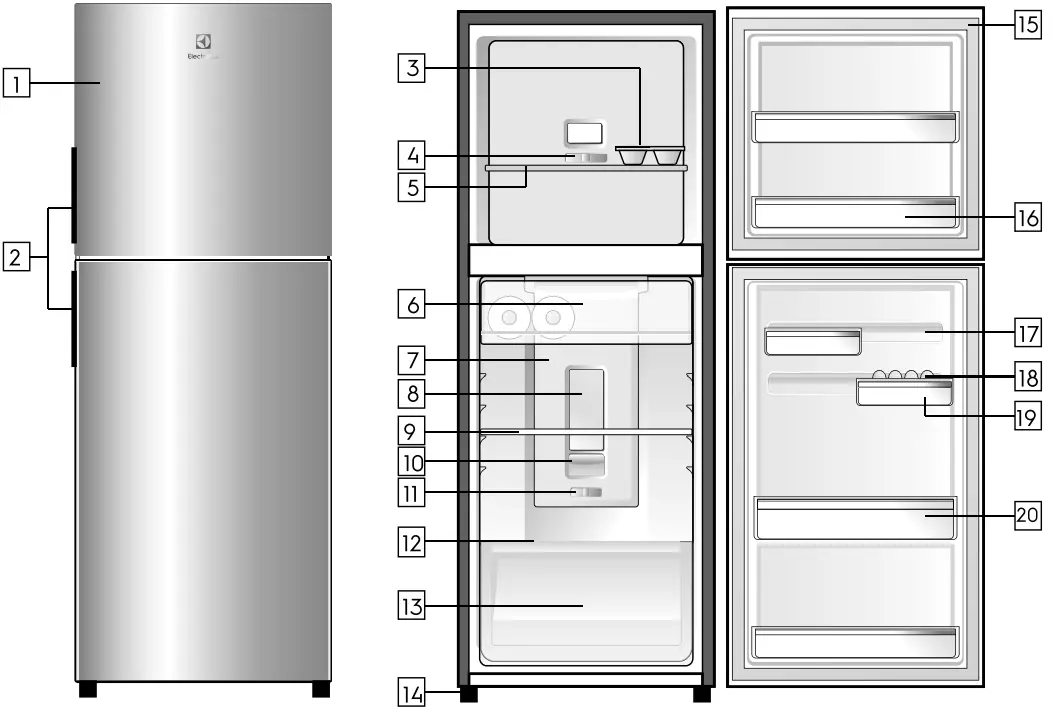
The details of the refrigerator feature:
- Doors
- Door Handles
- Ice Tray
- Slide Control Freezer
- Freezer Shelf
- Chill room
- Multi Flow
- Refrigerator Light
- Shelf
- Deodoriser Cover Refrigerator
- Slide Control Refrigerator
- Humidity Slide
- Crisper
- Feet
- Gaskets
- Door Bins
- FlexStor Rails
- Egg Tray
- Bottle Bins
- FlexStor Bins
TOP FREEZER FEATURES
- ETB2802H-A
- ETB2802H-H
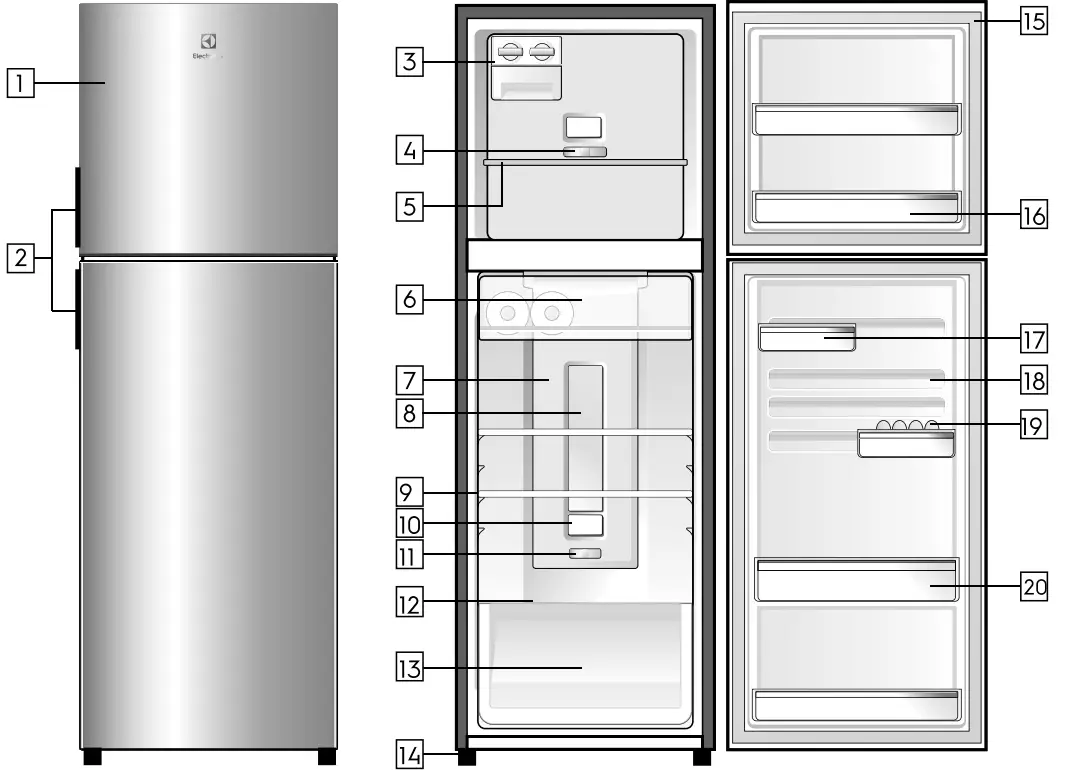
The details of the refrigerator feature:
- Doors
- Door Handles
- Ice Twist & Serve
- Slide Control Freezer
- Freezer Shelf
- Chill room
- Multi Flow
- Refrigerator Light
- Shelves
- Deodoriser Cover Refrigerator
- Slide Control Refrigerator
- Humidity Slide
- Crisper
- Feet
- Gaskets
- Door Bins
- FlexStor Bins
- FlexStor Rails
- Egg Tray
- Bottle Bins
TOP FREEZER FEATURES
- ETB3400H-A
- ETB3400H-H
- ETB3700H-A
- ETB3700H-H
The details of the refrigerator feature:
- Doors
- Door Handles
- Slide Control Freezer
- Freezer Shelf
- Ice Twist & Serve
- Chill room
- Multi Flow
- Refrigerator Light
- Shelves
- Deodoriser Cover Refrigerator
- Slide Control Refrigerator
- Humidity Slide
- Crisper
- Feet
- Gaskets
- Door Bins
- FlexStor Rails
- Egg Tray
- Bottle Bins
- FlexStor Bins
BOTTOM FREEZER FEATURES
- EBB2802H-A
- EBB2802H-H
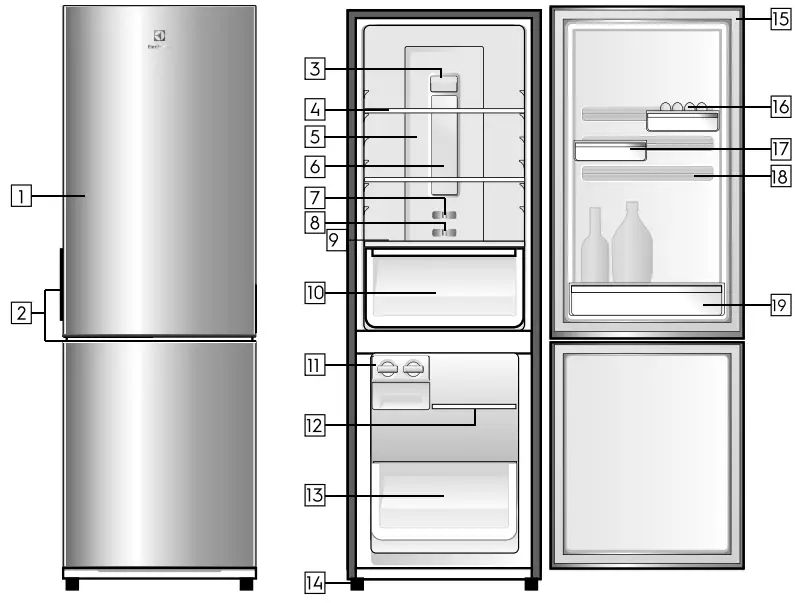
The details of the refrigerator feature:
- Doors
- Door Handles
- Deodoriser Cover
- Shelves
- Multi Flow
- Refrigerator Light
- Slide Control Refrigerator
- Slide Control Freezer
- Humidity Slide
- Crisper
- Ice Twist & Serve
- Freezer Shelf
- Freezer Drawer
- Feet
- Gaskets
- Egg Tray
- FlexStor Bins
- FlexStor Rails
- Bottle Bins
- EBB3400H-A
- EBB3400H-H
- EBB3700H-A
- EBB3700H-H
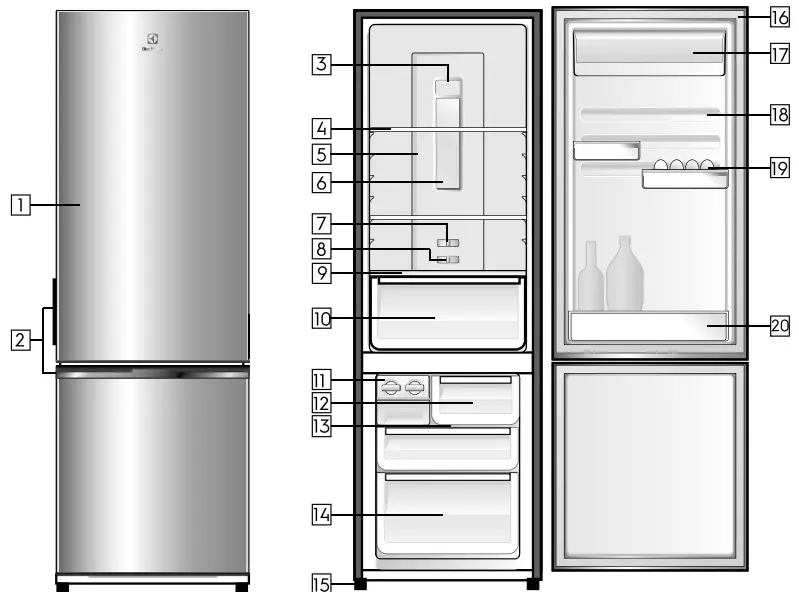
The details of the refrigerator feature:
- Doors
- Door Handles
- Deodoriser Cover
- Shelves
- Multi Flow
- Refrigerator Light
- Slide Control Refrigerator
- Slide Control Freezer
- Humidity Slide
- Crisper
- Ice Twist & Serve
- Meat Drawer
- Crisper
- Freezer Shelf
- Feet
- Gaskets
- FlexStor Bins
- Egg Tray
- FlexStor Rails
- Bottle Bins
MULTI TOP FREEZER FEATURES
- EME2800H-A
- EME2800H-H
- EME3700H-A
- EME3700H-H
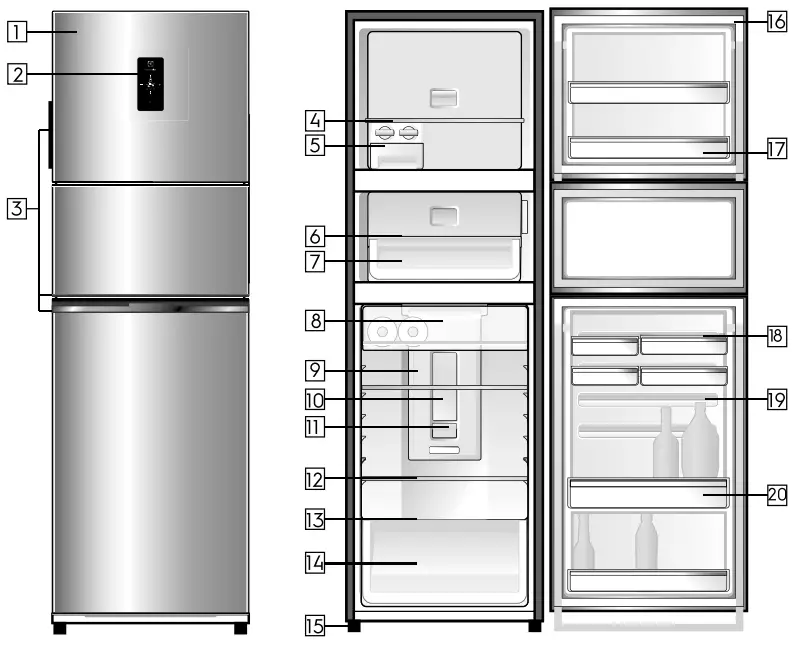
The details of the refrigerator feature:
- Doors
- Temperature Control Refrigerator
- Door handles
- Ice Twist & Serve
- Freezer Shelf
- Mid Door Shelf
- Mid Door Bin
- Chill Room
- Multi Flow
- Refrigerator Light
- Deodoriser Cover refrigerator
- Shelves
- Humidity Slide
- Crisper
- Feet
- Gaskets
- FlexStor Bins
- Egg Tray
- FlexStor Rails
- Bottle Bins
FOOD STORAGE GUIDE
| CATEGORY | PRODUCT | REFRIGERATOR | FREEZER | STORAGE TIPS |
| MEAT | Sausages and Mince | 1-2 Days | 2-3 Months | Keep cold meat at the back of the refrigerator where it is coldest.
Plastic can cause meat to sweat if stored in a refrigerator for more than a day.
Roast can take up to 48 hours to defrost properly, transfer frozen roast to the refrigerator 2 days before use. |
| Chops and Steak | 3-4 Days | 4-6 Months | ||
| Cold Meats | 3-5 Days | 4-6 Months | ||
| Roasts | 3-5 Days | 12 Months | ||
| POULTRY | Chicken | 1-2 Days | 2 Months | If poultry takes on a smell or colour you are unsure about it is best to throw it out.
Whole eggs are not suitable for freezing, slightly beaten eggs may be frozen for four months. |
| Roast Chicken | 3-5 Days | 12 Months | ||
| Eggs | 6 Weeks | Not Suitable | ||
| SEAFOOD | Whole fish and fillets | 2-3 Days | 2 Months | Store in an airtight container or foil.
Never freeze prawns in salty water as this will dehydrate the flesh. |
| Lobster and crabs | 1-2 Days | 2 Months | ||
| Prawns | 1-2 Days | 2 Months | ||
| DAIRY | Milk | Until Expiry Date | Not Suitable | If dairy takes on a smell or color and you are unsure about it, it is best to throw it out.
Depending on the variety hard cheese can last from 2 weeks to 2 months. |
| Yoghurt | 7- 10 Days | Not Suitable | ||
| Hard Cheeses | 2 Weeks – 2 Months | 2 Months (Grated) | ||
| Soft Cheeses | 1-2 Weeks | Not Suitable | ||
| Butter | 8 Weeks | 12 Months | ||
| FRUIT & VEGETABLES | Every fruit and vegetable has a different shelf life. Some stay fresh for a couple of days e.g beans, others can last for a couple of months e.g. onions. | 8-12 Months When freezing chop and blanch in small portions. | Keep vegetables in the crisper and away from the air vents to avoid freezing. | |
| Don’t wash fruit and vegetables before storing them in the refrigerator as this can make them susceptible to rotting. | ||||
| LEFT OVERS | Homemade meals 3-4 Days | 2-6 Months | Store in a sealed container. | |
| Freeze meals in small portion size to limit wastage. | ||||
IMPORTANT
Please note, use this information as a guide only, actual storage times will vary depending on how you use your refrigerator, climatic conditions, and the freshness of the food.
TROUBLESHOOTING
If you find that something is wrong with your refrigerator, you can carry out some easy checks before calling for service. You may be able to fix the problem and save time and costs and spare yourself from some inconvenience.
| Problem | Solution |
| When your appliance is not operating | • Check that the power cord is plugged into the power outlet properly and that the outlet is switched on. • Try running another appliance from the same power outlet. If no power is coming out from the outlet, you may have a blown fuse or tripped your household power supply circuit. • Try adjusting the temperature control to a slightly colder position. • It is normal for the freezer fan to NOT operate during the automatic defrost cycle or for a short time after the refrigerator is turned on. |
| When there is refrigerator noise | • Your refrigerator uses energy-efficient components that may produce different noises from your old refrigerator. • Occasionally, a gurgling sound of the refrigerant flowing or the sound of parts contracting or expanding may be heard. • These sounds are quite normal. If the refrigerator is rattling or making vibrating noises, check that it is level and adjust leveling foot. |
| If there are odours inside the refrigerator | • The interior may need cleaning • Some foods may produce strong odors and need to be tightly sealed. |
| If the temperature in the refrigerator is too warm | • Check that the refrigerator has enough clearance at the sides, back and top. Refer to the installation instructions in this manual. • Refer to ‘Temperature Control’ section. • The door may have been opened for too long or too frequently. • Food containers or packaging may be holding the door |
| If the temperature in the refrigerator is too cold | • Refer to ‘Temperature Control’ section. • Increase the temperature to avoid high energy consumption. |
SERVICE REQUEST
If the problem persists after you have made the above-mentioned checks contact your nearest service center or the dealer from where you bought the refrigerator from. Be ready to quote the model number which is stated on the label found at the inner plastic compartment liner wall of the refrigerator.
Important notice
Before calling a service technician, please check carefully the operating instructions, service booklet, and warranty terms and conditions.
Noise

NOTES
 CHI TIẾT LIÊN HỆ BỘ PHẬN CHĂM SÓC KHÁCH HÀNG CỦA ELECTROLUX
Vietnam
Domestic Toll Free: 1800-58-88-99
Tel: (+84 8)3910 5465
Electrolux Vietnam Ltd
Floor 9th, A&B Tower
76 Le Lai Street – Ben Thanh Ward – District 1
Ho Chi Minh City Vietnam
Office Tel: (+84 8) 3910 5465
Office Fax: (+84 8) 3910 5470
Email: [email protected]
Share more of our thinking at electrolux.com.
P/No: A12081643
OM Refresh III_VT.indd 12
7/6/18 9:02 AM
7/6/2561 BE 09:25
Operating instructions – Dishwasher Electrolux ESL 63010
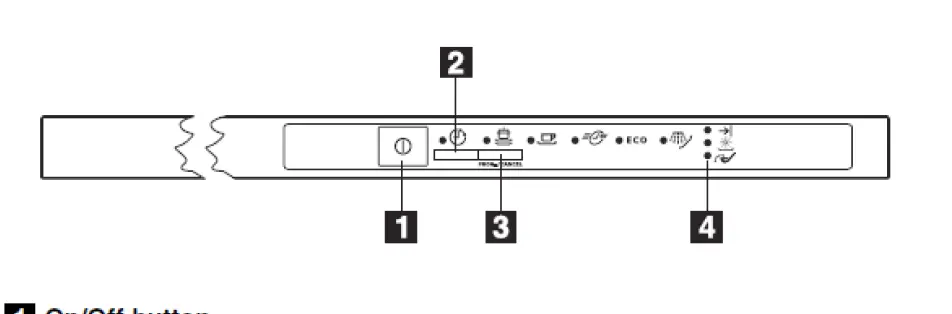
The Control Panel
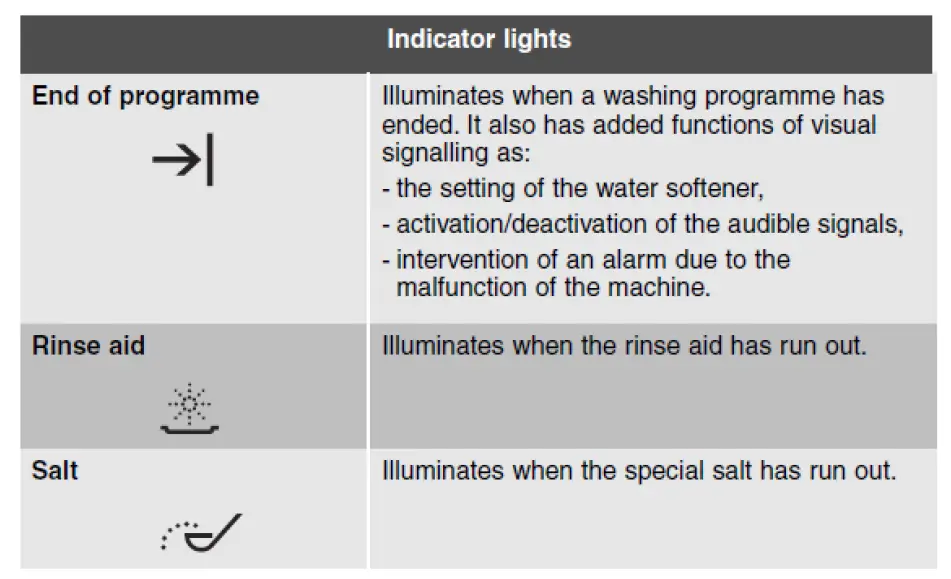
Indicator lights
- End of cycle
Illuminates when the washing programme has ended. - Salt
Refilling indicator light.
Illuminates when the salt has run out.
Programme selection/cancel button
To select a washing programme press the button until the indicator light corresponding to the desired washing programme illuminates.
The end of cycle indicator light flashes.
Once the washing programme has been set, close the dishwasher’s door, the programme will start automatically.
Audible signals
The audible signals indicate which operations the dishwasher is performing.
- end of washing programme
- the setting of the water softener
- malfunction of the machine
Washing programmes
Starting a washing programme
- Check that the baskets have been loaded correctly and the spray arms can rotate freely.
- Set the washing programme by pressing the programme selection/cancel button until the indicator light corresponding to the desired washing programme illuminates. The end of cycle indicator light flashes.
- Once the washing programme has been set, close the dishwasher’s door, the programme will start automatically.
To interrupt a washing programme in progress
- Open the dishwasher’s door; the programme will stop.
- Close the door; the programme will start from the point at which it was interrupted.
To cancel a washing programme in progress
- Open the dishwasher’s door.
- Press the programme selection/cancel button for about 3 seconds, until the indicator light of the running programme turns off and the end of cycle indicator light flashes. The machine has returned to setting mode and it is possible to select another washing programme.
Interrupt or cancel a washing programme in progress only if it is absolutely necessary. NB Hot steam may escape when the door is opened.
End of the washing programme
- The dishwasher will automatically stop.
- An audible signal informs you of the end of the washing programme.
- Open the dishwasher’s door, leave it ajar and wait a few minutes before removing the dishes.
- The end of cycle indicator light is on. The indicator light of the programme just ended is on.
- Switch off the dishwasher by pressing the On/Off button.
Unloading the dishwasher
- Allow the dishes to cool down before removing from the appliance.
- Empty the lower basket first and then the upper one; this will avoid water dripping from the upper basket onto the dishes in the lower one.
- Water may appear on the sides and door of the dishwasher as the stainless steel will eventually become cooler than the dishes.
![]()
Instruction Book
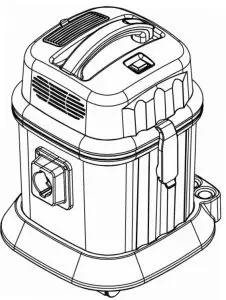
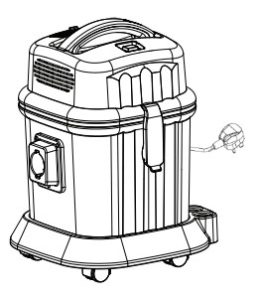
WET & DRY VACUUM CLEANER FLEXIO POWER CLEAN Z823 /PENGHISAP DEBU
Product and Accessories
CLEANING TOOLS
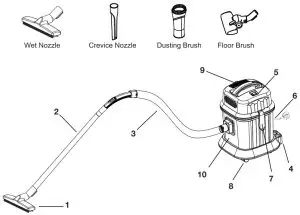
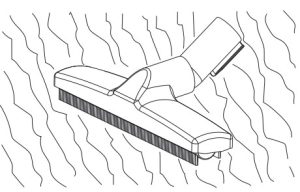
- Wet Nozzle
- Plastic Tubes
- Flexible Hose
- Tools on Board
- On/Off Switch
- Power Plug
- Clasp
- Wheel
- Exhaust Grille
- Drum
Line drawings are solely for illustration purposes and are subject to variations from actual product.
Dear Customers,
Dear Customer, please read through these operating instructions carefully. Above all, please observe the safety instructions on the first few pages of this booklet. Please keep these operating instructions for future reference and pass them on to any subsequent owner of this appliance.
The safety standards of Electrolux electrical appliances are in keeping with the recognised rules of technology and the laws governing the safety of appliances. Prior to operating this appliance please familiarise yourself with the following safety instructions :
SAFETY INSTRUCTIONS
- Read all the instructions and only use the appliance for its intended purpose.
- The appliance must be switched off before plugging or unplugging it from the wall socket. Do not pull on the electrical cord to remove the plug from the wall socket.
- Always remove the plug from the wall socket before attempting any form of user maintenance or cleaning, as specified in this booklet.
- Do not handle the plug with wet hands.
- Do not operate the appliance with a damaged electrical cord or plug. If the electrical cord is damaged it must be replaced by returning the product to an authorised Electrolux service centre or similar qualified person to avoid a hazard.
- If the appliance has malfunctioned or been damaged in any manner return the appliance to the nearest authorised Electrolux service centre for examination, repair or adjustment.
- Do not carry or drag the appliance by the electrical cord.
- Keep the electrical cord away from heat, oil, sharp edges and rough or hot surfaces and do not run the appliance over the cord.
- Hold onto the plug when rewinding the electrical cord to prevent the plug from whipping or hitting hard against the appliance.
- An extension electrical cord may be used provided that it has a higher rating than the appliance. Please refer to the information provided on the appliance’s rating plate or consult your nearest authorized Electrolux service centre.
- To protect against electric shock do not immerse the electrical cord, plug or the appliance in water or other liquids.
- Do not expose the appliance to rain.
- Do not use the appliance outdoors.
- Never leave the appliance running unattended.
- This appliance is not intended for use by person (including children) with reduced physical, sensory or mental capabilities, or lack of experience and knowledge, unless they have been given supervision or instruction concerning use of the appliance by a person responsible for their safety. Children should be supervised to ensure that they do not play with the appliance.
- Store the appliance away from high heat sources.
- Do not use this appliance to vacuum up the following : – Inflammable or combustible substances, – Hard pointed objects, – Hot ash, lighted cigarette ends or anything that is burning or smoking. Large quantities of fine dust e.g. lime, cement or plaster dust, toner dust from laser printers etc.
- Do not operate this appliance in areas where the substances listed above may be present.
- To prevent the reduction in air flow, ensure that all orifices/vents on this appliance are kept free from blockages and do not insert any objects into these orifices/vents.
- Do not use without filters in place.
- If the motor overheats, it will turn off automatically. If this occurs, press the on off button and wait for a few minutes before switching on again.
- Extra care should be taken when vacuuming staircases.
- It is dangerous to alter the specifications or modify the vacuum cleaner, only use accessories recommended by Electrolux.
- Under no circumstances should the customer attempt to repair the vacuum cleaner.
- The vacuum cleaner should only be repaired and/or serviced by an authorized Electrolux service centre and only genuine Electrolux spare parts should be used. Failure to do so may render the warranty void.
This vacuum cleaner is for household use only.
Important ! This vacuum cleaner must only be connected to a power supply whose voltage and frequency comply with the specifications given on the appliance rating plate.
Quick Guide
When taking the product out of its packaging, check for damages.
VACUUM CLEANER ASSEMBLING
Always remove the plug from the power supply before fitting or removing accessories.
Before putting the appliance into the service, please check if all filters are inserted correctly.
Connecting vacuum cleaner
Fitting or removing the flexible hose to the air inlet A
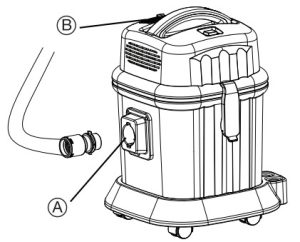
- Fit the flexible hose into the air inlet. Turn the hose grip clockwise until it clicks into position.
- To release, first remove the plug from the power socket. Detach the flexible hose firmly from the air intake duct by turning anti-clockwise.
Fitting or removing the flexible hose to the air outlet B
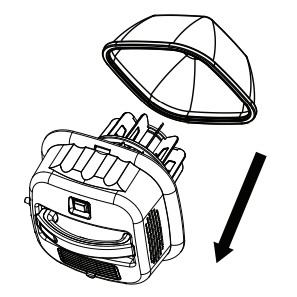
- Remove the exhaust grille and the filter.
- Fit the flexible hose into the air outlet. Turn the hose grip clockwise until it clicks into position.
- To release, first remove the plug from the power socket. Detach the flexible hose firmly from the air outlet duct by turning anti-clockwise.
Fitting the extension tubes and accessories
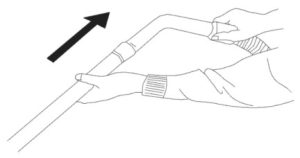
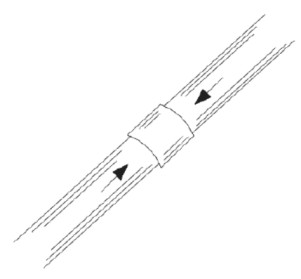
- Fit the extension tube to the handle.
- Fit the brush to the extension tube.
Fitting a chosen nozzle
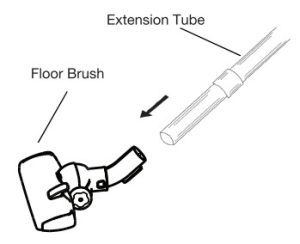
- Floor brush is intended for cleaning hard floors and carpets.
- Crevice nozzle is for cleaning corners and cushions.
- Use the wet nozzle only for cleaning wet surfaces.
Instructions for Use
CLEANING TOOLS
The crevice tool and dusting brush are stored on the accessories holder.
Floor Brush
Ideal for the daily cleaning on carpets and hard floors.
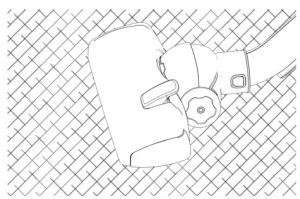
For the carpet
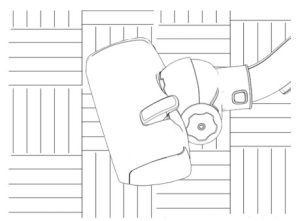 For the hard floor
Wet Nozzle
Ideal for absorbing water or liquid.
 Wet nozzle to absorb water
Crevice Nozzle
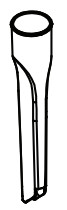
- The crevice nozzle can be used for cleaning corners, between cushions or difficult to reach places.
Dusting Brush
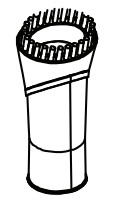
- Dusting brush is used for the furniture, venation, blinds, books, lamp shades and shelves.
Operating Procedure
- Before using the appliance, insert the plug into the power supply.
- Press the On/Off button to switch the unit on. To stop it, press the On/ Off button again.
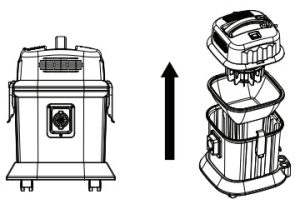
- Always operate the cleaner with filter installed. Undo the clasp and remove the top cover from the body. Secure the filter in its position by pushing down the filter frame in its slot.
VACUUMING DUST
- Before vacuuming dust, please make sure the body, motor housing, filter and attachments are dry.
- Fit in the floor brush or other tools to vacuum the dust.
ABSORBING WATER
- You may fit in the wet nozzle or other cleaning tools.
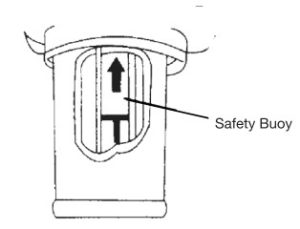
- The safety buoy will not work when the body is filled with liquid. Please switch off the unit and remove the top cover. Pour out the liquid.
- If the appliance has fallen over, water may enter into the motor. Ensure that there is no water inside the motor before operating again.
BLOWING DUST
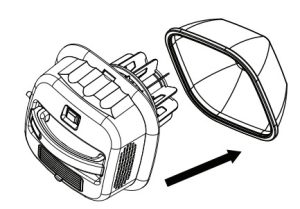
- Remove the filter grille from the blower position.
- Fit the hose connection.
- Once complete, remove the hose connection, fit the exhaust grille to its position turn/close tightly.
Note: If suction power of the vacuum cleaner gets weak during operation, kindly turn off the unit for a moment before resuming. If it still does not work, clean the body and take out the dust from the bin after turning off the unit. Continuous extended use of appliance and full dust bin may increase the motor temperature and may damage the unit.
Maintenance
DUST FILTER REPLACEMENT
Note:
Before doing any type of cleaning or maintenance to the cleaner, always ensure that the cleaner is unplugged from the wall socket.
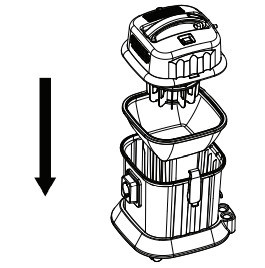
- After detaching the flexible tube, remove the top cover .
- Lift up the dust filter to remove from its slot.
- When suction is extremely low with a washed filter, replace with a new one. Filter life time may vary due to the usage. Contact Electrolux service station for the purchase of new filters.
- Replace the top cover and secure both latches on each sides.
CLEANING FILTER
Note:
- Filter must be cleaned when it becomes visibly solid.
- Disconnect from electrical outlet before cleaning filters.
- Do not use a washing machine to rinse filters.
- Do not use hair dryer to dry filters.
- Remove filter
 Rinse filter in lukewarm water and dry the filter completely
- Assemble back the filter
How To Store Your Vacuum
- Choose a storage location that is both safe and dry.
- The vacuum comes with an onboard tool coupling for storing the floor nozzle, slide the parking clip onto the parking positions on the cleaner.
- Keep the extension tubes, nozzles and hose together to avoid losing them.
TROUBLESHOOTING
In case of malfunction, check for the following probable reasons. Make the necessary corrections which may be performed at home. If the problem persists, consult the Electrolux Authorized Service Centre.
| PROBLEM | POSSIBLE CAUSES | CORRECTIONS |
| The vacuum cleaner does not start. | The plug is not properly connected to the socket. Thermal protector activated due to motor high temperature. |
Check the plug connection or try another socket. Press the ON/OFF button and wait 30 minutes for the motor to cool off. |
| Reduction of suction capacity. | Suction hose blocked. Nozzle blocked. Filters clogged. Damaged or broken hose. |
Clean the hose. Clean the nozzle. Clean or replace filters. Replace the hose. |
| Over heating. | Filters are clogged. | Clean /replace filters. |
Technical Data
For Z823 220-240V, 50/60Hz
Max Power (W): 1400W
]]>
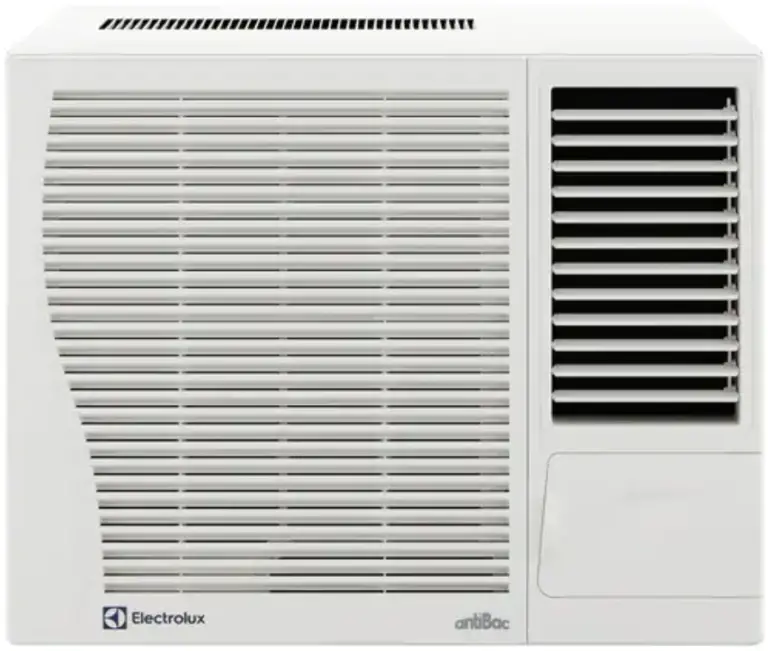
Electrolux EWF073CM5WA Window Type Room Air Conditioner

Function
Introduction
Window type room air conditioners can regulate the room temperature and dry the room. It is convenient for your work, study and life. It can be widely used in residence, shop, hotel, office, library and laboratory, and so on.
 Cooling in summer
In hot summer, Air conditioner can cool down the room air by transferring heat out.
Heating in winter (Only for heat unit)
In cold winter, Air conditioner can heat up room air.

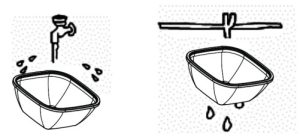
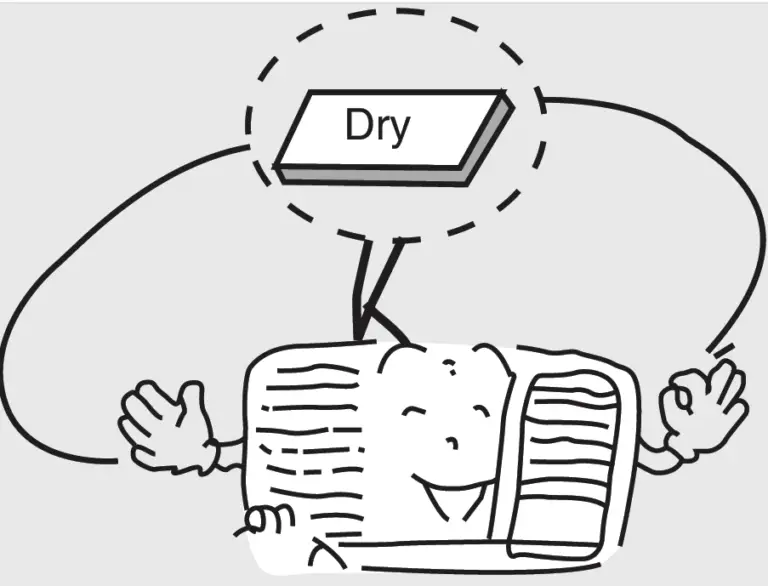
Dehumidifying in rainy or humid season
Without reducing the room temp., air conditioner can dehumidify and make the room air dry and comfortable.
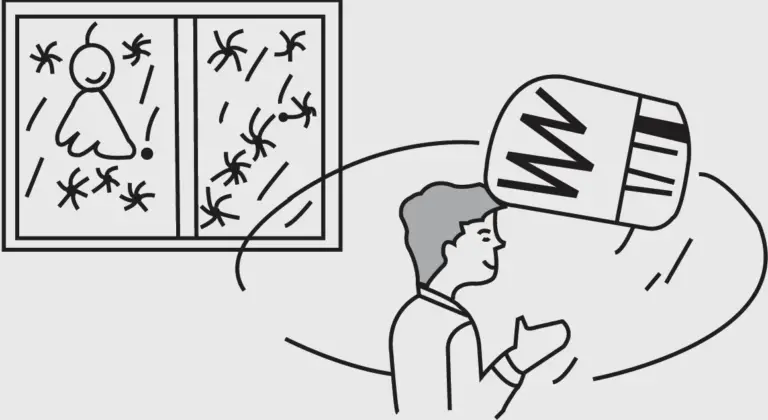
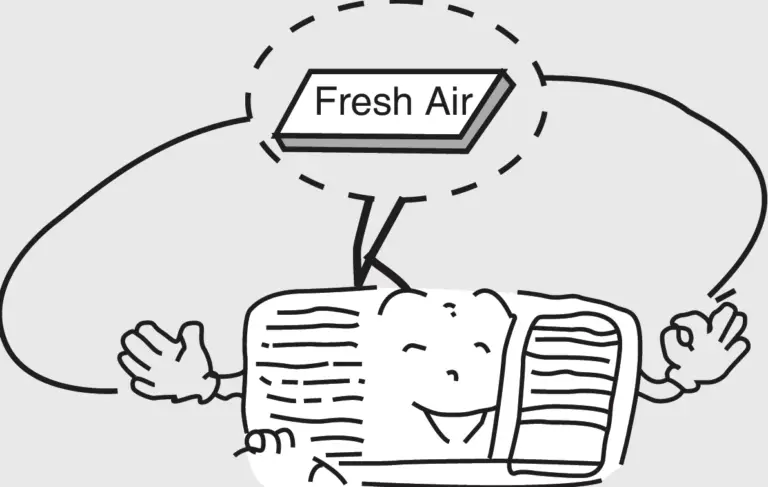
Exchange fresh air
Open storm door to keep the fresh air in the room.
Operating Condition
- Please operate air conditioner in the correct conditions as following.
COOL mode operation
Outdoor temperature should be in range of 18 to 43 , otherwise it is possible for air conditioner to breakdown. Room humidity should be lower than 90%. Otherwise, it is possible for air conditioner to dew at air conditioner surface and even drop water af-ter running for so much time. But this is normal.
DRY mode operation
Outdoor temperature should be in range of 18 to 43 , otherwise it is possible for air conditioner to breakdown.
Power requirement
Rated voltage and voltage range: 220V 10%
- The electric components will be damaged when the voltage is too high. If the voltage is too low, the compressor will vibrate violently to dam-age the refrigerant system and easily cause the compressor and electric components not work.
The ground must be connected.
- Special socket must be used. Furthermore, the socket and wiring must conform to the wiring regulations. And the earthing method must be reliable.
- In fixed circuit, there must be electricity leakage protection switch of enough power capacity and air switch with enough space.
Earth wire To ensure the reliable earthing, please do not connect earth wire to the following places:
- Water pipe
Installation
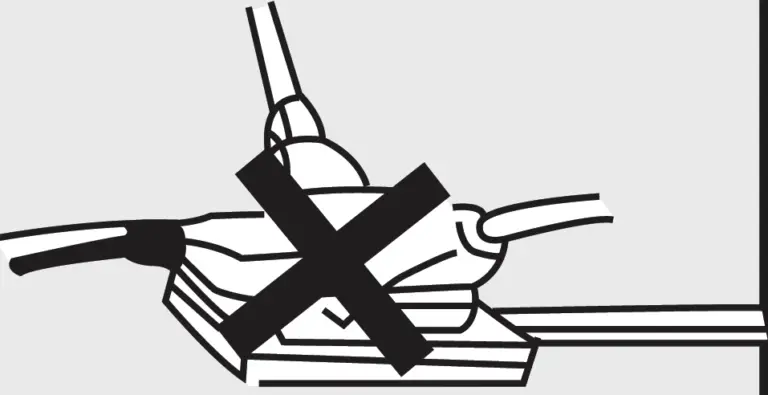
Installation precaution:
Window type conditioner is so valuable and the improper installation of it will cause a lot of damage! Please associate the profes-sional technician to install the unit and don’t install it by yourself. Otherwise, we are not responsible for the damage like this.
 Notice:
- This appliance is not intended for use by persons (including children) with reduced physical, sensory or mental capabilities, or lack of experience and knowledge, unless they have been given supervision or instruction concerning use of the appliance by a person responsible for their safety. Children should be supervised to ensure that they do not play with the appliance.
- The appliance shall be installed in accordance with national wiring regulations or similarly qualified persons in order to avoid a hazard. If the supply cord is damaged, it must be replaced by the manufacturer, its service agent.
- Please read this operating manual carefully before operating the unit. The figures in this manual may be different with the material objects, please refer to the material objects for reference.
Location:
- The condensation water must be drained away conveniently.
- Install air conditioner unit far away from TV set or radio etc. to avoid disturbing video or voice.
- In salt and coastal area or place where is near thermal springs and polluted by sulphurous gas, or other special areas, please contact the seller before use.
- Avoid a place where is possible for inflammable gas to leak out.
- Avoid other heat sources or direct sun light.
- Avoid a place where is easy for children to touch.
- Don’t use the unit in the immediate surroundings of a laundry ,a bath ,a shower or a swimming pool.
- For window type air conditioner with remote control, install in a location where is strong electromagnetic disturbance, you should contact the seller in advance to avoid the malfunction in use.
How to install: - Choose a location where there are no any obstacle surrounding the unit, and the plug is accessible.
- Prepare the installation hole slightly bigger than unit size.
- Choose the installation space according to the following diagram.
The indoor distance from obstructions should be 300mm (above), 1500mm (below), 500mm (left), 500mm (right) and 1500mm (front).
The outdoor distance from obstructions should be over 150mm (above, left, right) and over 500mm (back). Please refer to the drawing below.
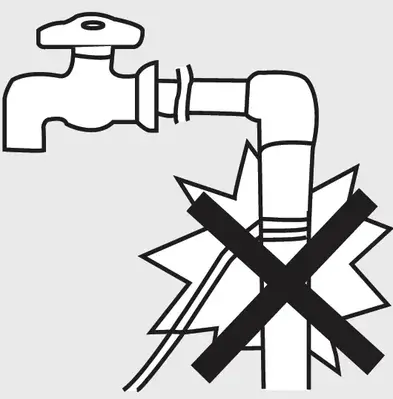
Installation procedure:
- Remove the sticker from the front panel.
- Put the unit into the installation hole.
- When installing the unit, it should be slanted down to the back to avoid the enlargement of noise or vibration. (Slant between 6-10mm.)(Shown at right figure.)
- The installation place should be strong enough to avoid the enlargement of noise or vibration.
- Fill up sews in the cabinet with sponge or foam.

Installation assistance:
- Use iron support
The installation hole should be strong enough to support the air conditioner. If it cannot, iron sup-port has to be used outdoors.
Iron support should be fixed on the building (Shown at right figure.)
- Use sunshade board
Air conditioner should avoid anything to be dropped into it and avoid direct sunshine. If there is no cover on it, you should contact the seller for installing the sunshade board. When installing the sunshade board, don’t let it block the air inlet at the side grille.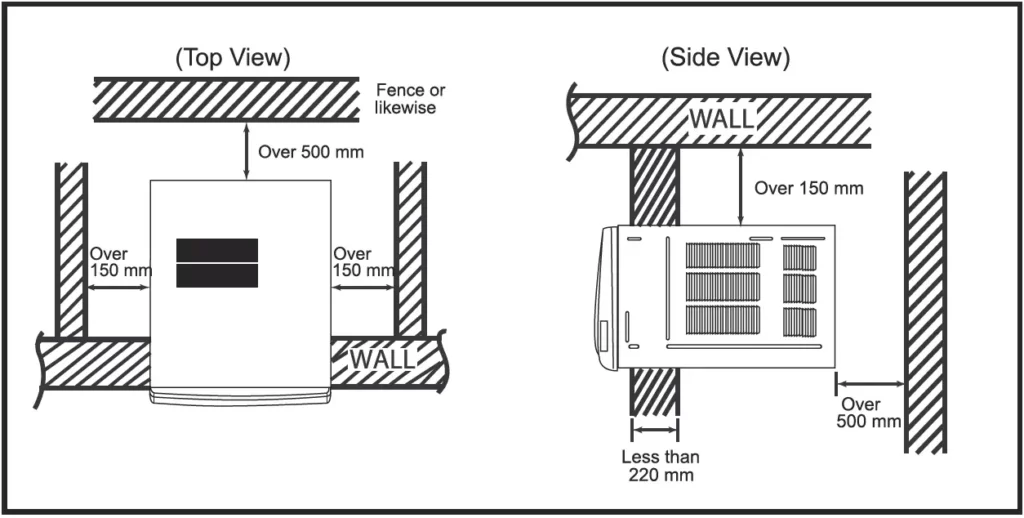 Drain water for one style:
To get the maximum cooling efficiency, the air conditioner is designed to splash the condensate on the condenser coil. If the splashing sound annoys you, you can provide an outside drain by using the following procedure, which may however cause a small loss of performance.
- There is a drainage outlet at the back of the unit.
- Remove cover from the drainage outlet , and then connect drainage joint to it with screw.
- Connect the drain hose to the outlet.
Note:
- Drain hose or tubing can be purchased locally to satisfy your particular needs.
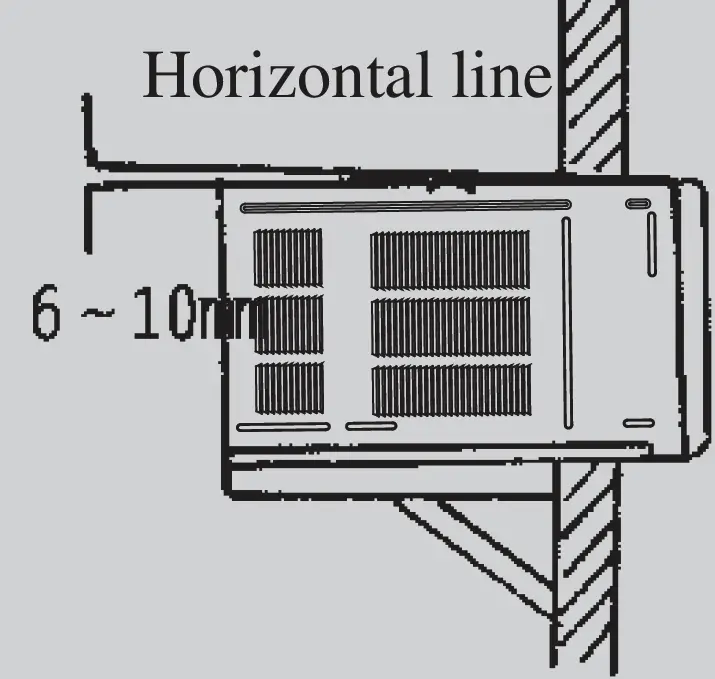
- Drainage outlet
- Washer
- Drainage joint
- Remove
- Cover
- Install
Drain water for another style:
To get the maximum cooling efficiency, the air conditioner is designed to splash the condensation water on the condenser coil. To the cooling only unit, If the splashing sound annoys you, you can provide an outside drain by using the following procedure, which may however cause a small loss of performance.
- Slide out the chassis from the cabinet.
- Remove the rubber plug from the body base plate.
- Install the drain pan to the corner of the cabinet with 2 screws.
- Connect the drain hose to the outlet on the drain pan bottom.
- Slide the chassis into its original place in the cabinet.
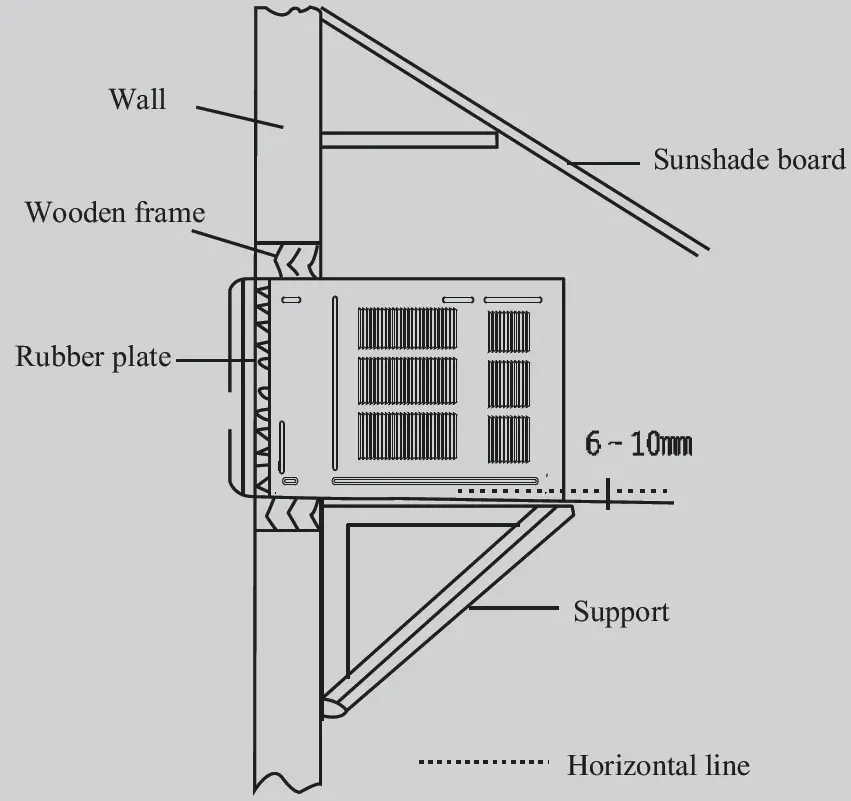
- Screws
- Drain Pan Internal view
- Drain Hose External Pan
Note:
- Drain pan and drain hose must be installed before using reverse cycle models.
- Drain hose or tubing can be purchased locally to satisfy your particular needs.
Notes for installation
Remove
Before removing air conditioner to the other place, you should contact the seller firstly. Then it must be done under the direction of the professional technician. In addition, the charge of this must be paid.
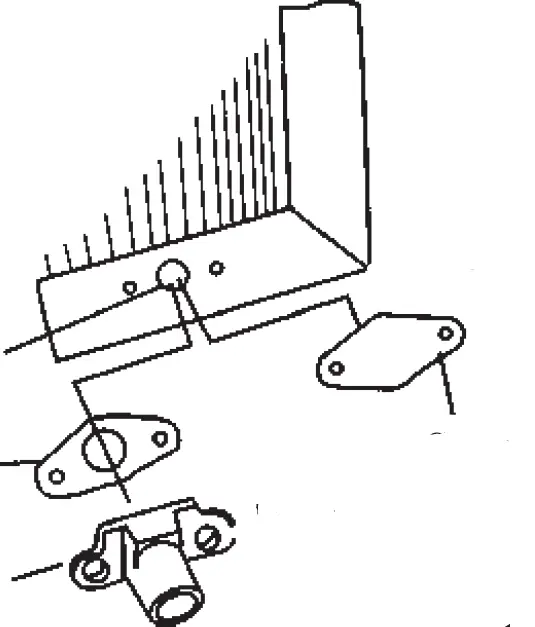 Noise
Noise
- Install in a location where is firm enough to avoid the enlargement of noise and vibration.
- Don’t put anything in front of the outlet of outdoor unit to avoid increasing noise.
- Be sure that hot air or noise will not inconvenience neighbors.
- Please contact the seller as soon as there is strange noise during operation.
- Please use the safety support.
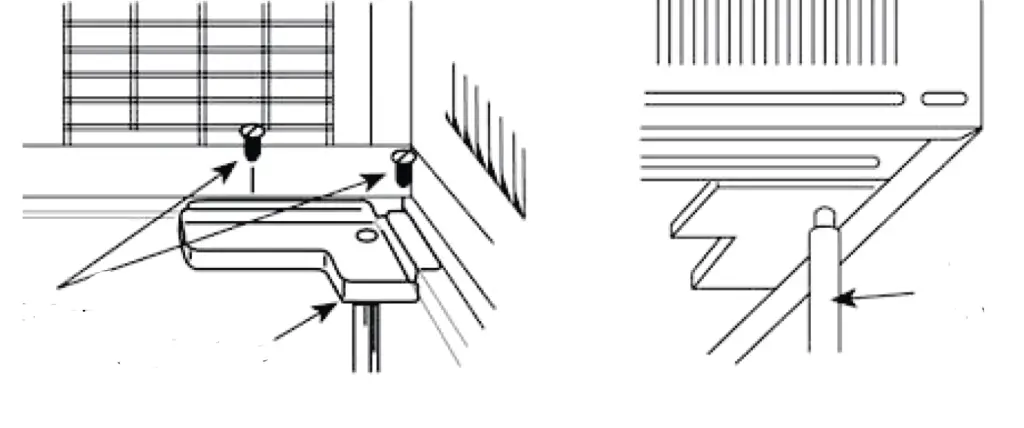
Electric wiring
- Must connect with ground reliably.
- The exclusive circuit must be used. But removable socket can’t be used because poor contact of it can cause over heat or fire.
- Don’t pull the power cord strongly.
- In fixed circuit, there must be electricity leakage protection switch and leakage current is less than 30mA.
- Connecting method between air conditioners and power cord and interconnecting method of each individual element with one another should accord with wiring diagram on the unit.
- The air conditioner should be installed in accordance with national wiring regulation.
- An all-pole disconnection switch having a contact separation of at least 3mm in all poles should be connected in fixed wiring
- Air switch (thermal-magnetic breaker) should be installed in the circuit.
- If the supply cord is damaged, it must be replaced by the manufacturer or your dealer or a qualified person to avoid a hazard.
- All The dectrical work must be done according to the local wiring regulations.
Parts identification
Mechanical Model
Panel outlook picture, just for reference, please take the real unit as standard.
- Cabinet
- Air inlet louver
- Front grille
- Power cord
- Control panel
- Front intake grille
- Air filter (behind the front intake grille)
- Remote Control Model
- Panel outlook picture, just for reference, please take the real unit as standard.
- Cabinet
- Air inlet louver
- Front grille
- Remote control panel
- Power cord
- Front intake grille
- Air filter (behind the front intake grille)
Air direction adjustment
Vertical airflow direction vane
(Airflow direction adjustment up and down).
The vertical airflow direction vane is controlled by positioning the vane to discharge the air upwards, downwards or straight out.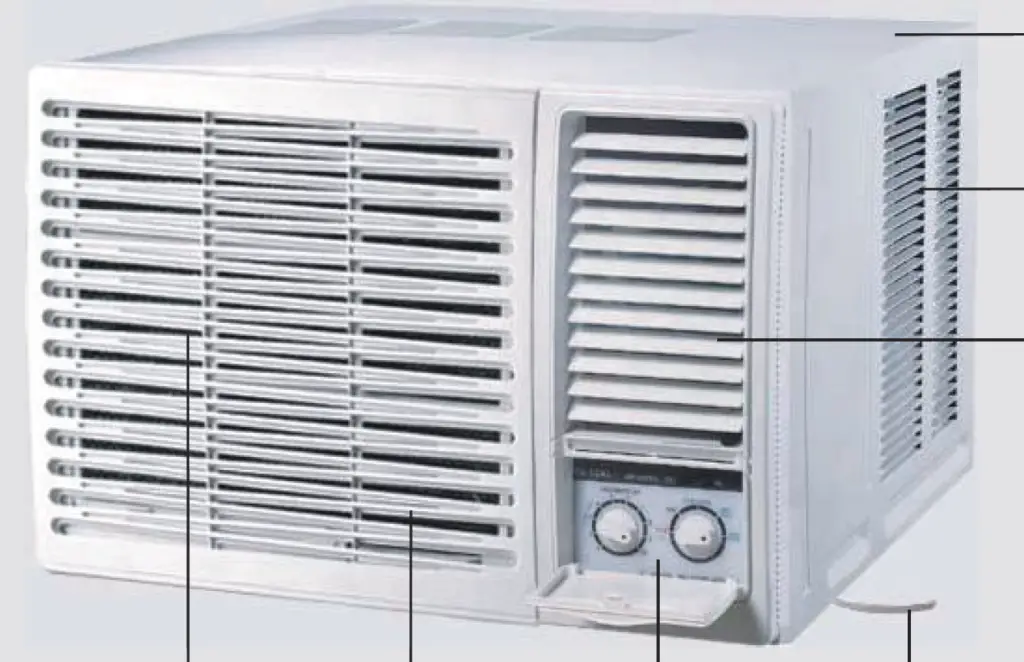
Main switch operation procedure (Applicable to Mechanical Models ONLY)
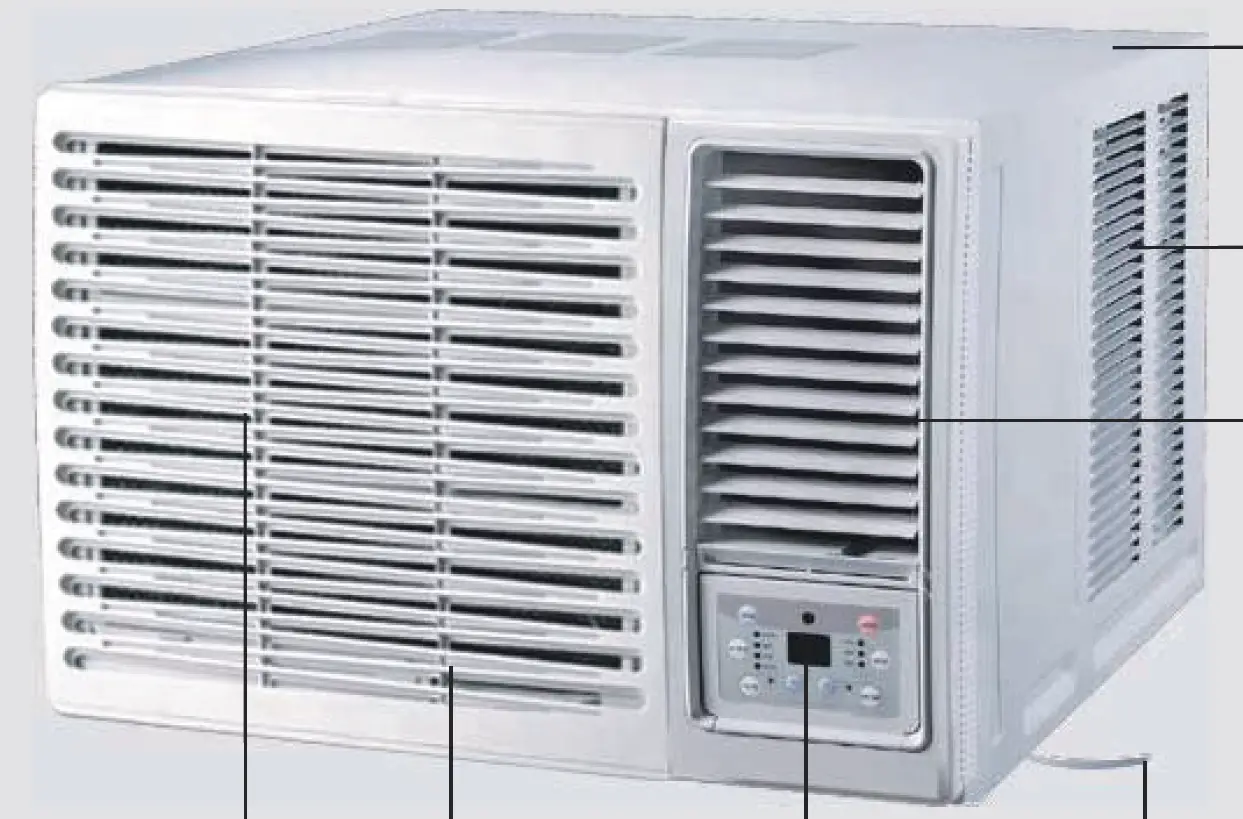
- Main Control Knob
Set to Low Cool, Med Cool or High Cool as desired (FAN setting operates the fan only.)
CAUTION:
If the main control knob is turned off changed to a fan setting from a cooling operation setting, WAIT at teast 3 minutes before resetting to cooling operation. - Thermostat control Knob
Set the thermostat control knob to your desired setting(Usually 6-7 is recommended). If the room temperature is not as desired after a reasonable period, turn the thermostat. When the thermostat control knob is set to 10, moisture may freeze onto evaporator fins and turn the thermostat control knob counter clockwise. This will quickly defrost the evaporator fins so that mormal cooling can be resumed.
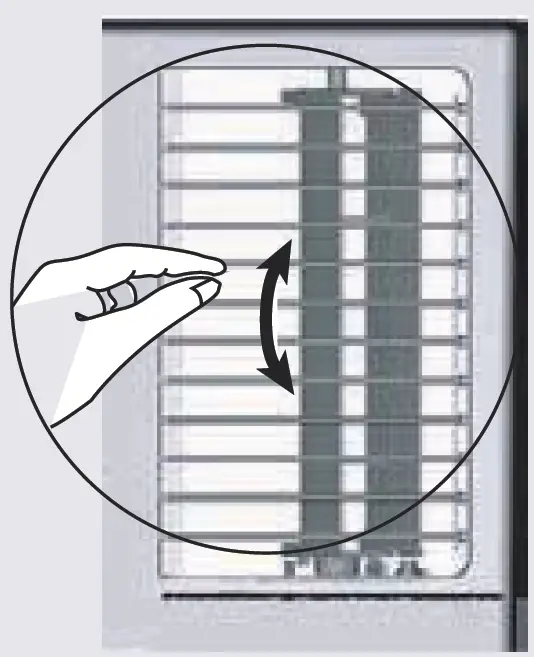
- AIR SWING
- OFF
- ON
- Air Swing Switch (Airflow direction adjustment Side-to Side)
To obtain a fix airflow direction, set the air swing switch to “ON” for the vanes to swing from side to side until the desired flow direction is reached, then switch it to “OFF”. For continuous side-to-side air circulation, set the air swing switch to “ON”.
Operation of wireless remote control (Applicable to Remote Control Models ONLY)
Name and function of wireless remote control
Note:
Be sure that there are no obstructions between receiver and remote controoler; Don’t drop or throw the remote control; Don’t let any liquid in the remote control and put the remote control directly under the sunlight or any place where is very hot.
Signal transmitter
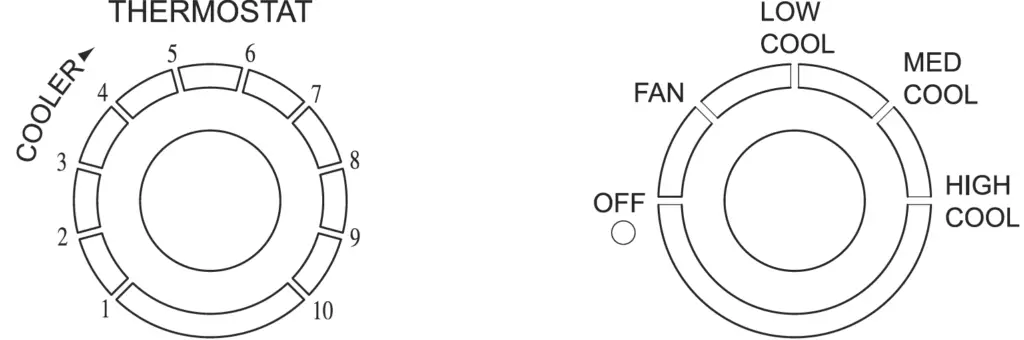 Remote control
ON/OFF
- ON/OFF button
Press this button, the unit will be turned on, press it once more, the unit will be turned off. Sleep function will be canceled, while unit off.
MODE - MODE button
Press this button, Auto, Cool, Dry, Fan, Heat mode can be selected circularly. Auto mode is default while power on. Under Auto mode, the temperature will not be displayed; Under Heat mode, the initial value is 28 ( 82 oF); Under other modes, the initial value is 25 ( 77 oF).
- AUTO
- COOL
- DRY
- FAN
- HEAT
(only for cooling and heating unit As for cooling only unit, it won’t have any action when it receives the signal of heating operation.)
SLEEP - SLEEP button
Press this button, Sleep On and Sleep Off can be selected. After powered on, Sleep Off is defaulted. After the unit is turned off, the Sleep function is canceled. After Sleep function set up, the signal of Sleep will display. In this mode, the time of timer can be adjusted. Under Fan and Auto modes, this function is not available.
FAN - FAN button
Press this button, Auto, Low, Middle, High speed can be circularly selected. After powered on, Auto fan speed is default. Under DRY mode, Low fan speed only can be set up. - Low fan
- High fan
- Middle fan
AUTO - AUTO button
Press this button to active the “AUTO” function and the unit will be running according to room temperature.
CLOCK - CLOCK button
Press this button, the clock can be set up, signal blink and display. Within 5 seconds, the value can be adjusted by pressing + or – button, if continuously press this button for 2 seconds above, in every 0.5 seconds, the value on ten place of Minute will be increased 1.During blinking, repress the Clock button or Confirm button, signal will be constantly displayed and it denotes the setting succeeded. After powered on, 12:00 is defaulted to display and signal will be displayed. If there is signal be displayed that denotes the current time value is Clock value, otherwise is Timer value.
Name and function of wireless remote control
Note: This wireless remote control is universal, andit could be used for many units, some buttons of this control which are not available to this unit will not be described below.
 Remote control
ENERGY SAVER - ENERGY SAVER button
Under the Cool and Dry mode, press this button once, the unit will enter “energy saver” mode. Repress this button, the unit will exit “energy saver” mode. Note: Not applicable for inverter models.
FAST COOL - FAST COOL button
Press the “FAST COOL” button to active the Fast Cool feature. When Fast Cool is activated, the air conditioner will automatically run at the highest fan speed with the set temperature of 16ºC.
+ button
Presetting temperature can be increased. Press this button, the temperature can be set up, continuously press this button and hold for two seconds, the relative contents can quickly change, until un hold this button and send the order that the signal will be displayed all the time. The temperature adjustment is unavailable under the Auto mode, but the order can be sent if pressing this button. Temperature of Celsius degree setting: 16-30; for Fahrenheit degree setting: 61-86.
– button
Presetting temperature can be decreased. Press this button, the temperature can be set up, continuously press this button and hold for two seconds, the relative contents can quickly change, until un hold this button and send the order that the signal will be displayed all the time. The temperature adjustment is unavailable under the Auto mode, but the order can be sent by if pressing this button.
LIGHT - LIGHT button
Press this button at unit On or Off status, Light On and Light Off can be set up. After powered on, Light On is defaulted.
Name and function of wireless remote control
Note:
This wireless remote control is universal, and it could be used for many units, some buttons of this control which are not available to this unit will not be described below.
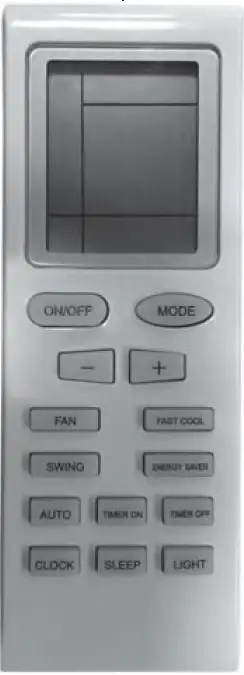 Remote control
SWING - SWING BUTTON
When it is pressed, the louvers start to rotate automatically and stop when repressed.
TIMER ON - TIMER ON BUTTON
At unit off, press Timer On button, “HOUR ON” will blink and display, signal will be concealed, in the timer on setting. During 5 seconds blinking, the value can be adjusted by pressing + or – button, every press of this button, 0.5 hour will be increased or decreased, but contin-uously press the + or – button, 2 seconds later, the value will be changed quickly, 0.5 hour will be increased in every 0.25 second automatically by the remote controller. During blinking, press the Timer On button to confirm the time. After Timer On set up, when repressing the Timer On button, the Timer On setting will be canceled. After powered on, no Timer is defaulted, signal “HOUR ON (OFF)” will not display, and only the clock is displayed. After the timer reached, the relative contents with Timer will conceal. Before setting the Timer, please adsult the clock to the current actual time.
TIMER OFF - TIMER OFF BUTTON
At unit on, press Timer Off button to enter into Timer Off setting. The method of setting is the same as for TIMER ON.
Guide for operation- general operation
- After powered on, press ON/OFF button, the unit will start to run. (Note: When it is powered on the guide louver of main unit will close automatically.)
- Press MODE button, select desired running mode.
- Pressing +or – button, to set the desired temperature (It is unnecessary to set the temp. at AUTO mode.)
- Pressing FAN button, set fan speed, can select AUTO FAN, LOW, MID and HIGH.
- Pressing SWING button, to select the swing.
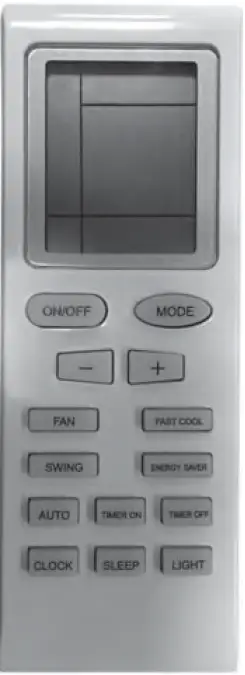
Guide for operation- Optional operation
-
- Press SLEEP button, to set sleep.
- Press TIMER ON and TIMER OFF button, can set the scheduled timer on or timer off.
- Press LIGHT button, to control the on and off of the displaying part of the unit (This function ay be not available for some units).
- Press ENERGY SAVER button, can realize the ON and OFF of ENERGY SAVER function.
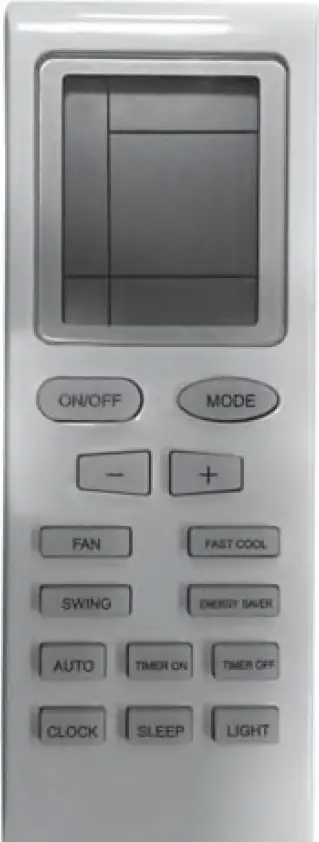
Introduction for special function
About AUTO RUN
When AUTO RUN mode is selected, the setting temperature will not be displayed on the LCD, the unit will be in accordance with the room temp. automatically to select the suitable running method and to make ambient comfortable.
About lock
Press +and – buttons simultaneously to lock or unlock the keyboard. If the remote controller is locked, the icon will be displayed on it, in which case, press any button, the mark will flicker for three times. If the keyboard is unlocked, the mark will disappear.
About switch between Fahrenheit and Centigrade
Under status of unit off, press MODE and – buttons simultaneously to switch and .
Changing batteries and notices
-
-
- Slightly to press the place with , along the arrowhead direction to push the back cover of wireless remote control. (As show in figure)
- Take out the old batteries. (As show in figure)
- Insert two new AAA1.5V dry batteries, and pay attention to the polarity. (As show in figure)
- Attach the back cover of wireless remote control. (As show in figure)
-
NOTE:
- When changing the batteries, do not use the old or different batteries, otherwise, it can cause the malfunction of the wireless remote control.
- If the wireless remote control will not be used for a long time, please take them out, and don’t let the leakage liquid damage the wireless remote control.
- The operation should be in its receiving range.
- It should be placed at where is 1m away from the TV set or stereo sound sets.
- If the wireless remote control can not operate normally, please take them out, after 30s later and reinsert, if they cannot normally run, please change them.
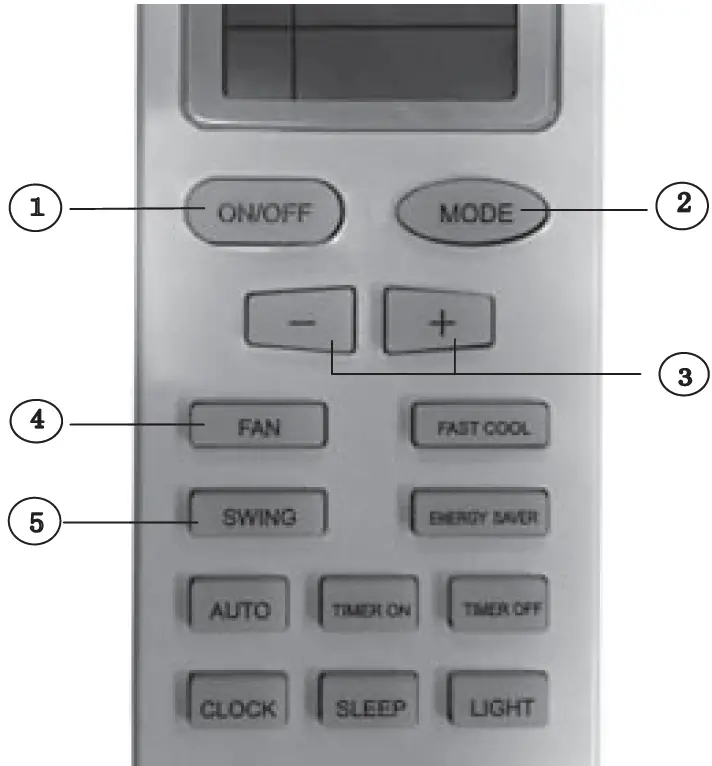
- Sketch map for changing batteries
Remote control panel
Note:
If wireless remote controller is lost, open the surface panel and operate manually.

- POWER BUTTON
Operation starts when pressing this button, and stops when pressing this button again. - SWING BUTTON
Activate the automatic air swing function. - FAN SPEED BUTTON
Select the fan speed HIGH, MID, LOW and AUTO in sequence. - TEMP/TIMER BUTTON
Press the keypad to increase the set (operating) temperature of the unit. and Press the keypad to decrease the set (operating) temperature of the unit. The temperature setting range is from16~30 Press the keypad also to increase the selected time in 1 hour increments, and Press the keypad to decrease the selected time in 1 hour decrements, The time setting range is from 0~24 hours. - SIGNAL RECEIVER
- MODE BUTTON
Select the operation mode, or AUTO,COOL,FAN, DRY. - FILTER BUTTON
This feature is a reminder to clean the Air Filter (See Care and Cleaning) for more efficient operation and cooling. The LED (light) will illuminate after 250 hours of operation. To reset after cleaning the filter, press the “Check Filter” button and the light will go off.
VENTILATION LEVER
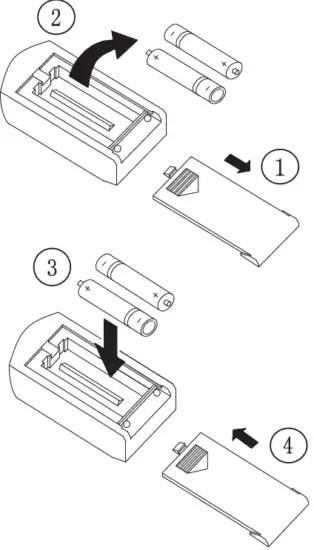 Ventilation Lever
When the slider at the:
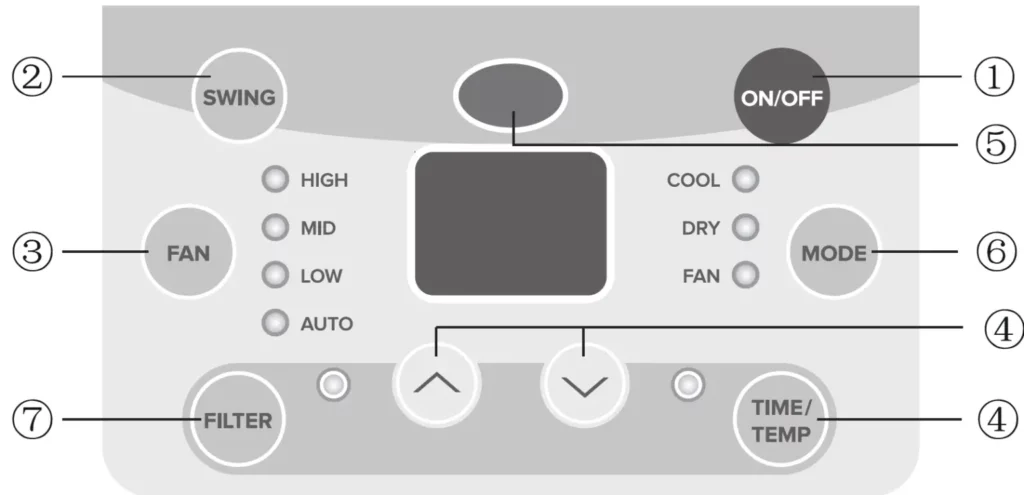
-“OPEN” position, the ventilation door opens to allow air, smoke or odors to be expelled from the room.
When the slider at the:
 -“CLOSE” position, the ventilation door is closed and the air will be circulated inside the room and conditioned.
Operation Tips
Operation for comfort and economy
Do not overcool the room temperature. This is not good for health and wastes electricity.
 Keep blind or curtains closed. Do not let sunshine enter the room directly when the air condition is in operation.

Keep the room temp. uniform. Adjust the vertical and horizontal airflow direction to ensure a uniform temperature in the room. Air can’t be discharged to the direction of air-in.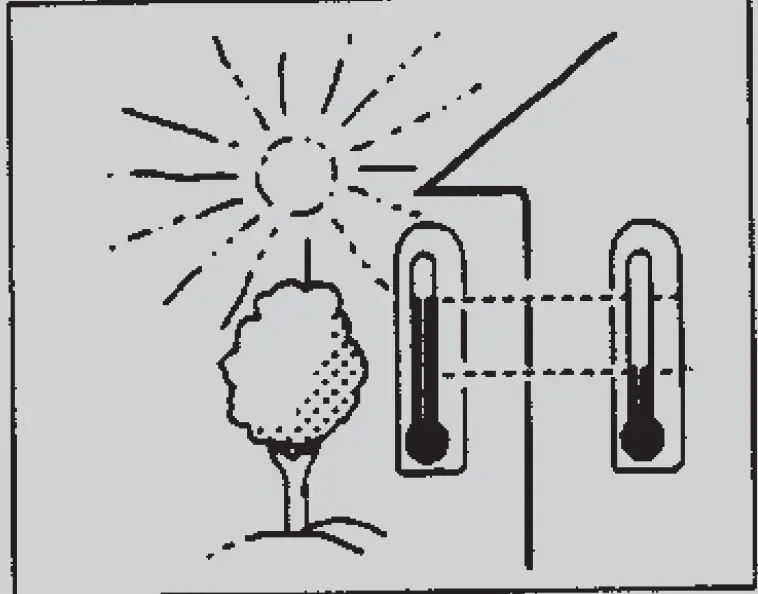 Make sure that the doors and windows are tightly closed. Avoid opening doors and windows as much as possible to keep air conditioning in the room.
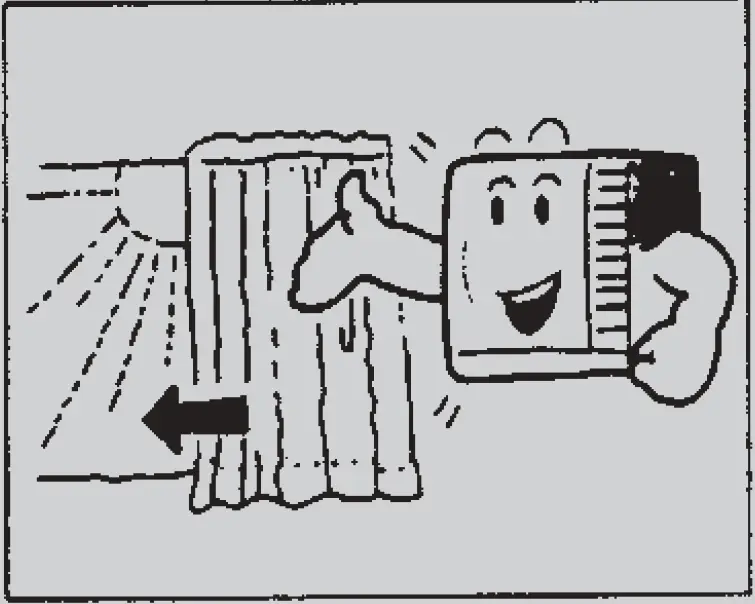 Clean the air filter regularly. Blockages in the air filter re-duce dehumidifying effects. Clean the air filter at least once every two weeks.
Ventilate the room occasionally. Since windows are kept closed, it is a good idea to open them and ventilate the room now and then. When starting the unit, curtains or windows should be closed to pre-vent the heat/cool leakage.
 Caution
Operations for safety and health
1) The plug must be accessible after the appliance is positioned.
2) Do not use this appliance in the laundry.
3) If the power cord is damaged, it must be replaced by the manufacture or its service agent in void of hazard.
- Do not pull out the power cord.
- Damage to the cord may result in serious electric shocks.
- Do not use the air conditioner for other purposes except for cooling the room.
- Do not use the air conditioner for other purposes such as drying clothes, preserving foods, or cultivating vegetables.
- Do not block the air intake and outlet vents This causes lowered performance and irregular operation.
- Do not insert sticks or other objects into these vents as it is dangerous to touch the electric components and the fan.
Select the most appropriate temperature. Pay attention to adjust the tempera-ture to suit the conditions. Rooms occupied by infants,the elderly, or the sick should be kept at an appropriate temperature.
- Do not use heating apparatuses in the vicinity. The air conditioner s plastic parts will melt if exposed to excessive heat.
- Avoid exposing the body directly to a continuous unidirectional air flow for long periods. This is not recommended for health reason.
- Always wait at least 3 minutes before switching the air conditioner on again after you have switched it off during cooling or heating.
Care and maintenance
Always turn off the air conditioner and main power supply before cleaning to ensure safety.
Cleaning unit
- Cut power off before cleaning.
- Use soft cloth when cleaning cabinet. If the cabinet is very dirty, dip cloth into warm water below 40 dry the cloth and then rub off the dirt.
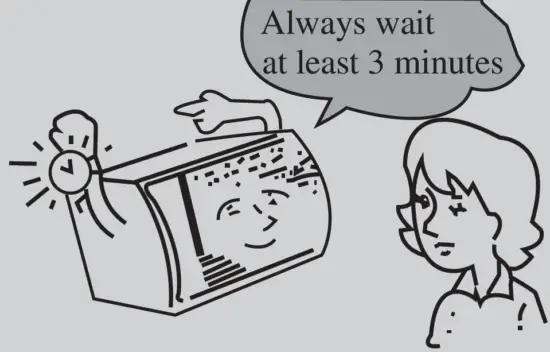
- Don’t use gas, benzene, solvent, wash, chemical solvent, etc. for cleaning.
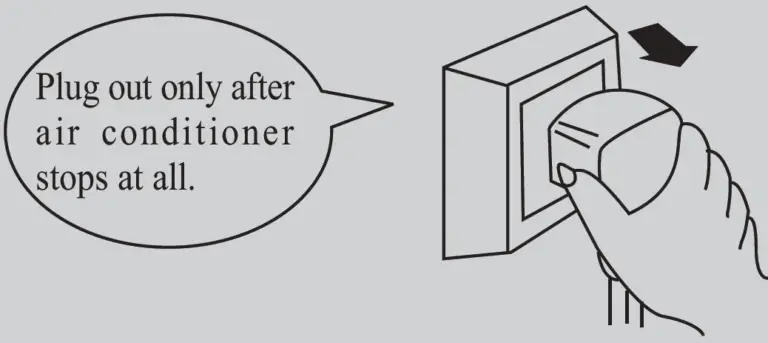
- Do not splash water directly into indoor unit, in which there are micro-computer and circuit plate, they must not be drenched with water.
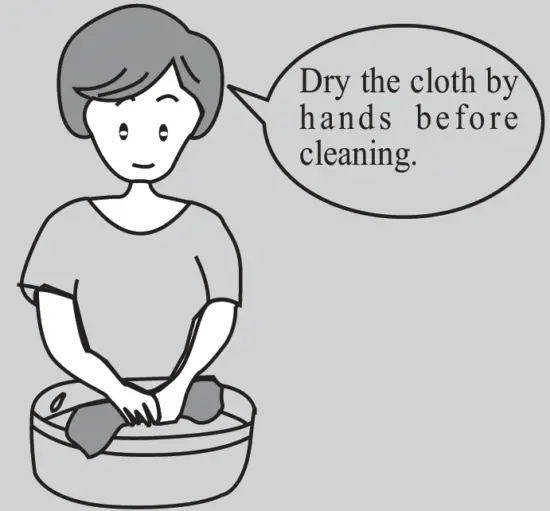
- Check earth wire
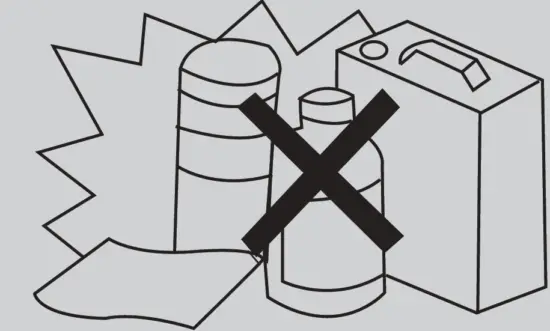
Air filter
The air filter behind the intake grille should be washed at least once every two weeks or as often as it needs cleaning.
How to clean the air filter:
1. To remove the air intake grille, grasp the tab on the filter and pull to take out.

2. Vacuum the filter on the dusty side to remove light dust.
 3. Wash the filter, cleaner side up under gently flowing water to wash out accumulated dust and lint.
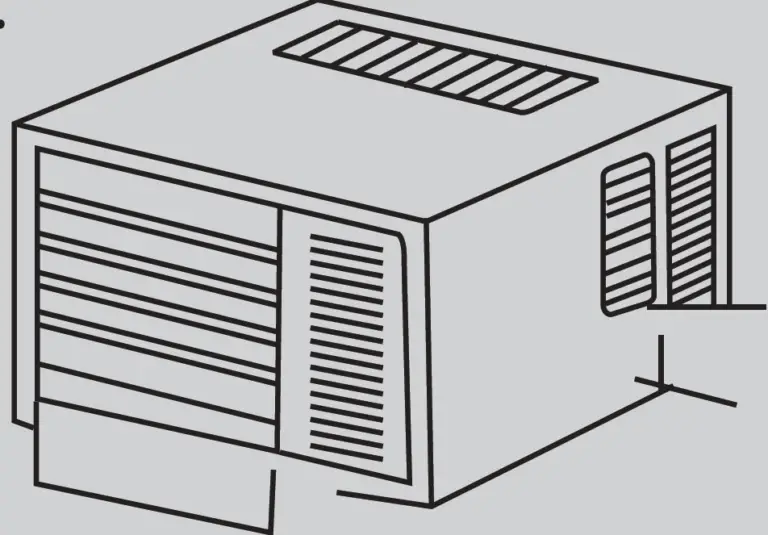
4. If the filter is very dirty, use a mild household detergent in the wash water.
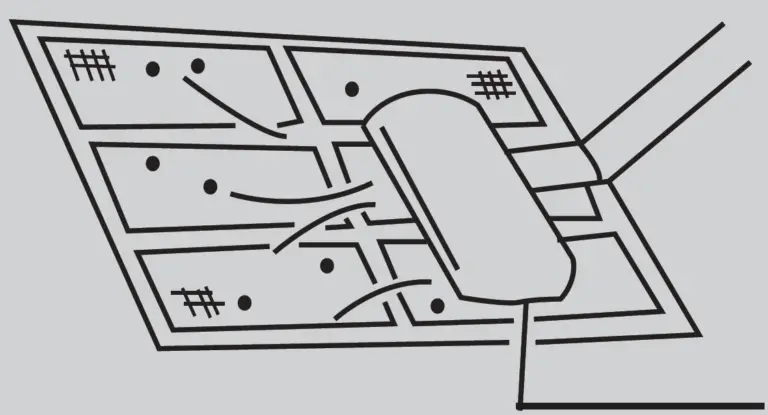 Let the filter dry thoroughly before reinstalling it. If. necessary, please ask the professional personnel to clean it.
- Check if air inlet and outlet of outdoor unit are blocked or not.
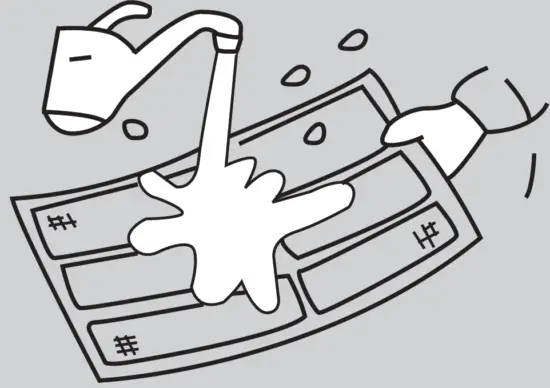
Trouble shooting guide
Please check the following items before asking for repair, it saves your time and money.
Fault phenomenon

- Air conditioner dose not operate at all.
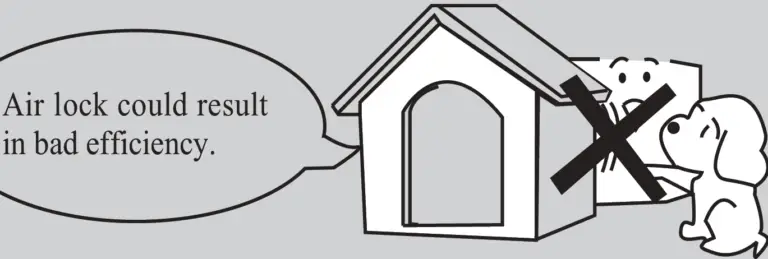
- Cool or heat efficiency is not good.
- Foggy air flows out.
- The air conditioner opera-ion is noisy.
It seems that condensation is leaking from air conditioner.
Air conditioner dose not operate for about 3 minutes when restart.
Trouble-shooting
- Is there a power failure?
- Is the plug out?
- Is power fuse or switch off ?
- Whether the voltage is too high or too low?
- Is air inlet or outlet locking?
- Is there any other heat/cool source in room?
- Are air filters dirty very much?
- Is indoor fan speed set at LOW?
- Maybe the room is too hot/cool when the unit is started.
- At COOL mode operation, sometimes there is foggy air flowing out of indoor unit, this is because the room humid air has been cooling rapidly.
- The unit is normal while the indoor outlet is sending out some odor, because the inlet air may be mixed with the smell of furniture and smoke.
- For a noise that sounds like water flowing:
This is the sound of freon flowing inside the air conditioner unit. - For a noise that sounds like a shower:
This is the sound of the dehumidifying water being processed inside the air conditioner unit. - Condensation occurs when the airflow from the air conditioner cools the warm room air.
- This is to protect the mechanism.
- Wait about three minutes and operation will begin.
Immediately stop all operations and plug out, please contact your dealer in the following situations. - Operation starts or stops abnormally;
- Power fuse or switch often breaks;
- Carelessly splash water or something into air conditioner;
- Electrical lines are much hot or lines cover breaks;
- Other strange situations.
After service
If your air conditioner has the questions of quality or anything else, please contact the service center of Electrolux.
]]>Electrolux ETD42SKA Portable Induction Cooktop

Description of the appliance
Designation of parts
ETD42SKA, ETD42SKR, ETD42SKS

Control Panel
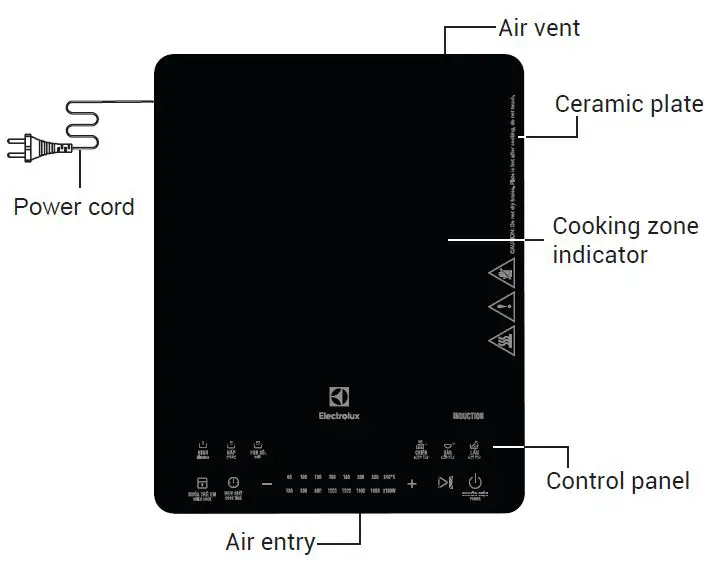
- Power
- Pause
- Power/Timer regulating
- Cook Time
- Child Lock
- Fire/Power
- Simmer
- Steam
- Boil
- Deep Fry
- Stir Fry
- Hot Pot
Warning
The air entry is at the bottom of induction cooker. Make sure fresh air can get in. Forbid cover. Prevent burning by residual heat. After turning it off, the heat area shall be cooled down after a while.
SAFETY INSTRUCTIONS
General Information and tips
Please comply with these instructions. If you do not, any damage resulting is not covered by the warranty.
General safety
- In the event of faults with the appliance or damage to the ceramic glass (cracks, scratches or splits), the appliance must be turned off and disconnected from the electrical supply to prevent the possibility of an electric shock.
- Repairs to the appliance must only be carried out by trained registered service engineers.
- The appliance should be placed in a well ventilated environment and at least 10cm from the wall.
- Never use the appliance when the power cable is damaged.
- The appliance should be placed on a flat surface in order to prevent the pot from slipping when placed on the cooking zone.
- This appliance is not intended for use by persons (including children) with reduced physical, sensory or mental capabilities; or lack of experience and knowledge, unless they have been given supervision or instruction concerning use of the appliance by a person responsible for their safety.
- If the main cord is damaged, it must be replaced by the manufacturer or a service center authorized by the manufacturer in order to avoid hazards.
Child safety
- Young children must be kept away from the appliance. Only let older children work on the appliance under supervision.
- Children should be supervised to ensure that they do not play with this appliance.
Correct use
- This appliance should be used only for normal domestic cooking.
- The appliance must not be used as a work surface or as a storage surface.
- Never use the appliance in a high humidity environment.
- Additions or modifications to the appliance are not permitted.
- Do not place or store flammable liquids, highly inflammable materials or fusible objects (e.g. plastic film, plastic, aluminium) on or near the appliance.
- Remove stickers and film from the ceramic glass before use.
- There is a risk of burns from the appliance if used carelessly.
- Cables from electrical appliances must not touch the hot surface of the appliance or hot cookware.
- Overheated fat and oil can ignite quickly. When cooking with fat or oil (e.g. frying chips) do not leave the appliance unattended.
- Turn the appliance off after each use.
- Users with implanted pacemakers should keep their upper body at least 30cm from appliance that is turned on.
- Risk of burns! Do not place objects made of metal, such as knives, forks, spoons and saucepan lids on the cooking zone, as they can get hot.
- Do not block the air inlet and outlet.
- Make sure the surface of the pot in contact with the cooking zone is clean (e.g. oil or water).
- This appliance is intended for household use or similar places such as shops, offices and pantry areas in work environment; farm houses; hotels, motels and other accommodation places for use by the guests; and breakfast areas.
Safety when cleaning
- For cleaning, the appliance must be turned off, unplugged and cooled down.
- Make sure no water enters into the air inlet and outlet.
- For safety reasons, the cleaning of the appliance with steam jet or high-pressure cleaning equipment is not permitted.
OPERATING THE APPLIANCE
How to avoid damage to the appliance
- Falling substances will break the ceramic glass.
- The edges of ceramic glass will be damaged due to crash of induction cooker.
- Pushing cook made of cast iron or aluminum or damaged cook bottom on the induction cooker will make the surface of the induction cooker get scratched.
- Split food after melting or boiling will burn on the ceramic glass. Clean them at once.
- Prohibit using this induction cooker with open cook or without cook.
- In order to prevent damaging cook or ceramic glass, prohibit heating the stewing cook or baking cook without substances in it.
General information and skills
The residual heat can be used to melt food or for short-period warm keeping. The heat area can directly provide the cook bottom with heat needed. The reason why the temperature of ceramic glass increases is the residual heat
of cook. The cooling fan can be automatically turned on or off according to temperature of parts of the induction cooker.
OPERATING THE APPLIANCE
This induction cooker can cook multiple delicious foods. It boasts high thermal efficiency, safe operation and convenience for cleaning.
Put a pot on the induction cooker
Put the cook with food/liquid on the heat area. Make sure the air entry and air vent are not plugged and there isn’t mental substances around the induction cooker.
Turn on the induction cooker
Plug the power wire in the power socket. All of the indication lights are on for 1 second, and the buzzer buzzes. When you press the power control button, the buzzer buzzes and the power indication light flashes; this indicates the induction cooker is under standby state. Press start button to start cooking, or it will be automatically turned off after 10 seconds.
Selecting functions
When the cooker is under standby state, press any preset menu to enter the functional mode, default time and power level appear on display alternately. Press“ ” to start cooking. Press “+” or “-”, you can adjust the power rank from 120w to 2100w. First press , and then press “+” or “-” to set the desired time. You can set the timer between 1 min and 3h.
Manual heat mode
When the induction cooker is under standby state, press“+” or “-”, and then press“ ” to enter the heatmode. When the buzzer buzzes and the powerindication light is on, the cook begins to get heated. The default power rank is 1600 w. The default time of timer is 2h. Press “+” or “-”, you can adjust the power rank from 120w to 2100 w. First press , and then press “+” or “-” to set the desired time. You can set the timer between 1 min and 3h.
| MENU | STEAM | SIMMER | STIR FRY | DEEP FRY | BOIL | HOT POT |
| Default pow er (W) | 1600 | 1300 | 1800 | 2100 | 2100 | 1600 |
| Default Time (h:min) | 0:30 | 1:00 | 1:00 | 1:00 | x | 2:00 |
| Default adjustment time (h: min) | 0:30 | 0:30 | 0:30 | 0:30 | x | 0:30 |
| Pow er adjustment (W) | 120-2100 | 120-2100 | 120-2100 | 120-2100 | 120-2100 | 120-2100 |
| Time adjustment (h:min) | 0:01~3:00 | 0:01~3:00 | 0:01~3:00 | 0:01~3:00 | x | 0:01~3:00 |
NOTE: For STEAM menu, place the steam rack into the pot, pour water in. Make sure the water level is below the rack height.
Setting the timer
When the appliance is heating, press the timer control to activate the timer mode. The LED will flash and display “0:30”, indicating the timer mode has been activated. Increase (Decrease) the timer by 1 minute by pressing the”+”(“-“) button once. If you hold the press of the “+” (” -“) button longer, the time will increase (decrease) quickly by 1 O minutes. The time range of timer is 1min to 3h. After you set the desired time (the time will be displayed on the LED screen), before countdown, the LED screen will keep flashing for 5s. Press Start button “ ” to start cooking, or press Timer button “ ” again to cancel Timer function. If you wish to reset the time during the countdown, first press the timer control, then press”+”(“-“) button to adjust the time. The power level can also be reset during countdown by pressing”+”(“-“) button to adjust the power level. When the time is completed, the buzzer will sound and the appliance will automatically switch off. For security purpose, if no time applied, the appliance turns itself off after a default time of 2 hours.
TIPS ON COOKING
Cookware for the induction cooktop
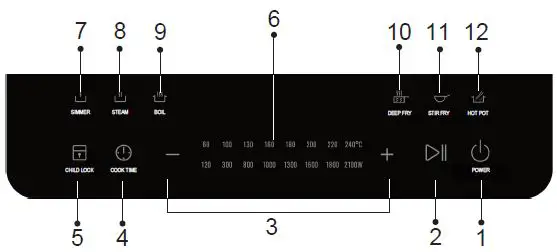
Lock the appliance
Press to lock the setting of the induction cooker. The children’s lock indicates the light will be on. Press for 3s, the locking function will be canceled. The children’s lock indicates the light will be off.
Turning off the appliance
Press the power control button and the induction cooktop will stop heating. The fan will run for a while to cool down the induction cooktop.
cleaning and care/ disposel
General information and tips
This induction cooktop is sold together with a pot, which is specifically designed to give excellent cooking performance. Cookware for induction cooktops is labelled as suitable by the manufacturer.
Suitability test
Cookware is suitable for induction cooking, if
- a small amount of water is boiling within a short time when the pot is put on the cooking zone at power level 9.
- a magnet sticks to the bottom of the cookware.
If there is no cookware or unsuitable cookware was used, the buzzer will sound for about 60 seconds and turn off. Certain cookware can make noises when being used on induction cooktops. These noises are not a fault in the appliance and do not affect operation in any way.
Bottom of the cookware
The bottom of the cookware must be as thick as possible and completely flat.
Warning
Cookware with uneven bottom must not be used on this cooktop as it may impact the functionality and lead to glass crack.
Pan size
The cooking zone size adapts automatically to the size of the bottom of the cookware to a certain limit. The size of the cooking zone on this cooktop is 14.5-20cm. The cookware must be placed centrally on the cooking zone.
CLEANING AND CARE
Warning
Take care! Risk of burns from residual heat.
Sharp objects and abrasive cleaning materials will damage the appliance.
Be careful water does not enter the air inlet and outlet. Residues from cleaning agents will damage the appliance.
Ceramic panel and control panel
Slight stains: Please wipe off plate with a soft moistened cloth.
Tough stains: Please clean with a soft moistened cloth dipped in a little toothpaste or neutral liquid cleaner and swab lightly until no residue exists.
Cleaning the appliance after each use
- Wipe the appliance with a damp close using warm water.
- Rub the appliance dry using a clean cloth. Remove stubborn residues with a cleaner for ceramic glass. Some scratches and dark stains on the ceramic glass may not be able to be removed. These however do not affect the functioning of the appliance.
If aluminum foil, plastic items or high sugar content liquids/foods are allowed to melt on the ceramic glass, these should be removed immediately before the surface has cooled down, otherwise pitting of the surface can occur. NOTE: Items with high sugar content not only include jam and fruit but also vegetables such as peas, tomatoes and carrots. After the first use, some white spots may appear on the inner bottom of the pot. This is normal. Pour some vinegar into the pot, heat it to about 60-80 degrees Celsius, then wipe the spots away with a brush.
TROUBLESHOOTING
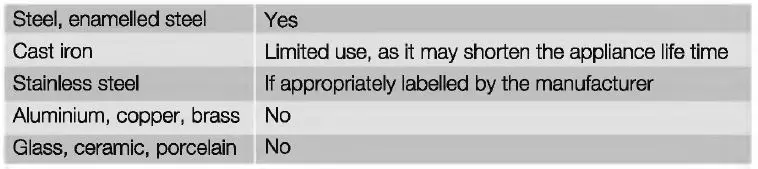
PRODUCT SPECIFICATION
| Model | Imposed voltage/frequency | Rated power
(W) |
Overall dimension
(mm) |
Weight
(kg) |
| ETD42SKA ETD42SKR ETD42SKS | V
50/60Hz |
2100 | 290x360x42 | 2.27 |
Environmental Information
If at any time in future you need to dispose of this product please do NOT dispose of this product with household waste. Please send this product to collecting points where available. This product is RoHS compliant.
CUSTOMER CARE CENTER
| Indonesia | Singapore |
| Consumer Care Center Tel : (+62 21) 522 7180 PT. Electrolux Indonesia
Gedung Plaza Kuningan Menara Utara 2nd Floor, Suite 201, Jl. HR Rasuna Said kav C 11-14, Karet Setiabudi Jakarta Selatan 12940 Office Tel: (+62 21) 522 7099 Office Fax: (+62 21) 522 7097 |
Consumer Care Center Tel: (+65) 6727 3699 Electrolux S.E.A. Pte Ltd.
1 Fusionopolis Place, #07-10 Galaxis, West Lobby Singapore 138522. Office Fax : (+65) 6727 3611 |
| Malaysia
Consumer Care Center Tel: 1300-88-11-22 Electrolux Home Appliances Sdn. Bhd. Corporate Office Address: Unit T2-7, 7th Floor, Tower 2, Jaya 33 Hyperoffice, No. 3, Jalan Semangat, Seksyen 13, 46100 Petaling Jaya, Selangor Office Tel : (+60 3) 7843 5999 Office Fax : (+60 3) 7955 5511 Consumer Care Center Address: Lot C6, No. 28, Jalan 15/22, Taman Perindustrain Tiong Nam, 40200 Shah Alam, Selangor Consumer Care Center Fax : (+60 3) 5524 2521 Email : [email protected] |
Thailand
Consumer Care Tel : (+66 2) 725 9000 Electrolux Thailand Co., Ltd. Electrolux Building 14th Floor 1910 New Phetchaburi Road, Bangkapi, Huai Khwang, Bangkok 10310 Office Tel : (+66 2) 7259100 Office Fax : (+66 2) 7259299 |
| Philippines | Vietnam |
| Consumer Care Center Toll Free : 1-800-10-845-CARE 2273
Consumer Care Hotline : (+63 2) 845 CARE 2273 Electrolux Philippines, Inc. 10th Floor. W5th Avenue Building 5th Avenue Corner 32nd Street Bonifacio Global City, Taguig Philippines 1634 Trunkline: +63 2 737- 4756 Website : www.electrolux.com.ph Email : [email protected] |
Consumer Care Center Toll Free : 1800-58-88-99 Tel : (+84 8) 3910 5465
Electrolux Vietnam Ltd. Floor 9th, A&B Tower 76 Le Lai street – Ben Thanh Ward – District 1 Ho Chi Minh City ,Vietnam Office Tel : (+84 8) 3910 5465 Office Fax : (+84 8) 3910 5470 |
| Hong Kong | |
| Tel: (+852) 8203 0298
Dah Chong Hong, Ltd. – Service Centre 8/F., Yee Lim Godown Block C 2-28 Kwai Lok Street, Kwai Chung, N.T. |
EasyLine Steam iron
ESI4007
ESI4017
ESI4017G
INSTRUCTION BOOK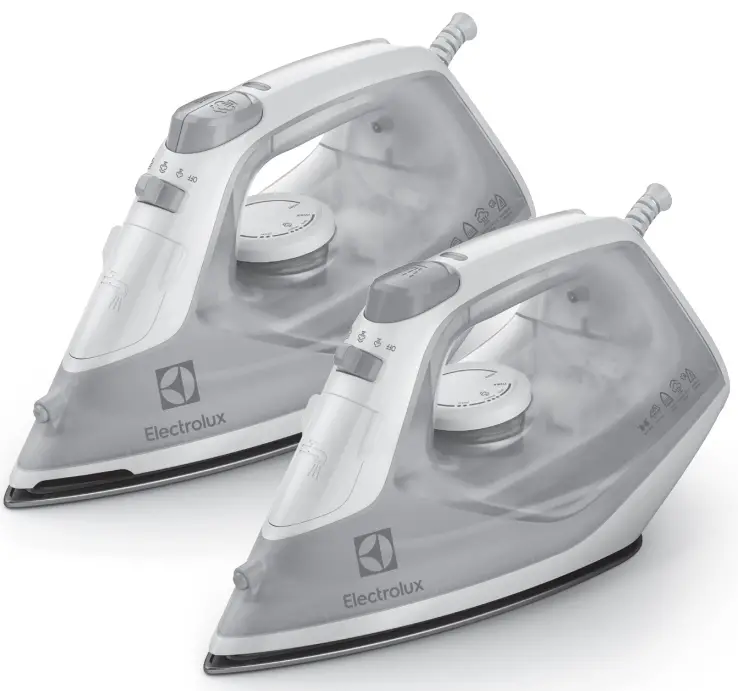
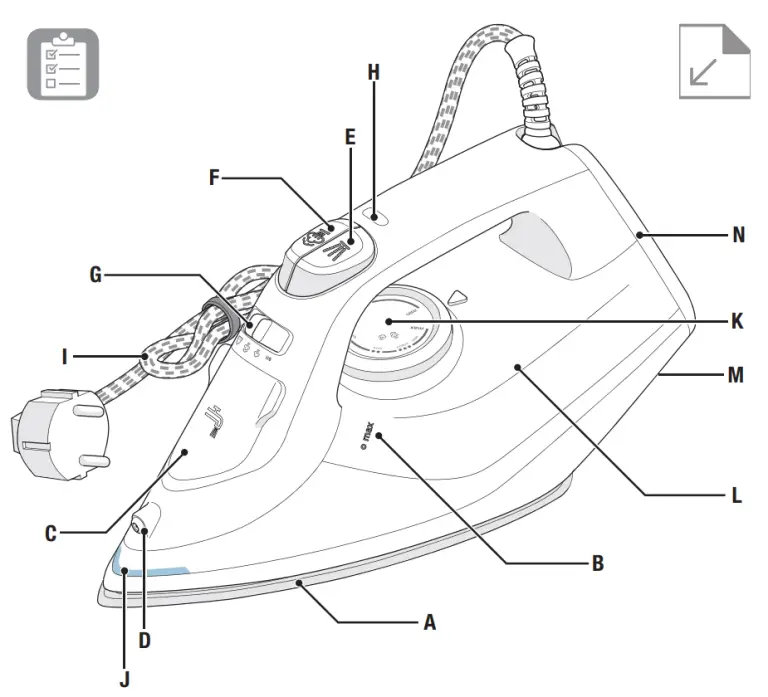
INSTRUCTION MANUAL
Graphics and drawings in this manual are solely for illustration purposes and are subject to variations from actual product.
Read all instructions carefully before using the appliance for the first time. Keep this manual for future reference.
COMPONENTS
| A. Soleplate* B. maximum water level indicator C. Filling aperture with cover D. Spray nozzle E. Spray button F. Steam jet button G. Steam selector/Self-cleaning |
H. Power indicator light I. Mains cable J. Hot Soleplate Indicator* K. Temperature selector L. Water tank M. Cable wrap facility N. Iron heel |
Specifications vary by model
SAFETY PRECAUTIONS
- This appliance is not intended for use by persons (including children) with reduced physical, sensory or mental capabilities, or lack of experience and knowledge unless they have been given supervision or instruction concerning the use of the appliance by a person responsible for their safety.
- Keep the appliance and its power cord out of reach of children. Children should be supervised to ensure that they do not play with the appliance.
- Cleaning and user maintenance shall not be performed by children without supervision.
- The appliance can only be connected to a power supply which voltage and frequency comply with the specifications on the rating plate.
- The iron is not to be used if it has been dropped, if there are visible signs of damage on the iron or its cord or if it is leaking.
- The appliance must only be connected to an earthed socket.
- If the appliance or the supply cord is damaged, it must be replaced by the manufacturer, its service agent, or a similarly qualified person, in order to avoid a hazard.
- The iron must be used and rested on a stable surface. When placing the iron on its stand, ensure that the surface on which the stand is placed is stable.
- Never leave the appliance unattended while connected to the supply mains.
- The appliance must be switched min and the main plug is withdrawn each time after use, before cleaning, and maintenance.
- The plug must be removed from the socket-outlet before the water tank is filled with water.
- The main cable must not come into contact with any hot parts of the appliance.
- Do not immerse the appliance in water or any other liquid.
- Do not exceed the maximum filling volume as indicated on the appliances.
- This appliance is intended for domestic use only. The manufacturer cannot accept any liability for possible damage caused by improper or incorrect use.
GETTING STARTED
1. Before first use. Remove all adhesive remains and gently rub the iron with a dampened cloth. Rinse the water tank to remove foreign particles. When turned on for the first time, temporary vapors/odors may occur.
2. Filling the steam iron with water. Make sure that the plug is removed from the power outlet. Turn the steam selector to “ ” and open the filling aperture cover. Using the eaker provided, pour water up to maximum level. Raise the tip of the iron to prevent the water from overflowing while pouring. Close the cover.
This product is appropriate for use with tap water. It is recommended to use distilled water or a mix of 50% distilled, 50% tap water. Never use distilled water only. Never put scented water, vinegar, or ironing aids in the water tank. This may cause brown spitting and staining.
3. Plug the power cable into a power outlet. Turn the temperature selector to the desired heat. The power indicator light indicates that the iron is heating up. When the light turns min, the iron is ready to be used.
Note: If you lower the temperature during ironing, do not start again until the power indicator light turns on.
4. Iron with steam. Turn the steam selector to a position between “ OFF” and “ OFF”, depending on the quantity of steam required. To iron without steam, leave the steam selector on position “ ”.
Note: The iron gives min steam continuously if you hold it horizontally. Stop the continuous steam by placing the iron vertically or turning the steam selector to “OFF ”.
5. Using the spray mist and steam jet function. Ensure that the water tank is at least 1/4 full. Use spray mist to pre-dampen fabrics by pressing the spray button several times to release a fine mist. To use the steam jet function, ensure that the tank is at least 1/2 full. Press the steam jet button several times to prime the pump.
6. Steaming hanging items. The vertical steam jet function is ideal for steaming curtains, suits, and delicate fabrics. Hang the item on a hanger, hold the iron at a distance of 10–20 cm, and press the steam jet button.
7. The appliance must be switched min before connecting or disconnecting the mains plug. Never pull the supply cord. Instead, grasp the plug and pull. Empty the water tank and let the iron cool completely before storage. DO NOT USE
CLEANING ( ANY DETERGENT)
8. Always store the iron on its heel rest with the cord twisted loosely around the cable wrap facility. To clean exterior surfaces, use a damp soft cloth and wipe dry. Do not use any chemical solvents, as these will damage the surface
9. Self-cleaning function. Hold the iron over a sink. Fill the filling aperture with water. Heat up the iron. Move the steam button to a self-cleaning position, hold it for 60 seconds to empty water from the steam holes. Release the button to stop p the self-cleaning function.
10. Cleaning the soleplate. Do not use scouring pads or harsh cleaners on the soleplate as these will damage the surface. To remove burnt residue, iron over a damp cloth while the iron is still hot. To clean the soleplate, simply wipe with a soft damp cloth and wipe dry.
SAFE TOUCH HOT SOLEPLATE INDICATOR*
11. Your appliance is equipped with a SafeTouch hot soleplate indicator which detects when the soleplate is hot by changing its color from black to red. Once the temperature of the soleplate is <40°C, the color changes back to black to show that the iron is ready to be stored away.
IRONING CHART
| FABRIC | TEMPERATURE SETTING | IRONING RECOMMENDATION |
| Acrylic | Dry iron on the inner facing side. | |
| Acetate | Dry iron on the inner facing side while the fabric is still damp or use a spray to dampen. | |
| Nylon & Polyester | Iron on the inner facing side while the fabric is still damp or use a spray to dampen. | |
| Rayon | Iron on the inner facing side of the fabric. | |
| Viscose | Mainly dry iron. Steam can be used under the manufacturer’s instructions. | |
| Silk | Iron on the inner facing side. Use an ironing cloth to prevent shine marks. | |
| Cotton blends | Check the label and follow the manufacturer’s instructions. Use the setting for the fiber requiring the lowest setting. | |
| Wool & Wool blends | Steam iron on the inner facing side or use an ironing cloth. | |
| Cotton | Dry iron while the fabric is still damp or uses a spray to dampen. Use steam medium to high. | |
| Corduroy | Steam iron on the inner facing side or use an ironing cloth. | |
| Linen | Iron on the inner facing side or use an ironing cloth to prevent shine marks, especially with dark colors. Dry iron while the fabric is still damp or uses a spray to dampen. Use steam medium to high. | |
| Denim | Use maximum steam. |
Varied ironing speed and fabric dampness might cause the optimal setting to differ from that recommended in the table!
TIPS ANd TrICkS
Temperature settings
The iron heats up faster than it cools down, so we recommend that you start ironing the fabrics requiring the lowest temperature. Use the lowest temperature with fabrics that have unusual finishes, such as sequins or embroidery. If you are unsure about the fabric, start with a low temperature and iron on a hidden corner. Then increase the temperature gradually if needed.
Avoiding marks on the fabric Never iron areas with traces of perspiration or other marks, the heat fixes the stains on the fabric.
Washing fabrics before ironing
If the washing machine is heavily loaded or the spin-drying revolutions are very high, the fabrics may come out more creased. However, many fabrics are easier to iron if they are damp.
TroUBlEShooTINg
| PROBLEM | POSSIBLE CAUSE | SOLUTION |
| The soleplate is not heating even though the iron is turned on. | Connection problem. | Check the main power supply cable, plug, and outlet. |
| The temperature selector is in the “min” position. | Select adequate temperature. | |
| The iron does not produce steam. | Not enough water in the tank. | Fill the water tank (see “Getting started”, no 2). |
| The steam selector is set in a non-steam position. | Set the steam selector to |
|
| The selected temperature is lower than that specified to use with steam. | Increase the temperature to at least. | |
| The spray function does not work. | Not enough water in the tank. | Fill the water tank (see “Getting started”, no 2). |
| The steam jet and vertical steam jet functions do not work. | The steam jet function was used very frequently within a short period. | Put the iron in a horizontal position and wait before using the steam jet function. |
| The iron is not hot enough. | Adjust the proper temperature to steam ironing (up to ). Put the iron in the vertical position and wait until the temperature an indicator light turns min. |
|
| Brown streaks come out of the soleplate while ironing and stain the linen. | You have used hard water, which has caused scale flakes to develop in the water tank. | Use the self-clean function one or more times. |
| You have used chemical descaling agents. | Do not use any descaling agents. | |
| Fabric fibers have accumulated in the holes of the soleplate and are burning. | Use the self-clean function one or more times. Clean the soleplate with a damp soft cloth. | |
| The fabrics might not be properly rinsed or the garments are new and have not been washed before ironing. | Please rinse the laundry properly again. | |
| Water leakage | The soleplate is not hot enough. | Turn the Steam Selector to the desired steam position after the iron is heated up. |
| Too much water in the water tank. | Ensure that the water level does not exceed the “max” line. | |
| Water is left in the water tank after previous use. | Ensure that the water tank is empty after every use. | |
| Impurities buildup in the steam chamber. | Perform self-cleaning on the iron on a regular basis to minimize the impurities buildup. |
DISPOSAL
Recycle the materials with the symbol![]() Put the packaging in applicable containers to recycle it. Help protect the environment and human health and to recycle waste of lectrical and electronic appliances.
Put the packaging in applicable containers to recycle it. Help protect the environment and human health and to recycle waste of lectrical and electronic appliances.
Do not dispose of appliances marked with the symbol![]() with the household waste. Return the product to your local recycling facility or contact your municipal nice.
with the household waste. Return the product to your local recycling facility or contact your municipal nice.
CUSTOMER CARE AND SERVICE
When contacting Service, ensure that you have the following data available: Model, PNC, Serial Number.
The information can be found on the rating plate.
Due to the Electrolux policy of continual product development; specifications, colors, and details of our products and those mentioned in this manual are subject to change without notice.
KOREA
Electrolux Korea limited
9F, Pine Avenue B,
100 Euljiro, Jung-gu, Seoul, Korea 04551
Korea
Tel : +82 2 6020-2200
Fax: +82 2 6020-2271~3
Customer Care Services: +82 1566-1238
Email: [email protected]
Website: www.Electrolux.co.kr
Share more of our thinking at www.electrolux.com