EasyLine Steam iron
ESI4007
ESI4017
ESI4017G
INSTRUCTION BOOK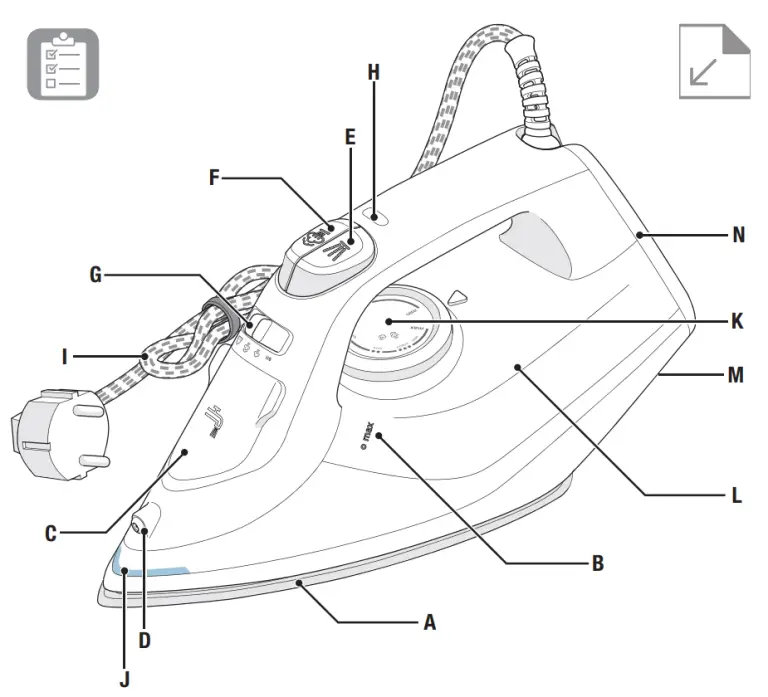
INSTRUCTION MANUAL
Graphics and drawings in this manual are solely for illustration purposes and are subject to variations from actual product.
Read all instructions carefully before using the appliance for the first time. Keep this manual for future reference.
COMPONENTS
| A. Soleplate* B. maximum water level indicator C. Filling aperture with cover D. Spray nozzle E. Spray button F. Steam jet button G. Steam selector/Self-cleaning |
H. Power indicator light I. Mains cable J. Hot Soleplate Indicator* K. Temperature selector L. Water tank M. Cable wrap facility N. Iron heel |
Specifications vary by model
SAFETY PRECAUTIONS
- This appliance is not intended for use by persons (including children) with reduced physical, sensory or mental capabilities, or lack of experience and knowledge unless they have been given supervision or instruction concerning the use of the appliance by a person responsible for their safety.
- Keep the appliance and its power cord out of reach of children. Children should be supervised to ensure that they do not play with the appliance.
- Cleaning and user maintenance shall not be performed by children without supervision.
- The appliance can only be connected to a power supply which voltage and frequency comply with the specifications on the rating plate.
- The iron is not to be used if it has been dropped, if there are visible signs of damage on the iron or its cord or if it is leaking.
- The appliance must only be connected to an earthed socket.
- If the appliance or the supply cord is damaged, it must be replaced by the manufacturer, its service agent, or a similarly qualified person, in order to avoid a hazard.
- The iron must be used and rested on a stable surface. When placing the iron on its stand, ensure that the surface on which the stand is placed is stable.
- Never leave the appliance unattended while connected to the supply mains.
- The appliance must be switched min and the main plug is withdrawn each time after use, before cleaning, and maintenance.
- The plug must be removed from the socket-outlet before the water tank is filled with water.
- The main cable must not come into contact with any hot parts of the appliance.
- Do not immerse the appliance in water or any other liquid.
- Do not exceed the maximum filling volume as indicated on the appliances.
- This appliance is intended for domestic use only. The manufacturer cannot accept any liability for possible damage caused by improper or incorrect use.
GETTING STARTED
1. Before first use. Remove all adhesive remains and gently rub the iron with a dampened cloth. Rinse the water tank to remove foreign particles. When turned on for the first time, temporary vapors/odors may occur.
2. Filling the steam iron with water. Make sure that the plug is removed from the power outlet. Turn the steam selector to “ ” and open the filling aperture cover. Using the eaker provided, pour water up to maximum level. Raise the tip of the iron to prevent the water from overflowing while pouring. Close the cover.
This product is appropriate for use with tap water. It is recommended to use distilled water or a mix of 50% distilled, 50% tap water. Never use distilled water only. Never put scented water, vinegar, or ironing aids in the water tank. This may cause brown spitting and staining.
3. Plug the power cable into a power outlet. Turn the temperature selector to the desired heat. The power indicator light indicates that the iron is heating up. When the light turns min, the iron is ready to be used.
Note: If you lower the temperature during ironing, do not start again until the power indicator light turns on.
4. Iron with steam. Turn the steam selector to a position between “ OFF” and “ OFF”, depending on the quantity of steam required. To iron without steam, leave the steam selector on position “ ”.
Note: The iron gives min steam continuously if you hold it horizontally. Stop the continuous steam by placing the iron vertically or turning the steam selector to “OFF ”.
5. Using the spray mist and steam jet function. Ensure that the water tank is at least 1/4 full. Use spray mist to pre-dampen fabrics by pressing the spray button several times to release a fine mist. To use the steam jet function, ensure that the tank is at least 1/2 full. Press the steam jet button several times to prime the pump.
6. Steaming hanging items. The vertical steam jet function is ideal for steaming curtains, suits, and delicate fabrics. Hang the item on a hanger, hold the iron at a distance of 10–20 cm, and press the steam jet button.
7. The appliance must be switched min before connecting or disconnecting the mains plug. Never pull the supply cord. Instead, grasp the plug and pull. Empty the water tank and let the iron cool completely before storage. DO NOT USE
CLEANING ( ANY DETERGENT)
8. Always store the iron on its heel rest with the cord twisted loosely around the cable wrap facility. To clean exterior surfaces, use a damp soft cloth and wipe dry. Do not use any chemical solvents, as these will damage the surface
9. Self-cleaning function. Hold the iron over a sink. Fill the filling aperture with water. Heat up the iron. Move the steam button to a self-cleaning position, hold it for 60 seconds to empty water from the steam holes. Release the button to stop p the self-cleaning function.
10. Cleaning the soleplate. Do not use scouring pads or harsh cleaners on the soleplate as these will damage the surface. To remove burnt residue, iron over a damp cloth while the iron is still hot. To clean the soleplate, simply wipe with a soft damp cloth and wipe dry.
SAFE TOUCH HOT SOLEPLATE INDICATOR*
11. Your appliance is equipped with a SafeTouch hot soleplate indicator which detects when the soleplate is hot by changing its color from black to red. Once the temperature of the soleplate is <40°C, the color changes back to black to show that the iron is ready to be stored away.
IRONING CHART
| FABRIC | TEMPERATURE SETTING | IRONING RECOMMENDATION |
| Acrylic | Dry iron on the inner facing side. | |
| Acetate | Dry iron on the inner facing side while the fabric is still damp or use a spray to dampen. | |
| Nylon & Polyester | Iron on the inner facing side while the fabric is still damp or use a spray to dampen. | |
| Rayon | Iron on the inner facing side of the fabric. | |
| Viscose | Mainly dry iron. Steam can be used under the manufacturer’s instructions. | |
| Silk | Iron on the inner facing side. Use an ironing cloth to prevent shine marks. | |
| Cotton blends | Check the label and follow the manufacturer’s instructions. Use the setting for the fiber requiring the lowest setting. | |
| Wool & Wool blends | Steam iron on the inner facing side or use an ironing cloth. | |
| Cotton | Dry iron while the fabric is still damp or uses a spray to dampen. Use steam medium to high. | |
| Corduroy | Steam iron on the inner facing side or use an ironing cloth. | |
| Linen | Iron on the inner facing side or use an ironing cloth to prevent shine marks, especially with dark colors. Dry iron while the fabric is still damp or uses a spray to dampen. Use steam medium to high. | |
| Denim | Use maximum steam. |
Varied ironing speed and fabric dampness might cause the optimal setting to differ from that recommended in the table!
TIPS ANd TrICkS
Temperature settings
The iron heats up faster than it cools down, so we recommend that you start ironing the fabrics requiring the lowest temperature. Use the lowest temperature with fabrics that have unusual finishes, such as sequins or embroidery. If you are unsure about the fabric, start with a low temperature and iron on a hidden corner. Then increase the temperature gradually if needed.
Avoiding marks on the fabric Never iron areas with traces of perspiration or other marks, the heat fixes the stains on the fabric.
Washing fabrics before ironing
If the washing machine is heavily loaded or the spin-drying revolutions are very high, the fabrics may come out more creased. However, many fabrics are easier to iron if they are damp.
TroUBlEShooTINg
| PROBLEM | POSSIBLE CAUSE | SOLUTION |
| The soleplate is not heating even though the iron is turned on. | Connection problem. | Check the main power supply cable, plug, and outlet. |
| The temperature selector is in the “min” position. | Select adequate temperature. | |
| The iron does not produce steam. | Not enough water in the tank. | Fill the water tank (see “Getting started”, no 2). |
| The steam selector is set in a non-steam position. | Set the steam selector to |
|
| The selected temperature is lower than that specified to use with steam. | Increase the temperature to at least. | |
| The spray function does not work. | Not enough water in the tank. | Fill the water tank (see “Getting started”, no 2). |
| The steam jet and vertical steam jet functions do not work. | The steam jet function was used very frequently within a short period. | Put the iron in a horizontal position and wait before using the steam jet function. |
| The iron is not hot enough. | Adjust the proper temperature to steam ironing (up to ). Put the iron in the vertical position and wait until the temperature an indicator light turns min. |
|
| Brown streaks come out of the soleplate while ironing and stain the linen. | You have used hard water, which has caused scale flakes to develop in the water tank. | Use the self-clean function one or more times. |
| You have used chemical descaling agents. | Do not use any descaling agents. | |
| Fabric fibers have accumulated in the holes of the soleplate and are burning. | Use the self-clean function one or more times. Clean the soleplate with a damp soft cloth. | |
| The fabrics might not be properly rinsed or the garments are new and have not been washed before ironing. | Please rinse the laundry properly again. | |
| Water leakage | The soleplate is not hot enough. | Turn the Steam Selector to the desired steam position after the iron is heated up. |
| Too much water in the water tank. | Ensure that the water level does not exceed the “max” line. | |
| Water is left in the water tank after previous use. | Ensure that the water tank is empty after every use. | |
| Impurities buildup in the steam chamber. | Perform self-cleaning on the iron on a regular basis to minimize the impurities buildup. |
DISPOSAL
Recycle the materials with the symbol![]() Put the packaging in applicable containers to recycle it. Help protect the environment and human health and to recycle waste of lectrical and electronic appliances.
Put the packaging in applicable containers to recycle it. Help protect the environment and human health and to recycle waste of lectrical and electronic appliances.
Do not dispose of appliances marked with the symbol![]() with the household waste. Return the product to your local recycling facility or contact your municipal nice.
with the household waste. Return the product to your local recycling facility or contact your municipal nice.
CUSTOMER CARE AND SERVICE
When contacting Service, ensure that you have the following data available: Model, PNC, Serial Number.
The information can be found on the rating plate.
Due to the Electrolux policy of continual product development; specifications, colors, and details of our products and those mentioned in this manual are subject to change without notice.
KOREA
Electrolux Korea limited
9F, Pine Avenue B,
100 Euljiro, Jung-gu, Seoul, Korea 04551
Korea
Tel : +82 2 6020-2200
Fax: +82 2 6020-2271~3
Customer Care Services: +82 1566-1238
Email: [email protected]
Website: www.Electrolux.co.kr
Share more of our thinking at www.electrolux.com