Empave Induction Cooktop
Important Safety Information:
- When using electrical appliance, basic safety precautions should always be followed. For this induction cooktop, even with the built-in safety features, it is essential to heed all precautions.
- Installation of the appliance into a kitchen countertop and its connection to the main power and electrical supply may only be performed by a qualified person.
- While cooking fat or oil on the cooktop may ignite. There is a risk of burning and fire; therefore, never leave the cooktop unattended at anytime.
- When the unit is on, do not touch outside the control panel as the surface may contain residual heat.
- To protect against electric shock, do not immerse cord plugs or cooktop in water (or other liquid substance).
- When using any electric appliance around children, close supervision is required.
- Do not a operate any appliance with a damaged cord or plug, after a malfunction of if it has been damaged in any manner. Read seller’s guidelines for warranty repairs and returns.
- Do not cook on a broken or damaged cooktop as spillovers may penetrate surface and create a risk of electric shock.
- To avoid potential injury, do not use accessory attachments which aren’t recommended by the manufacturer.
- Do not use outdoors, This Induction Cooktop is designed for household use.
- Do not let the cord dangle over the edge of a table or counter. Keep the cord away from hot surface.
- Do not place cooktop on or near: hot gas, electric burner.
- Avoid preparing food in aluminum foil or plastic containers over the hot cooking zones.
- Do not store and temperature-sensitive objects, material, or substances underneath the cooktop, such as: detergents, sprays, etc.
- To prevent accidents and achieve optimal fan ventilation, allow for sufficient space around the cooking area.
- Items with a magnetic field such as: radios, televisions, credit cards, cassette tape etc., can affect the unit.
- The marked electrical rating should be at least as great as the electrical rating on the appliance.
- The cord should be arranged so that it will not drape over the countertop or tabletop where it can be pulled on by children or tripped over.
- Do not use with empty pans/pots.
- Do not use cooktop for another use than directed by the manufacturer.
- Wear proper apparel – loose fitting or hanging garments should never be worn while using the appliance.
- In case of appliance failure. immediately disconnect the appliance from the main power source and contact the manufacturer.
- Do not place metallic objects such as knives, forks, spoons, lids, cans or aluminum foil on the cooktop.
- It is important to be aware that the unit’s surface will remain hot for a period of time after use.
- When possible, unplug the cooktop from the outlet when not in use and before cleaning. Allow to cool before performing any maintenance or repairs.
- Clean cooktop with caution – do not clean while unit is still hot, some cleaners product steam or fumes if applied to a heated surface.
- Do not store items of interest to children in cabinets above the range or on the blackguard of a range – children climbing on the range to reach items should get seriously injured.
- The power cord has been sized accordingly, however, with caution and care, an extension cord may be used.
- Do not repair or replace any part of the appliance unless specifically recommended in the manual. All other services should be referred to a qualified technician.
- Use only dry potholders – Moist or damp potholders on hot surfaces may result in burns from steam. Do not use a towel or other bulking cloth.
- Use proper cookware size – Choose cookware with a flat bottom large enough to cover the unit heating surface. The use of undersized cookware will expose a portion of the heating surface where direct contact may be made and cause serious injury. Compatible cookware is necessary to operate properly.
- Protective liners – Do not use aluminum foil to line cooking zone, drip bowls or oven bottoms; except as suggested in the manual. Improper use of these liners may result in a risk of electric shock or fire.
- To reduce risk of burns, ignition of flammable materials, and spillage due to unintentional contact with cookware, the cookware handles should be turned inward and not extend over adjacent heating surface.
- Do not use steam cleaners or high pressure cleaners to clean the cooktop, as this may result in electric shock.
- Do not touch cooking zones or areas near units – Cooking zones may be hot even though they are dark in color. Areas near cooking zones may become hot enough to cause burns. During and after use, do not touch, or let clothing or other materials contact the flammable contact the cooking zones or areas near the units until they have had sufficient time to cool.
This product should not be thrown away as household waste. Instead it should be handed over to the applicable collection point for the recycling of electrical and electronic equipment. By ensuring this product is disposed of correctly, you will help prevent potential negative consequences to the environment and human health, which could otherwise be caused by inappropriate waste handling of this product. For more detailed information about recycling of this product, please contact your local city office, your household waste disposal service or the store where you purchased the product.
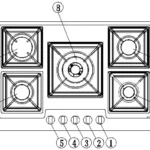
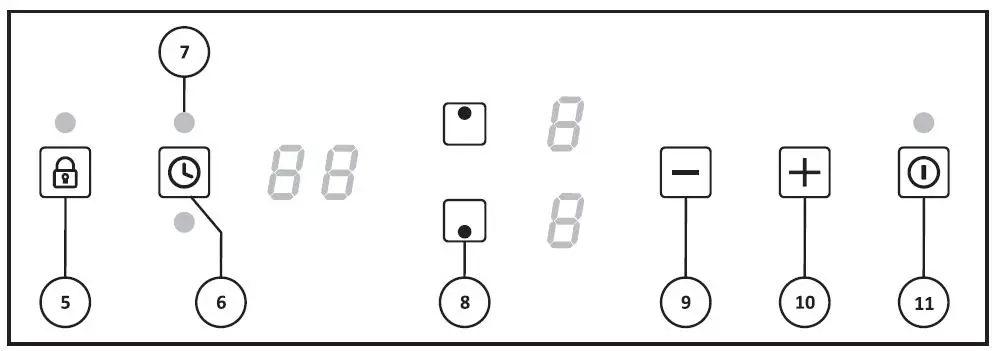
Control Panel Overview:
FOR MODEL EMPV-IDC12B2
- Left Cooking Zone
- Right Cooking Zone
- Ceramic Glass
- Left touch control panel
- Right touch control panel
Diagram may look different from actual product.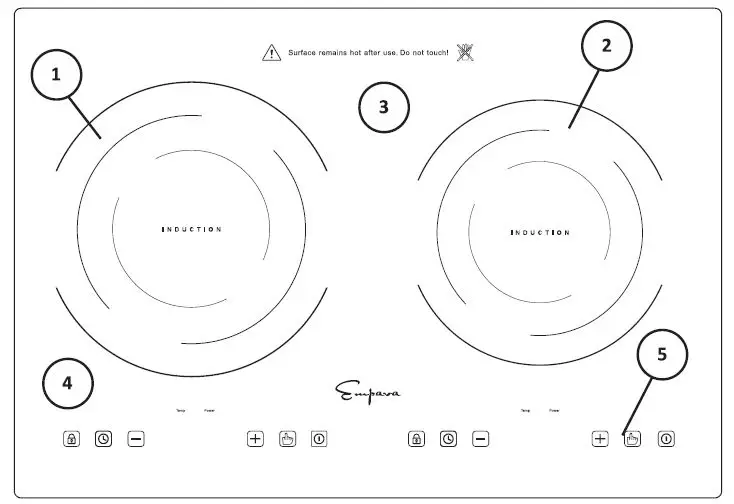
- Child safety lock
- Timer control key
- Lower power or temp key
- Power or temp option display
- Raise power or temp key
- Function selection
- ON/OFF
FOR MODEL EMPV-IDC12

- Rear Cooking Zone
- Front Cooking Zone
- Control panel
- Ceramic glass
Diagram may look different from actual product.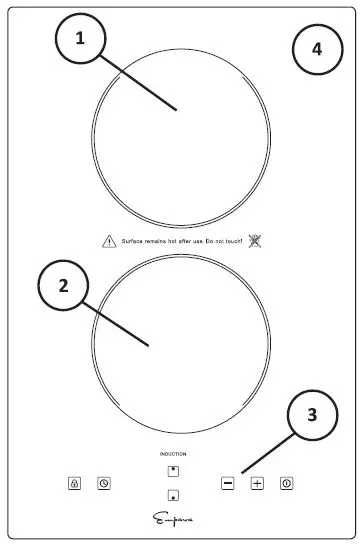
- Child safety lock
- Timer control key
- Cooking element symbol light
- Cooking element symbol and power on/off
- Lower power or temp key
- Raise power or temp key
- Main power on/off
Specifications and How to Use:
| Frequency (Hz) | 60 | 60 |
| Total power (Watts) | 1800 | 1800 |
| Minimum circuit breaker Amperage | 20 | 20 |
| Elements | 2 | 2 |
| Front | 1800W | N/A |
| Rear | 1800W | N/A |
| Left | N/A | 1800W |
| Right | N/A | 1300W |
Standby Mode
Upon inserting the power plug into an electric socket, induction cooktop will make a “beep”sound once, and all the digital lights on the cooktop will blink once, indicating the unit enters into the Standby Mode.
Controls Lock
- Controls Lock is activated when the cooktop is off: Controls Lock prevents activation of any sensor key, except for the Lock key pad, so you must deactivate the control lock firstly, then touch the main POWER key pad to turn on the cooktop.
- Controls Lock is activated during the cooktop use: Controls Lock prevents activation of any sensor key, except for the ON/OFF, Power and Lock key pad.
To Lock
Touch and Hold Lock key pad for 3 seconds, a “beep” will sound and the indicator light above the Lock key pad will be lit up.
To unlock
Touch and Hold Lock key pad for 3 seconds, a beep will sound, the indicator light will turn OFF.
FOR MODEL EMPV-IDC12B2
Readiness Mode
While in the Standby Mode, press the “ON/OFF” key, it will make a “beep” sound once and “ON/OFF” indicator light will be blinking, indicating that the induction cooktop functions are ready to use. The unit will automatically return to standby mode if Function is not turned on within 60 seconds.
Turning Off Unit
When use of the cooktop is complete, press the “ON/OFF” key. “ON/OFF” light will turn off, indicating the unit is now on the standby mode. Please do not pull the power plug until the cooling fan has stopped.
Function
Place cookware on the cooktop. Please select from the Power Setting or Temperature Setting to begin cooking.
Power Setting Mode: This function cooks at power (wattage) settings. When the unit is in the Readiness Mode, or in the Temperature Mode, press the “Function” key to select the “Power” mode. “Power” indicator light is lit up, and the digital display show “900”, indicating that the cooktop has entered power setting mode, if the user wants to adjust the power level, please press the”-” or”+” key. If the user wants to set the timer for the unit to shut off automatically, please refer to the Set Timer Mode. To stop cooking, please press “ON/OFF” key. Heating power level settings:
| Level
Power |
1 | 2 | 3 | 4 | 5 | 6 | 7 | 8 |
| Right 1300W | 300W | S00W | 700W | 900W | 1100W | 1300W | ||
| Left 1800W | 300W | S00W | 700W | 900W | 1100W | 1300W | 1500W | 1800W |
NOTE: This function is equipped with safeguards against parching. The unit might shut off automatically when this function is used for frying, stir-frying, grilling and other high temperature cooking formats.
Temperature Setting Mode: This function cooks at temperature settings. When the unit is in the Readiness Mode, or in the Power Mode, press the “Function” key to select “Temp” mode. The “Temp” indicator light is lit up and the digital display shows “460F”, indicating that the cooktop has entered the temperature setting mode. If the user wants to adjust the temperature level, please press the”-” or”+”
key to adjust the temperature setting. If the user wants to set the timer for the unit to shut off automatically, please refer to the Set Timer Mode. To stop cooking, please press the “ON/OFF” key. Temperature
levels:120° F, 150° F, 180° F, 210° F, 260° F, 300° F, 360° F, 420° F, 460° F.
NOTE: If one heating zone is turned on at temp. setting, the max power setting in another heating zone is level 5(900W).
FOR MODEL EMPV-IDC12B2
Power Sharing
When both burners are on, one of the two burners would not have a power level higher than 1300W. Both of them together would not be more than Max 1800W. If only one burner is on, the heating zone can maintain its full heat setting, but when operating both burners, their combined total is Max 1800W, meaning that when operating the two burners at the same time, they will self adjust levels accordingly. When you increase the power of one side, the power output of the other side will reduce automatically if their combined total is more than Max 1800W (i.e. one side is at 1100W, the other burner automatically reduces power to level 700W, creating a total max 1800W setting).
Set Timer Mode
Use”+” or”-” key to adjust and set the desired time. A short key press adjusts the time by 1 minute and a long key press by 10 minutes. The automatic timer settings range from 1 minute to 2 hours and 59 minutes. (NOTE: there is no “seconds” display, only hours and minutes).
When the unit is in the Power or Temp. Mode, press the “Timer” key. The “Timer” and “Time” indicator light will be blinking, indicating the cooktop has entered Set Timer Mode; the digital display read “0:00″ and hour number will be blinking; Press”+” or”-” key to set the hour desired number, then press the “Timer” key again, minute number will be blinking, press”+” or”-” key to set the minutes desired number, then press “Timer” key thirdly to complete setting. (Setting is also complete if neither the”+” or “-“key is pressed for 10 seconds.)Once activated, “Timer” or “Time” indicator light will turn long lit, the digital display will alternate between showing the remaining cooking time and power level. When the countdown is complete, the cooktop will sound “beep” and the specific heating element will shut off automatically.
To Cancel Timer: While in Timer Mode, press “Timer” key, the digital display shows countdown time. Then press”+” or”-” key until the digital display reads “0:00” and timer display will blink for 10 seconds and then go off. The timer is no longer active.
Hot Surface Indicator
After using any of the cooking zones, the cooktop will remain hot. Even after turning off the entire unit, the surface of the cooktop will remain hot for some time. The display for the cooking zones will show an “H” to warn the user that the surface is hot to touch after the heating zone switch off. Wait until the “H” is no longer displayed to clean the unit. You may turn the unit back on even if the “H” is displayed.
FOR MODEL EMPV-IDC12
Readiness Mode
While in the Standby Mode, press the “ON/OFF” key, it will make a “beep” sound once and “ON/OFF” indicator light will be blinking, indicating that the induction cooktop functions are ready to use. The unit will automatically return to standby mode if Cooking Element Symbol is not turned on within 60 seconds.
To Turn Off Unit
- Touch the cooking element symbol you desire to turn off, press”-” key to power level 1, then press”-” again to turn off the desired cooking element.
- Touch the Main Power on/off to turn off the entire cooktop, a “beep” will sound and all indicator lights will turn off, indicating the cooktop enter into the Standby Mode.
Operating The Cooking Elements
To turn on one or more Cooking Elements, place a compatible pot or pan on the desired cooking element. With the hob being ON as mentioned above, touch the desired cooking symbol element within 30s, Power display will show a”-“, Touch”-” key or”+” key to adjust the desired power level;
NOTE: During cooking, the unit is equipped with safeguards against parching. Heating will appear intermittent phenomenon when cooking element is used for frying, stir-frying, grilling and other high temperature cooking formats.
| Level
Power |
1 | 2 | 3 | 4 | 5 | 6 | 7 | 8 | 9 |
| Rear 1800W | 100W | 300W | S00W | 700W | 900W | 1100W | 1300W | 1600W | 1800W |
| Front 1800W | 100W | 300W | S00W | 700W | 900W | 1100W | 1300W | 1600W | 1800W |
Power Sharing
When both burners are on, one of the two burners would not have a power level higher than level 7. Both of them together would not be more than Max 10.
If only one burner is on, the heating zone can maintain its full heat setting. But when operating both burners, their combined total is Max 10, meaning that when operating the two burners at the same time, they’ll self adjust levels accordingly. When you increase the power of one side, the power output of the other side will reduce automatically if their combined total is more than Max 10(i.e., one side is at 5, the other burner automatically reduces power to level 5, creating a total max 10 setting).
Set Timer
Use”+” or”-” key to adjust and set the desired time. A short key press adjusts the time by 1 minute and along key press by 10 minutes.
The automatic timer settings range from 1 minute to 99 minutes. (NOTE: There is no “seconds” and “hours” display, only minutes.) The red dot next to the Time symbol indicator will illuminate indicating that the cooking elements is selected.
FOR MODEL EMPV-IDC12
While cooking, touch the Timer key pad until time light of the desired cooking element is ON, Time digital display reads “00” and blinking; Touch”+” or”-” key to set the desired number, Once the Timer is set and no “+” or”-” key are pressed for 5 seconds, the Minute Timer begins the countdown and the timer display will stop blinking and will stay on in the display. Once the Minute Timer reaches “00”, a “beep” will be sound, indicating that the time is up, the Particular Cooking Element will automatically shut off.
If you want to set another burner to switch-off automatically, touch Timer key to until the desired time symbol indicator blinks, repeat the same steps above.
If you want to check the remaining time for another Cooking Element, touch the Timer until the Time symbol indicator for the desired Cooking Element blinks.
If more than one switch-off time is programmed, the shortest time remaining will show in the Time digital display, the indicator for that particular burner will be blinking.
To Cancel Timer
Touch the Timer until the Time symbol indicator for the desired Cooking Element blinks, then touch the”+” or”-” to set the timer to 00 . The Time digital display will blink for 5 seconds and then turn off, indicating that the timer of selected cooking element has been cancelled.
Hot Surface Indicator
After using any of the cooking zones, the cooktop will remain hot. Even after turning off the entire unit, the surface of the cooktop will remain hot for some time. The display for the cooking zones will show an “H” to warn the user that the surface is hot to touch after the heating zone switch off. Wait until the “H” is no longer displayed to clean the unit. You may turn the unit back on even if the “H” is displayed.
Notes on Using your Cooktop:
- This appliance will get hot during use and will remain hot for a time after use.
- Never heat empty cookware. This can damage both the cookware and the appliance.
- Remember to turn off cooktop after use.
- Keep unit away from a gas range or other heat source. If the surrounding temperature is too hot, the cooktop will stop heating.
- Make sure to wipe off water from the bottom of the pot before heating.
- Use caution when boiling water. During the boiling process, hot water may splash out.
Operational Cooktop Noises
Cookware Noise
The induction fields are generated by electronics equipment, which are pretty much silent but they do produce heat at high power level. A soft-sounding cooling fan run when the unit is running multiple cooking elements at high settings at once or when a cooking element is set at very high power settings.
What can sometimes produce sound with induction cooking is not the induction equipment but the cookware itself. Slight sounds may be produced by different types of cookware. Some of the possible causes include:
- Heavier pans such as enameled cast iron produce less noise than a lighter weight multi-ply stainless steel pan; Light weight cookware may also vibrate. Heavy weight quality cookware
is recommended. - Cookware with irregular or warped bottoms can vibrate audibly on the ceramic glass surface, though again typically only at high power settings.
- A “Cracking” noise may be heard if the cookware base is made of layer of different material.
- A low “humming” noise occurs when cooking, which is normal particularly at high power settings.
- Whistling can occur if both elements are being used at the same time at the high settings, and the cookware has bases made of layer of different material.
- Loose-fitting handles on cookware, typically when riveted on, can vibrate slightly.
- High quality cookware of solid cast iron including enamelware will lower the noise.
Compatible Cookware:
The quality of your cooking is dependent on the cookware you use.
Because induction cooking requires a magnetic vessel for heating, only certain materials can be used on your cooktop.
Proper Cookware
Flat-bottom pots or pans with diameter from 12 to 26 cm (4. 7 to 10.83 inches) made from the following:
Improper Cookware
Pots or pans with or made of the following CANNOT be used on your cooktop:
- Non-magnetic stainless steel
- Bottom measuring less than 12 cm {4.7 inches)
- Pot with stands
- Heat resistant glass
- Ceramic container
- Copper
- Aluminum
If you are unsure about the usability of your cookware, simply take a magnet (such as one on your refrigerator) and hold it under the bottom of your pot or pan. If the magnet sticks, the cookware CAN be used on the induction cooktop.
Cleaning and Maintenance:
Please follow these directions along with Important Safety steps for cleaning, advised at the beginning of the manual. Use a ceramic glass cleaner on the glass cooktop. To maintain and protect the surface of your glass cooktop, follow these steps:
Before using the cooktop for the first time, clean it to protect the top and makes cleanup easier.
- Daily use of ceramic glass cleaner when the cooktop is cool will keep the cooktop looking new.
- Shake the cleaning solution well. Apply a few drops of ceramic glass cleaner directly to the cooktop.
- Use a paper towel or a soft cleaning pad for ceramic surface to clean the entire cooktop surface.
- Use a dry cloth or paper towel to remove all cleaning residue. No need to rinse. Never run the cooktop under water.
Cleaning Burned on Residue:
NOTE: It is very important that you DO NOT use the cooktop until it has been thoroughly cleaned.
WARNING: Damage to the glass surface may occur if you use scrub pads or any other type of abrasive cleaning materials.
- Allow the cooktop to cool.
- Spread a few drops of the ceramic glass cleaner on the burned residue area.
- Using the ceramic glass cleaning pad, rub the residue area, applying pressure as needed.
- If any residue remains, repeat the steps listed above.
- For additional protection, after all residue has been removed, polish the entire surface with the ceramic glass cleaner and a paper towel.
Cleaning heavy burned – on residue:
- Allow the cooktop to cool.
- Used a single-edge razor blade scraper approximately at a 45 degree angle against the glass surface, and scrape off the residue.
- After scraping off the residue, apply a few drops of the ceramic glass cleaner on the entire burned residue area. Use the cleaning pad to remove any remaining residue.
- For additional protection, after all residue has been removed, polish the entire surface with the ceramic glass cleaner and a paper towel.
Metal Marks and Scratches:
Be careful not to slide pots or pans across the cooktop surface. It will leave behind metal markings. These marks are removable using the ceramic glass cleaner along with the cleaning pad for induction cooktop.
If pots with a thin overlay of aluminum or copper boil dry, the overlay may leave a black discoloration on the cooktop. This should be removed immediately before using the cooktop again or the discoloration will become permanent.
NOTE: If cracks or indentations in the glass surface occurs, the cooktop glass will have to be replaced. Contact the manufacturer for assistance.
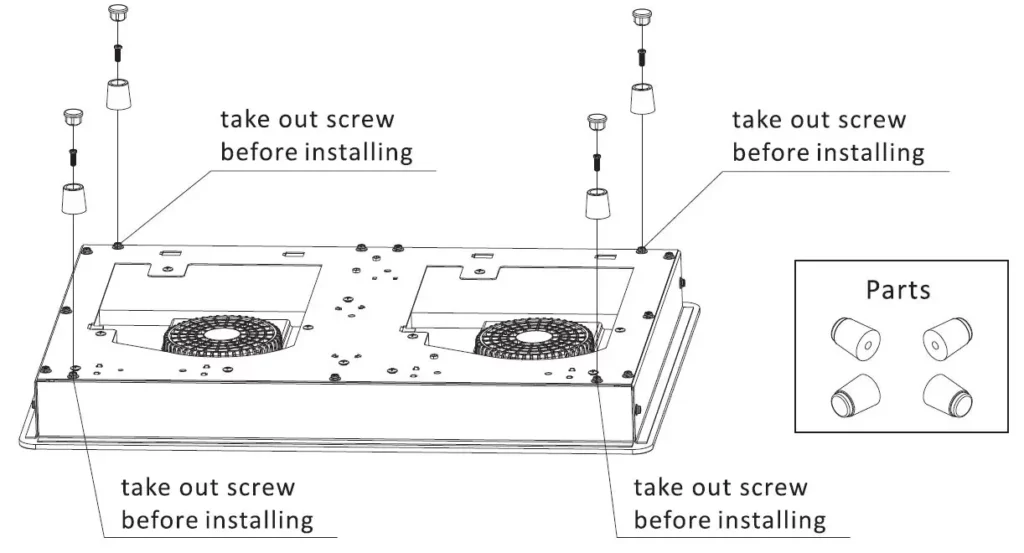
Installation Instructions:
USE—- COUNTERTOP
Please find 4 feet in the packaging, you can screw them into the bottom of the unit, then the unit can be used directly on the countertop.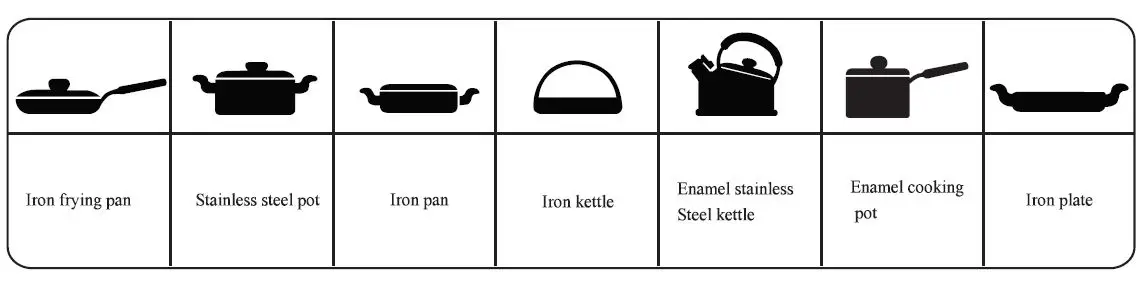
USE—- DROP-IN
This appliance is not user serviceable. Installation must be completed by a qualified technician.
warning!
For Your Safety: Do not store or use gasoline or other flammable vapors and liquids in the vicinity of this or any other appliance. To eliminate the risk of burns or fire due to overheating, cabinets located above the induction unit should be avoided. If cabinet space is available, the risk can be reduced by installing a range hood that protects horizontally at a minimum of 5 inches below the bottom of the cabinets.
IMPORTANT INSTALLATION INFORMATION
All electric cooktops run off a single phase, three-wire cable, 120V/60Hz AC only electrical supply with ground.
The installation should be made using wires, conduits, and fittings size in accordance with the National Electrical Code, ANSI/NFPA 70.
Cooktop Installation
- Cut an opening in the counter surface. Refer to the drawings on the following pages for appropriate dimension sizes and follow these instructions:
• Select heat-resistant table material to avoid damage caused by heat radiation.
• Ensure that the underside of the induction cooktop is well ventilated and the air inlet is not blocked.
• The distance between the cooktop and any cupboard above the appliance should be at least 30 inches. - After cutting the opening, remove any shavings or other loose material that may interfere with the appliance’s operation.
- IMPORTANT NOTE: Do not seal the cooktop to the countertop. It must be removed if service is necessary.
- IMPORTANT NOTE: For unframed installation. adhere foam strip to the outer edge of the glass.
Before installing the cooktop
- Ensure that cooktop is turned OFF.
- Visually inspect the cooktop for damage. Also make sure all cooktop screws are on tight.
- Place the cooktop into the countertop cutout.
Model and Serial Number Location
The serial plate is located under the cooktop. When ordering parts or making inquiries about your cooktop, be sure to include the model and serial numbers.
MODEL EMPV-IDC12B2 120V 60Hz 1800W
Overall Dimensions
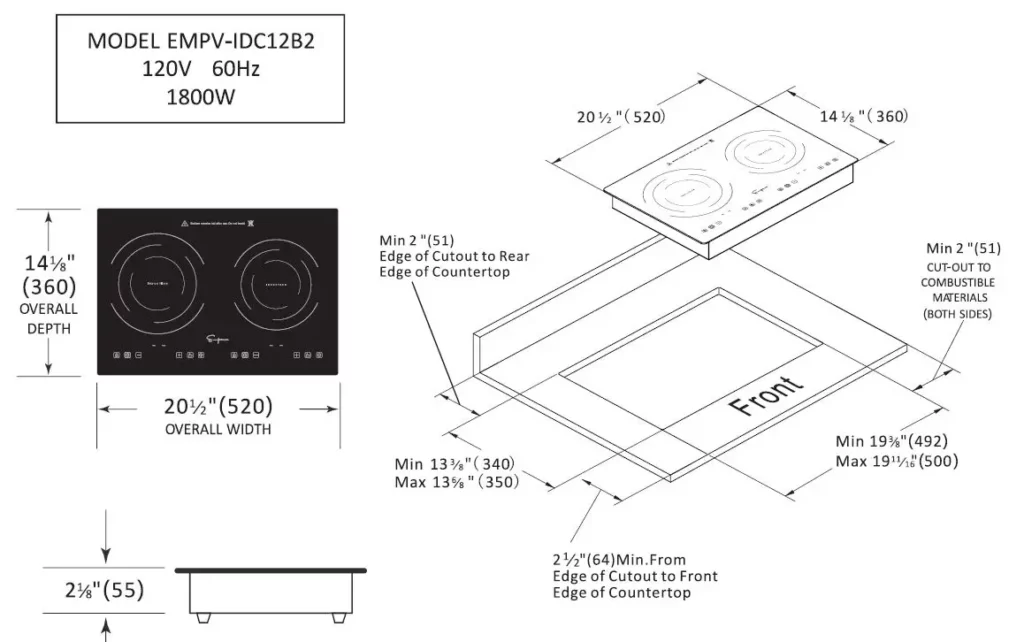
MODEL EMPV-IDC12 120V 60Hz 1800W
Overall Dimensions 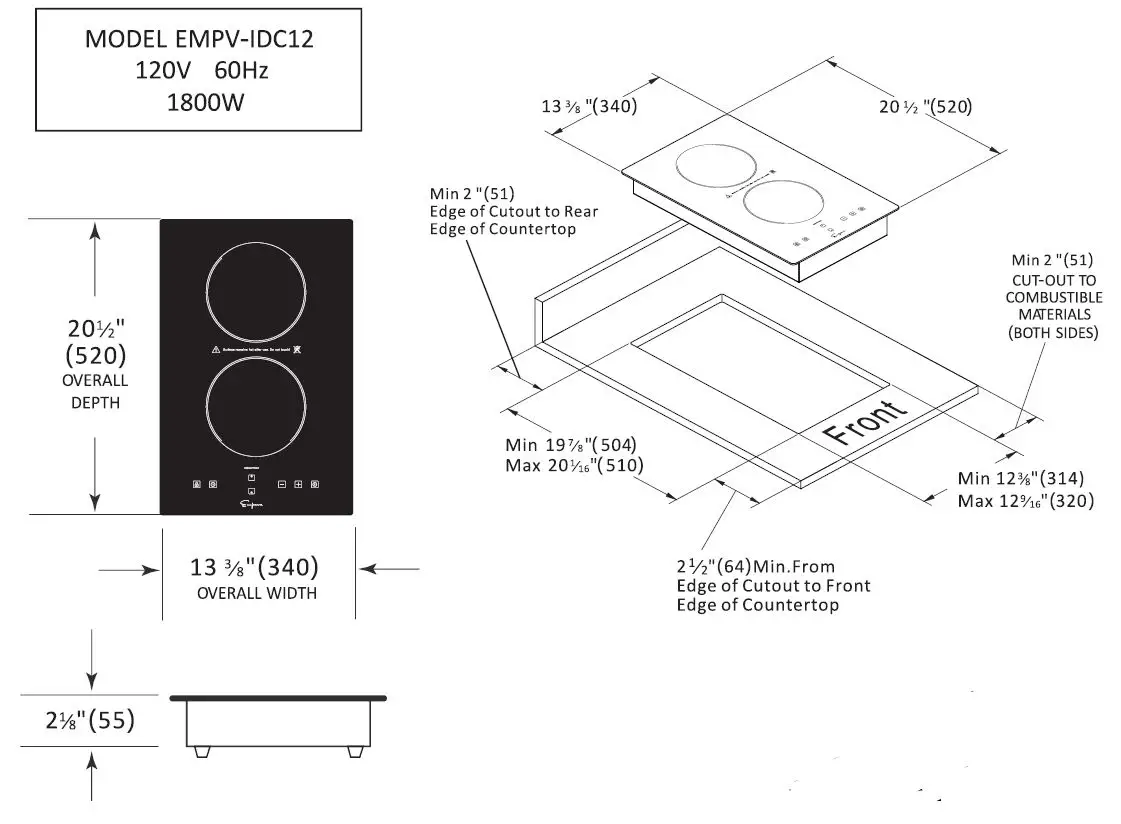
After Installation
- Remove all the stickers and items from the top of the cooktop surface.
- Clean cooktop before use. Dry with a soft cloth. See Cleaning Your Cooktop for reference.
- Read Using The Cooktop.
- Turn on the power to the cooktop.
- Verify all function operation properly.
NOTE: If the cooktop does not work, or you met any problem in your operation, please check that the circuit breaker has not tripped or the house has not blown. For more information, please See Troubleshooting Guide. If you do not solve the problem by yourself, please call us for assistance or service.
Troubleshooting Guide:
If the display shows an error code, please refer to this sheet for a potential solution.
| Error Code | Possible Cause | Solutions |
| • Cooktop does not work | • Cooktop controls are locked
• Power outage |
• Make sure Lock mode is turned off
• Check house lights to confirm power outage • Contact manufacturer |
| • Cooktop does not heat | • No cookware or improper cookware placement on the cooking zone
• Incorrect cookware size for the selected cooking zone • Cookware is not properly resting on cooking zone • Incorrect Cooking Zone selected • No power to cooktop |
• Make sure that the cookware is centered on the cooking zone, and that cookware is also of correct type for induction cooking. See COMPATIBLE COOKWARE
•The bottom of the cookware must be large enough to cover Cooking Zone • Cookware bottoms must be flat andcentered on the Cooking Zone. • Make sure the correct control is ON for the Cooking Zone being used • See “Cooktop does not work” above |
| • Cooktop turns off while cooking | • Cooktop internal heat sensor has detected high temperature inside the cooktop, activating automatic shut off
• Liquid or object on the controls area |
• Make sure the cooktop vents are not blocked
• The cooktop features an automatic shutoff feature that turns off the entire cooktop if any Cooking Zone has been on continuously for 2 hours • The cooktop control panel may register liquids or objects obstructing the panel, which can cause the cooktop to shut off. Clean up spills or remove objects and restart the unit |
| • The fans keep running for one minute after the unit has been switched off | • The electronics are cooling down | • This is a normal occurrence |
| Error Code | Possible Cause | Solutions |
| • Power sharing | • When two heating zones are turned on, will create a total max power 1800W | • See POWER SHARING |
| • “EO”appears in the digital display | • IGBT (Insulated Gate Bipolar Transistor) overheating | •Turn off unit to allow IGBT to cool. Restart unit |
| • “El” appears in the digital display | • No cookware found or improper placement of cookware on the cooking zone | • Make sure that the cookware is centered on the cooking zone, and that it is also induction compatible. See COMPATIBLE COOKWARE |
| • “E2” appears in the digital display | • Supplied voltage to cooktop is too low | • If the voltage of the power supplied to the cooktop is too low, it cannot operate properly and will show this error code. This may be caused by reduced voltage being supplied to the house circuit. If connections are correct and the supplied voltage returns to normal, the code will disappear |
| • “E3” appears in the digital display | • Supplied voltage to cooktop is too high | • If the voltage of the power supplied to the cooktop is too high, it cannot operate properly and will show this error code. This may be caused by increased voltage being supplied to the house circuit. If the connections are correct and the supplied voltage returns to normal, the code will disappear |
| • “E7” appears in the digital display | • NTCl(To check the temperature of IGBT) break off | •Turn OFF the cooktop; then shut off the power at the fuse or circuit breaker for about 30 second s. Turn the power back on to the cooktop then press the POWER button to turn on the unit. If the error message is still being displayed, call for service |
| • “E8” appears in the digital display | • NTCl(To check the temperature of IGBT) short circuit | |
| • “E9” appears in the digital display | • NTC2 (To check the temperature of heating center) Break off | |
| • “EE” appears in the digital display | • NTC2 (To check the temperature of heating center) short circuit |
![]()