
![]()

Remote Control Switch
User Manual
12V.16Channels Model: R1216A
Thanks for choosing the wireless remote switches presented by eMylo. Thanks to our staff of experienced engineers and designers, we are the leader in the wireless remote control industry in China. Our products are applied in different industries, such as lights, motors, lighting control, and security industry, using various voltages and channels to meet specific requirements. Our goal is to provide customers with state-of-the-art products and services.
PRECAUTIONS
For the avoidance of damage to the product or injury to people, please carefully read this Manual before use and keep it for future reference.

- For the avoidance of damage to the product, do not expose the product to rain or damp.
- This product is only for indoor use.
- Please use a combination of Transmitter and receiver provided by eMylo. We cannot guarantee our Transmitter or receivers are fully compatible with other manufacturer’s products.
- Wiring shall be conducted by a professional electrician, so as to avoid electric shock.
- The product installation shall be conducted by a professional electrician as it requires specialized knowledge. Incorrect operation may damage the product, or make it inoperable.
- The Transmitter and receiver have been paired with each other in factory.
- If it is used for control of equipment with a high starting current, like a high power motor, we highly suggest you to add an AC Contactor; to control starting-up and shutdown, which can prolong the life span of the product.
- Keep this product away from 0-3 years old baby for preventing ingestion.
- Install the receiver in a place out of touch of children, so as to prevent electric shock.
- Please do not put the battery in water, fire or moisture places for the avoidance of explosion.
- The battery contains hazardous substances. Return the waste batteries to the recycling bin to avoid contamination to the environment.
- We do not provide battery duo to regulations on air transport safety. To purchase a battery, please refer to Transmitter Specification.
MAIN FEATURES
- The product adopts RF technology, with a long remote control distance and stable signal.
- Independent output in 16 channels without mutual interference.
- operational frequency is 433MHz.
- It adopts an energy-saving design, consuming low power both in standby and operation.
- The integrated module features stable performance, making the product easy to use, strongly reliable and enduring.
- The receiving module provides high signal sensitivity at lower cost.
- The receiving module can resist interference for excellent stability.
- It adopts non-directional wireless encoding technology, allowing independent control without mutual interference.
- It can be easily set to your desired mode, like jog, Latched and Toggle.
- The programmable transmitter and receivers can be flexibly configured in quantity and in operating modes.
- It can stably operate under adverse weather, with a temperature range of -20-70°C.
- It is widely used in industrial control and security fields, such as light, motor, remote controller, wireless security alarm, wireless door alarm, wireless controller, etc.
- The product has passed the certification of CE, FCC and RoHS, etc.
SPECIFICATIONS
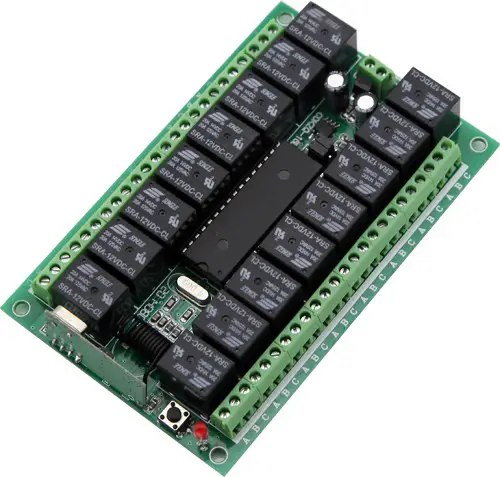
Receiver:
- Input voltage: DC 12V
- Channel: 16 channels.
- Operational frequency: 433Mhz
- Encoding mode: intelligent-learning code
- Output type: Passive output
- Max load: 10A
- Sensitivity: 105DB
- Temperature: -30 °C -70 °C; RH: <95%.
- Dimensions: 122x80x28mm
Transmitter:
- Refer to 《TRANSMITTER SPECIFICATIONS》
OPERATING MODE
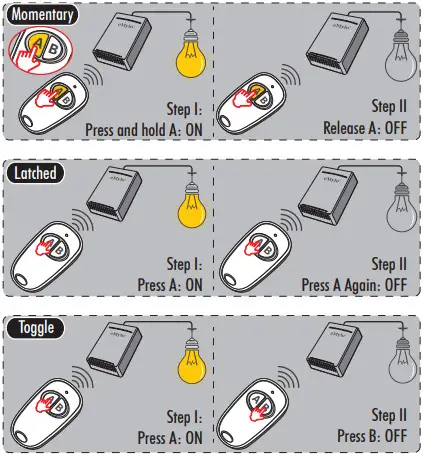
* The available operating modes depend on the number of buttons on the Transmitter and the number of channels on the receiver. Please refer to MODE SETTING to check whether a certain mode is available.
MODE SETTING
| Single Receiver | |||
| Key Number | Channel Number | Settable Mode | Mode by Default |
| 16 Buttons | 16 Channels | Momentary Latched | Latched |
HOW TO USE
Check and Install batteries
If the LED indicator on the transmitter blinks when you press any key, it means the batteries has been installed, and the power is enough.
(The Transmitter appearance varies with models, just for reference only.)
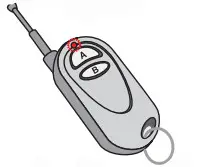 If the LED indicator doesn’t blink when you press any key, it means the batteries are not installed or are used up. Please install or replace the batteries in this case.
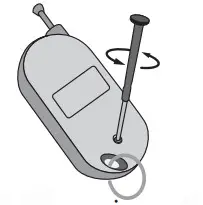
(1) Open the rear cover of the transmitter with a screwdriver (or directly open the battery cover for some models), and then install the batteries.
(The Operating varies with different models, Just for reference only.)
 (2) Put the cover back. If the LED indicator can blink after pressing any key, it means the batteries are installed correctly.
Install Receiver
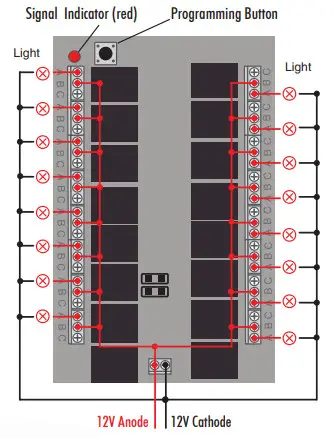
Wiring shall be performed by a professional electrician strictly following the wiring diagram for the equipment you want to control. Incorrect wiring may make the product inoperable or even damage product.
Diagram I: Wiring Diagram for Light
Start Using
You can use the product after finishing the two steps above. We hope you will enjoy the convenience provided by our products.
SWITCHING MODE & PAIRING TRANSMITTER AND RECEIVER

normally, please re-pair them in the following steps.
Connect to Power Source
Connect Power to Receiver.
Clear Code
Press the programming key on the receiver for 5 seconds until the red LED signal indicator turns on and then goes out, release the button. At this time, the code clearance is completed, and pairing between the transmitter and receivers are removed.![]() Choose Working Mode
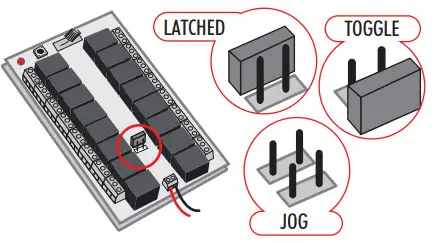
Choose Working Mode
Choose working mode by setting the jumper according to the images.
Pairing Transmitter and Receiver
Press the programming key on the receiver until the red indicator turns on, Press any key on the transmitter, the red indicator on the receiver blinks and goes out; At this time, the pairing is finished.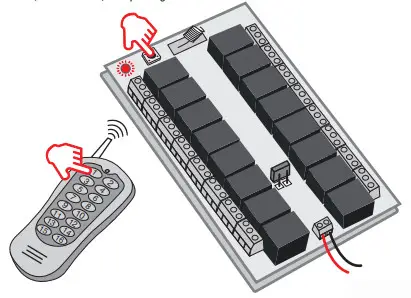
TROUBLESHOOTING
If the Transmitter and receiver cannot operate normally, try to solve the problem by following the steps below.
- Please check if batteries are installed in the transmitter, or if the battery power is used up.
- Please check if your receiver is wired correctly. Please make sure the wires are connected in strict accordance with the wiring diagram. 99% of failures are caused by incorrect wiring.
- Ask a professional electrician to help you with the wiring.
- If it is still inoperable after you operate as per the above steps, please re-pair the transmitter and receiver again according to “SWITCHING MODE & PAIRING TRANSMITTER AND RECEIVER”.
- If the problem still remains, please contact our after-sale support at [email protected]. We will provide you with professional after-sale services.
![]()
Shenzhen eMylo Technology Co., Ltd.
Address: B-202, The Second Industrial Park, Taoxia, Gaofeng Sub-district,
Longhua New District, Shenzhen, Guangdong, P. R. China 518109
Official website: www.emyloworld.com
Sales consulting: [email protected]
Technical support: [email protected]
DECLARATION:
Copyright©2017 reserved by Shenzhen eMylo Technology Co., Ltd. This manual shall not be copied, reproduced, transmitted or translated, in part or in whole, without the written consent of Shenzhen eMylo Technology Co., Ltd.
eMylo® is the registered trademark of Shenzhen eMylo Technology Co., Ltd. All other trademarks referred to in this Manual are respectively the property of their owners. The specifications and other information in this Manual are only for reference, and no express or implied guarantee is given to any statement in it.
This manual is subject to change without prior notice.