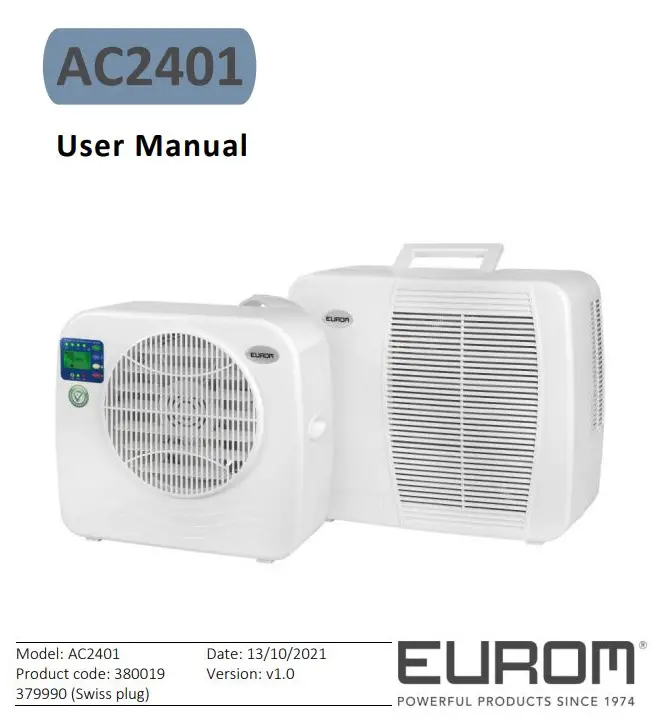
EUROM AC2401 Split Air Cinditioning
User Manual

Thank you for choosing this EUROM device. You have purchased a quality device that you will enjoy for many years. Using this device with respect and care will reduce the risk of personal injury or material damage.
![]() CAUTION It is important to read and understand this instruction manual before assembling, installing and using the device.
CAUTION It is important to read and understand this instruction manual before assembling, installing and using the device.
Introduction
This manual describes the correct and safe use of this device. Keep this manual for future reference. The manual is an essential part of the device and must be given to the new owner upon resale or exchange. This manual has been compiled with the utmost care. Nevertheless, we reserve the right to improve and adjust this manual at any time. The images used may differ.
The following symbols and terms are used in this manual to alert the reader on safety issues and important information:
![]() WARNING Indicates a hazardous situation which, if the safety instructions are not followed, can lead to injuries to the operator or bystanders, light and/or moderate damage to the product or to the environment.
WARNING Indicates a hazardous situation which, if the safety instructions are not followed, can lead to injuries to the operator or bystanders, light and/or moderate damage to the product or to the environment.
![]() CAUTION Indicates a hazardous situation which, if the safety instructions are not followed, can lead to light and/or moderate damage to the product or to the environment.
CAUTION Indicates a hazardous situation which, if the safety instructions are not followed, can lead to light and/or moderate damage to the product or to the environment.
Warranty
EUROM offers a 24-month warranty on this device from the date of purchase. The warranty does not cover wear and tear from normal use. The warranty expires if a defect is the result of unintentional or careless use of the device. The manufacturer, importer and supplier are not liable for incorrect connections.
Identification
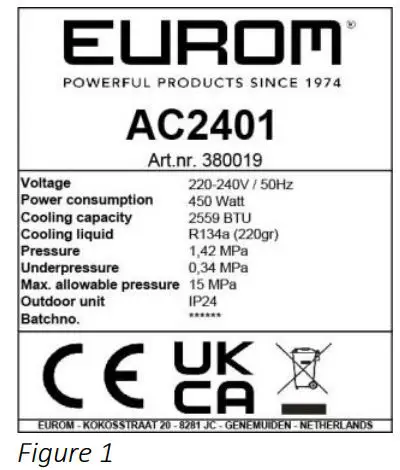
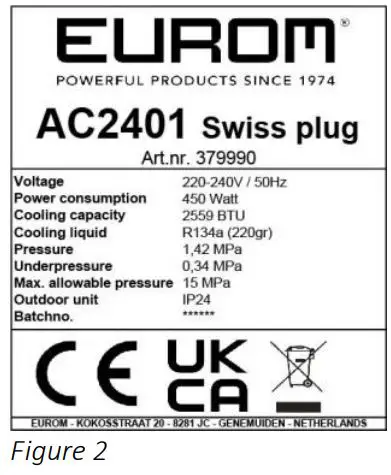
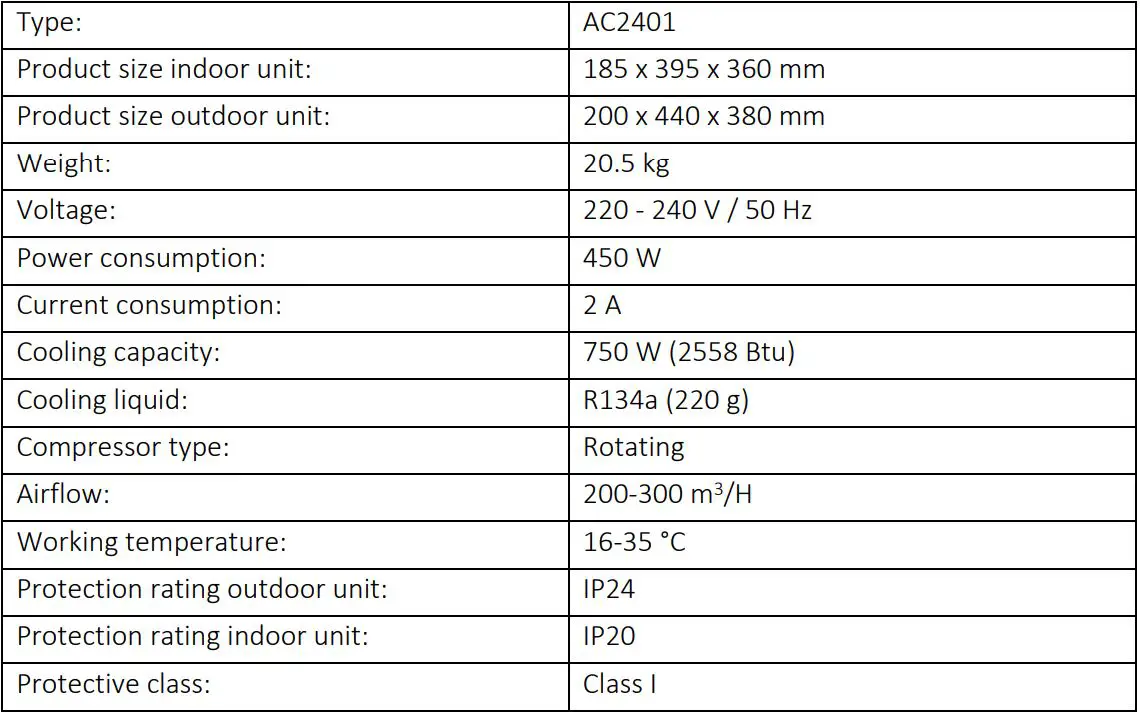
Specifications
Description
The AC2401 is an easy-to-use portable caravan air-conditioner for caravan use only (Figure 3). The device provides continuous cooling and drains the condensed water automatically.
- Outdoor unit
- Handle
- Air inflow grid
- Handgrip
- Air outflow grid
- Indoor unit
- Control panel and LED display
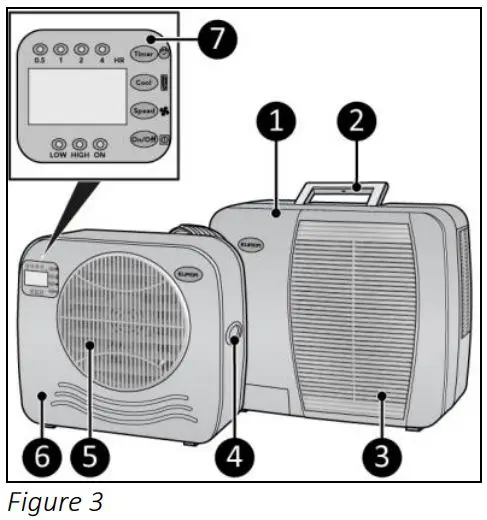
Control panel and LED display
- 4 hr indication
- Clock indication
- Timer button
- Cool button
- Speed button
- ON/OFF button
- Time indication
- Power indication
- High indication
- Low indication
- Speed indication
- Cooling level indication
- Speed level indication
- 0.5 hr indication
- 1 hr indication
- 2 hr indication

Safety
Please read and understand these safety instructions. Incorrect use can cause injury and will void EUROM’s warranty.
This device is not suitable for use by persons with a physical, sensory or mental disability, or lack of experience and knowledge (including children). Keep the device out of reach of children, unqualified persons and pets. Never leave the device unattended while it is in operation.
General safety instructions
Safety during operation
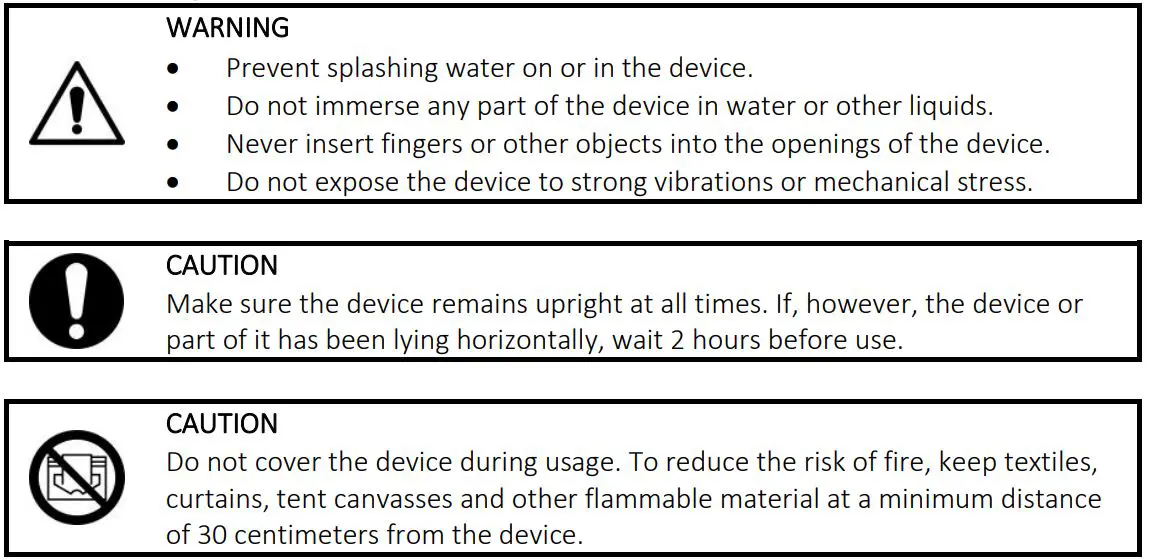
![]() WARNING Do not use the device:
WARNING Do not use the device:
- lying, leaning, hanging crooked or tilted;
- if any parts are dirty or wet;
- if there is a strange noise, smell or smoke;
- near a water source, like a sink, shower or swimming pool;
- in the rain (outdoor unit resistance up to 10 litters per minute)
- in constant direct sunlight exposure;
- near or in a dusty and dirty environment, like a construction site;
- near flammable materials, liquids or fumes, like an insect repellent spray, splattering oil, gas cylinder or gas pipes;
- near a heat source or open fire;
- with an appliance that automatically switches the device on, such as a timer, dimmer or any other similar device.
If the device, the electric cable or plug shows damage or is malfunctioning, immediately take the appliance out of use and disconnect the power supply.
Transport and storage
![]() CAUTION
CAUTION
Do not leave the device hanging while transporting the caravan or motorhome. Before moving the indoor unit, first drain the water by removing one of the two sealing caps.
- Clean the device before storing it.
- Transport the device upright.
- Store the device upright in its original packaging in a cool, dry and dust-free area.
Installation
The device is packed in one box. Remove all packaging material and check that the device is not damaged. Do not use the device if it is damaged, but always contact your supplier. Keep the packaging for safe storage and transport.
![]() WARNING
WARNING
Do not put the power plug into the wall socket before the device is correctly mounted. Do not use an extension cable; this can cause overheating and fire. If using an extension cable is unavoidable, make sure it is undamaged and earthed. Use an extension cable with a minimum power of 450 Watt. Always unwind the extension cable completely to prevent overheating.
![]() CAUTION
CAUTION
Make sure that the main voltage is the same as indicated on the identification label of the device. All electrical connections must stay dry under all circumstances.
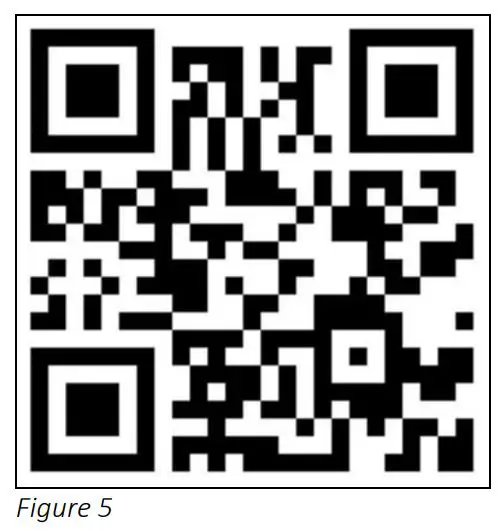
- Open an installation video with the QR code (Figure 5) or go to www.eurom.nl.
Outdoor unit installation
- Attach the large brackets (Figure 6, pos. 2) to the outdoor unit (Figure 6, pos.1) by tightening two screw caps per bracket (Figure 6, pos. 3).
- Hang the outdoor unit (Figure 6, pos. 1) from the desired window, make sure the indoor unit is securely placed on a table.
- Tighten the adjustment bolt (Figure 6, pos. 4) per bracket. Make sure the bumper (Figure 6, pos. 5) is placed vertical. If needed, use the removable block on thinner walls or window frames.
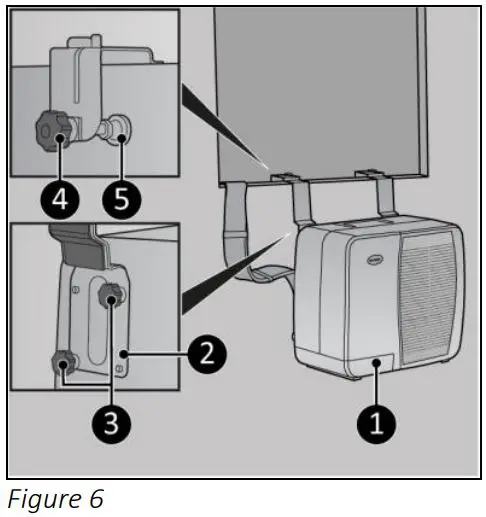
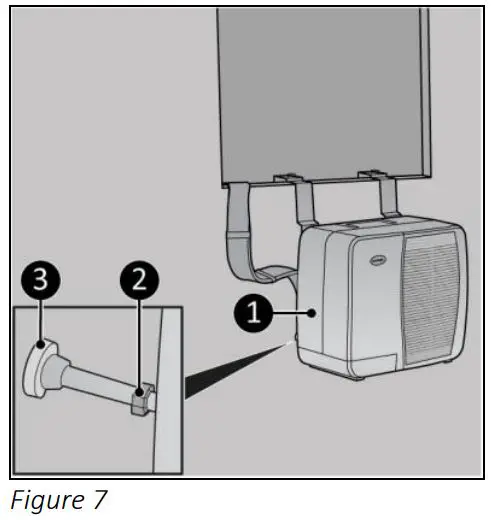
- Make sure the outdoor unit (Figure 7, pos. 1) hangs level by tightening the nut (Figure 7, pos. 2) on the adjustment bolt. Make sure the bumper (Figure 7, pos. 3) is placed vertical.
Indoor unit installation
The indoor unit can be placed on a sturdy table or it can be placed hanging on support brackets.
Support brackets (optional)
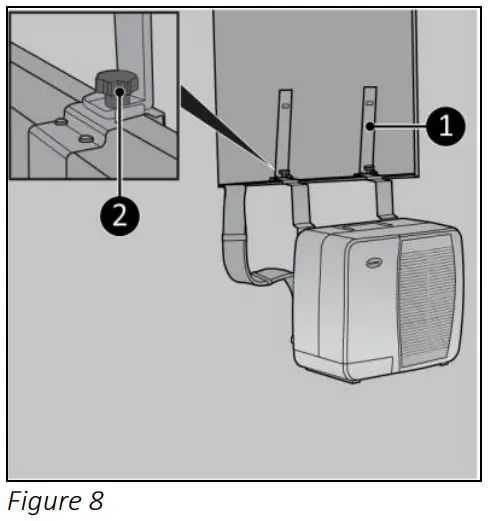
- Attach the support brackets (Figure 8, pos. 1) to the outdoor unit brackets by tightening the screw cap per bracket (Figure 8, pos. 2).
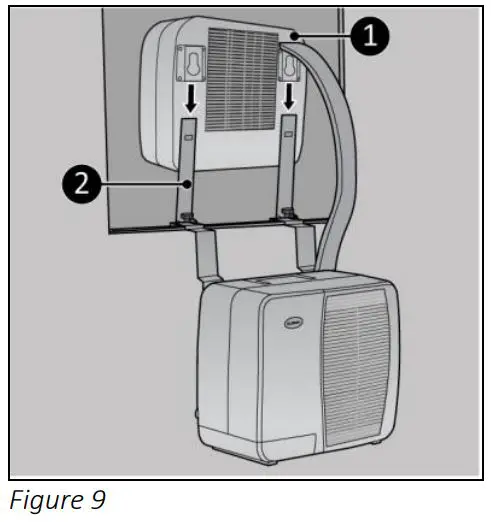
- Slide the indoor unit over the support brackets (Figure 9, pos. 2).
- To remove the device, lift and slide it in the opposite direction.
Operation
![]() WARNING
WARNING
Before every use, make sure that:
- both sealing caps on the rear side of the indoor unit are mounted;
- you operate the device with dry hands;
- the device is clean and dry;
- the device is not damaged;
- the device is not covered or blocked;
- the device stands or hangs securely and horizontally.
![]() CAUTION
CAUTION
The device works at an ambient temperature of maximum 42 °C on high speed and maximum 38 °C on low speed.
- Make sure the device is correctly mounted.
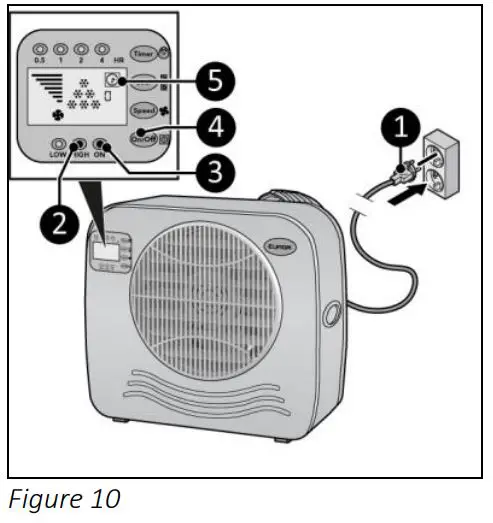
- Place the power plug (Figure 10, pos. 1) into an earthed wall socket that is easily accessible. Use an earthed wall socket with a minimum power of 450 Watt.
- Three beeps will sound to indicate the device is ready for use.
• Press the ON/OFF button (Figure 10, pos. 4), the power indicator (Figure 10, pos. 3) and the high indicator (Figure 10, pos. 2) will light up. The display will show the time indicator and 6 cooling indicators (Figure 10, pos. 5). The device now operates at high capacity.
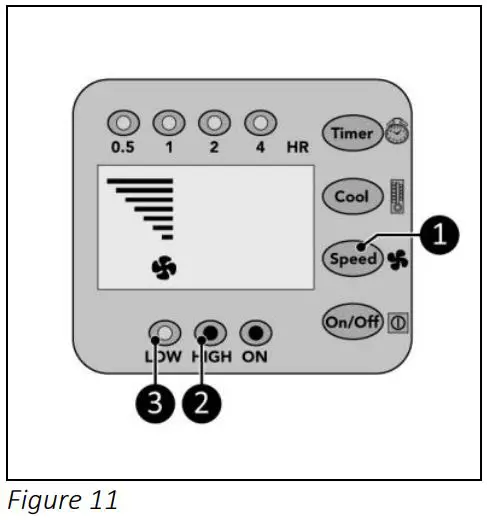
Speed setting
- Press the Speed button (Figure 11, pos. 1) repeatedly to set the required speed setting:
- High: high indicator (Figure 11, pos. 2) will light up and the speed graph will show 7 bars.
- Low: low indicator (figure 11, pos. 3) will light up and the speed graph will show 4 bars.
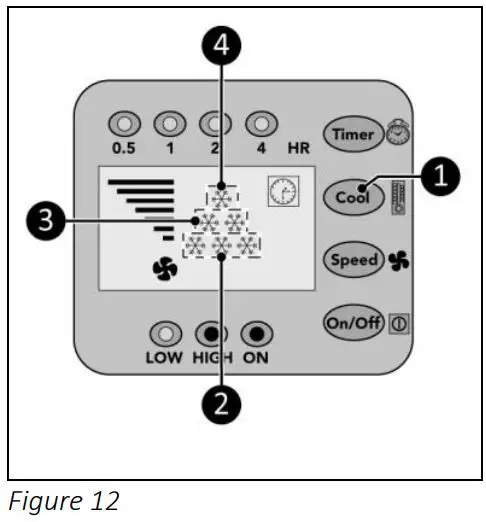
Cool setting
- Press the Cool button (Figure 12, pos. 1) repeatedly to set the required ambient temperature:
- 28 °C, the display will show 1 cool indicator (Figure 12, pos. 4).
- 25 °C, the display will show 2 cool indicators (Figure 12, pos. 3).
- 22 °C, the display will show 3 cool indicators (Figure 12, pos. 2).
- <22 °C, the display will show 6 cool indicators (Figure 12, pos. 2, 3 and 4).
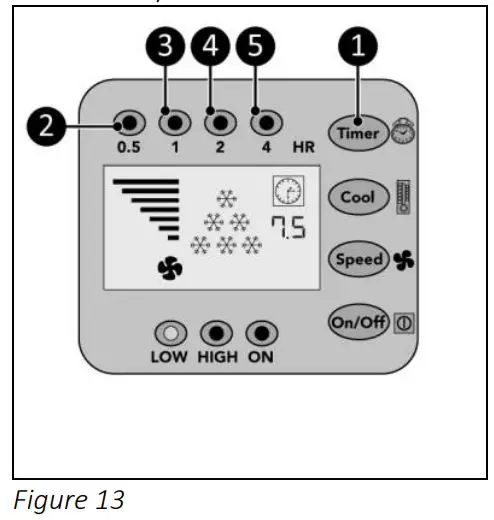
Timer
At the end of the set countdown timer the device will automatically switch off.
- Press the Timer button (Figure 13, pos. 1) repeatedly to start the countdown timer of:
- 0.5 hour: the 0.5 hr indicator (Figure 13, pos. 2) will light up;
- 1 hour: the 1 hr indicator (Figure 13, pos. 3) will light up;
- 2 hours: the 2 hr indicator (Figure 13, pos. 4) will light up;
- 4 hours: the 4 hr indicator (Figure 13, pos. 5) will light up;
- 7.5 hours: the 0.5 hr indicator, the 1 hr indicator, the 2 hr indicator and the 4 hr indicator (Figure 13, pos. 2, 3, 4 and 5) will light up.
Drainage of condensed water
Automatic
As soon as the condensate in the collecting tray of the indoor part has reached a certain height (0.8 litter), the pump automatically leads it to the condenser in the outdoor part. In the outdoor unit, the water is partially evaporated with the discharge of the warm air. The remaining water is drained through the drain pipe at the bottom of the outdoor unit.
Manual
In the event of a malfunction of the automatic drainage, you will hear an alarm for 20 seconds and the device will switch off. The water has to be removed manually.
- Remove the plug at the bottom of the indoor unit.
- Connect the supplied drain hose to the bottom of the indoor unit.
- Turn the device back on. The device can be used in this way temporarily even with a defective pump.
After operation
![]() CAUTION
CAUTION
Do not use the power cable to unplug or carry the device. Do not wind the power cable too tightly or in sharp corners. Do not wrap the power cable around the device.
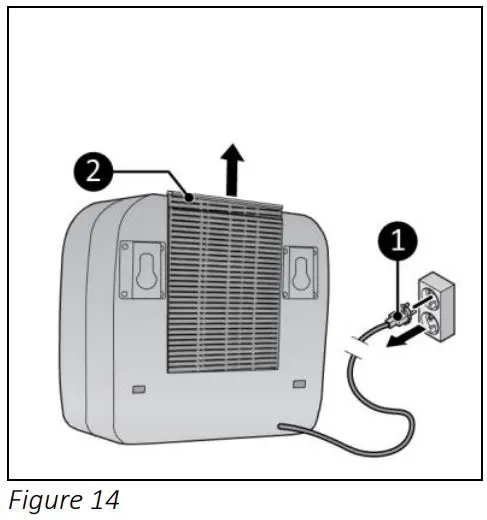
- Make sure the device is switched off and the plug is removed from the power outlet (Figure 14, pos. 1).
- Let the device cool down before touching it.
- Wind the power cable.
Maintenance
![]() WARNING
WARNING
Do not perform any repairs or modifications to this device.
Maintenance and repairs must be carried out by a EUROM authorized professional. If the electric cable and/or electric plug is damaged, it should be replaced by the manufacturer or its service employee or persons with similar qualifications to prevent risks.
Cleaning
![]() CAUTION Do not use:
CAUTION Do not use:
- scouring pads;
- hard brushes;
- flammable, aggressive or chemical cleaning products.
Prevent water from entering the device. Do not immerse any part of the device in water or other liquids.
It is recommended to clean the device after each use and prior to storage.
- Make sure the device is switched off and the plug is removed from the power outlet (Figure 14, pos. 1).
- Carefully vacuum the openings to remove dust and dirt.
- Wipe the device with a damp, clean, soft, lint-free cloth or a soft brush.
- Let the device dry completely prior to use and storage.
Filter cleaning
- Make sure the device is switched off and the plug is removed from the power outlet (Figure 14, pos. 1).
- Pull the frame up (Figure 14, pos. 2) and remove the filter.
- Carefully vacuum the filter.
- The filter can be cleaned with clean water.
- Let the filter dry completely prior to returning it to its place.
Disposal
![]()
At its end of life, discard the device according to the local laws and regulations, or deliver the device to your supplier.
Attachments
The CE declaration can be found at the end of this manual.
CE–declaration
Eurom
Kokosstraat 20
8281 JC Genemuiden
The Netherlands
declares the following device in sole responsibility:
Product: Vehicle/Caravan Air Conditioner
Brand name: EUROM
Model: AC2401
Item number: 380019
379990 (Swiss plug)
Complies with the following harmonization rules:
Low Voltage Directive: LVD 2014/35/EU
Electromagnetic Compatibility Directive: EMC 2014/30/EU
Restriction of Hazardous Substances RoHS Directive:2011/65/EU&(EU)2015/863
Applied harmonized standards:
EN 60335-1:2012+A11+A13+A1+A14+A2
EN 60335-2-40:2003+A11+A12+A1+A2+A13
EN 62233:2008
EN 55014-1:2017
EN 55014-2:2015
EN 61000-3-2:2014
EN 61000-3-3:2013
Genemuiden, 02-08-2021
W.J. Bakker, alg. Dir.
Kokosstraat 20, 8281 JC Genemuiden, The Netherlands
T: (+31) 038 385 43 21
E: [email protected]
I : www.eurom.nl
Model: AC2401 Date: 13/10/2021
Product code: 380019
379990 (Swiss plug)
Version: v1.0
![]()