Everbilt 2-in-1 Utility Pump
Quick Start Guide
2-in-1 Utility Pump
Non-Submersible Transfer Pump
SKU# 1002 921 354 Model/Modelo UTA02510
Read your manual for installation, operation, and safety information. This guide neither supplements nor replaces the Owner’s Manual.
1. Attaching the suction hose to the strainer
Attach the clear suction hose to the suction strainer by pushing the male threaded end into the rubber coupler on the suction strainer. Then, place the strainer in at least 1 in. of water at the lowest point to be pumped. NOTE: Make sure the connection is airtight. An air leak can cause the pump to run dry.
2. Attaching hoses
Open the bottom cover. Thread the other end of the suction hose to the inlet of the pump. Thread a 5/8 in. garden hose (sold separately, 50 ft. max. length) onto the discharge outlet of the pump.
NOTE: Always ensure the washer in the hose bib is not damaged. An airtight seal is necessary for this pump to operate.
NOTE: Make sure the end of the outlet hose is not underwater. If the outlet is underwater, the pump may not work.
NOTE: Do not coil or kink the hose.
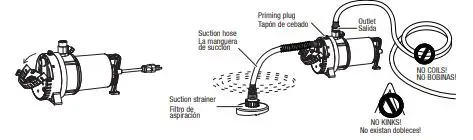
3. Priming water
Unscrew the priming plug. Fill water through the priming hole as the picture shows until it overflow. Tighten the priming plug.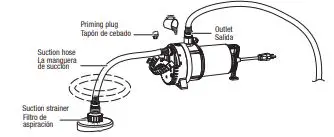
4. Operating
To operate, plug the pump into a GFCI outlet. When the water level has been reduced to approximately 1/8 in. you MUST UNPLUG THE PUMP. DO NOT RUN DRY. NOTE: Make sure the suction hose and suction strainer are in the water before plugging in the pump. NOTE: If water is not pumped in 30 seconds, unplug the power cord and check the connection on the two ends of the inlet hose to make sure there are no air leaks. Then, add water into the outlet again and repeat the process.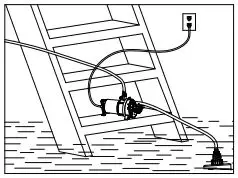
1. Connecting garden hose
Attach a garden hose with a 3/4 in. garden hose thread (not included) to the pump outlet. NOTE: Be sure a 3/4 in. garden hose thread connector has a rubber gasket to minimize water leaks. NOTE: The larger the inside diameter and the shorter the length of the hose, the less pressure that is lost (or the larger the flow rate).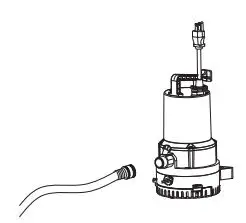 2. Plugging in the pump
Place the pump on a solid base in the flooded area or any place that you would like to remove water. Plug the pump into a 115-volt GFCI power outlet WARNING: Do not allow the plug to fall in the water and do not stand in water while the pump is plugged in. NOTE: Place upright on a solid base.
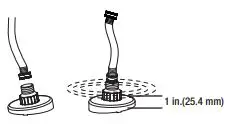
NOTE: The pump must be standing in at least 1-1/2 in. (38.1 mm) of water before you start it. The shaft seal is water lubricated and may be damaged if the pump runs dry.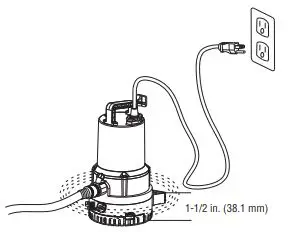 3. Operating the pump
Allow the pump to run and monitor its progress. Unplug the pump when it has removed water down to approximately 1/2 in. (12.7 mm). Remove the pump and hose from the location when finished pumping. The hose still has water that can drain back through the pump. Remove remaining water with a squeegee, mop, sponge, towel, wet/dry vac, etc. CAUTION: Do not run the pump dry. Operating the pump without water will cause damage to the seals and will cause the pump to fail, thereby voiding the pump’s warranty. CAUTION: This hole is for anti-airlock purposes only. Leakage of air or water is normal and necessary. DO NOT REMOVE OR PLUG THIS HOLE!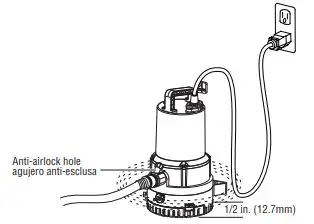
For Professional Technical Support call 1-844-241-5521 Para comunicarse a Soporte técnico profesional llame al 1-844-241-5521