
EV-CE-141-2
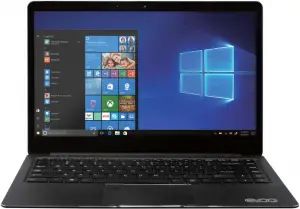
Review this manual before operating your EVOO laptop and keep it for future reference.
Introduction and Table of Contents
1.0 INTRODUCTION
This User Manual is designed to guide you through the key functions and features of your new laptop. Please read carefully to ensure an optimal user experience and keep it handy for future reference.
NOTE:
To change from English language prompts to Spanish language prompts, please go to “Control Panel,” then to “Clock, Language and Region,” and then to “Language” to change from English to Spanish.
1
Overview and Notes
1.1 OVERVIEW
The new EVOO 14.1″ Ultra Thin Laptop (EV-CE-141-2) features Windows 10 in S mode, 1920 x 1080p Full HD resolution and boasts a Intel® Apollo Lake N3350 with 2MB Cache and up to 2.4 GHz. With the built-in Bluetooth function you can seamlessly pair your Ultra Thin Laptop with any Bluetooth compatible devices.
Do the things you want with performance that lasts.
With Windows 10 in S mode, you can search the web or stream movies with Microsoft Edge, choose your own cloud storage, and download many of your favorite apps. Windows 10 in S mode works exclusively with apps from the Microsoft Store within Windows and accessories that are compatible with Windows 10 in S mode. A one-way switch out of S mode is available.
Learn more at Windows.com/SmodeFAQ.
NOTES
- The Ultra Thin Laptop is a high-density electronic product. DO NOT attempt to disassemble the device.
- Please do not drop or bang the device.
- Avoid using this product in the following environments: Extremely hot or cold places, high humidity, dusty areas, direct sunlight or long-term exposure to the sun.
- The product may be cleaned with a damp cotton cloth; the use of any chemical cleaning fluid is prohibited. Please keep the product away from water at all times.
- If you use headphones, DO NOT use them while crossing the street, riding a bicycle or driving a motorcycle.
- Please use approved battery, battery charger and accessories only. The use of any other type of products would be a breach of warranty and may be dangerous.
- If you have any questions regarding the use of this product, please contact your local dealer or contact EVOO customer service center directly at [email protected] or call (888) 999-1682.
- EVOO will not be held responsible for any files lost due to product damage, repair or other causes. Please be sure to follow instructions in the User Guide and backup your files in a timely manner.
2
Appearance and Buttons
2.0 APPEARANCE AND BUTTONS

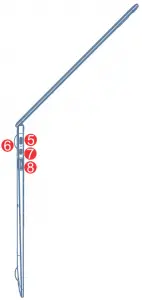
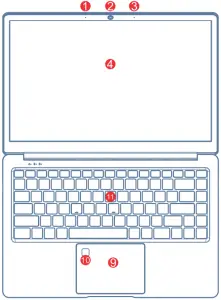
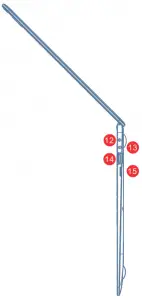
1 Microphone 9 Touchpad
2 Camera 10 Fingerprint
3 Microphone 11 Keyboard
4 Screen 12 DC IN
5 Type-C 13 Earphone
6 Charge Light 14 USB 3.0
7 Micro HDMI 15 TF card
8 USB 3.0 16 SSD Slot
3
Introduction to Desktop
2.1 INTRODUCTION TO THE DESKTOP
You must log on to your Microsoft account before the start up application can run.
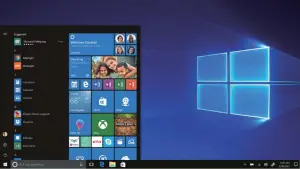
2.2 WINDOWS START MENU
Press the key ![]() on the keyboard or click the icon
on the keyboard or click the icon ![]() on the screen until you see the Start Menu. All applications/programs are displayed in the form of “magnets” listed on the screen. Click on any of the icons to open.
on the screen until you see the Start Menu. All applications/programs are displayed in the form of “magnets” listed on the screen. Click on any of the icons to open.
2.3 INTRODUCTION TO APP INTERFACE
If you want to pin more application programs on the Start interface, press and hold the application program for about one second, and release the magnet until the pop-up option appears and select “Pin to Start” to fix to the start screen, or just press and move to the start screen. (Screen 1).
4
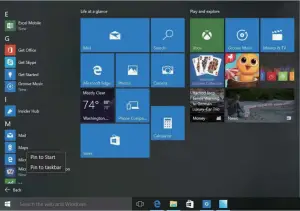
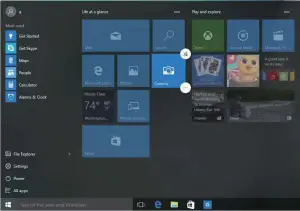
Conversely, if you want to cancel or delete a certain application in the Start screen, press and hold the application program magnet for about one second and click 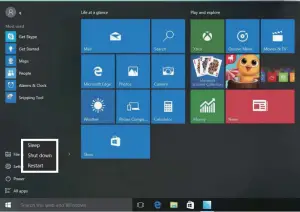 . You can also click
  to check more menu options, such as resizing the magnet you want. (Screen 2) Slide it to the left from the right side of the screen to start Action Center to check the laptop status: Rotation lock, Bluetooth, Brightness, etc.
5
Basic Operations
3.0 BASIC OPERATIONS
3.1 Sleep, Restart and Shutdown
Force Reset / Shutdown
If the laptop freezes, you can press and hold the Power button for 8~12 seconds, then the laptop will shutdown.
3.2 RECOVERY
Follow the steps below
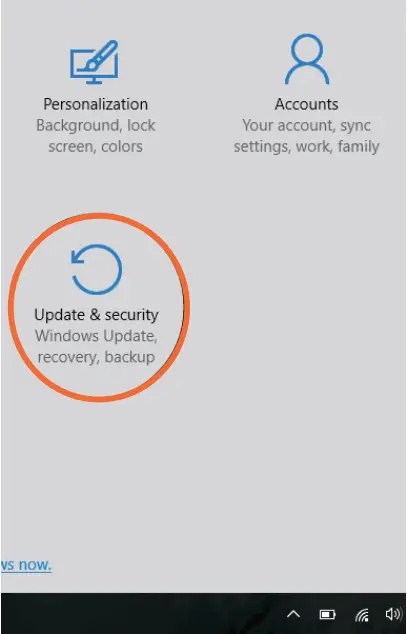
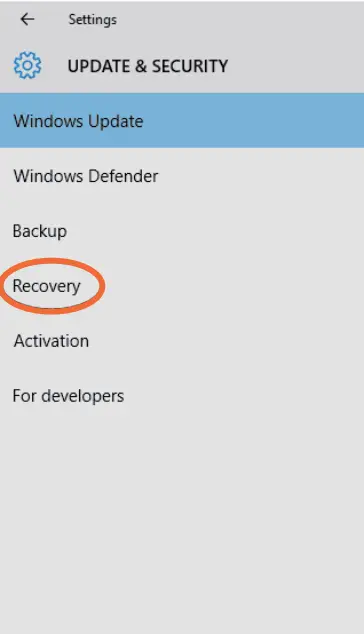

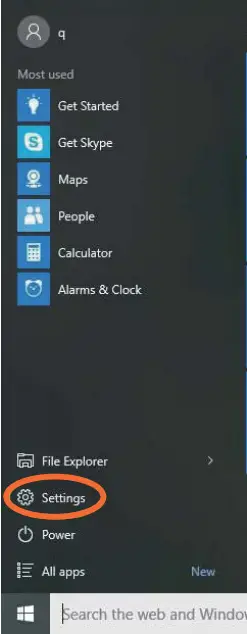
Click the ![]() button in the lower left corner of screen and select “Settings” then select “Update & Security“, click on “Recovery“. The program will walk you through simple steps necessary to recover your system.
button in the lower left corner of screen and select “Settings” then select “Update & Security“, click on “Recovery“. The program will walk you through simple steps necessary to recover your system.
6
3.3 BLUETOOTH
- Click the
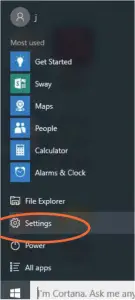 button in the lower left corner of screen.
 - Select “Settings“
- Select “Devices“, click on “Bluetooth“.
a) Make sure the Bluetooth switch is set to “On”
After you turn on Bluetooth, the laptop will auto-search other devices you can pair with your device.
Send or Receive Files via Bluetooth
b) Send a File: Before sending files, you should open the window, “Select where to send your files”: Click the icon ![]() at lower right corner of desktop –
at lower right corner of desktop –![]() – Send a File.
– Send a File.
c) Receive a File: Before receiving the files, you should open the window “Waiting for a connection”: Click the icon ![]() at lower right corner of desktop –
at lower right corner of desktop –![]() – Receive a File.
– Receive a File.

Send or Receive Files via Bluetooth

7
3.4 SECURITY MANAGEMENT
Method for quick setup:
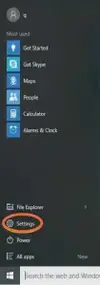
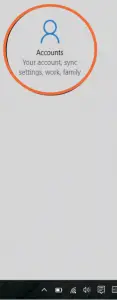
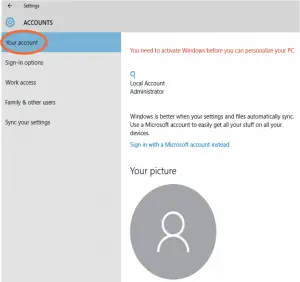
Click the ![]() button in the lower left corner of screen and select “Settings”. Select “Accounts” on the right and click “Create local account” in “Your account” on the right side. After creating a user name and a password for Windows Live ID Account, input username, password, confirm password and password prompt.
button in the lower left corner of screen and select “Settings”. Select “Accounts” on the right and click “Create local account” in “Your account” on the right side. After creating a user name and a password for Windows Live ID Account, input username, password, confirm password and password prompt.

8
Specifications
| System Standard Configuration | ||
| Product Form | Form Factor | 14.1′ Notebook |
| Dimensions (W x D x H) | 13″ x 8.7″ x 8.86″ | |
| LCD | Screen Size | 14.1″ |
| Screen Resolution | 1920 x 1080 IPS | |
| TP | Touch Module | Glass Cover |
| Battery | Type | Lithium-ion polymer battery 7.6v |
| Capacity | 5000mAh | |
| Working Time | 4-5 hours | |
| System Hardware Configuration | ||
| CPU | Type | Apollo Lake N3350 |
| Speed | 1.1GHz-2.4GHz | |
| GPU | Type | Intel HD Graphics 500 |
| Memory | Capacity | LPDDR3 4GB |
| Storage | Capacity | eMMC 32GB |
| Camera | Front | 2 MP |
| Rear | N/A | |
| Speaker | Built-in | Built-in stereo speakers 8Ω/1.0W (x2) |
| G-Sensor | Built-in | N/A |
| Network Connections | ||
| WIFI | WIFI Module | WIFI 802.11 AC3165 |
| Bluetooth | BT Module | Bluetooth 4.0 |
| Ethernet Network | External Dongle | Supportive |
| Interface | ||
| Memory Card Slot | External Memory | Micro SD card up to 64GB (x1) + SSD (x1) |
| USB Interface | Support Data Transfer | Type C (x1) + USB3.0 (x2) |
| Headphone Jack | Music Output | ∮ 3.5mm standard |
| HDMI Interface | Video Output | Micro HDMI |
| Keyboard | Input Device | Hard Keyboard |
| Main Accessories | ||
| Adapter | Standard Configuration | USB Type C or DC 12V/2A ∮ 3.5mm |
| Software Configuration | ||
| OS | Windows | Windows 10 Home in S Mode |
| Audio Format | MP3, WMA, MP3, OGG, AAC, M4A, MA4, FLAC, APE, 3GP, WAV | |
| Video Format | AVI (H.264, DIVX, DIVX, XVID, RM, RMVB,
MKV (H.264, DIVX, DIVX, XVID), WMV, MOV, MP4 (H.264, MPEG, DIVX, XVID), MPEG, MPG, FLV (H.263, H.264) |
|
| Certification | Rohs, FCC, CEC, BQB, Pro65 | |
| Accessories | Charger | |
9
This device complies with part 15 of the FCC Rules. Operation is subject to the condition that this device does not cause harmful interference (1) this device may not cause harmful interference, and (2) this device must accept any interference received, including interference that may cause undesired operation.
Any changes or modifications not expressly approved by the party responsible for compliance could void the user’s authority to operate the equipment.
NOTE: This equipment has been tested and found to comply with the limits for a Class B digital device, pursuant to Part 15 of the FCC Rules. These limits are designed to provide reasonable protection against harmful interference in a residential installation. This equipment generates, uses and can radiate radio frequency energy and, if not installed and used in accordance with the instructions, may cause harmful interference to radio communications. However, there is no guarantee that interference will not occur in a particular installation.
If this equipment does cause harmful interference to radio or television reception, which can be determined by turning the equipment off and on, the user is encouraged to try to correct the interference by one or more of the following measures:
— Reorient or relocate the receiving antenna.
— Increase the separation between the equipment and receiver.
— Connect the equipment into an outlet on a circuit different from that to which the receiver is connected.
— Consult the dealer or an experienced radio/TV technician for help.
FCC ID: 2ACPR-CE141-2

