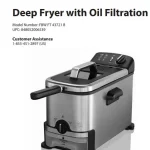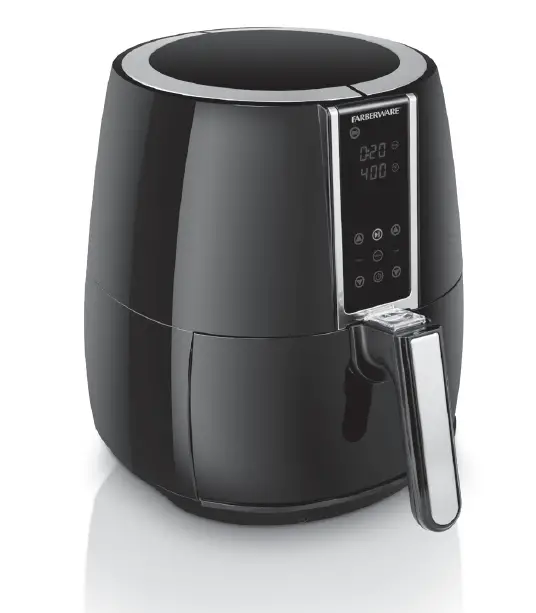

DIGITAL OIL-LESS FRYER
Model Number: FBW FT 43479 BK
UPC: 848052004283
Customer Assistance
1-855-451-2897 (US)
IMPORTANT SAFEGUARDS
When using electrical appliances, basic safety precautions should always be followed, including the following:
- Read all instructions before use.
- Do not touch hot surfaces. Use handles or knobs.
- WARNING – to protect against electric shock, fire and personal injury:
– do not immerse cord or plug in water or other liquids;
– do not immerse the appliance or any electrical components in water or any other liquids;
– always switch off and unplug the appliance before cleaning;
– cook only in the provided basket placed in the basket holder. - Close supervision is necessary when any appliance is used by or near children.
- Unplug from wall outlet when not in use and before cleaning. Allow to cool before putting on or taking off parts, and before cleaning the appliance.
- Do not operate any appliance with a damaged cord or plug, or after the appliance malfunctions or has been damaged in any manner. Call our toll-free customer assistance number for information on examination, repair, or adjustment.
- The use of accessory attachments not recommended by the appliance manufacturer may result in fire, electric shock or injuries to persons.
- Do not use outdoors or in a damp area.
- Do not let power cord hang over edge of table or counter, or touch hot surfaces.
- Do not place on or near a hot gas or electric burner or in a heated oven.
- Extreme caution must be used when moving an appliance containing hot oil or other hot liquids.
- To turn off and disconnect, press the On/off button , then remove plug from wall outlet.
- Never pull on the cord to disconnect the appliance from the wall outlet; instead, grasp the plug and pull on the plug.
- CAUTION – Risk of electric shock. Cook only in removable container.
- Oversized foods or metal utensils must not be inserted in the appliance as they may create a fire or risk of electric shock.
- Do not use appliance for other than intended use.
- Never leave the appliance unattended during operation.
- During use and when removing the basket, hot steam is released. Keep hands and face clear.
- Ensure a minimum distance around the appliance of at least 6 inches to other objects, cupboards and walls.
- A fire may occur if the appliance is covered or touches flammable material, including curtains, draperies, walls, and the like, when in operation. Do not store any item on top of the appliance when in operation.
SAVE THESE INSTRUCTIONS!
IMPORTANT SAFEGUARDS
- Use extreme caution when removing the basket, the basket holder or disposing of hot grease.
- Do not clean with metal scouring pads. Pieces can break off the pad and touch electrical parts involving a risk of electric shock.
- Extreme caution should be exercised when using containers constructed of other than metal or glass.
- Do not store any materials, other than manufacturers recommended accessories, in this appliance when not in use.
- Do not place any of the following materials in the appliance: paper, cardboard, plastic.
- Do not cover the basket or any part of the appliance with metal foil. This will cause overheating of the appliance.
- Let the appliance cool completely before putting away or storing.
ADDITIONAL SAFEGUARDS
This appliance is for HOUSEHOLD USE ONLY.
WARNING:
– DO NOT OPERATE THIS APPLIANCE, IF THE POWER CORD SHOWS DAMAGE OR IF APPLIANCE WORKS INTERMITTENTLY OR STOPS WORKING ENTIRELY.
- A short power-supply cord is to be provided to reduce the risk resulting from becoming entangled in or tripping over a longer cord.
- Longer extension cords are available and may be used if care is exercised in their use.
- If an extension cord is used:
– The marked electrical rating of the cord or extension cord should be at least as great as the electrical rating of the appliance.
– If the appliance is of the grounded type, the extension cord should be a grounding 3 wire cord; and
– The longer cord should be arranged so that it does not drape over the countertop or table top where it can be pulled on by children or tripped over unintentionally.
Polarized plug
- This appliance has a polarized plug (one blade is wider than the other). As a safety feature, this plug will fit in a polarized outlet only one way. If the plug does not fit fully in the outlet, reverse the plug. If it still does not fit, contact a qualified electrician. Do not attempt to defeat this safety feature.
- Do not let children handle or put the electrical cord into their mouths.
SAVE THESE INSTRUCTIONS!
PARTS
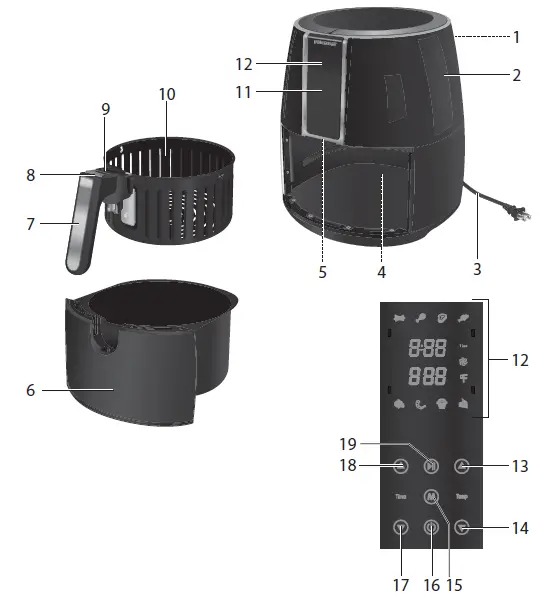
1. Air vents
2. Housing
3. Power cord with plug
4. Heating element
5. Safety switch
6. Basket holder
7. Basket handle
8. Release button
9. Release button cover
10. Basket
11. Control panel
12. Digital LED display
13. Increase temperature button 
14. Decrease temperature button 
15. Select program button 
16. On/off button 
17. Decrease time button
18. Increase time button
19. Start/Pause button 
KNOW YOUR DIGITAL OIL-LESS FRYER
Prepare your favorite foods and snacks in a quick, healthy, and easy way with your new Digital Oil-Less Fryer. This Oil-less Fryer combines heat with high-speed air circulation to cook your ingredients from all sides, simultaneously! It also allows you to prepare a variety of tasty dishes without the addition of excess oils or fats to most ingredients. This Oil-less Fryer features:
- Digital control of the cooking time and temperature.
- A digital control panel with 8 preset menu options.
- A temperature control range up to 400°F (200°C)
- A timer range from 1 to 60 minutes, which is equipped with an auto shut-off feature. Once the timer reaches “0”, the unit will turn itself off.
- Capacity of 2 lbs.
Other great advantages provided by your Oil-less Fryer include:
- Fast cooking, with little to no preheating required.
- Quick and easy clean-up: the non-stick coated parts are conveniently sized to fit in the dishwasher.
- Hassle-free frying—no spatters, no mess, and no oil smell!
- Versatility—with its frying, baking, grilling, and roasting capacities, this unit serves as a great cooking tool for a busy kitchen.
- No assembly required—very easy and safe to use!
Important: For golden, crispier results, similar to those obtained in a deep fryer, it is important to remember that leaner foods (fries, vegetables, chicken, fish, etc.) are best coated with just a tablespoon of oil. Simply add the ingredients in a bowl, add a tablespoon of oil, and toss until well coated.
You can also air-fry any food designed for being baked in the oven. The cooking times will likely need to be adjusted, because the Oil-less Fryer will bake food much faster than a traditional oven or toaster oven.
ILLUSTRATIONS
OPERATION
Before first use
- Remove all packaging materials, labels and/or other transportation means.
- Check package content to verify it is complete and undamaged. Do not operate the appliance if the content is incomplete or appears damaged. Return it immediately to Walmart.
Danger of suffocation!
- Packaging materials are not toys. Always keep plastic bags, foils and foam parts away from babies and children. Packaging material could block airways and prevent breathing.
NOTE:
*Always use the appliance with the basket (10) placed securely in the basketholder (6).
*The appliance may produce an odor and emit smoke when switched on for the first time, as residues from the production process are eliminated. This is normal and does not indicate a defect or hazard.
- It is recommended to operate it for at least 20 minutes on its highest setting ( Using the appliance), until no odor or smoke is present. During use, ensure ample ventilation.
- Let the appliance cool completely.
- Clean the appliance ( Cleaning and Maintenance).
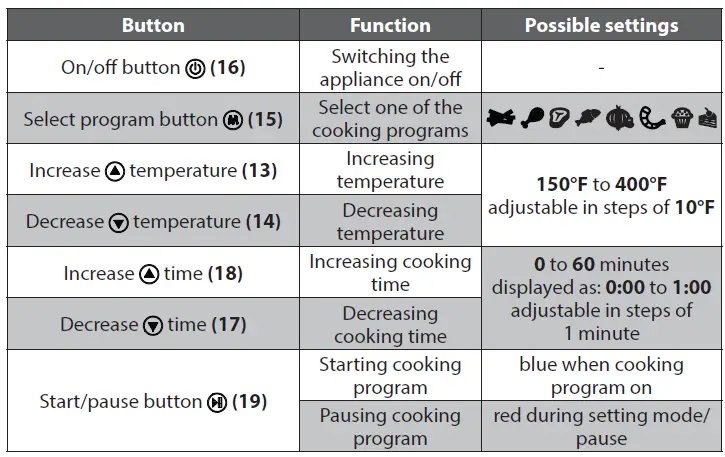
Cooking programs
The appliance is equipped with several pre-set cooking programs. The cooking times and temperatures can be adjusted to suit your own taste, food quantities and food manufacturer’s instructions.

Using the appliance
This appliance can be used to prepare fries and potatoes, meat and poultry, snacks and for baking ( Recommended cooking times and temperatures).
This appliance uses a combination of hot air, high speed air circulation and a top heating element to cook food from all sides. It is an alternative way to cook food and snacks in a quick, healthy and easy way.
WARNING:
Do not use the appliance to cook greasy or fatty food, such as sausages, as the grease could catch on fire.
NOTE:
The appliance has a rated power of 1500W. Before plugging it into the wall outlet, ensure that the electrical circuit is not overloaded with other appliances. This appliance should always be operated on a separate 120V ~ 60Hz wall outlet.
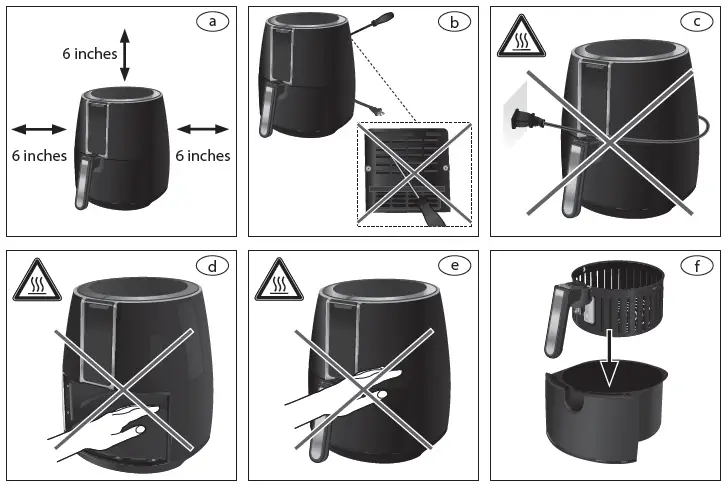
- Place the appliance on a clean, flat and heat-resistant surface. Ensure a minimum distance around the appliance of at least 6 inches to other objects, cupboards and walls (a).
WARNING:
→ Only use accessories recommended by the manufacturer. Do not place any other materials in the appliance.
→ Do not cover or insert any objects into the air vents (1) (b).
→ Never let the power cord (3) come in contact with the housing (2) of the appliance during use (c).
Danger of burns!
→ Always pay special attention when inserting or removing accessories and food from the appliance. Never place your bare hand inside the appliance (d), or on the housing (2) (e) when the appliance is plugged in and switched on. It is recommended to always use oven mitts.
→ Escaping steam can burn.
- Insert the basket (10) into the basket holder (6) (f).
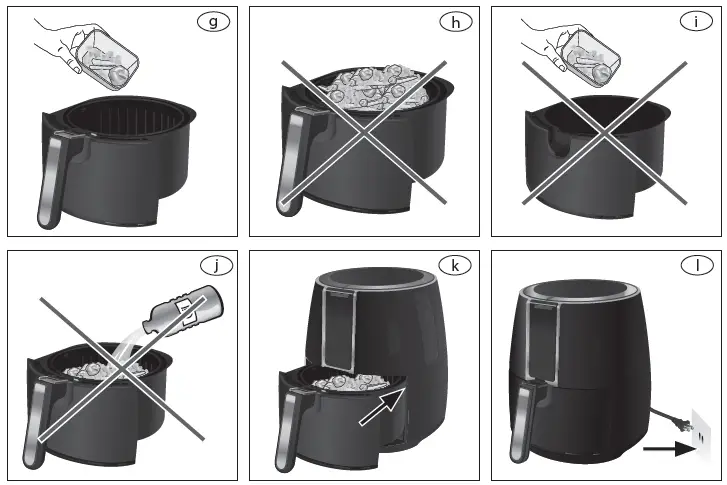
- Place the food to be cooked in the basket (10) (g).
WARNING:
→ Do not overfill the basket (10) (h). Do not exceed the MAX marking on the basket (10) when placing food inside.
→ Do not use the basket holder (6) without the basket (10). Do not place food directly in the basket holder (6) (i).
→ Do not add oil directly into the basket (10) or basket holder (6) (j).
- Place the basket holder (6) in the appliance housing (k).
NOTE:
→ The appliance is equipped with a safety switch (5). If the basket holder (6) is not placed correctly in the housing (2) or removed during use, the appliance will not switch on or is switched off automatically. Ensure the basket holder (6) is flush with the appliance housing (2).
→ The default settings of the appliance are a temperature of 400°F and default time of 15 minutes.
→ Press and hold either of the buttons increase 
- Insert the plug (3) into a wall outlet (i). The on/off button

- Press the on/off button
- Press the select program button

- Press the increase


- Press the start/pause button


NOTE:
→ The fan 
→ During the cooking process, the cooking programs, temperature and time cannot be adjusted. Press the start/pause button
→ Some foods might require the basket (10) to be shaken after half of the cooking time. Simply use the handle (7) to remove the basket holder (6) from the appliance, give it a shake and place it back in the appliance. The appliance will switch off as soon as the basket holder (6) is removed and switch back on once placed back inside.
→ The appliance can be switched off manually, by pressing the on/off button
- Once the set time has passed, the appliance will beep to indicate the cooking process has finished.
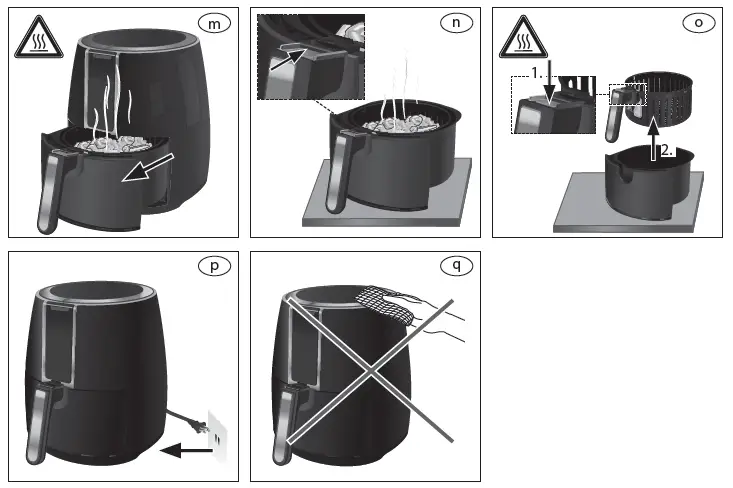
- Use the handle (7) to remove the basket holder (6) from the appliance (m) and place it on a clean, flat and heat resistant surface. Never place the hot basket holder (6) directly on a tabletop or countertop to avoid damage to surfaces.
- To remove the basket (10) from the basket holder (6), first push the release button cover (9) forward to expose the release button (8) (n).
- Then, press the release button (8) and carefully lift the basket (10) upwards, out of the basket holder (6), by the handle (7) (o).
- Turn the basket upside down and carefully pour the food onto a suitable dish. Use suitable utensils to remove food, if required.
- Continue using the appliance straight away to prepare additional food, if required. If you have finished using the appliance, disconnect the plug (3) from the wall outlet (p).
- Allow the appliance to cool down completely before cleaning it ( → Cleaning and Maintenance). Clean after every use.
Danger of burns!
→ Do not press the release button (8) unless the basket holder (6) is placed on a clean, flat and heat resistant surface, it may contain hot liquids generated during the cooking process.
→Always release the basket (10) from the basket holder (6) before emptying it. Hot oil, other liquids or food residues may have collected in the basket holder (6).
→ The metal surfaces of the appliance become hot. Do not touch while in use. Allow the appliance to cool at least 30 minutes before handling and cleaning.
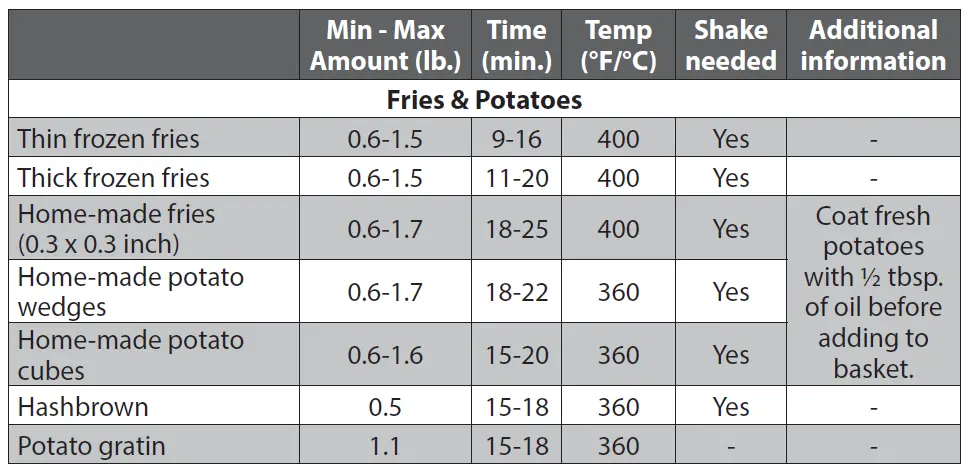
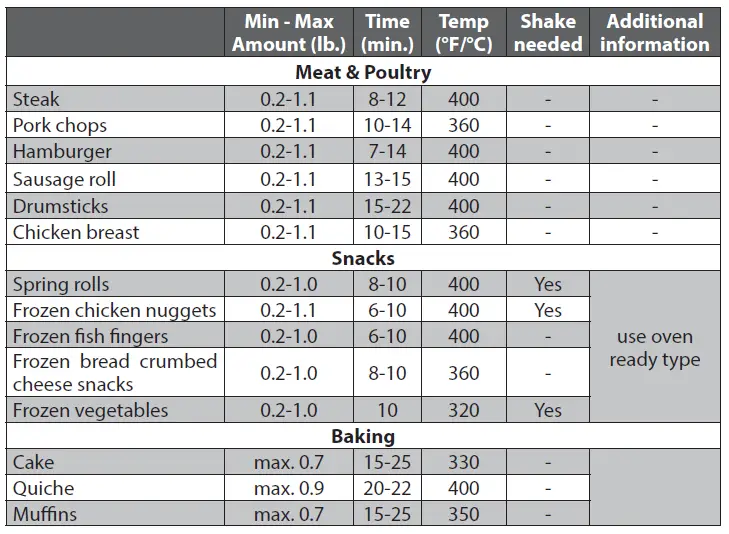
Recommended cooking times and temperatures
NOTE:
→ The following temperatures and times are recommendations only. Adjust them to your personal preferences and needs. They are based on food at refrigerator temperatures. Cooking frozen food will take longer.
HINTS AND TIPS
- This appliance can be used to cook many foods that can also be prepared in a traditional oven.
- Smaller quantities of food normally require a slightly shorter cooking time than larger quantities of food.
- To reduce cooking time, defrost food prior to cooking. It is recommended that some foods should not be thawed/defrosted prior to cooking, such as frozen fish, and frozen french fries.
- It is recommended to use a meat thermometer to check the cooking progress.
- In the event of food flare-ups, do not remove the basket holder (6); press the on/off button
- Do not release the basket (10) from the basket holder (6) unless it is placed on a clean, flat and heat resistant surface.
- When the food you are cooking requires shaking, it is recommended to set the time to half the required time or use a separate timer set for half of the suggested cooking time. This way a bell will ring and remind you to shake the basket (10).
- The optimal amount for cooking crispy fries is up to 1.5lbs of sliced potatoes.
- Use pre-made dough to cook filled snacks quickly and easily. Pre-made dough also requires a shorter cooking time than home-made dough.
- Use the appliance to reheat food. Place food into the appliance, and then set the temperature to 150°F and the time up to 10 minutes.
- It is recommended to only use nylon, heat-proof plastic or wooden cooking utensils. Metal utensils may damage the non-stick surface. Always remove utensils from the appliance. Do not leave them in the appliance during use.
CLEANING AND MAINTENANCE
Proper maintenance will ensure many years of service from your appliance. Clean the appliance after every use. The appliance contains no user serviceable parts and requires little maintenance. Leave any servicing or repairs to qualified personnel.
WARNING:
→ Always turn the appliance off by pressing the on/off button (16). Disconnect the plug (3) from the wall outlet before cleaning. Allow all parts of the appliance to cool down completely.
NOTE:
→ Do not immerse the power cord with plug (3) and appliance housing (2) into water or any other liquids. Do not use abrasive cleaners, steel wool or scouring pads (q). Dry all parts thoroughly after cleaning, before using or storing the appliance. Ensure that no water enters the appliance housing (2).
- Remove the basket holder (6) from the appliance and then, the basket (10) from the basket holder (6).
- Wipe the inside and outside of the appliance with a slightly damp, soft cloth and some mild detergent if needed.
- Take extra care when cleaning near the heating element (4) in order not to damage it.
- The basket holder (6) and basket (10) and can be washed in hot soapy water. The basket holder (6) and basket (10) can also be placed in a dishwasher.
WARNING:
→ Any food residue left on the basket (10) and basket holder (6) could cause odor and/or smoke emissions. Ensure all parts of the appliance are free from residue.
NOTE:
Dry all parts and surfaces thoroughly before use. Make sure that all parts and surfaces are completely dry before connecting the appliance to a wall outlet.
Storage
- Before storage, always make sure the appliance is completely cool, clean and dry.
- It is recommended to store the appliance in a dry place.
- Store the appliance on a stable shelf or in a cupboard. To avoid accidents, ensure that both the appliance and its power cord are beyond reach of children or pets.
TROUBLESHOOTING
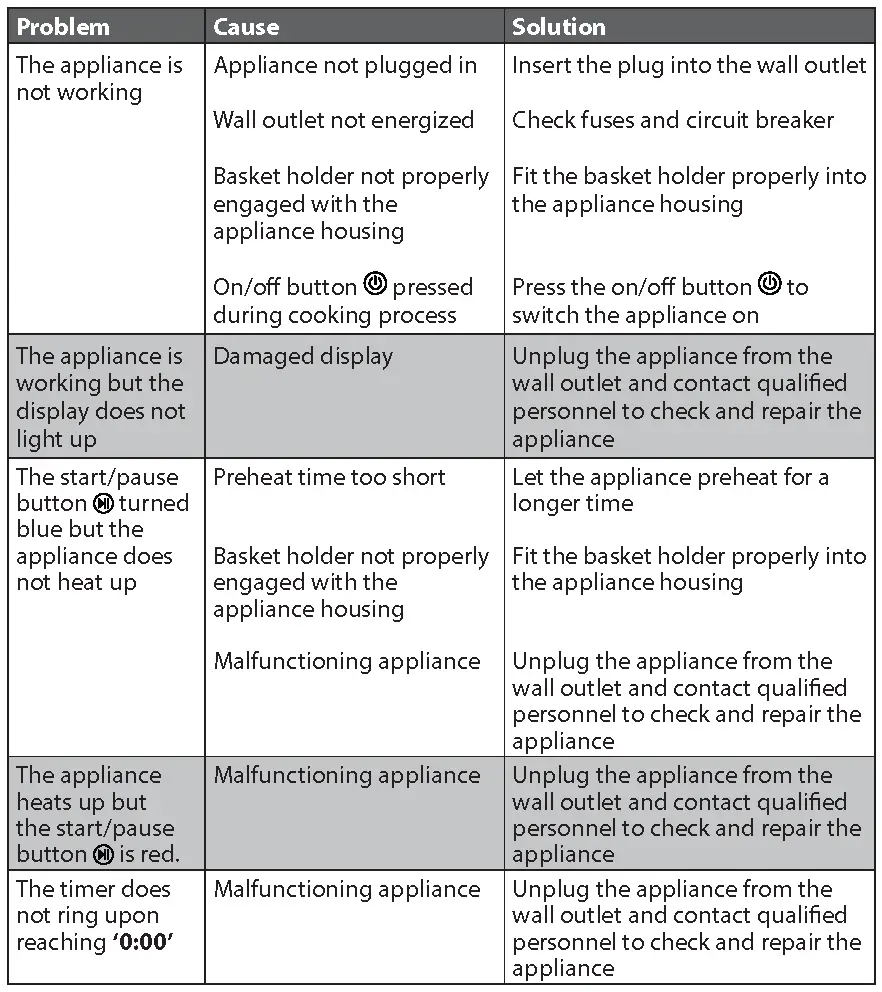
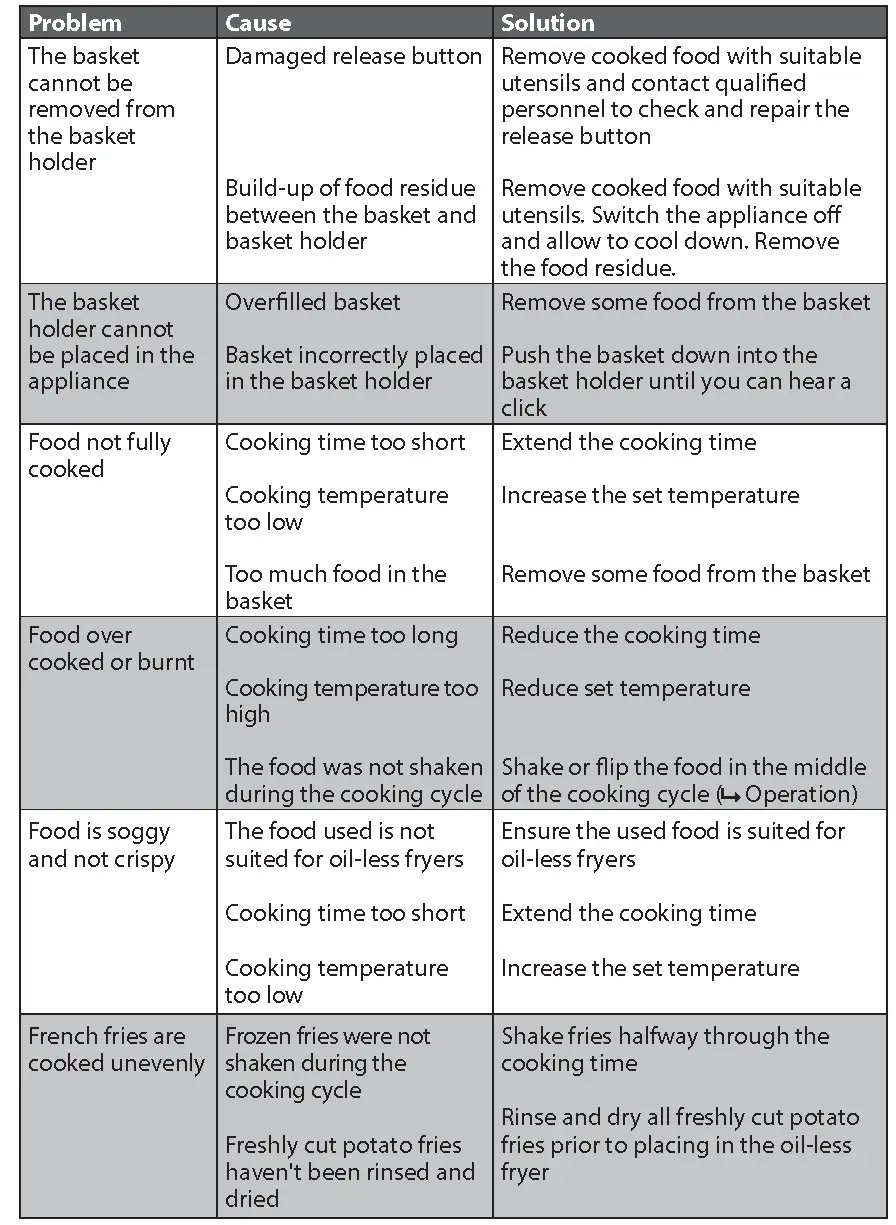
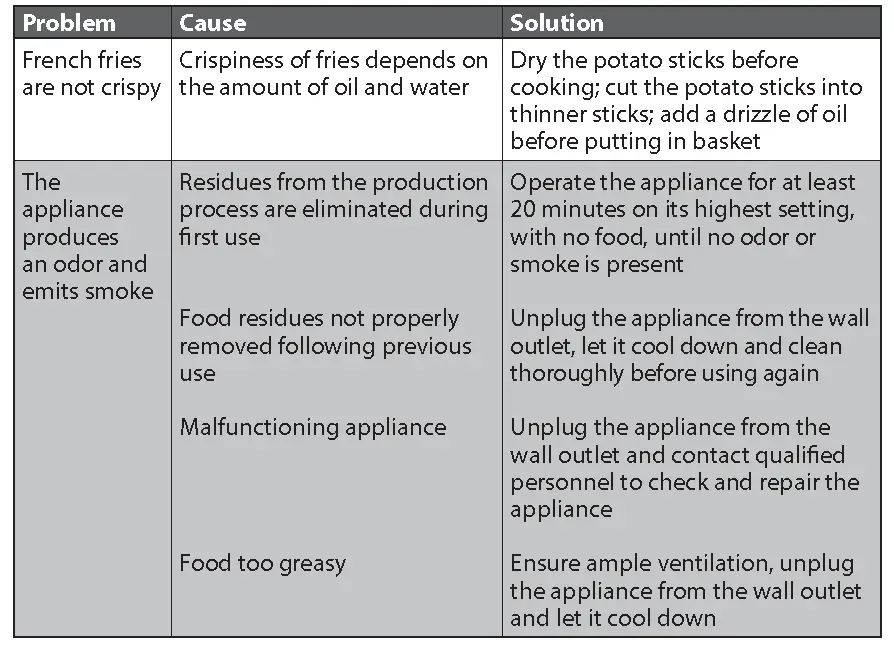
If additional assistance is needed, please contact our Customer Assistance at
1-855-451-2897 (US).
TECHNICAL DATA
- Rated voltage: 120V ~ 60Hz
- Rated power input: 1500W
- Rated current: 12.5A
- Capacity: Max. 3.2Qt (3L)
CUSTOMER ASSISTANCE
If you have a claim under this warranty, please call our Customer Assistance Number. For faster service, please have the model number and product name ready for the operator to assist you. This number can be found on the bottom of your appliance and on the front page of this manual.
Model Number: __________________ Product Name: __________________
Customer Assistance Number 1-855-451-2897
Keep these numbers for future reference!
Two-year limited warranty
What does your warranty cover?
- Any defect in material or workmanship.
For how long after the original purchase?
- Two years.
What will we do?
- Provide you with a new one.
- For those items still under warranty but no longer available, WAL-MART reserves the right to replace with a similar FARBERWARE branded product of equal or greater value.
How do you make a warranty claim?
- Save your receipt.
- Properly pack your unit. We recommend using the original carton and packing materials.
- Return the product to your nearest
Walmart store or call Customer Assistance
at 1-855-451-2897.
What does your warranty not cover?
- Parts subject to wear, including, without limitation, glass parts, glass containers, cutter/strainer, blades, seals, gaskets, clutches, motor brushes, and/or agitators, etc.
- Commercial use or any other use not found in printed directions.
- Damage from misuse, abuse, or neglect, including failure to clean product regularly in accordance with manufacturer’s instructions.
How does state law relate to this warranty?
- This warranty gives you specific legal rights, and you may also have other rights which vary from state to state or province to province.
- This warranty is in lieu of any other warranty or condition, whether express or implied, written or oral, including, without limitation, any statutory warranty or condition of merchantability or fitness for a particular purpose.
- WAL-MART, FARBERWARE and the product manufacturer expressly disclaim all responsibility for special, incidental, and consequential damages or losses caused by use of this appliance. Any liability is expressly limited to an amount equal to the purchase price paid whether a claim, however instituted, is based on contract, indemnity, warranty, tort (including negligence), strict liability, or otherwise.
Some states or provinces do not allow this exclusion or limitation of incidental or consequential losses, so the foregoing disclaimer may not apply to you.
What if you encounter a problem with this product while using it outside the country of purchase?
- The warranty is valid only in the country of purchase and if you follow the warranty claim procedure as noted.
FARBERWARE
© 2017 Farberware Licensing Company, LLC. All Rights Reserved.
Copyrights and Trademarks of Farberware Licensing Company,
LLC, including FARBERWARE®, are used under license from
Farberware Licensing Company, LLC.