Fat Shark Dominator HD02 Model #FSV1123 User Manual

Introduction
Congratulations on purchasing the Fat Shark HDO2 modular UVGA OLED FPV goggles with integrated DVR for analog recording. To ensure your continued enjoyment, please take the time to read through this operating manual thoroughly before using.
There are many feature changes from the previous generations of the Dominator google line. Even if you are a long-time Dominator user, it is recommended that you read this manual to understand what features have been changed and added.
Product Compatibility
The HDO2 has been designed to adhere to established video standards and is compatible with any product also adhering to accepted video standards. Due to the high number of different manufacturers and variation in quality, it’s impossible to for us to have tested with every product combination and some troubleshooting may be required if mix/matching components. The Dominator HDO2 has been thoroughly tested with ImmersionRC gear. For best results and no compatibility issues, Fat Shark recommends ImmersionRC gear for your accessory products.
IMPORTANT!!!! Product Warning!!!!!
DO NOT LEAVE HEADSET EXPOSED TO DIRECT SUNLIGHT. SUNLIGHT WILL MAGNIFY THROUGH THE OPTICS AND BURN HOLES IN THE OLED COLOR FILTER (appears as white open areas).
THIS WILL NOT BE COVERED BY WARRANTY. KEEP GOGGLES IN PROTECTIVE CASE WHEN NOT IN USE.
Product Contents
Carrying Case
Dominator HDO2 Headset

7.4V 18650 Battery Case
Lens Cleaning Cloth
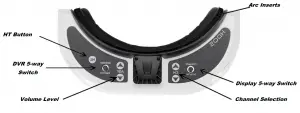
HDO2 Headset Overview


Setup
The HDO2 has many features that can be customized to the individual pilot. This level of personalization requires some interaction to properly set it up for each individual. The following topics are items to be aware of while tuning your HDO2 to you.
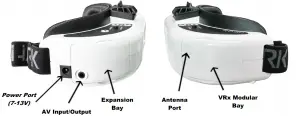
Input Power:
The HDO2 is shipped in Legacy Mode. If you connect a 7-13V (2S or 3S) power source to the power port the HDO2 will automatically power on and it will power off when the source is removed. With a short press, the Power Button will turn on and off the fan while in this mode. If you hold the button, the HDO2 will continuously beep to remind you the headset is in Legacy Mode and the goggles will not power down.
If you want, you can change the input power to use the Power Button to turn on and off the headset. To do this, you need to remove the Expansion Bay door and move the power modejumper from Legacy Mode to Button Mode as show below.
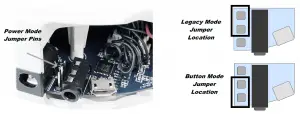
While the headset is in Button Mode and powered off, a long press will turn on the headset. While the headset is in operation, a short press on the power button will change the fan speed. A beep will indicate maximum fan speed. A long press will power down the headset.
Fan speed is proportional to the input voltage. If the headset is being powered from a 2S battery, maximum speed is recommended, and we recommend lowering fan speed if using a 3S source. The low battery alarm also exhibits different behaviors for 2S and 3S sources. It is designed to work for a 2S source and may not provide much warning for a 3S source. We recommend not relying on the low battery indicator if you are using a 3S source as it will provide a very limited time window in which to return and land safely.
Optical Adjustments:
In addition to a larger field of view and higher resolution OLED panel, the HDO2 has a completely updated optical engine that allows for both focus and interpupillary (IPD)
adjustment. Spending a little time getting these dialed in can dramatically improve the visual experience of the HDO2 over previous headsets.
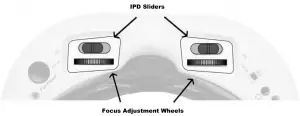
The suggested method for optical adjustments is to first power on the headset and get a stable image. This can be done by using a VRx with an external camera, the AV in, or even the DVR menu. Once you have a stable image go through the following steps:
- Coarse Focus Adjustment: As you move your thumb from left to right while wearing the goggles, you will move the lenses in toward the headset. It is recommended that
you start by moving both lenses all the way in. Close one eye and slowly move just that lens out until the image comes into focus. Once it works well with one eye, repeat the process with the other eye. - Coarse IPD Adjustment: Close one eye and use the IPD adjustment to center the image. Once the image is center, close your other eye and center the image.
- Fine Adjustment: Open both eyes and looked at the merged image. It may not appear great yet. At this point, make small adjustments to the focus and IPD to each eye until it feels visually comfortable and merges into a single crisp picture.
Note: It can be helpful to do focus adjustment first as some users will find that changing focus can cause the IPD to shift slightly. IPD adjustments should be the final correction. Once the headset is adjusted it should hold its position and not require more adjustment over many uses.
Head Strap and Face Fit:
The HDO2 has been designed to fit a larger number of face shapes. The first thing to notice is that it ships with Arc inserts between the face padding and the Velcro layer. These inserts may allow you to get a tighter fit, or they may cause the face fit to be to narrow and create a worse overall experience. Press the HDO2s up to your face with and without the arc inserts to determine which you prefer for reasons of both comfort and light leakage. Some pilots find the “goldilocks” fit by only using a single arc on one side. It does not impact optical alignment so experimentation is strongly encouraged.
Once you have configured your HDO2s for your preferred face fit, put on the head strap, mount the battery, and make any final adjustments to your head strap tightness to finish personalizing your HDO2 to your specific fit requirements.
Display Configuration:
One of the most powerful customization tools in the HDO2 is the ability to tune the actual OLED panels and drivers to the performance parameters that you most prefer. While we recommend a few flights on the default setting, experienced pilots may want to begin to make adjustments right away to customize their display.
To access the complete image setting menu, press and hold the display 5-way switch for 2 seconds. The Image Settings menu should appear onscreen. The 5-way switch is then used to adjust the image settings. Moving the joystick up and down will navigate between setting categories and pressing right or left will increment or decrement the category. The maximum setting for everything but power is 20. The maximum setting for power is 100.
The settings that can be adjusted are contrast, brightness, sharpness, saturation, and power. The first four setting are standard display settings. Power is the actual maximum power provided to the OLED panels. If you increase this, the light energy of the panel will actually goup (so whites get brighter). This will have a negative impact on battery life as it can significantly increase power consumption. It is recommended to keep the OLED power setting at or below 75 for battery life reasons.
General Operation
Display Controls:
Brightness/contrast control: On the display 5-way switch, pressing left and right increases/decreases display contrast and forward/back increases/decreases brightness.
Display mode selection: Vertically depressing the contrast/brightness button for a short press scrolls through the following modes: Analog 4:3, Analog 16:9, HDMI. The OSD indicates mode.
Channel select: Pressing channel up/down buttons will cause the channel to incrementally increase/decrease from channels 1 to 8 (see relevant receiver module for channel map). Audio will beep on channel change. A long beep sounds on channel top and bottom limits.
Low battery warning: Audio warning if input voltage drops below 6.8V which only works well for a 2S power supply
Volume control: each press of button increments volume up or down. Standard earphones can be used with the Dominator HDO2
RX power switch: The RX module power is independently controlled via this switch. If a module is inserted, but desired video source is via the AV cable; the RX module needs to be turned off to avoid image conflict.
DVR Operation:
- SD card MUST be formatted before use to ensure stable recording.
- DVR is for analog recording only, no HD recording.
- Do not place alternative files that you want to keep into the DVR. The DVR may not recognize the file space and write over your files. Use dedicated SD card.
Recording (Using the DVR 5-way switch):
After powering goggles, turn on DVR by depressing vertically and holding the DVR control button for 1 full second (long press).
The DVR red LED should now show be solid.
Ensure a SD card is inserted and short press to start recording (LED will slowly FLASH (~2 times/second). Single beep on record start.
Playback (Using the DVR 5-way switch):
After turning on DVR and in stop record mode (SOLID LED) depress and hold DVR button for 1 second (long press) to enter menu.
Menu Navigation
Playback (press right to enter) – the first file will be selected, and a preview will be displayed
- Press up/down to change the selected file
- Press right to play the selected file
o During playback, up/down will control playback speed or rewind
o Right press will pause / unpause the video
o Left Press will return to the main menu
Format (press right to enter)
Execute (press right again to begin formatting the SD card)
Record (press right to enter) – there are 3 modes to choose from
- Default mode: no recording begins until the button is pressed to start
- Auto Start: the DVR will start recording when the headset is powered on
- Auto Start Continuous: the DVR will start recording when the headset is powered on and will overwrite the file if the SD card memory is full
Pressing up/down to select the recording mode and right press to confirm the selection. Press left to exit to the main menu.
AV connector Pin-out
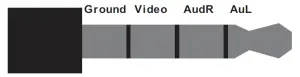
3.5mm AV Connector: Yellow: Video,
White: Audio Left, Red: Audio Right
HDMI Input
The HDMI port can be connected to HDMI devices via a Mini to Mini HDMI cable. It is recommended that the cable is first connected to the HDMI source. Then, turn on the HDO2. The objective to allow the HDMI device to initiate using power supplied by the host device before rather than the goggles.
Note: Most HDMI connectivity issues are due to either incorrect monitor settings or faulty a HDMI cable. Before assuming the HDMI is defective, try connecting with alternative HDMI sources and alternative cables.
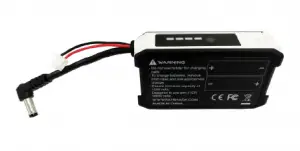
Fat Shark 18650 Battery Case
The Fat Shark 18650 pack with a row of stylish blue LED indicators allows you to visually check remaining capacity (4 levels) to prevent a sudden power/vision lost. It seats securely in the headset strap pocket. The soft silicone battery cable extends out of the top of the pack to avoid contact with head strap. Barrel connector cable features high strand count wire for flexibility and long life. Wire stress is minimized by the additional rubber gasket around the cable exit. 18650 Batteries are not included.
WARNING: USING NON-CERTIFIED 18650 CELLS CAN CAUSE SERIOUS RISKS OF FIRE OR OTHERE HAZARDS AND VOIDS THE DEVICE WARRANTY
Specifications
| Optics: FOV (field of view): IPD (interpupillary distance): Focus: Display: Audio: Electrical: Power Supply: Analog DVR: Interface: Mechanical: |
46 degrees diagonal 54 to 74 mm (adjustable) +2 to -6 diopters (adjustable) Two Sony 0.5” OLED displays Resolution 1280 X 960 NTCS/PAL auto selecting AV Mode 4:3 AV Mode 16:9 HDMI Mode 16:9Stereo Channel Selection Volume Control Mode Selection Display Control (Brightness and Contrast) DVR Control Power Button / Fan Control 7 – 13V input voltage (2S – 3S Supply) 3.5mm AV in/out port Ergonomic molded headset w/ adjustable headband |
Technical Support
Documentation/ troubleshooting: http://fatshark.helpscoutdocs.com/
Support:[email protected]
Note support should be attempted in the following manner. Initial enquiries to Fat Shark support will expect you to have exhausted the online and retailer resources:
- Research Fat Shark helpdocs.
- Contact retailer for support.
- email Fat Shark support.
Warranty
The system can be exchanged for a new unit within 7 days for any manufacturing defects if returned in new condition. The video headset will be warrantied for repair for 2 years if there are no signs of excessive use. Buyer will be responsible for shipping costs. If beyond the warranty period, we will provide repair services.