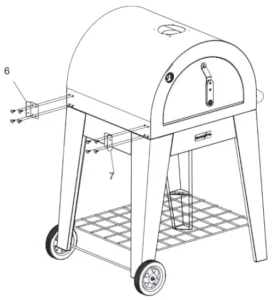
FIAMMETTA 0095630 Blackfast Wood Fired Pizza Oven Instruction Manual
Read these instructions before installation and use.
Keep these instructions for future reference.
WARNING! HOT SURFACES DURING USE, WEAR HAND PROTECTION.
WARNING
- Do not modify this appliance.
- This appliance must be located/installed in accordance with the manufacturer’s installation instructions, municipal building codes and any other statutory regulations..
- For use outdoors only.
- The use of this appliance in enclosed areas is extremely dangerous and is prohibited.
- This appliance must not be used indoors.
- This appliance must not be used in basements or below ground level.
- Do not place items on or against this appliance.
- Do not store chemicals or flammable materials or spray aerosols near this appliance.
- Do not operate this appliance in an explosive atmosphere like near areas where gasoline or other flammable liquids or vapors are stored.
- Do not move the appliance during use.
- Do not use accelerants. This could lead to an explosion and bodily injury.
- Never use treated timber in your oven.
- The oven gets very hot during use. To protect yourself from burns, always wear shoes, oven mitts or gloves and protective clothing with long sleeves while operating this oven. Avoid touching hot surfaces and be very careful when opening the oven door.
- Place Oven in an area where children and pets cannot come into contact with the unit. Do not leave Oven unattended when in use.
- Never move oven when it is in use or when it contains hot coals or ashes.
- Wear gloves when assembling your oven to avoid scrapes or cuts from sharp edges of metal parts.
- This appliance is not intended for use by persons (including children) with reduced physical, sensory or mental capabilities, or lack of experience and knowledge, unless they have been given supervision or instruction concerning use of the appliance by a person responsible for their safety.
WARNING
The user assumes all risk in the assembly and operation of this oven.
Failure to follow the warnings and instructions in this manual can result in severe personal injury, death or property damage. If user cannot read or fully understand the instruction manual, please contact your dealer or service agent. The manufacturer or supplier will not be responsible for user’s negligence.
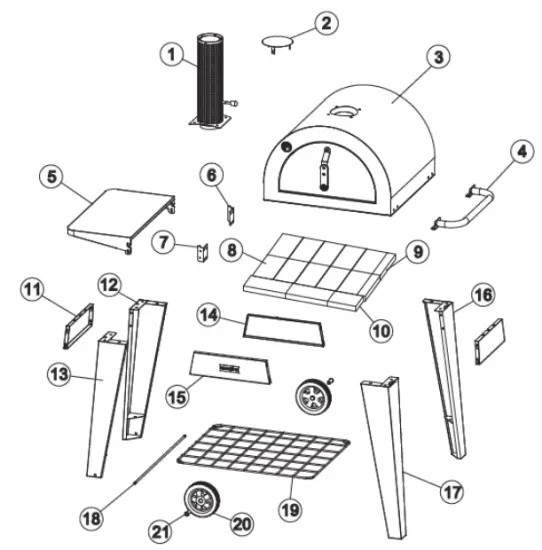
EXPLODED VIEW
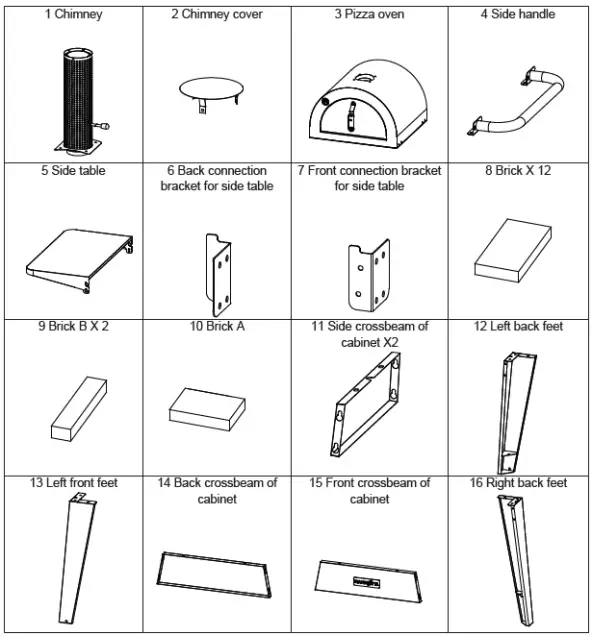
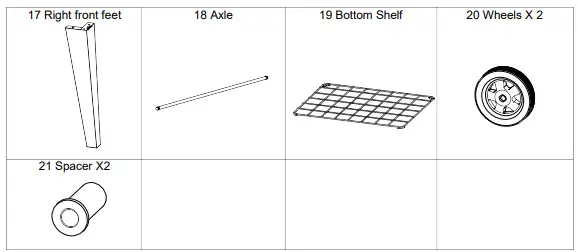
PARTS LIST
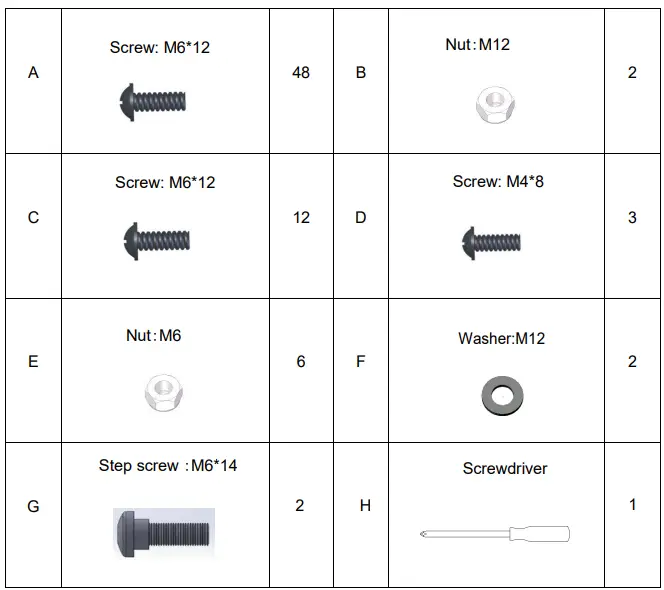
BOLT PACK
ASSEMBLY
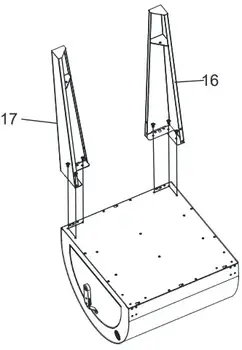
- STEP 1
Assemble the right back feet (16) and the right front feet (17) by screw (A) 6pcs as shown.
Note: Ensure you protect oven when assembling surfaces. Do not fully tighten these screws at this step.
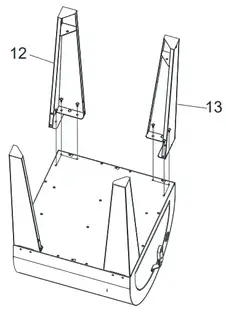
- STEP 2
Assemble the left front feet (13) and the left back feet (12) by screw (A) 6pcs as shown.
Note: Do not fully tighten these screws at this step.
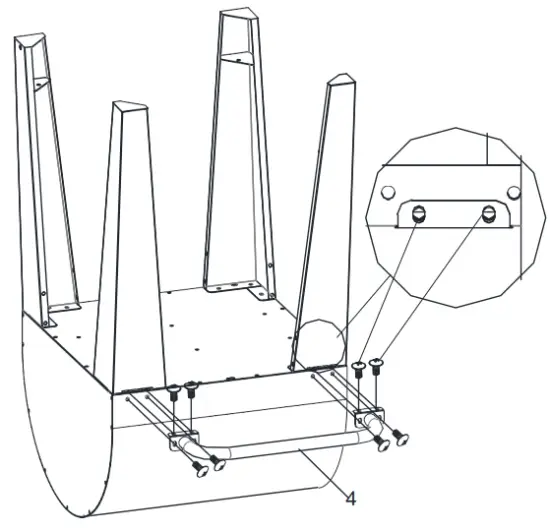
- STEP 3
Assemble the side handle(4)on the pizza oven by screw (C) 8pcs as shown.
Note: Do not fully tighten these screws at this step.
- STEP 4
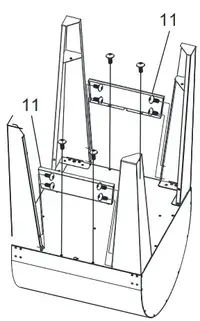
Assemble the side crossbeam of cabinet (11) on the feet (12),(13),(16),(17).by screw (A) 12pcs as shown.
Note: Do not fully tighten these screws at this step.
- STEP 5
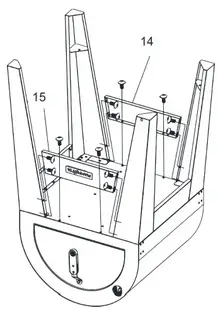
Assemble the front crossbeam of cabinet (15) and the back crossbeam of cabinet (14) on the feet (12),(13),(16),(17).by screw (A) 12pcs as shown.
Note: Do not fully tighten these screws at this step.
- STEP 6
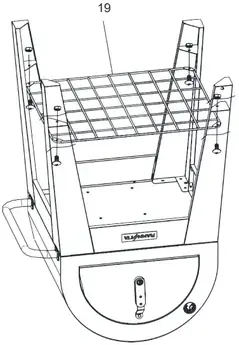
Assemble the bottom shelf (19) on the feet by screw (A) 4pcs and nut (E)4pcs as shown.
Note: Now all screws are in position you can tighten all the screws on the feet and crossbeam and side handle.
- STEP 7
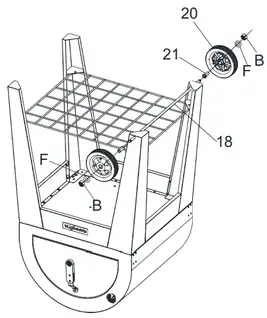
Assemble the axle(18)and wheels(20)and spacer (21) on the left front feet (13) and the left back feet (12) by nut (B) 2pcs and washer (F) 2pcs as shown.
Note: Secure the axle (18) when tightening nuts (B). After all screws are
tightened, carefully turn the oven onto its feet.
- STEP 8
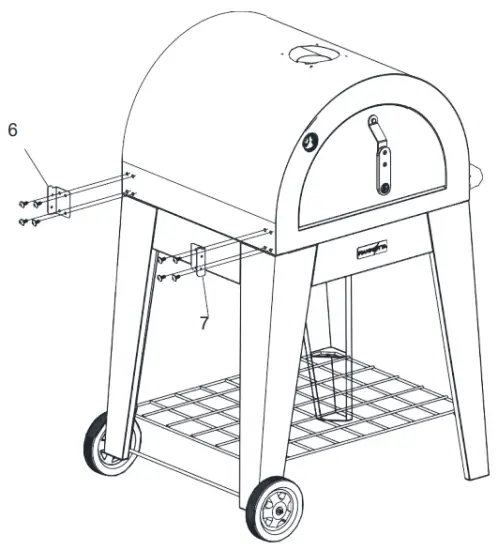
Assemble the back connection bracket for side table (6) and the front connection bracket (7) on the pizza oven by screw (A) 8pcs as shown.
- STEP 9
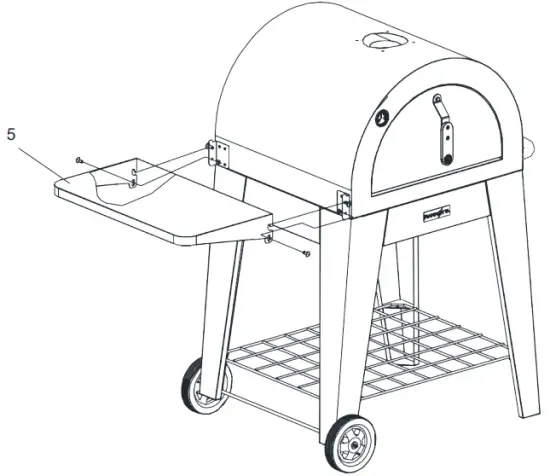
Assemble the side table (5) on the back connection bracket for side table (6) and the front connection bracket for side table (7) by (G) step screw 4pcs and nut (E) 4pcs as shown.
Note: 2pcs (G) step screws and 2pcs nuts are already in position on the brackets of side table (6) & (7).
- STEP 10
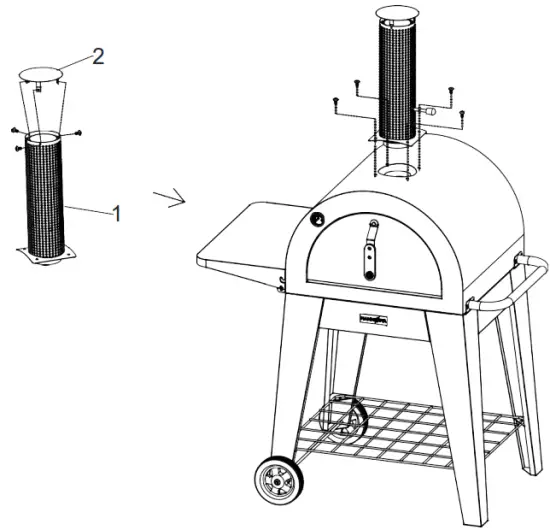
First assemble the chimney cover (2) and the chimney (1) with the 3pcs screw (D) as shown on the right side of the figure below, then fit this assembly to the oven with the 4pcs screw (C) as shown below.
- STEP 11
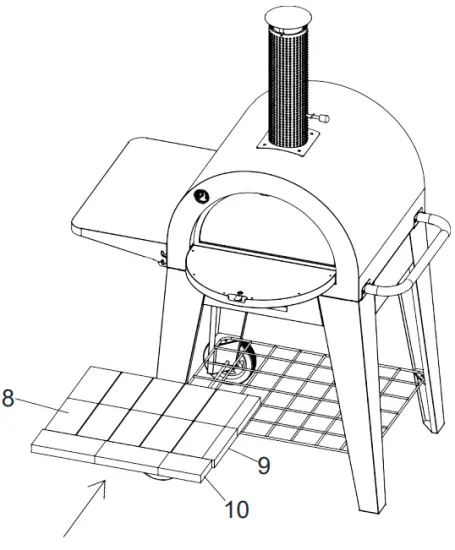
Arrange the bricks (8) (9) and (10) inside the pizza oven as shown below.
Note: Put the front row in first and put the back row in second.
Check all the screws are tight.
HOW TO USE THE PIZZA OVEN
- Keep a fire extinguisher close by for safety.
- Ensure the oven is not over loaded with firewood and any burning logs cannot rollout.
- Due to the intense heat of the fire, be very careful when operating this oven.
- This oven is intended for cooking pizzas, breads, etc. not as a general wood fire, incinerator or outdoor heater.
- The oven temperature should not exceed the normal cooking temperature where possible. If the normal cooking temperature is exceeded for a long period, the oven has been overloaded with fuel.
- Always add additional logs gradually to ensure not to overload the oven with fuel.
- Overloading the Pizza Oven will void the warranty.
- The door must be closed at all times during the lighting period and when adding additional fuel to the fire. Failure to keep the door closed during these periods will result in discoloration of the fascia.
When lighting your oven, ensure the damper is fully opened in the chimney.
The efficiency of the oven depends on the quality of the fire wood used. Only dry wood should be used as damp wood produces excessive smoke and lower temperatures.
Once the fire is burning consistently, add wood as required. Check the oven temperature gauge regularly to maintain the ideal cooking temperature.
Cooking can commence when a white ash has formed over the timber and the oven temperature has stabilized.
Chimney Damper Adjustment
The Damper in the chimney is used to control the air flow out of the oven. A fully open damper allows additional air flow which is useful when lighting the fire or when adding fire wood. Slightly closing the damper will reduce the flame size, intensity and heat allowing for more controlled cooking temperature.
Damper in fully open position
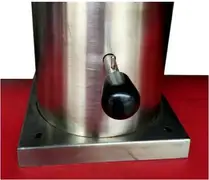
Damper in fully closed position
Oven door
The oven door should be kept in the closed position as often as possible to prevent heat loss and discoloration of the fascia from smoke. When accessing the oven door handle, use hand protection to avoid contact with the hot surfaces.
Maintenance
- To prevent a possible burn injury, always allow the Oven to cool before cleaning.
- Do not dispose of ash residue or unburnt charcoal embers until they have completely cooled.
- Use warm soapy water and a soft cloth to clean the exterior of the Oven. Do not use oven cleaner as it will damage the surface coating.
- Use a stainless steel cleaner to maintain stainless steel surfaces.
TO PROTECT YOUR PIZZA OVEN FROM THE ELEMENTS, WE RECOMMEND YOU PURCHASE A COVER.
Please contact Pacific Gas &Heating Pty Ltd on tel:1300 793978orviaemail on [email protected].
PRODUCT WARRANTY
Thank you for purchasing one of our quality FIAMMETTA products. Your FIAMMETTA product is covered against defects for a period of 12 months for parts and labour, repair or replacement. This warranty excludes surface rust and damage caused by abuse or neglect.
This warranty in Australia is given by Pacific Gas & Heating Pty Ltd, Tel: 1300 793978.
Email: [email protected]
The warranty in New Zealand is given by Bunnings NZ Ltd, PO BOX 14436, Panmure, Auckland, 1741.
Tel: 09-9780000 Fax: 09-9782222
Email: [email protected]
Any claim under this warranty must be made within 12 months of the date of purchase of the product. Proof of purchase must be presented.
Goods presented for repair may be replaced by refurbished goods of the same type rather than being repaired. Refurbished parts may be used to repair the goods.
FOR AUSTRALIAN CUSTOMERS
To make a claim under the warranty please contact the store where the product was purchased or contact Pacific Gas & Heating Pty Ltd directly.
CONDITIONS OF THE WARRANTY
The warranty covers domestic use only and does not apply to commercial applications. You may submit details and proof to our store for consideration. The warranty covers manufacture defects in materials, workmanship and finish under normal use. This warranty is provided in addition to other rights and remedies you may have under law: our goods come with guarantees which cannot be excluded under the Australian Consumer Law.
You are entitled to replacement or refund for a major failure and to compensation for other reasonably foreseeable loss or damage. You are also entitled to have the goods repaired or replaced if the goods fail to be acceptable quality and the failure does not amount to a major failure.
FOR NEW ZEALAND CUSTOMERS
To make a claim under the warranty, take the product (with proof of purchase) to any Bunnings store (See www.bunnings.co.nz for store locations). This warranty is provided in addition to other rights and remedies you may have under law: our goods come with guarantees which cannot be excluded under the Consumer Guarantees Act 1993(NZ). You are entitle to replacement or refund for a major failure and to compensation for other reasonably foreseeable loss or damage. You are also entitled to have the goods repaired or replaced if the goods fail to be of acceptable quality and the failure does not amount to a major failure.
Goods presented for repair may be replaced by refurbished goods of the same type rather than being repaired. Refurbished parts may be used to repair the goods.
The warranty excludes damage resulting from product misuse or product neglect.
The warranty covers domestic use only and does not apply to commercial applications.
Please thoroughly read conditions of warranty.
- The appliance must be operated and maintained in accordance with the instructions supplied in the operating manual.
- Any repair does not extend the warranty period.
- Any parts other than original Jumbuck parts will void this warranty.
INSTALLATION CONDITIONS
All installations must conform to the applicable Electrical and Building standards as laid down by the local codes or state or region.
WHAT IS NOT COVERED IN THE WARRANTY
- Removal or re-installation costs. This warranty does not cover costs for transit nor in home service.
- Lack of maintenance, abuse, neglect, misuse, accidental or improper installation of this appliance.
- Scratches, dents, corrosion or discolouration caused by heat, abrasive chemical cleaners or chipping.
- Corrosion or damage caused by exposure to the elements such as insects, weather or hail.
- Cleaning and wear and tear; service calls of this nature are chargeable.
- Commercial use of the product.
- Unauthorised repairs or modifications during the warranty period.
- Consumable items, example – heating elements.
RECORD THE FOLLOWING INFORMATION
Attach a copy of the purchase receipt here:
Date of purchase………………………………..
Purchased from…………………………………
Location………………………………………..
Model Name and Number……………………..
Date of Manufacture……………………………
Receipt number…………………………………
FOR TECHNICAL ASSISTANCE
For Australian customers
If you experience any technical issues with your FIAMETTA product, in the first instance review the instruction manual or call the warranty service agent below.
For New Zealand Customers
If you experience any technical issues with your FIAMETTA product, in the first instance review the instruction manual or call your local Bunnings Warehouse.
WARRANTY CLAIMS
For Australian customers
Please contact Pacific Gas & Heating Pty Ltd,
Tel: 1300 793978.
Email: [email protected]
For New Zealand Customers
Please contact the store where the product was purchased.