FIRST ALERT Combination Carbon Monoxide & Smoke Alarm

IMPORTANT! PLEASE READ CAREFULLY AND SAVE.
This user’s manual contains important information about your Combination Carbon Monoxide & Smoke Alarm’s operation. If you are installing this Alarm for use by others, you must leave this manual— or a copy of it—with the end user.
© 2020 BRK Brands, Inc. All rights reserved. • Distributed by BRK Brands, Inc.
Aurora, IL 60504 • BRK Brands, Inc. is a subsidiary of Newell Brands Inc. (NASDAQ: NWL)
Customer Service Team: (800) 323-9005 • www.firstalert.com • www.brkelectronics.com
All First Alert® and BRK® Smoke Alarms conform to regulatory requirements, including UL217 and are designed to detect particles of combustion. Smoke particles of varying number and size are produced in all fires.
Ionization technology is generally more sensitive than photoelectric technology at detecting small particles, which tend to be produced in greater amounts by flaming fires, which consume combustible materials rapidly and spread quickly. Sources of these fires may include paper burning in a wastebasket, or a grease fire in the kitchen.
Photoelectric technology is generally more sensitive than ionization technology at detecting large particles, which tend to be produced in greater amounts by smoldering fires, which may smolder for hours before bursting into flame.
Sources of these fires may include cigarettes burning in couches or bedding.
For maximum protection, use both types of Smoke Alarms on each level and in every bedroom of your home.
INTRODUCTION
FIRE SAFETY TIPS
Follow safety rules and prevent hazardous situations: 1) Use smoking materials properly. Never smoke in bed. 2) Keep matches or lighters away from children; 3) Store flammable materials in proper containers; 4) Keep electrical appliances in good condition and don’t overload electrical circuits; 5) Keep stoves, barbecue grills, fireplaces and chimneys grease- and debris-free; 6) Never leave anything cooking on the stove unattended; 7) Keep portable heaters and open flames, like candles, away from flammable materials; 8) Don’t let rubbish accumulate.
Keep alarms clean, and test them weekly. Replace alarms immediately if they are not working properly. Smoke Alarms that do not work cannot alert you to a fire. Keep at least one working fire extinguisher on every floor, and an additional one in the kitchen. Have fire escape ladders or other reliable means of escape from an upper floor in case stairs are blocked.
BASIC SAFETY INFORMATION
IMPORTANT
- Dangers, Warnings, and Cautions alert you to important operating instructions or to potentially hazardous situations. Pay special attention to these items.
- This Smoke/CO Alarm is approved for use in single-family residences. It is NOT designed for marine or RV use.
CAUTION: This combination Smoke/Carbon Monoxide Alarm has two separate alarms. The CO Alarm is not designed to detect fire or any other gas. It will only indicate the presence
of carbon monoxide gas at the sensor. Carbon monoxide gas may be present in other areas. The Smoke Alarm will only indicate the presence of smoke that reaches the sensor. The Smoke Alarm is not designed to sense gas, heat or flames.
WARNING:
- This Smoke/CO Alarm cannot operate without working batteries.
Removing the batteries for any reason, or failing to replace the batteries at the end of their service life, removes your protection. - NEVER ignore any alarm. See “If Your Smoke/CO Alarm Sounds” for more information on how to respond to an alarm. Failure to respond can result in injury or death.
- The Silence Features are for your convenience only and will not correct a problem.
See “Using the Silence Features” for details. Always check your home for a potential problem after any alarm. Failure to do so can result in injury or death. - Test this Smoke/CO Alarm once a week. If the Alarm ever fails to test correctly, have it replaced immediately! If the Alarm is not working properly, it cannot alert you to a problem.
- This product is intended for use in ordinary indoor locations of family living units.
It is not designed to measure CO levels in compliance with Occupational Safety and Health Administration (OSHA) commercial or industrial standards. Individuals with medical conditions that may make them more sensitive to carbon monoxide may consider using warning devices which provide audible and visual signals for carbon monoxide concentrations under 30 ppm. For additional information on carbon monoxide and your medical condition contact your physician.
FCC COMPLIANCE
This equipment has been tested and found to comply with the limits for a Class B digital device, pursuant to Part 15 of the FCC rules. These limits are designed to provide reasonable
protection against harmful interference in a residential installation. This equipment generates, uses and can radiate radio frequency energy and, if not installed and used in accordance
with the instructions, may cause harmful interference to radio communications.
However, there is no guarantee that the interference will not occur in a particular installation.
If this equipment does cause harmful interference to radio or television reception, which can be determined by turning the equipment off and on, the user is encouraged to try to correct the interference by one or more of the following measures:
- Reorient or relocate the receiving antenna.
- Increase the separation between the equipment and receiver.
- Connect the equipment into an outlet on a circuit different from that of the receiver.
- Consult the dealer or an experienced radio or TV technician for help.
WARNING: Changes or modifications to the product, not expressly approved by First Alert /BRK Brands, Inc., could void the user’s authority to operate the equipment.
This device complies with Part 15 of the FCC Rules. Operation is subject to the following two conditions: (1) this device may not cause harmful interference, and (2) this device must accept any interference received, including interference that may cause undesired operation.
INSTALLATION
WHERE TO INSTALL THIS ALARM
Minimum coverage for Smoke Alarms, as recommended by the National Fire Protection Association (NFPA), is one Smoke Alarm on every floor, in every sleeping area, and in every bedroom (See “Regulatory Information For Smoke Alarms” for details on the NFPA recommendations).
For CO Alarms, the National Fire Protection Association (NFPA) recommends that a CO Alarm should be centrally located outside of each separate sleeping area in the immediate vicinity of the bedrooms. For added protection, install additional CO Alarms in each separate bedroom, and on every level of your home.
NOTE: For added protection, install an additional Smoke/CO Alarm at least 15 feet (4.6 meters) away from the furnace or fuel burning heat source where possible. In smaller homes or in manufactured homes where this distance cannot be maintained, install the Alarm as far away as possible from the furnace or other fuel burning source. Installing the Alarm closer than 15 feet (4.6 meters) will not harm the Alarm, but may increase the frequency of unwanted alarms.
To pair this ZCOMBO alarm to a Ring or other compatible Z-Wave network, download the appropriate App and follow the instructions to Set up Device or Connect Device.
IN GENERAL, INSTALL COMBINATION SMOKE AND CARBON MONOXIDE ALARMS:
- On every level of your home, including finished attics and basements.
- Inside every bedroom, especially if people sleep with the door partly or completely closed.
- In the hall near every sleeping area. If your home has multiple sleeping areas, install a unit in each. If a hall is more than 40 feet (12 meters) long, install a unit at each end.
- At the top of first-to-second floor stairs.
- At the bottom of the basement stairs.
- For additional coverage, install Alarms in all rooms, halls, and storage areas, where temperatures normally remain between 40˚ F and 100˚ F (4.4˚ C and 37.8˚ C).
RECOMMENDED PLACEMENT

- When installing on the wall, the top edge of Smoke Alarms should be placed between 4 inches (102 mm) and 12 inches (305 mm) from the wall/ceiling line.
- When installing on the ceiling, place the alarm as close to the center as possible.
- In either case, install at least 4 inches (102 mm) from where the wall and ceiling meet. See “Avoiding Dead Air Spaces” for more information.
NOTE: For any location, make sure no door or other obstruction could keep carbon monoxide or smoke from reaching the Alarm.
Installing Smoke/CO Alarms in Mobile Homes
For minimum security install one Smoke/CO Alarm as close to each sleeping area as possible.
For more security, put one unit in each room. Many older mobile homes (especially those built before 1978) have little or no insulation. If your mobile home is not well insulated, or if you are unsure of the amount of insulation, it is important to install units on inside walls only.
WHERE THIS ALARM SHOULD NOT BE INSTALLED DO NOT LOCATE THIS SMOKE/CO ALARM:
In garages, furnace rooms, crawl spaces and unfinished attics. Avoid extremely dusty, dirty or greasy areas.
WHERE THIS ALARM SHOULD NOT BE INSTALLED – DO NOT LOCATE THIS SMOKE/CO ALARM (CONTINUED)…
- Where combustion particles are produced. Combustion particles form when something burns.
Areas to avoid include poorly ventilated kitchens, garages, and furnace rooms. Keep units at least 20 feet (6 meters) from the sources of combustion particles (stove, furnace, water heater, space heater) if possible. In areas where a 20-foot (6 meter) distance is not possible – in modular, mobile, or smaller homes, for example – it is recommended the Smoke Alarm be placed as far from these fuel-burning sources as possible. The placement recommendations are intended to keep these Alarms at a reasonable distance from a fuel-burning source, and thus reduce “unwanted” alarms. Unwanted alarms can occur if a Smoke Alarm is placed directly next to a fuel-burning source. Ventilate these areas as much as possible. - Within 5 feet (1.5 meters) of any cooking appliance. In air streams near kitchens. Air currents can draw cooking smoke into the smoke sensor and cause unwanted alarms.
- In extremely humid areas. This Alarm should be at least 10 feet (3 meters) from a shower, sauna, humidifier, vaporizer, dishwasher, laundry room, utility room, or other source of high humidity.
- In direct sunlight.
- In turbulent air, like near ceiling fans or open windows. Blowing air may prevent CO or smoke from reaching the sensors.
- In areas where temperature is colder than 40˚ F (4.4˚ C) or hotter than 100˚F (37.8˚ C). These areas include non-airconditioned crawl spaces, unfinished attics, uninsulated or poorly insulated ceilings, porches, and garages.
- In insect infested areas. Insects can clog the openings to the sensing chamber.
- Less than 12 inches (305 mm) away from fluorescent lights. Electrical “noise” can interfere with the sensor.
- In “dead air” spaces. See “Avoiding Dead Air Spaces”.
AVOIDING DEAD AIR SPACES
“Dead air” spaces may prevent smoke from reaching the Smoke/CO Alarm. To avoid dead air spaces, follow installation recommendations below.
On ceilings, install Smoke/CO Alarms as close to the center of the ceiling as possible. If this is not possible, install the Smoke/CO Alarm at least 4 inches (102 mm) from the wall or corner.
For wall mounting (if allowed by building codes), the top edge of Smoke/CO Alarms should be placed between 4 inches (102 mm) and 12 inches (305 mm) from the wall/ceiling line, below typical “dead air” spaces.
On a peaked, gabled, or cathedral ceiling, install first Smoke/CO Alarm within 3 feet (0.9 meters) of the peak of the ceiling, measured horizontally. Additional Smoke/ CO Alarms may be required depending on the length, angle, etc. of the ceiling’s slope.
Refer to NFPA 72 for details on requirements for sloped or peaked ceilings.
WEEKLY TESTING
WARNING:
- NEVER use an open flame of any kind to test this unit. You might accidentally damage or set fire to the unit or to your home. The built-in test switch accurately tests the unit’s operation as required by Underwriters Laboratories, Inc. (UL). NEVER use vehicle exhaust! Exhaust may cause permanent damage and voids your warranty.
- DO NOT stand close to the Alarm when the horn is sounding. Exposure at close range may be harmful to your hearing. When testing, step away when horn starts sounding.
CAUTION: It is important to test this unit every week to make sure it is working properly.
Using the test button is the recommended way to test this Smoke/CO Alarm.
You can test this Smoke/CO Alarm: Press and hold the Test/Silence button 3-5 seconds until unit starts to alarm.
During testing, you will see and hear the following sequence:
- The Horn will sound 3 beeps, pause, 3 beeps. The Power/Smoke LED flashes Red and the CO LED will be Off.
- Next the Horn will sound 4 beeps, pause, 4 beeps. The Power/Smoke LED will be Off and the CO LED flashes Red.
If the unit does not alarm, make sure the batteries are correctly installed, and test again. If the unit still does not alarm, replace it immediately.
HOW TO INSTALL THIS ALARM
IMPORTANT: This combination Smoke/CO Alarm was designed to be mounted on the ceilingor wall. It is not a tabletop device. You must install this device on the ceiling or wall as outlined below. Read “Where To Install This Alarm” before starting.
Tools you will need: pencil, drill with 3/16” or 5mm drill bit, flathead screwdriver, hammer.

PARTS OF THIS SMOKE/CO ALARM
- Test/Silence Button
- Battery Compartment
- Power/Smoke Alarm LED
- CO Alarm LED
CAUTION:
- Do not connect this unit to any other alarm or auxiliary device. It is a single-station unit that cannot be linked to other devices. Connecting anything else to this unit may prevent it from working properly.
- Do not install this unit over an electrical junction box. Air currents around junction boxes can prevent smoke from reaching the sensing chamber and prevent the unit from alarming. Only AC powered units are intended for installation over junction boxes.
IMPORTANT
If you want to lock the battery compartment, or lock the Smoke/CO Alarm to the mounting bracket, please read the “Optional Locking Features” section located at www.firstalert.com
- Hold base firmly and twist the mounting bracket counterclockwise (left) to separate it from the unit.
- Hold the mounting bracket against the ceiling (or wall) so the vertical mounting slot is aligned in the 12 o’clock position and trace around the inside of the mounting slots (vertical and horizontal mounting).
- Put the unit where it won’t get covered with dust when you drill the mounting holes.
- Using a 3/16” (5 mm) drill bit, drill a hole through the center of the oval outlines you traced.
- Insert the plastic screw anchors (in the plastic bag with screws) into the holes. Tap the screw anchors gently with a hammer, if necessary, until they are flush with the ceiling or wall.
- Line the mounting bracket up over the plastic screw anchors.
- Screw the mounting bracket to the ceiling or wall through the mounting slots using the two screws provided.
- Before attaching the Alarm to the bracket, insert the two (2) AA batteries (included) into the battery compartment.
Match the terminals on the end of the battery with the terminals on the unit. Match “+” to “+” and “-” to “-.” If the batteries are not fully inserted, the unit cannot receive battery power.
NOTE: The unit may beep briefly when you install the batteries. This is normal. The GREEN Light flashes about every 60 seconds when the unit is receiving battery power.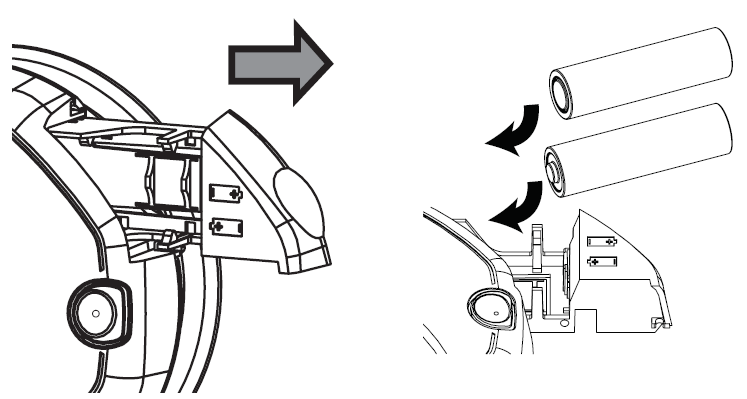
- Attach the Smoke/CO Alarm to the mounting bracket. Line up the guides on the alarm’s base with the guides on the mounting bracket. When guides are lined up, turn the base clockwise (right) until it snaps into place. NOTE: Once the Smoke/CO Alarm is snapped onto the mounting bracket, you can rotate the Smoke/CO Alarm to adjust the alignment.
- Test the Smoke/CO Alarm. See “Weekly Testing” for details.


OTHER Z-WAVE SYSTEMS
This product can be operated in any Z-Wave network with other Z-Wave certified devices from other manufacturers. All non-battery operated nodes within the network will act as repeaters regardless of the vendor to increase the reliability of the network.
ADD
- Slide battery door open.
- Insert batteries checking the correct orientation.
- Press and hold the test button with your finger or thumb. Keep it held down as you slide the battery drawer closed. You may then release the button.
NOTE: Use only your finger or thumb on the test button. The use of any other instrument is strictly prohibited.
REMOVE
- Slide battery door open.
- Remove and re-insert batteries checking the correct orientation.
- Press and hold the test button with your finger or thumb. Keep it held down as you slide the battery drawer closed. You may then release the button.
NOTE: Use only your finger or thumb on the test button. The use of any other instrument is strictly prohibited.
The alarm will remain awake for 30 seconds on inclusion.
RESET DEVICE
If the device is powered up with the test button held down for 10+ seconds, the device will reset all Z-Wave settings and leave the network.
Upon completion of the Reset operation, the LED will glow and the horn will sound for ~1 second.
Please use this procedure only when the network primary controller is missing or otherwise inoperable.
NOTE: The device will not remain awake after resetting and will go into standby mode.
PROCEDURE TO MANUALLY WAKE-UP THE DEVICE
To manual wake-up the device, slide the battery door open wait for ~5 seconds and then slide the battery drawer closed. Upon power-up, the device will send the wake-up notification.
DSK LOCATION ON THE PRODUCT
The QR code and the 5-digit DSK pin can be found on the product nameplate which is located on the back of the product. The Full DSK string can be found on the product insert, available inside the product packaging.
For more information on Z-Wave specifications, visit www.firstalert.com/zwaveinfo
REGULAR MAINTENANCE
This unit has been designed to be as maintenance-free as possible, but there are a few simple things you must do to keep it working properly.
- Test it at least once a week.
- Clean the Smoke/CO Alarm at least once a month; gently vacuum the outside of the Smoke/CO Alarm using your household vacuum’s soft brush attachment. A can of clean compressed air (sold at computer or office supply stores) may also be used. Follow manufacturer instructions for use.
Test the Smoke/CO Alarm. Never use water, cleaners or solvents since they may damage the unit. - If the Smoke/CO Alarm becomes contaminated by excessive dirt, dust and/or grime, and cannot be cleaned to avoid unwanted alarms, replace the unit immediately.
- Relocate the unit if it sounds frequent unwanted alarms. See “Where This Alarm Should Not Be Installed” for details.
Choosing a replacement battery:
Your Smoke/CO Alarm requires two standard AA batteries. The following batteries are acceptable as replacements: Energizer E91, Duracell MN1500/LR6. These batteries are available at many local retail stores.
WARNING:
- Always use the exact batteries specified by this User’s Manual. DO NOT use rechargeable batteries. Clean the battery contacts and also those of the device prior to battery installation. Install batteries correctly with regard to polarity (+ and -).
- Please dispose of or recycle used batteries properly, following any local regulations. Consult your local waste management authority or recycling organization to find an electronics recycling facility in your area. DO NOT DISPOSE OF BATTERIES IN FIRE. BATTERIES MAY EXPLODE OR LEAK.
- Constant exposure to high or low temperatures or high humidity may reduce battery life.
- Keep battery out of reach of children. In the event a battery is swallowed, immediately contact your poison control center, your physician, or the National Battery Ingestion hotline at 202-625-3333 as serious injury may occur.
Actual battery service life depends on the Smoke/CO Alarm and the environment in which it is installed. All the batteries specified above are acceptable replacement batteries for this unit. Regardless of the manufacturer’s suggested battery life, you MUST replace the battery immediately once the unit starts “chirping” (the “low battery warning”).
To replace the batteries (without removing Alarm from the ceiling or wall):
- Open the battery compartment.
- Press tabs A and B as shown in the diagram and remove each battery.
- Insert the new batteries, making sure they snap completely into the battery compartment.
Match the terminals on the ends of the batteries with the terminals on the unit. - Close the battery compartment, and then test the unit by pressing the Test/Silence button.

IF YOUR SMOKE/CO ALARM SOUNDS
WHAT TO DO FIRST–IDENTIFY THE TYPE OF ALARM
| Type of Alarm | What You See and Hear |
| Carbon Monoxide (CO) | CO LED: Flashes Red
Horn: 4 beeps, pause, 4 beeps, pause Power/Smoke LED: Off |
| Smoke | Power/Smoke LED: Flashes Red Horn: 3 beeps, pause, 3 beeps, pause CO LED: Off |
REGULATORY INFORMATION FOR SMOKE ALARMS
RECOMMENDED LOCATIONS FOR SMOKE ALARMS
Installing Smoke Alarms in Single-Family Residences
The National Fire Protection Association (NFPA), recommends one Smoke Alarm on every floor, in every sleeping area, and in every bedroom. In new construction, the Smoke Alarms must be AC powered and interconnected. See “Agency Placement Recommendations” for details.
For additional coverage, it is recommended that you install a Smoke Alarm in all rooms, halls, storage areas, finished attics, and basements, where temperatures normally remain between 40˚ F (4.4˚ C) and 100˚ F (37.8˚ C). Make sure no door or other obstruction could keep smoke from reaching the Smoke Alarms.
More specifically, install Smoke Alarms:
- On every level of your home, including finished attics and basements.
- Inside every bedroom, especially if people sleep with the door partly or completely closed.
- In the hall near every sleeping area. If your home has multiple sleeping areas, install a unit in each. If a hall is more than 40 feet long (12 meters), install a unit at each end.
- At the top of the first-to-second floor stairway, and at the bottom of the basement stairway.
Specific requirements for Smoke Alarm installation vary from state to state and from region to region.
Check with your local Fire Department for current requirements in your area. It is recommended AC or AC/DC units be interconnected for added protection.

AGENCY PLACEMENT RECOMMENDATIONS
Standards: Underwriters Laboratories Inc. Single and Multiple Station Smoke Alarms 217. NFPA 72 Chapter 29
“For your information, the National Fire Alarm and Signaling Code, NFPA 72, reads as follows:”
29.5.1* Required Detection.
29.5.1.1* Where required by other governing laws, codes, or standards for a specific type of occupancy, approved single and multiple-station smoke alarms shall be installed as follows:
- In all sleeping rooms and guest rooms
- Outside of each separate dwelling unit sleeping area, within 21 ft (6.4 m) of any door to a sleeping room, with the distance measured along a path of travel
- On every level of a dwelling unit, including basements
- On every level of a residential board and care occupancy (small facility), including basements and excluding crawl spaces and unfinished attics
- In the living area(s) of a guest suite
- In the living area(s) of a residential board and care occupancy (small facility)
(Reprinted with permission from NFPA 72®, National Fire Alarm and Signaling Code Copyright © 2010
National Fire Protection Association, Quincy, MA 02269. This reprinted material is not the complete and official position of the National Fire Protection Association, on the referenced subject which is represented only by the standard in its entirety), (National Fire Alarm and Signaling Code® and NFPA 72® are registered trademarks of the National Fire Protection Association, Inc., Quincy, MA 02269).
California State Fire Marshal (CSFM)
Early warning detection is best achieved by the installation of fire detection equipment in all rooms and areas of the household as follows: A Smoke Alarm installed in each separate sleeping area (in the vicinity, but outside bedrooms), and Heat or Smoke Alarms in the living rooms, dining rooms, bedrooms, kitchens, hallways, finished attics, furnace rooms, closets, utility and storage rooms, basements, and attached garages.
ABOUT SMOKE ALARMS
Battery (DC) operated Smoke Alarms: Provide protection even when electricity fails, provided the batteries are fresh and correctly installed. Units are easy to install, and do not require professional installation.
AC powered Smoke Alarms: Can be interconnected so if one unit senses smoke, all units alarm. They do not operate if electricity fails. AC with battery (DC) back-up: will operate if electricity fails, provided the batteries are fresh and correctly installed. AC and AC/DC units must be installed by a qualified electrician.
Smoke/CO Alarms for Solar or Wind Energy users and battery backup power systems:
AC powered Smoke/CO Alarms should only be operated with true or pure sine wave inverters. Operating this Alarm with most battery-powered UPS (uninterruptible power supply) products or square wave or “quasi sine wave” inverters will damage the Alarm. If you are not sure about your inverter or UPS type, please consult with the manufacturer to verify.
Smoke Alarms for the hearing impaired: Special purpose Smoke Alarms should be installed for the hearing impaired. They include a visual alarm and an audible alarm horn, and meet the requirements of the Americans With Disabilities Act.
Can be interconnected so if one unit senses smoke, all units alarm.
TROUBLESHOOTING
| TROUBLESHOOTING GUIDE | ||
| IF THE ALARM… | PROBLEM… | YOU SHOULD… |
| Horn “chirps” and LED flashes GREEN about once per minute. | Low battery warning. | Install two new AA batteries*. |
| Horn “chirps” 3 times every minute; LED flashes GREEN 3 rapid flashes. | MALFUNCTION SIGNAL. Device is not working properly, and needs to be replaced. | Units under warranty should be returned to manufacturer for replacement. See “Limited Warranty” for details. |
| Horn “chirps” 5 times every minute; LED flashes GREEN 5 rapid flashes. | END OF LIFE SIGNAL. Alarm needs to be replaced. | Immediately replace the Alarm. |
| Carbon Monoxide Alarm ONLY: | ||
| CO Alarm goes back into alarm 4 minutes after you Silence it. | CO levels indicate a potentially dangerous situation | IF YOU ARE FEELING SYMPTOMS OF CO POISONING, EVACUATE your home and call 911 or the Fire Department. Refer to “If The CO Alarm Sounds” for details. |
| CO Alarm sounds frequently even though no high levels of CO are revealed in an investigation. | The CO Alarm may be improperly located. Refer to “Where to Install This Alarm” for details. | Relocate your Alarm. If frequent alarms continue, have home rechecked for potential CO problems. You may be experiencing an intermittent CO problem. |
| Smoke Alarm ONLY: | ||
| Smoke Alarm sounds when no smoke is visible. | Unwanted alarm may be caused by non- emergency source like cooking smoke. | Silence Alarm using manual button; clean the Alarm’s cover with a soft, clean cloth. If frequent unwanted alarms continue, relocate your Alarm. Alarm may be too close to a kitchen, cooking appliance, or steamy bathroom. |
| *For a list of acceptable replacement batteries, see “Regular Maintenance.” | ||
| If you have any questions that cannot be answered by reading this manual, call the Customer Service Team: 1-800-323-9005. | ||
LIMITED WARRANTY
BRK Brands, Inc., (“BRK”) the maker of First Alert® brand and BRK® brand products, warrants that for a period of ten years from the date of purchase, this product will be free from defects in material and workmanship. BRK, at its option, will repair or replace this product or any component of the product found to be defective during the warranty period. Replacement will be made with a new or remanufactured product or component. If the product is no longer available, replacement may be made with a similar product of equal or greater value. This is your exclusive warranty.
This warranty is valid for the original retail purchaser from the date of initial retail purchase and is not transferable. Keep the original sales receipt. Proof of purchase is required to obtain warranty performance. BRK dealers, service centers, or retail stores selling BRK products do not have the right to alter, modify or any way change the terms and conditions of this warranty.
This warranty does not cover normal wear of parts or damage resulting from any of the following: negligent use or misuse of the product, use on improper voltage or current, use contrary to the operating instructions, disassembly, repair or alteration by anyone other than BRK or an authorized service center. Further, the warranty does not cover Acts of God, such as fire, flood, hurricanes and tornadoes or any batteries that are included with this unit.
BRK shall not be liable for any incidental or consequential damages caused by the breach of any express or implied warranty. Except to the extent prohibited by applicable law,
any implied warranty of merchantability or fitness for a particular purpose is limited in duration to the duration of the above warranty. Some states, provinces or jurisdictions do not allow the exclusion or limitation of incidental or consequential damages or limitations on how long an implied warranty lasts, so the above limitations or exclusion may not apply to you. This warranty gives you specific legal rights, and you may also have other rights that vary from state to state or province to province.
How to Obtain Warranty Service
Service: If service is required, do not return the product to your retailer. In order to obtain warranty service, contact the Customer Service Team at 1-800-323-9005. To assist us in serving you, please have the model number and date of purchase available when calling.
For Warranty Service return to: 1301 Joe Battle, El Paso, TX 79936
Battery: BRK Brands, Inc. make no warranty, express or implied, written or oral, including that of merchantability or fitness for any particular purpose with respect to battery.
Visit www.firstalert.com for more information.
A copy of the manual can be found at www.firstalert.com/products
![]()
