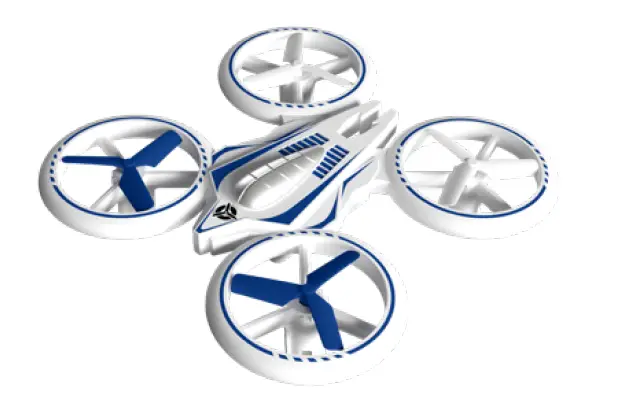
Force 1 UFO4000 2-speed Led stunt Drone

PRODUCT OVERVIEW

ATTENTION:
PLEASE WATCH THIS FLIGHT INSTRUCTION VIDEO BEFORE FLYING YOUR DRONE. https://youtu.be/tk3qzsUwoWs
WELCOME!
Welcome to the Force1 Team, and thank you for your Force1 drone purchase. Please read this manual carefully before drone operation.
- This drone is not a toy! It’s a pro-level drone suitable for experienced RC drone users aged 14 years and older. You accept all liability for operation.
- FAA rules apply. Visit faa.gov for more information. Please download the B4UFLY mobile app for the most up-to-date zoning info, and heed all local government ordinances.
- The flying field must be legally approved by your local government.
- This drone does not have a serial number, and weighs approximately 65 grams.
Any questions? We’d love to hear from you! Please include your order number when you contact us at [email protected] for fast, friendly service.
- Please use only original Force1 parts and accessories.
- Please keep the packaging and this user manual for future reference.
SAFETY PRECAUTIONS
This drone is suitable for experienced RC drone operators aged 14 years and older. It contains small parts, and should be kept out of reach of small children.
Please follow these safety procedures:
- Flight Zone
This drone does not require FAA registration or permitting, but FAA rules still apply. Please download the B4UFLY mobile app for the most up-to-date zoning info, and heed all local government ordinances. - Avoid Moisture
Humidity and water can damage your drone, which in turn may cause accidents. - Fly Safely
Please operate your drone as your skill level allows. User fatigue, impairment and improper operation can cause accidents. - Avoid Moving Parts & Hot Motors
Do not touch propellers, motors or other moving parts while your drone is on. - Avoid Heat
Keep your drone away from heat and prolonged exposure to direct sunlight to avoid damage.
LI-PO BATTERY CARE
Avoid Overheating
Your batteries will sometimes be warm/hot to the touch after use. This is normal, but beware that battery components will fail if not allowed to cool down between uses. Also, do not leave batteries exposed to direct sunlight.
Store Properly
Store batteries at room temperature, between 5C°/40°F and 27°C/80°F.
Use Carefully
- Leave time between charging and using the battery
- To extend the lifetime of the battery, always keep about 20% of the power remaining in the drone battery (rather than completely draining it)
- If the battery is pushed beyond its limits, the battery could get hot and the performance will drop
- When using the battery for a long time, the battery will increase in temperature. If it is sealed, the air inside will inflate rapidly causing further heating
Charging
- DO NOT overcharge the battery; never charge batteries unattended, and stop charging as soon as your batteries indicate they are charged
- DO NOT attempt to charge batteries that appear damaged in any way (cracking, swelling, discoloration, etc.)
- If you feel a battery isn’t charging properly, try using another charger if possible. If you find your battery or charger is defective, please visit force1rc.com for a replacement, or email us at [email protected]
- To inspect a battery, remove it from the device and examine the battery, battery pins and contacts. If you notice damage, please visit force1rc.com for a replacement, or email us at [email protected]
- Check your battery and connections after every crash
- Please use genuine factory parts and replacements from force1rc.com
WARNING:
DRONE BATTERY CHARGING
DRONE BATTERY CHARGING
- First, attach your USB cable to the drone battery, then connect it to your preferred charging source.
- When the battery is charging, the USB indicator light will be off. When the battery is fully charged, the USB indicator light will appear. The battery charging time is around 70-85 minutes.
NOTE
DO NOT plug the battery cable into the battery charger upside down. This will render the charger inoperable. 
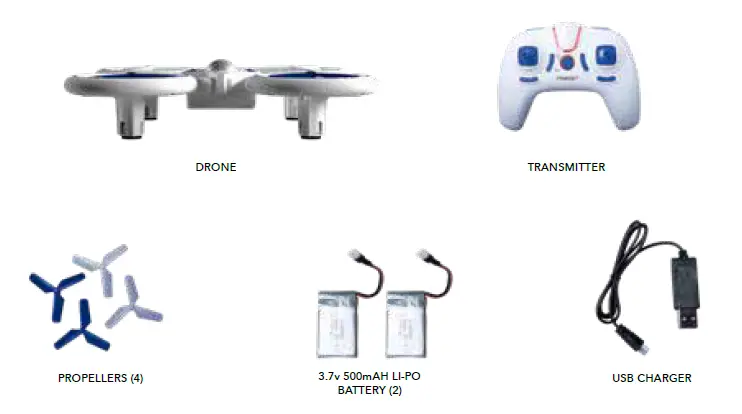
BOX CONTENTS
DRONE OVERVIEW
TRANSMITTER OVERVIEW

TRANSMITTER BATTERY INSTALLATION
Open the battery cover and insert 4 AAA batteries as shown below (not included).
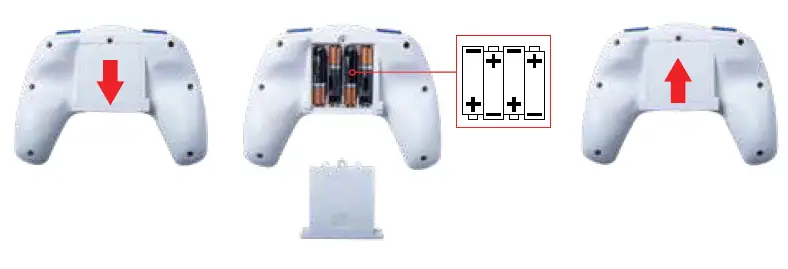
CAUTION:
• The transmitter needs 4 AAA batteries to work
• Insert batteries in correct polarity (+) and (-)
• Don’t mix old and new batteries
• Don’t mix alkaline, standard (carbon-zinc) and rechargeable (nickel-cadmium) batteries
• Remove rechargeable batteries before charging
• Only charge batteries under adult supervision
• Remove spent batteries from the transmitter
DRONE ASSEMBLY
BATTERY INSTALLATION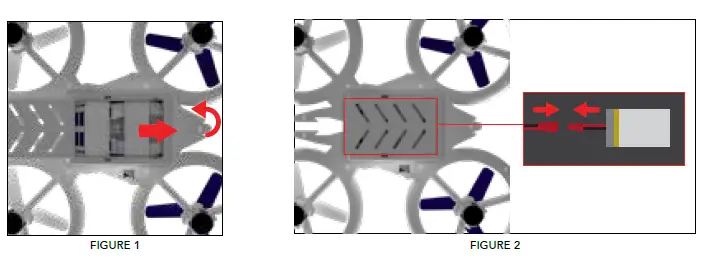
1. Open the battery cover by sliding the cover over and lifting up (Fig. 1).
2. Connect the wire of the 3.7v lithium battery to the receiver wire in the power port (Fig. 2).
3. Replace the battery cover, and move the power switch to the “ON” position.
CAUTION:
Install the battery firmly; failure to do so may affect flight safety.
BATTERY REMOVAL
Make sure the drone power switch is in the “OFF” position. Open the battery cover (Fig. 1) and disconnect the wire of the battery from the receiver wire.
DRONE ASSEMBLY
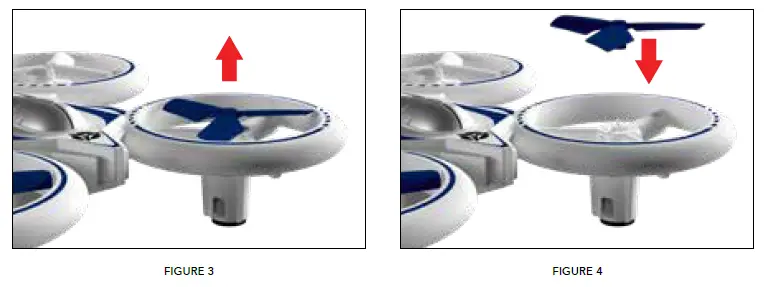
PROPELLER INSTALLATION/REMOVAL
- To remove propeller, lift upwards on propeller until in snaps off (Fig. 3)
- The replacement propeller should have the same rotational direction; place on the correct motor pin, and apply pressure until it snaps into place (Fig. 4)
NOTE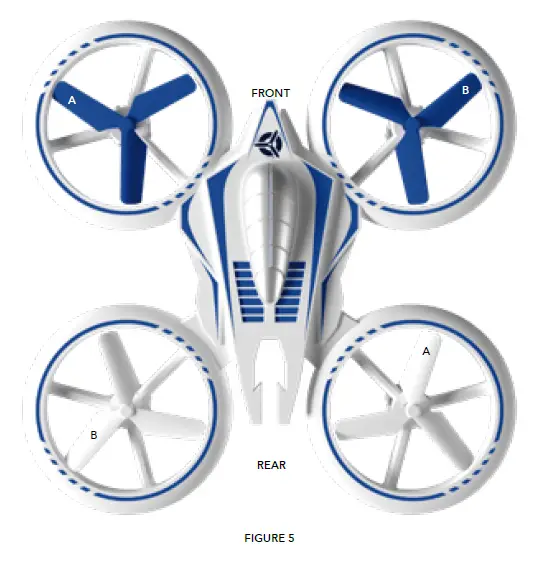
- Be sure to install the correct propellers matching A and B (Fig. 5)
- Purchase extra propellers at force1rc.com
QUICK-START GUIDE
- Insert the drone battery. Turn on the drone and place it on a flat surface; drone lights will flash quickly.
- Make sure the left stick is in the center position. Turn on the transmitter; it will beep twice (Fig. 6).
- Push the left stick all the way up then all the way down. The transmitter will beep again (Fig. 7). The drone lights will switch from flashing to solid, indicating that the drone and transmitter are successfully paired.
- The drone is ready to fly. See the Preflight Checklist and Basic Flight Controls before operating.
NOTE:
Follow the Preflight Checklist steps below if your drone doesn’t start or isn’t performing properly.
PREFLIGHT CHECKLIST
- Fly in an open area and abide by all local and federal guidelines. Check the FAA’s B4UFLY mobile app for up-to-date drone flight info.
- Make sure your drone and transmitter batteries are fully charged.
- Put the left stick of the transmitter in the middle position.
- Always turn ON your transmitter first before flying, and turn OFF the drone first when you’re finished.
- Make sure the connection is solid between your battery and motor; vibration may cause loosening.
. Make sure the propellers are installed correctly and the motors are working normally after unlocking.
FLIGHT CONTROLS
HOVER UP AND DOWN
Push the THROTTLE/RUDDER STICK up to fly the drone up, and pull the
THROTTLE/RUDDER STICK down to fly the drone down.
FLY FORWARD OR BACKWARD
Push the DIRECTION CONTROL STICK up to fly the drone forward, and
pull the DIRECTION CONTROL STICK down to fly the drone backward.
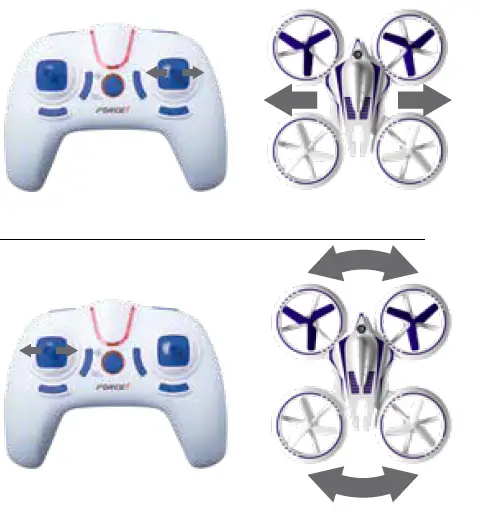
FLY LEFT OR RIGHT
Move the DIRECTION CONTROL STICK to the left to fly the drone to the left, and move the DIRECTION CONTROL STICK to the right to fly the drone to the right.
ROTATE LEFT OR RIGHT
Move the THROTTLE/RUDDER STICK to the left to rotate the drone to the left, and move the THROTTLE/RUDDER STICK to the right to rotate the drone to the right.
TRIM ADJUSTMENTS
If your drone drifts in an unwanted direction, try adjusting the trim as shown below.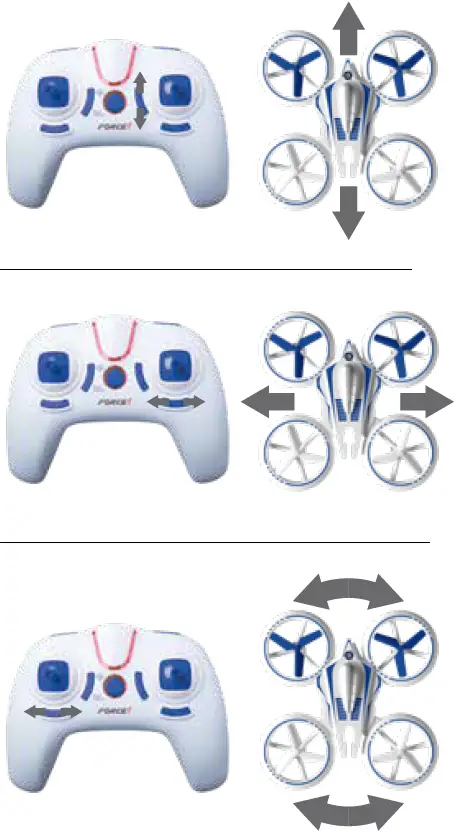
FORWARD/BACKWARD TRIM
Adjust the FORWARD/BACKWARD TRIMMER backwards if the drone drifts forward when taking off, and adjust the
FORWARD/BACKWARD TRIMMER forwards if drone drifts backwards. In Mode 1, the FORWARD/BACKWARD TRIMMER is on the left side.
LEFT/RIGHT TRIM
Adjust the LEFT/RIGHT FLYING TRIMMER to the right if the drone drifts to the left when taking off, and adjust the LEFT/RIGHT FLYING TRIMMER to the left if drone drifts to the right.
LEFT OR RIGHT ROTATION TRIM
Adjust the LEFT/RIGHT RUDDER TRIMMER to the right if the drone rotates to the left when taking off, and adjust the LEFT/RIGHT RUDDER TRIMMER to the left if drone rotates to the right.
FUNCTIONS
360° FLIP/ROLL
CAUTION:
Only execute rolls when you have plenty of airspace. The drone can only perform flips when it is at least 7 feet in the air.
Front/Back Flip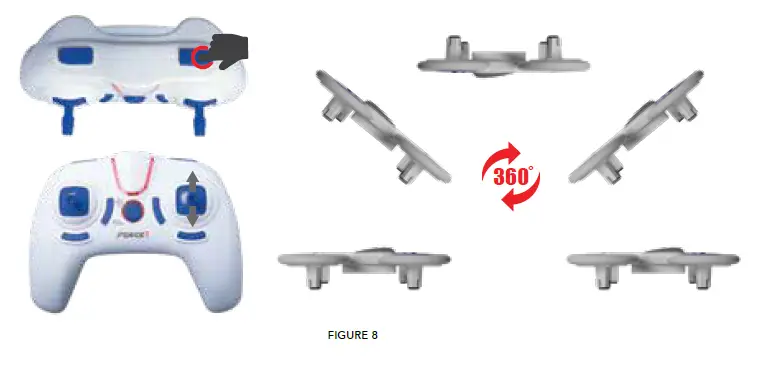 Press the Flip/Roll button to flip the drone. The transmitter will beep, indicating the drone is in Flip/Roll Mode. Next, move the right stick up or down then let it return to center (Fig. 8).
Roll
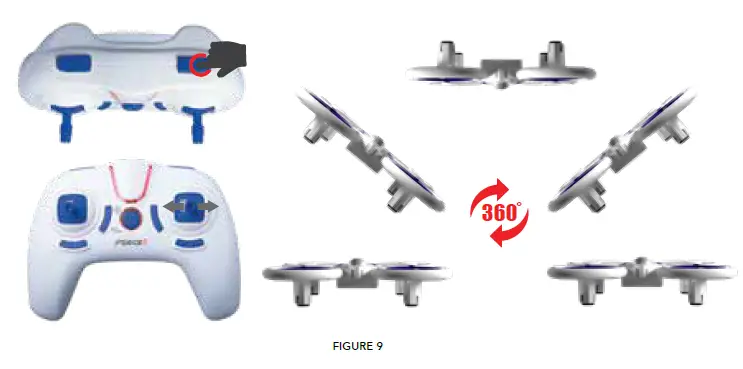
Press the Flip/Roll button to roll the drone. The transmitter will beep, indicating the drone is in Flip/Roll Mode. Next, move the right stick left or right then let it return to center (Fig. 9).
FUNCTIONS
1-KEY LIFT
Place the drone on a flat surface. Press the 1-Key Lift/Land Button (Fig. 10) – the drone propellers will start spinning, and it is ready to fly. Push the left stick up to fly the drone upwards.
1-KEY LAND
Press the 1-Key Lift/Land button while the drone is aloft to land it (Fig. 10).
HEADLESS MODE
Headless Mode allows you to fly your drone without knowing its orientation, because it will be fixed in the direction you set it. Press the Headless Mode button to enter Headless Mode before takeoff (Fig. 11). Your transmitter will beep continuously and the drone lights will begin to flash to indicate mode selection. You must now set the Headless Mode drone direction.
Setting Headless Mode Drone Direction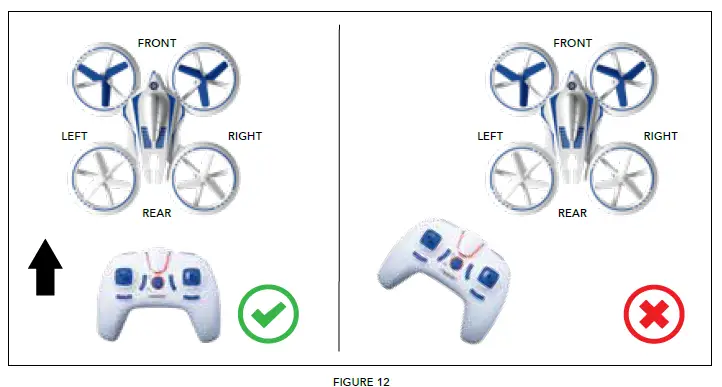
You must verify your drone’s flight direction before entering Headless Mode:
- Be sure your drone is facing away from you (Fig. 12)
- Press the Headless Mode button again to set the direction
- Drone lights will stop flashing and then stay on, and the transmitter will stop beeping to indicate the direction is verified
NOTE:
Do not change the transmitter orientation after entering Headless Mode. Otherwise, you will lose track of the set orientation (i.e., that you and your transmitter are facing “forward”).
FUNCTIONS
ALTITUDE HOLD MODE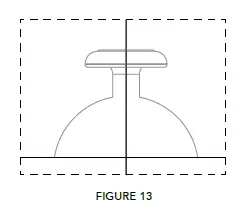
Altitude hold Mode allows the drone to maintain a consistent altitude while still allowing the operator to use normal flying functions. This function makes flying the drone much easier for beginners and allows for better aerial photography.
To activate Altitude Hold, push the left stick up or down to reach a preferred altitude, then release the stick to the center positon (Fig. 13). The drone will continue to fly at the current altitude. Repeat the steps below if you want to change the drone altitude.
SPEED MODES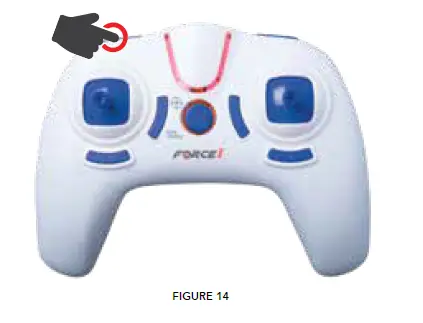
The UFO 4000 has two speed modes: Low and High. To switch speed modes, press the Speed Mode button (Fig. 14). The transmitter will beep twice to indicate that it is in High Speed Mode, or once for Low Speed Mode. The speed mode may be changed during flight.
LOW BATTERY WARNING
Your drone’s lights will flash and the transmitter will beep in midflight when the battery is low. This means you have 30 seconds to land your drone before you lose power.
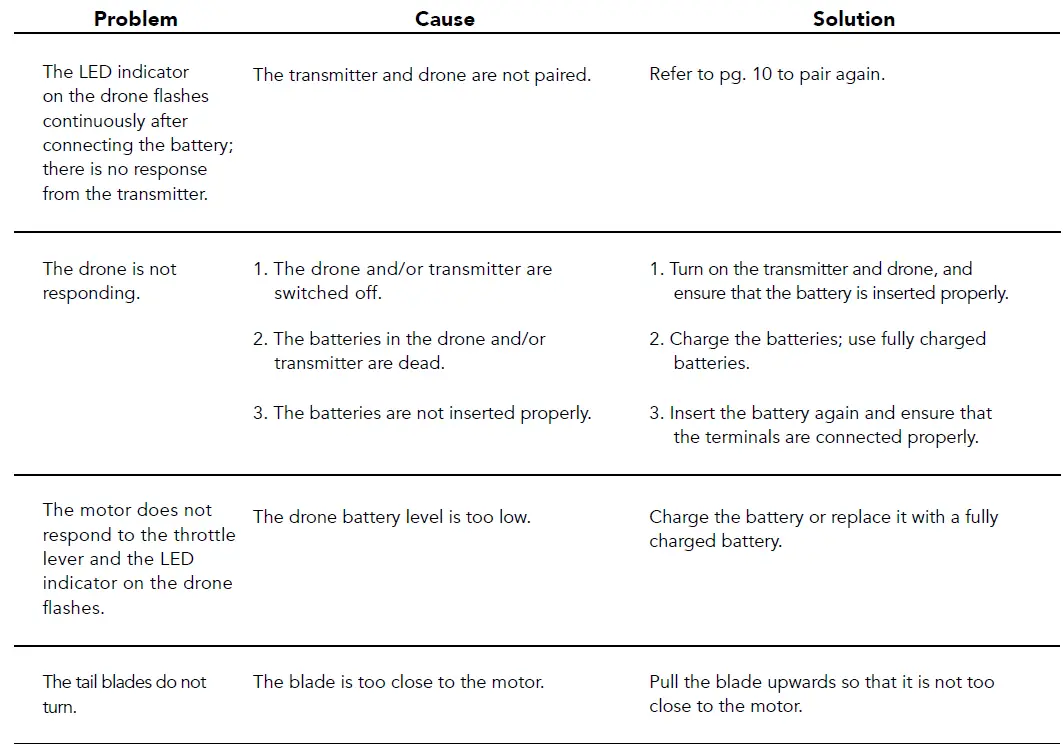
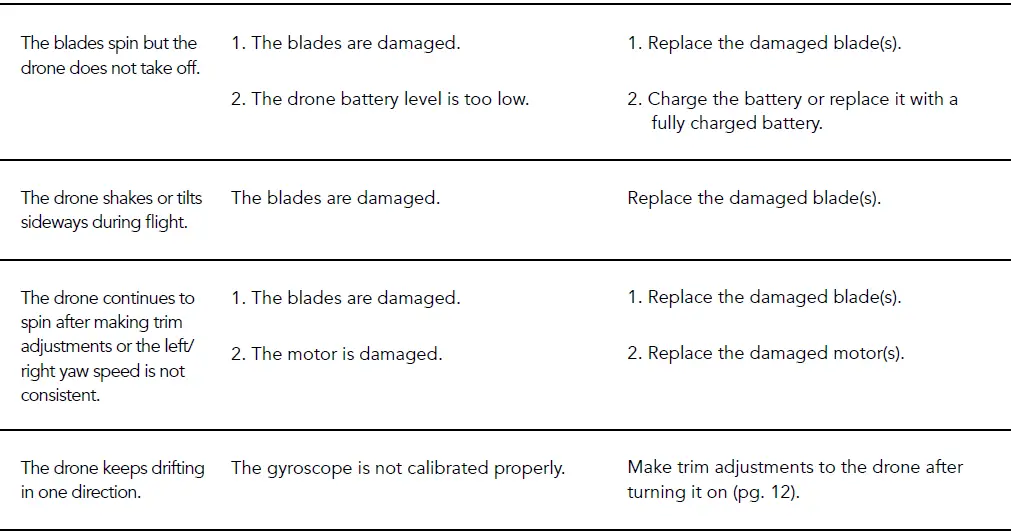
TROUBLESHOOTING GUIDE
SPARE PARTS
FCC INFORMATION
This equipment has been tested and found to comply with the limits for a Class B digital device, pursuant to part 15 of the FCC Rules. These limits are designed to provide residential protection against harmful interference in a residential installation. This equipment generates, uses and can radiate radio frequency energy and, if not installed and used in accordance with the instructions, may cause harmful interference to radio communications. However, there is no guarantee that interference will not occur in a particular installation. If this equipment does cause harmful interference to radio or television reception, which can be determined by turning the equipment off and on, the user is encouraged to try to correct the interference by one or more of the following measures:
- Reorient or relocate the receiving antenna
- Increase the separation between the equipment and receiver
- Try using a different electrical outlet
- Consult the dealer or an experienced technician for help
FCC WARNING
The equipment may generate or use radio frequency energy. Changes or modifications to this equipment may cause harmful interference unless the modifications are expressly approved in the instruction manual. Modifications not authorized by the manufacturer may void user’s authority to operate this device.
This device complies with part 15 of the FCC Rules. Operation is subject to the following two conditions:
- The device does not cause harmful interference, and
- The device accepts interference, including interference that may cause undesired operation.force1rc.com
To ensure that play is both safe and fun, please review these operating instructions:
Failure to follow all safety instructions may result in injury or property damage none of which Forcel will be held liable for as proper warnings are outlined in the manual.
- Upon use of this product the end user assumes all responsibility and Forcel cannot be held liable for any personal injury and/or property damage.
- This item contains fast moving parts, motors and/or other wiring. When using it, basic precautions should always be followed including but not limited to the following:
- Keep your eye on the product at all times
- Tie back hair or wear a hat to avoid entanglement or injury
- Keep hands, hair and loose clothing away from moving parts when the power switch is turned ON.
- Please ensure the product is turned off when not in use.
WARNING
CHANGES OR MODIFICATIONS TO THIS UNIT NOT EXPRESSLY APPROVED BY THE SELLER WILL VOID THE USER’S AUTHORITY TO OPERATE THE EQUIPMENT.