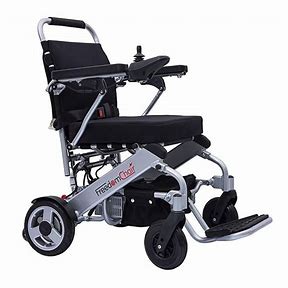
Electric Foldable Wheelchair
View Fullscreen
Operating Manual
Please read these Operating Instructions before using your FreedomChair
Issue 20201001 1
PRECAUTIONS
Please read the instructions before using the chair in order to operate and maintain it properly.
PLEASE PAY ATTENTION TO THE FOLLOWING CONTENT WITH THESE WARNING SYMBOLS.
FAILURE TO TAKE PRECAUTIONS COULD RESULT IN SERIOUS INJURIES.
IT CAN ALSO DAMAGE OR DECREASE THE LIFE EXPECTANCY OF THE CHAIR.
2
Contents
1 Introduction……………………………………………………………………………………………………..4 2 Contents of Packaging…………………………………………………………………………………..5 3 Routine Checks by the User …………………………………………………………………………6 4 Opening/Folding the Chair……………………………………………………………………………7 5 Fitting Anti-Tip Wheels………………………………………………………………………………….8 6 Installing the Joystick Controller………………………………………………………………….9 7 Lifting the Armrest…………………………………………………………………………………………10 8 Manual Operation…………………………………………………………………………………………..10 9 Joystick Operation………………………………………………………………………………………..11 10 Charging Instructions……………………………………………………………………………….12-13 11 Transport & Storage……………………………………………………………………………………..13 12 Safety Guide……………………………………………………………………………………………..14-20 13 Appendix……………………………………………………………………………………………………….21
3
1. Introduction
Thank you for choosing FreedomChair which will provide you with years of dependable service with proper use and care.
It is important to read through this manual before operating your FreedomChair to become familiar with its features as well as its limitations and safety information. You will find the operation and care of your FreedomChair very simple and easy, but should you have any questions, please contact the reseller from where you purchased the chair.
Your Freedom Chair is designed for users with many different needs. Decisions as to whether Freedom Chair is suitable for the user are always taken by the assessor or the dealer together with the user themselves. Proactive Mobility Ltd assumes no responsibility for cases where a third-party assessment results in the electric wheelchair not being suitable to the needs of the user.
A Freedom Chair should primarily be used in its standard design. If the wheelchair has been modified in any way, it will not be covered by the warranty. Please note that damage and defects that occur due to failure to follow the instruction manual or due to poor maintenance are not covered by the warranty.
Good luck and enjoy with your independence with Freedom Chair.
Drive carefully!
Gettingto know your FreedomChair
Seat Back/ Push Handle Backrest with Cushion Joystick Controller Knob Safety Belt
Battery Box Rear Powered Wheels
Anti-tip Wheels
Joystick Controller Armrest
Armrest Lock
Seat with Cushion Serial Number Label on Left or Right Side
Storage Bag
4
Foot Rest Front Wheels
2. Contents of Packaging
Your FreedomChair will arrive carefully packaged in a cardboard box. We suggest that two people are available to remove the packaging and set up the FreedomChair for the first time.
1. Carefully open the top of the box then turn the box on its side for easier removal of the contents.
2. Once all packaging has been removed, you will find the following components:
Main Chair Assembly
Battery Charger and off-board charging cable
Travel Bag
Joystick Controller
Tools
Battery or Batteries (depending on order)
Cup holder (option if ordered)
Rear Reflectors
5
3. Routine Checks by the User
IMPORTANT
Your FreedomChair is a mode of transport designed to safely enhance your independence. It contains items that should be regularly checked by the user to ensure that the chair remains safe to use.
Please make a general inspection of the chair before each use and regularly check the following specific areas for your safety:
· Check bolts, screws and fixings on the frame of the chair for tightness. The Toolkit provided with the chair can be used for this. Particular screws to be checked are:
A06/L Models on BOTH SIDES of the chair
Front of seat frame at sides
Rear of backrest at sides
A08/L Models on BOTH SIDES of the chair
Above front wheels
Front of seat frame at sides
Rear of backrest at sides
Above front wheels
· Fastenings securing all wheels are tight. · Electrical connections are secure. These include:
o connections to the Control Module located above the battery compartment o the lead connecting the battery o the connection in the cable behind the joystick
(see 5. Installing the Joystick Controller)
· Any straps securing seat or backrest covers are secure and in good condition without any tears or cuts in the fabric.
· If your FreedomChair is fitted with pneumatic rear tyres, keep them inflated to a recommended pressure of 40 psi or 2.75 Bar.
6
4. Opening the Chair
A) Unfolding – Step 1
Hold the top of the backrest and pull up while holding down on the seat to expand the chair and complete the opening.
Hold backrest bar Hold down seat to expand
B) Unfolding – Step 2
Lock the safety clasp. This locks the frame of the chair and prevents it folding when being used.
Safety clasp
5. Folding the Chair
A) Folding – Step 1 Open the safety clasp.
B) Folding – Step 2 While one hand holds the seat and the other holds the backrest, push the backrest forwards and downwards, folding the chair.
Hold backrest bar Hold the seat to fold
7
5. Fitting Anti-Tip Wheels
NOTE: Applies to Models A08 & A08L only Supplied with the FreedomChair model A08 & A08L are a pair of Anti-Tip Wheels. These are used with the chair to minimise it tipping backwards. * They should be fitted to the chair at all times when it is being used. With the locking screw backed-off, insert an anti-tip wheel into each receiving tube located under the motors.
With the the wheel positioned upright as shown in the photo below, tighten the locking screw to secure the anti-tip wheel assembly inside the tube. Ensure there is an anti-tip wheel fitted to each side of the chair.
Note: if the anti-tip wheels are removed from the chair, it is recommended to rotate in the locking screw until it is tight to minimise accidentally loosing the screw.
8
6. Installing the Joystick Controller
Step 1 Insert the controller joystick into the armrest tube and tighten the knob to fix it in position.
Step 2 Connect the wire from the Joystick to the connector which is secured under the armrest, taking care to line up the pins properly so that they do not get bent, broken or damaged. The connectors are designed to only fit together in one position. Gently rotate both parts until they can be pushed together. Rotate the locking ring to secure both parts. NOTE: DO NOT force the connections together or you may bend or break the pins.
9
7. Lifting the Armrest
Under each armrest is a rotary knob which can be turned to release or secure the armrest lock. This allows the armrest to be raised for easy side transfers or to clear the joystick when pulling up to a table.
8. Manual Mode Operation
The chair can be pushed by an Attendant in freewheel mode. Push forward on both of the red motor levers to disengage the electromagnetic brakes.
In normal powered mode, without an Attendant pushing the chair, both red motor levers should be pulled back to engage the electromagnetic brakes. Both wheels will now lock, holding the chair on the brakes.
Pull back both red motor levers for normal powered mode.
10
9. Joystick Operation
Charging port
Battery level indicator
Power button
Operating panel
Speed increase button
Speed level indicator
Directional Control Knob
Joystick: controls the chair’s direction and speed.
Speed decrease button
Horn button
Directional Control Knob
Before entering or exiting from the chair, ensure that the Power is turned OFF. This will prevent unintentional movement of the chair.
· Power on: press the Power switch to turn on the power · Power off: press the Power switch to turn off the power · Battery level indicator: all lights on indicate a full battery. The number of lights illuminated
decreases as the battery power is consumed. · Speed increase button. Press to increase the maximum speed of the chair. · Speed decrease button. Press to decrease the maximum speed of the chair. · Speed level indicator. All lights on indicate that the maximum speed has been set. · Horn Button: sounds when the user presses the button.
Lock Function – immobilising the wheelchair
FreedomChair can be immobilised to prevent misuse. To Immobilise the Wheelchair (Lock the Joystick) 1. Press Power button to turn on and release 2. Press both the + and – buttons together and hold down until the amber speed lights go out. The chair will now NOT respond to movements of the joystick.
To Mobilise the Wheelchair (Unlock the Joystick)
1. Press Power button to turn on and release
2. Press both the + and – buttons together and hold down until the amber speed lights illuminate. The joystick will now operate normally.
11
10. Charging Instructions
The battery requires charging once every three months, otherwise it could lead to over-discharge damage. Charging Method 1 (Joystick charging): 1. Turn the power OFF using the green button on the Joystick. 2. Plug the charger’s power cable into the battery charger and then into a mains wall
outlet. TURN OFF the mains power. 3. Connect the round metal plug from the charger’s lead into the socket on the underside
of the Joystick (see below). NOTE: The plug is designed to only connect in one position. Gently rotate the plug until it can be pushed into the socket. DO NOT force the plug. 4. Now TURN ON the mains power. 5. Allow your chair to charge for 5 hours/battery (10 hours/ two batteries) or when the light on the charger turns green, which means your battery/ies are fully charged. 6. BEFORE disconnecting the charger’s plug, TURN OFF the mains power.
Joystick Charger Port
Front of Charger Charger Light illuminates after plugging in the charger. Light color indicates charging state: RED battery is fully drained ORANGE battery is charging. GREEN battery is fully charged.
Back of Charger with an explanation of what the Charger’s light colour indicate.
12
Charging Method 2 (offboard charging):
NOTE: BEFORE removing a battery and disconnecting any cables, please note all connections so that reconnecting the cables is done in the same way. A Guide to correctly connecting batteries for each model of FreedomChair is shown in the Appendix section.
FreedomChair batteries can easily be removed from the chair. This may be required before the chair is stored in the hold of an aircraft for example, or more commonly if the batteries require charging in a different location from the chair. You have the option of charging the batteries individually, or using the Battery Parallel Connection Cable to charge multiple batteries.
Battery Release Clip is located under the front of the battery.
Battery Parallel Connection Cable Offboard Charging Cable
11. Transport & Storage
· To lift the chair, stand it upright when it is folded. · The battery should be fully charged and the chair should be placed in a cool, dry,
and ventilated place, especially if stored for a long period.
13
12. Safety Guide
· The user must be of sound mind and judgment. · The user must read this User Manual before
operating the chair and get familiar with its components and features. · The user should practice driving skills with assistance on open, flat, and safe grounds before normal use. · To move Forward and for Parking. To move forward, push the joystick gently forward. To stop, release the joystick.
· Moving backwards To move backwards, push the joystick gently back. The user must be aware of what is behind them before manoevering backwards to avoid collisions.
14
· Turning To turn, push the joystick to the left or right. and be aware of what is to the left or right to avoid collisions.
· Driving on bends Lightly push the joystick in the direction of the bend. Practice speed control.
· Practice avoiding obstacles Lightly push the joystick in either direction to avoid and manoever around the obstacles Practice speed control.
· Avoid any obstacles that are more than 5cm high.
· Driving More Quickly Push the joystick all the way in the direction you want to go. Pull the joystick back to the middle if you do not feel you are 100% in control.
15
· Driving Uphill Keep your body tilted forward to keep the center of gravity stable. Drive slowly. The incline must be less than 9 degrees. Also, you are not allowed to reverse whilst driving on an incline.
· Entering & Exiting a passenger lift The user should pay attention to the opening and closing intervals of the lift door to avoid collisions while entering or exiting the lift.
· Driving on pavements The user should stay on the pavement and avoid entering the motor vehicle lane unless to cross the street. Pay attention to obstacles and avoid contact with them.
· If you need to drive over any obstacles, these obstacles must not be more than 5cm high.
· Crossing the street Pay attention to avoid vehicles and only cross when you are allowed to. Look for dropped curbs where available and drive slowly over the curb. To return to the pavement, look for a dropped curb or one that is no more than 5cm high. When driving up a drop curb, keep your body tilted forward to keep the center of gravity stable. Drive slowly.
16
· Driving over train/railroad tracks Don’t cross railroad/train tracks alone, we highly recommend you should be accompanied by an Attendant.
· Only drive over railroad/train tracks that are no more than 5 cm high.
· Driving on a steep incline (more than 9 degrees) could result in the chair rolling over or a serious accident.
· Driving over a high curb/step (more than 5cm) could result in in the chair rolling over or a serious accident.
17
· We recommend that the user has assistance getting out of and into the chair. Move the armrests and footrest out of the way before entering and exiting the chair.
· Do not attempt to repair the product on your own. It may cause permanent damage to the chair and could put yourself at risk of injury or death. It should be repaired by a professional technician.
· Do not allow children access to the chair.
18
· Do not hose down the chair with water or any liquids. It will cause damage to the chair and could also harm or endanger your personal safety. To clean the chair, wipe down with a damp cloth.
· Do not leave the battery or electrical components of the chair in a car that is exposed to direct sunlight. It will cause permanent damage. Also, keep it away from fire and all heat sources.
· Do not allow children access to the battery or electrical components to the chair. It should be stored in a cool, dry area that children do not have access to.
· Do not store the battery in direct sunlight. Please store in a dry, cool, and ventilated area that children don’t have access to. Also, do not store in a severely cold environment. It will damage and decrease the life of the battery.
19
13. Appendix
Warranty
Part
Frame Motor CPU Battery Joystick Wearable Parts
Coverage
2 Years 2 Years 1 Year 1 Year 1 Year 3Months
Remarks
Non-deliberate damage Non-deliberate damage Non-deliberate damage Non-deliberate damage Non-deliberate damage Non-deliberate damage
UK & Ireland Distributor
Proactive Mobility Ltd
Silverstone House Kineton Road Gaydon Warwickshire CV35 0EP
Phone: 0330 555 5225 Email: [email protected] Web: www.e-goes.co.uk
Retailer Details
21
Specifications
Details for each model of FreedomChair are shown in separate tables.
A06 Specifications Net weight of chair Maximum weight capacity Seat dimensions Drive wheels Driving Range Battery capacity Motors Maximum speed Gradient Suspension Length Width Height
22.8kg 245lbs/110kg 17″ x 17″/43cm x 43cm 10″ PU tyre – Front wheels 8″ PU tyre With 1 battery up to 9 miles/15km – With 2 batteries up to 18 miles/30km 24V 10AH per battery 2 x 200W brushless motors with electromagnetic braking Up to 4 mph/6.5 kph 8 degrees Spring absorber Open: 37.8″ / 96cm – Folded 23.2″ / 58.9cm Open: 23.2″ / 58.9cm – Folded 27.2″ / 69cm Open: 36.8″ / 93.5cm – Folded 13.4″ / 34cm
A06L Specifications Net weight of chair Maximum weight capacity Seat dimensions Drive wheels Driving Range Battery capacity Motors Maximum speed Gradient Suspension Length Width Height
25.7kg 245lbs/110kg 19″ x 17.5″ / 49cm x 44cm 12.5″ air tyre – Front wheels 8″ PU tyre With 1 battery up to 9 miles/15km – With 2 batteries up to 18 miles/30km 24V 10AH per battery 2 x 300W brushless motors with electromagnetic braking Up to 4 mph/6.5 kph 9 degrees Spring absorber Open: 37.8″ / 96cm Folded: 23.2″ / 58.9cm Open: 23.2″ / 58.9cm Folded: 27.2″ / 69cm Open: 36.8″ / 93.5cm Folded: 13.4″ / 34cm
22
Specifications (continued)
Details for each model of FreedomChair are shown in separate tables.
A08 Specifications Net weight of chair Maximum weight capacity Seat dimensions Drive wheels Driving Range
Battery capacity Motors Maximum speed Gradient Suspension Length Width Height
26.7kg 350lbs / 160kg 19″ x 17.5″ / 49cm x 44cm 10″ PU tyre – Front wheels 8″ PU tyre With 1 battery: up to 9 miles/15km With 2 batteries: up to 18 miles/30km With 3 batteries: up to 27 miles / 45km 24V 10AH per battery 2 x 250W brushless motors with electromagnetic braking Up to 4 mph/6.5 kph 10 degrees Spring absorber Open: 39.4″ / 100cm Folded: 23.2″ / 58.9cm Open: 23.2″ / 58.9cm Folded: 27.2″ / 69cm Open: 35″ / 89cm Folded: 12.6″ / 32cm
A08L Specifications Net weight of chair Maximum weight capacity Seat dimensions Drive wheels Driving Range
Battery capacity Motors Maximum speed Gradient Suspension Length Width Height
28.5kg 350lbs / 160kg 19″ x 17.5″ / 49cm x 44cm 12.5″ air tyre – Front wheels 8″ PU tyre With 1 battery: up to 9 miles/15km With 2 batteries: up to 18 miles/30km With 3 batteries: up to 27 miles / 45km 24V 10AH per battery 2 x 300W brushless motors with electromagnetic braking Up to 4 mph/6.5 kph 14 degrees Spring absorber Open: 40″ / 102cm Folded: 25.2″ / 64cm Open: 24.4″ / 62cm Folded: 29″ / 74cm Open: 35.4″ / 90cm Folded: 13″ / 33cm
23
FreedomChairs
Battery Installation
Connect multiple batteries as shown in the photographs
A06 & A06L with 1 battery
A06 & A06L with 2 batteries
A08 & A08L with 1 battery
24
A08 & A08L with 2 batteries
A08 & A08L with 3 batteries
Check battery clips under frame are secure
NOTES