FreeStyle Libre 2 User Guide

IMPORTANT USER INFORMATION

- Before you use your System, review all the product instructions and the Interactive Tutorial. The Quick Reference Guide and Interactive Tutorial give you quick access to important aspects and limitations of the System. The User’s Manual includes all safety information and instructions for use.
- Go to www.FreeStyleLibre.com to view the “Tips for Kids”.
- Talk to your health care professional about how you should use your Sensor glucose information to help manage your diabetes.
- During the first 12 hours of Sensor wear the symbol will display, and you cannot use Sensor values to make treatment decisions during this time. Confirm Sensor glucose readings with a blood glucose test before making treatment decisions during the first 12 hours of Sensor wear when you see the symbol.
INDICATIONS FOR USE
The FreeStyle Libre 2 Flash Glucose Monitoring System is a continuous glucose monitoring (CGM) device with real time alarms capability indicated for the management of diabetes in persons age 4 and older. It is intended to replace blood glucose testing for diabetes treatment decisions, unless otherwise indicated. The System also detects trends and tracks patterns and aids in the detection of episodes of hyperglycemia and hypoglycemia, facilitating both acute and long-term therapy adjustments. Interpretation of the System readings should be based on the glucose trends and several sequential readings over time. The System is also intended to autonomously communicate with digitally connected devices. The System can be used alone or in conjunction with these digitally connected devices where the user manually controls actions for therapy decisions.
CONTRAINDICATIONS:
Automated Insulin Dosing: The System must not be used with automated insulin dosing (AID) systems, including closed loop and insulin suspend systems.
![]() MRI/CT/Diathermy: The System must be removed prior to Magnetic Resonance Imaging (MRI), Computed Tomography (CT) scan, or high-frequency electrical heat (diathermy) treatment. The effect of MRI, CT scans, or diathermy on the performance of the System has not been evaluated. The exposure may damage the Sensor and may impact proper function of the device which could cause incorrect readings.
MRI/CT/Diathermy: The System must be removed prior to Magnetic Resonance Imaging (MRI), Computed Tomography (CT) scan, or high-frequency electrical heat (diathermy) treatment. The effect of MRI, CT scans, or diathermy on the performance of the System has not been evaluated. The exposure may damage the Sensor and may impact proper function of the device which could cause incorrect readings.
What you need to understand in the Indications For Use: You can use the FreeStyle Libre 2 System if you’re 4 or older.
IMPORTANT:
- After you scan the Sensor, consider all the information on your screen before deciding what to do or what treatment decision to make.
- Don’t take a correction dose within 2 hours of your meal dose. This may result in “insulin stacking” and low glucose.
WARNING:
The System can replace blood glucose testing except in the below situations. These are the times when you need to do a blood glucose test before deciding what to do or what treatment decision to make as Sensor readings may not accurately reflect blood glucose levels:
Do a blood glucose test if you think your glucose readings are not correct or do not match how you feel. Do not ignore symptoms that may be due to low or high glucose.
Do a blood glucose test when you see the symbol during the first 12 hours of wearing a Sensor or the Sensor glucose reading does not include a Current Glucose number.
- Do not ignore symptoms that may be due to low or high
blood glucose: If you are experiencing symptoms that are not consistent with your glucose readings, consult your health care professional. - Use your blood glucose meter to make diabetes treatment decisions when you see the symbol during the first 12 hours of wearing a Sensor, if your Sensor glucose reading does not match how you feel, or if the reading does not include a number.
- Choking hazard: The System contains small parts that may be dangerous if swallowed.
Cautions and Limitations:
Below are important cautions and limitations to keep in mind so you can use the System safely. They are grouped into categories for easy reference.
![]() What to know about Glucose Alarms:
What to know about Glucose Alarms:
- For you to receive alarms, they must be on and your Reader should be within 20 feet of you at all times. The transmission range is 20 feet unobstructed. If you are out of range, you may not receive glucose alarms.
- To prevent missed alarms, make sure the Reader has sufficient charge and that sound and/or vibration are turned on.
- Alarms you receive do not include your glucose reading so you must scan your Sensor to check your glucose.
![]() What to know before using the System:
What to know before using the System:
- Review all product information before use.
- Take standard precautions for transmission of blood borne pathogens to avoid contamination.
- Make sure that your Reader and Sensor kits are kept in a safe place, under your control. This is important to help prevent anyone from accessing or tampering with the System.
![]() Who should not use the System:
Who should not use the System:
- Do not use the System in people less than 4 years of age. The System is not cleared for use in people under 4 years of age.
- Do not use the System if you are pregnant, on dialysis, or critically ill. The System is not cleared for use in these groups and it is not known how different conditions or medications common to these populations may affect performance of the System.
- Performance of the System when used with other implanted medical devices, such as pacemakers, has not been evaluated.
![]() What should you know about wearing a Sensor:
What should you know about wearing a Sensor:
- Wash application site on the back of your upper arm using a plain soap, dry, and then clean with an alcohol wipe. This will help remove any oily residue that may prevent the Sensor from sticking properly. Allow site to air dry before proceeding. Carefully preparing the site according to these instructions will help the Sensor stay on your body for the full 14 day wear period and help prevent it from falling off early.
- The Sensor can be worn for up to 14 days. Remember to always have your next Sensor available before your current one ends so you can keep getting your glucose readings.
- You must scan the Sensor to get your real-time current glucose level as the Reader will not provide this information without a scan.
- In the event that your Sensor stops working and you do not have another Sensor readily available, you must use an alternate method to measure your glucose levels and inform your treatment decisions.
- The System is designed to detect certain conditions which may occur where the Sensor is not working as intended and shut it off, telling you to replace your Sensor. This may occur if the Sensor gets knocked off from the skin or if the System detects that the Sensor may not be performing as intended. Contact Customer Service if you receive a Replace Sensor message before the end of the 14 day wear period. Customer Service is available at 1-855-632-8658 7 Days a Week from 8AM to 8PM Eastern Standard Time.
- Some individuals may be sensitive to the adhesive that keeps the Sensor attached to the skin. If you notice significant skin irritation around or under your Sensor, remove the Sensor and stop using the System. Contact your health care professional before continuing to use the System.
- Intense exercise may cause your Sensor to loosen due to sweat or movement of the Sensor. If the Sensor is becoming loose or if the Sensor tip is coming out of your skin, you may get no readings or unreliable low readings. Remove and replace your Sensor if it starts to loosen and follow the instructions to select an appropriate application site. Do not attempt to reinsert the Sensor. Contact Customer Service if your Sensor becomes loose or falls off before the end of the wear period. Customer Service is available at 1-855-632-8658 7 Days a Week from 8AM to 8PM Eastern Standard Time.
- Do not reuse Sensors. The Sensor and Sensor Applicator are designed for single use. Reuse may result in no glucose readings and infection. Not suitable for re-sterilization. Further exposure to irradiation may cause unreliable low results. · If a Sensor breaks inside your body, call your health care professional.
![]() How to Store the Sensor Kit:
How to Store the Sensor Kit:
- Store the Sensor Kit between 36°F and 82°F. Storage outside of this range may cause inaccurate Sensor glucose readings.
- If you suspect that the temperature may exceed 82°F (for example, in an un-airconditioned home in summer), you should refrigerate your Sensor Kit. Do not freeze your Sensor Kit.
- Store your Sensor Kit in a cool, dry place. Do not store your Sensor Kit in a parked car on a hot day.
- Store the Sensor Kit between 10-90% non-condensing humidity.
![]() When not to use the System:
When not to use the System:
- Do NOT use if the Sensor Kit package, Sensor Pack, or Sensor Applicator appear to be damaged or already opened due to risk of no results and/or infection.
- Do NOT use if Sensor Kit contents are past expiration date.
- Do NOT use if the Reader appears to be damaged due to risk of electric shock and/or no results.
![]() What to know before you Apply the Sensor:
What to know before you Apply the Sensor:
- The Sensor Pack and Sensor Applicator are packaged as a set (separately from the Reader) and have the same Sensor code. Check that the Sensor codes match before using your Sensor Pack and Sensor Applicator. Do not use Sensor Packs and Sensor Applicators with different Sensor codes together as this will result in incorrect glucose readings.
- Wash application site on the back of your upper arm using a plain soap, dry, and then clean with an alcohol wipe. This will help remove any oily residue that may prevent the Sensor from sticking properly. Allow site to air dry before proceeding. Carefully preparing the site according to these instructions will help the Sensor stay on your body for the full 14 day wear period and help prevent it from falling off early.
- Clean hands prior to Sensor handling/insertion to help prevent infection.
- Change the application site for the next Sensor application to prevent discomfort or skin irritation.
- Only apply the Sensor to the back of the upper arm. If placed in other areas, the Sensor may not function properly.
- Select an appropriate Sensor site to help the Sensor stay attached to the body and prevent discomfort or skin irritation. Avoid areas with scars, moles, stretch marks, or lumps. Select an area of skin that generally stays flat during normal daily activities (no bending or folding). Choose a site that is at least 1 inch away from an insulin injection site.
![]() When is Sensor Glucose different from Blood Glucose:
When is Sensor Glucose different from Blood Glucose:
- Physiological differences between the interstitial fluid and capillary blood may result in differences in glucose readings between the System and results from a finger stick test using a blood glucose meter. Differences in glucose readings between interstitial fluid and capillary blood may be observed during times of rapid change in blood glucose, such as after eating, dosing insulin, or exercising.
![]() What to know about X-Rays:
What to know about X-Rays:
- The Sensor should be removed prior to exposing it to an X-ray machine. The effect of X-rays on the performance of the System has not been evaluated. The exposure may damage the Sensor and may impact proper function of the device to detect trends and track patterns in glucose values during the wear period.
![]() When to remove the Sensor:
When to remove the Sensor:
- If the Sensor is becoming loose or if the Sensor tip is coming out of your skin, you may get no readings or unreliable readings, which may not match how you feel. Check to make sure your Sensor has not come loose. If it has come loose, remove it, apply a new one, and contact Customer Service.
- If you believe your glucose readings are not correct or are inconsistent with how you feel, perform a blood glucose test on your finger to confirm your glucose. If the problem continues, remove the current Sensor, apply a new one, and contact Customer Service. Customer Service is available at 1-855-632-8658 7 Days a Week from 8AM to 8PM Eastern Standard Time.
![]() What to know about the Reader’s Built-in Meter:
What to know about the Reader’s Built-in Meter:
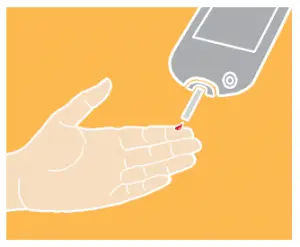
- The FreeStyle Libre 2 Reader has a built-in blood glucose meter that is designed to be used only with FreeStyle Precision Neo blood glucose test strips and MediSense Glucose and Ketone Control Solution. Using other test strips with the Reader’s built-in meter will produce an error or cause the Reader’s built-in meter to not turn on or start a test. The Reader’s built-in meter does not have ketone testing functionality.
- The Reader’s built-in meter is not for use on people who are dehydrated, hypotensive, in shock, or for individuals in hyperglycemichyperosmolar state, with or without ketosis.
- The Reader’s built-in meter is not for use on neonates, in critically-ill patients, or for diagnosis or screening of diabetes.
- See Using the Reader’s Built-in meter section of the Reader Kit User’s Manual for additional important information on the use of the Reader’s built-in meter.
![]() Where to charge your Reader:
Where to charge your Reader:
- Be sure to select a location for charging that allows the power adapter to be easily unplugged. Do NOT block access to the charger due to the potential risk of electrical shock.
Interfering Substances: Taking ascorbic acid (vitamin C) supplements while wearing the Sensor may falsely raise Sensor glucose readings. Taking more than 500 mg of ascorbic acid per day may affect the Sensor readings which could cause you to miss a severe low glucose event. Ascorbic acid can be found in supplements including multivitamins. Some supplements, including cold remedies such as Airborne® and Emergen-C®, may contain high doses of 1000 mg of ascorbic acid and should not be taken while using the Sensor. See your health care professional to understand how long ascorbic acid is active in your body.
Using Sensor Glucose Readings for Treatment Decisions
After you scan your Sensor, use all of the information on the screen when deciding what to do or what treatment decision to make.
WARNING: The System can replace blood glucose testing except in the below situations. These are the times when you need to do a blood glucose test before deciding what to do or what treatment decision to make as Sensor readings may not accurately reflect blood glucose levels:
Do a blood glucose test if you think your glucose readings are not correct or do not match how you feel. Do not ignore symptoms that may be due to low or high glucose.
Do a blood glucose test when you see the symbol during the first 12 hours of wearing a Sensor or the Sensor glucose reading does not include a Current Glucose number.
Example Scenarios
Here are some example scenarios to help you understand how to use the information on your screen. If you are not sure about what to do, consult your health care professional.
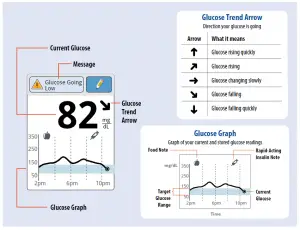
What you see
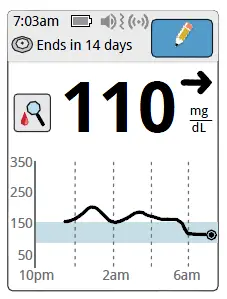
When you wake-up:
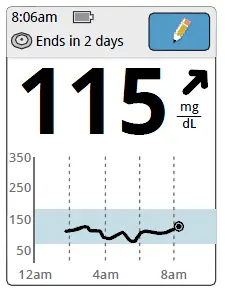
Before breakfast:
What it means
When you wake-up on your first day of wearing a Sensor, your current glucose is 110 mg/dL. There is also the symbol on the screen.
During the first 12 hours of Sensor wear the symbol will display, and you cannot use Sensor values to make treatment decisions during this time. Confirm Sensor glucose readings with a blood glucose test before making treatment decisions during the first 12 hours of Sensor wear when you see the symbol.
Before breakfast, your current glucose is 115 mg/dL. The graph shows that your glucose is going up and so does the trend arrow.
Consider what might be causing your glucose to go up and what you might do to prevent a high glucose. For example:
- How much insulin should you take before your meal?
- Since you see , should you consider taking a little more insulin?
What you see
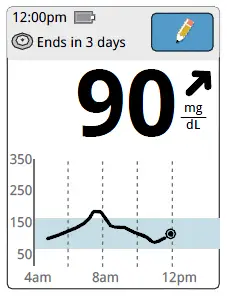
Before lunch:
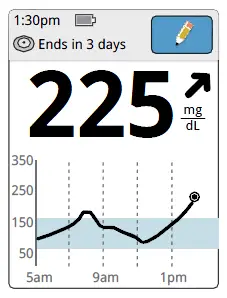
After lunch:
What it means
When you checked your glucose before lunch, it was 90 mg/dL and rising. Before eating lunch, you took enough insulin to cover the meal and a little more since your trend arrow was.
90 minutes later, your current glucose is 225 mg/dL. The graph shows that your glucose is still going up, and so does the trend arrow.
Don’t take a correction dose within 2 hours of your meal dose. This may result in “insulin stacking” and low glucose. Consider what might be causing your glucose to go up and what you might do to prevent a high glucose. For example:
- Has the insulin you took for your meal reached its full effect?
- Scan your Sensor again later.
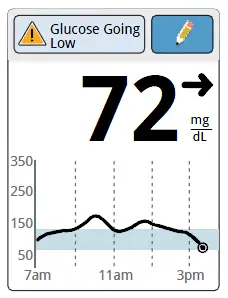
What you see In the afternoon:
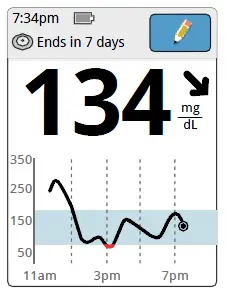
Before d:inner
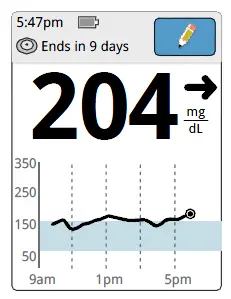
After exercising:
What it means
Between meals, your current glucose is 72 mg/dL. The Glucose Going Low message tells you that your glucose is projected to be low within 15 minutes.
Think about what might be causing your glucose to go low. Consider eating a snack to stay within target. Avoid taking insulin as this can cause low glucose.
After exercising, you are feeling shaky, sweaty, and dizzy symptoms you generally get when you have low glucose. But, your current glucose is 204 mg/dL.
Anytime you get a reading that doesn’t match how you feel, do a blood glucose test.
Before dinner, your current glucose is 134 mg/dL. The graph shows that your glucose is going down and so does the trend arrow ➘.
Consider what might be causing your glucose to go down and what you might do to prevent a low glucose. For example:
- How much insulin should you take before your meal
- Since you see ➘, should you consider taking a little less insulin
The shape of the circle sensor unit, FreeStyle, Libre, and related brand marks are owned by Abbott. Other trademarks are the property of their respective owners. ©2020 Abbott ART40711-001 Rev. C 06/20
Manufacturer Consult instructions for use
FAQS
How do I get started with FreeStyle Libre?
The first step is to register your FreeStyle Libre System online at www.freestylelibre.com. Next, you will receive a FreeStyle Libre Starter Kit in the mail. The Starter Kit includes a Quick Reference Guide, a User’s Manual, and a Sensor. You will need to download the FreeStyle Libre App from the App Store or Google Play and create an account to use the FreeStyle Libre System.
How do I know if my FreeStyle Libre is working correctly?
The first time you use your FreeStyle Libre, it will take about 10 minutes to complete the calibration process. Once complete, you should see a green check mark on your screen and hear a beep when you scan your Sensor. If you do not see a green check mark or hear a beep within 10 minutes, please contact customer service at 1-800-734-9980 for assistance.
What do I do if my FreeStyle Libre does not turn on?
Please ensure that the battery has been charged for at least 6 hours before attempting to turn on the device. If the device still will not turn on after charging for 6 hours, please contact customer service at 1-800-734-9980 for assistance.
How long does it take to charge my FreeStyle Libre?
It takes approximately 2 hours to fully charge your FreeStyle Libre battery using the included charger and power adapter. You can also charge your device by plugging it into a computer or laptop using the USB cable provided with your kit. It takes approximately 2 hours to fully charge your device using this method as well. You can also purchase additional chargers and power adapters from our website or by calling customer service at 1-800-734-9980 for assistance.
How do I know if my FreeStyle Libre is running out of battery life?
When your battery is running low, you will see the “Low Battery” icon appear on screen and hear an audible alert every 15 minutes until charging is complete. If you are unable to charge your device within 15 minutes, please contact customer service at 1-800-734-9980 for assistance.
Can you buy FreeStyle Libre 2 over the counter?
The FreeStyle Libre system requires a prescription to be dispensed by a pharmacy in the United States. As a result, the FreeStyle Libre OTC (over-the-counter) is not available and one cannot just easily buy a Freestyle Libre sensor online. Instead, the first step is connecting with a licensed medical provider.
How much does a Libre 2 sensor cost without insurance?
Freestyle Libre 2 is only available as a brand name drug. The lowest GoodRx price for the most common version of Freestyle Libre 2 is around $128.47, 14% off the average retail price of $149.90.
How many sensors come in a box of FreeStyle Libre 2?
The FreeStyle Libre 2 System Starter Kit is the easiest way to get started and comes with one reader and two 14-day sensors (one sensor per box).
How often does the FreeStyle Libre 2 reader need to be replaced?
After the 12 hour start-up period, the sensor can be worn for up to 10 days. Your sensor automatically stops working after 10 days of data and must be replaced. You can scan to get a real-time glucose reading anytime. The reader stores up to 90 days of data.
What is the difference between FreeStyle Libre 14 and FreeStyle Libre 2?
Data from this study was collected with the outside US version of the FreeStyle Libre 14 day system. FreeStyle Libre 2 has the same features as FreeStyle Libre 14 day system with optional real-time glucose alarms. Therefore the study data is applicable to both products.
How long does the Libre 2 last?
Minute-by-minute glucose readings — FreeStyle Libre 2 system is the only iCGM system that measures glucose every minute. That’s five times more glucose readings than competitors. Longest lasting self-applied sensor — At 14 days, the next-gen FreeStyle Libre 2 system is the longest lasting iCGM sensor available
What is normal blood sugar by age?
From 90 to 130 mg/dL (5.0 to 7.2 mmol/L) for adults. From 90 to 130 mg/dL (5.0 to 7.2 mmol/L) for children, 13 to 19 years old. From 90 to 180 mg/dL (5.0 to 10.0 mmol/L) for children, 6 to 12 years old. From 100 to 180 mg/dL (5.5 to 10.0 mmol/L) for children under 6 years old.
Does freestyle Libre have a needle?
It’s a needle-free system where a small sensor is attached to the skin and a reader is passed over the sensor to record sugar measurements a few times a day. This is a major breakthrough for patients who have previously had to provide multiple blood samples to get this information.
Where is the best place to put the freestyle Libre sensor?
Select an area of skin on the back of your upper arm that generally stays flat during normal daily activities (no bending or folding). Avoid areas with moles, scarring or tattoos. Choose a site that is at least 2.5cm (1 inch) away from an insulin injection site.
![]()