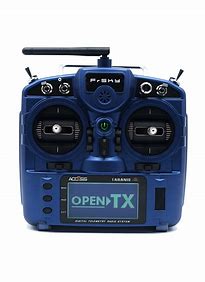
FrSky 2.4GHz Access Taranis X9 Lite/ Taranis X9 Lite S
Introduction
Taranis X9 Lite/X9 Lite S inherits its classic form factor from the FrSky Taranis X9D series remote control, with the addition of a program scroll button adding convenience when navigating the menu further improving the user experience. Some additions the S version has are dual momentary buttons on the top shoulders and hall sensor gimbals. The changes are not only on the exterior, this upgraded version features Accurate SWR indicator along with the addition of our PARA Wireless Trainer Function, making it compatible with the FrSky Free Link App and AirLink S, while the wired training port is still retained. Balance charging for 2S Li-ion battery is now possible via the USB with an included USB cable.
The Taranis X9 Lite/X9 Lite S also uses the latest ACCESS communication protocol, along with ErskyTX/OpenTX open-source operating system, which boasts 24 channels with a faster baud rate and lower latency because of its high-speed module digital interface. ACCESS features like wireless firmware updates and wireless configurations are completely supported, providing a more reliable more secure link between the transmitter and model. Even more practical features will be unlocked gradually, making the X9 Lite/X9 Lite S a fully functioning remote control with a ton of extra features.
Layout
Switch
- SA: 3 positions; Short lever
- SB: 3 positions; Long lever
- SC: 3 positions; Short lever
- SD: 2 positions; Short lever
- SE: 2 positions; Momentary; Short lever
- S1: Knob Switch
SF and SG: Tact switch; Momentary
- Micro SD card is not provided with shipment.
- USB port is for upgrading, reading / writing Micro SD card and internal memory of radio contents.
- Smart Port is for firmware upgrade for all FrSky S.Port devices.
Specifications
- Dimension: 184*170*101mm (L*W*H)
- Weight: Taranis X9 Lite 505g (without battery)
Taranis X9 Lite S 525g (without battery) - Operating system: ErskyTX/OpenTX
- Number of channels: 24 channels
- Internal RF Module: ISRM-N/ISRM-S-X9
- Operating voltage range: 6.0~8.4V
- Operating current: [email protected]
- Operating Temperature: -10℃~60℃ (14℉~140℉)
- Backlight LCD resolution: 128*64
- Model memories: 60 models (expandable by Micro SD card)
- Smart Port, Micro SD card slot, Micro USB Port and DSC Port
Features
- Ergonomic and compact design
- Installed with ACCESS protocol
- Supports spectrum analyzer function
- High-speed module digital interface
- G7 Noble potentiometer gimbal (Taranis X9 Lite)
G7-H92 hall gimbal (Taranis X9 Lite S) - Supports wired training function
- Haptic vibration alerts and voice speech outputs
- Easily accessible battery compartment (*Batteries not included,adaptive with replaceable 18650 button top Li-ion batteries for X9 Lite/flat-top Li-ion batteries for X9 Lite S)
Comparison List
About USB 2S Li-battery balance charging :
The Green Power indicator LED state:
Led on: charging
Led off: charge end
Led flash: charge fault
Note:
- Charge the battery with the USB adapter (Voltage:5V+0.2V Current:>2.0A) when you use the USB charging function.
- The lower the initial charging voltage, the better the charging effect is when the voltage difference between the two cells exceed 50 mV.
Navigate the Menu
To navigate the menus, Taranis X9 Lite/Taranis X9 Lite S has the following elements:
- Scroll Button
- MENU Button
- PAGE Button
- EXIT Button
Taranis X9 Lite/Taranis X9 Lite S supports ErskyTX / OpenTX system
Scroll Button
To navigate menus or widgets, roll the button to left or right as navigation.
MENU Button
To go to the main menu, press the button, and hold for one second.
PAGE Button
To go to switch the page, press the button.
EXIT Button
To exit current page or operation widgets.
Menu Tree
Enter the MODEL SETUP menu
Step 1: Set the Mode for Taranis X9 Lite/Taranis X9 Lite S Internal RF.
Press Scroll button or MENU button and hold one second, go to the main menu, select [Model Setup], go to [Protocol], select the [Internal] [Enable], and select [Proto] [Acces].
Step 2: Set the Channel Range
The Internal RF module of Taranis X9 Lite/Taranis X9 Lite S supports up to 24 channels. The channel range is configurable, and needs to be confirmed before use.
Step 3: Set the Receiver Number
When you create a new model, the system will assign you a receiver number automatically, but this can be easily changed. The range of the receiver number is 00-63, with the default number being 01 (use 00 is not recommended). Once the receiver is set to desired number and is bound to the Taranis X9 Lite/Taranis X9 Lite S, the bind procedure will not need to be repeated unless the receiver number is changed. In this case, either set the receiver number to the previous one or repeat the bind procedure.
Step 4: Registration
Select [Register], press F/S button, and power it on, The display will show the RX xx and press the Menu button or the Scroll button to complete process. then power down the receiver.
Step 5: Automatic binding (Smart Match )
Move the cursor to Receiver 1 [BIND], and select it, power your receiver,The display will show the RX xx and press the Menu button or the Scroll button to complete process. the system will confirm “Bind ok”. (You do not need to press the “F/S” button in ACCESS Protocol to bind. Refer to the receivers manual for details.)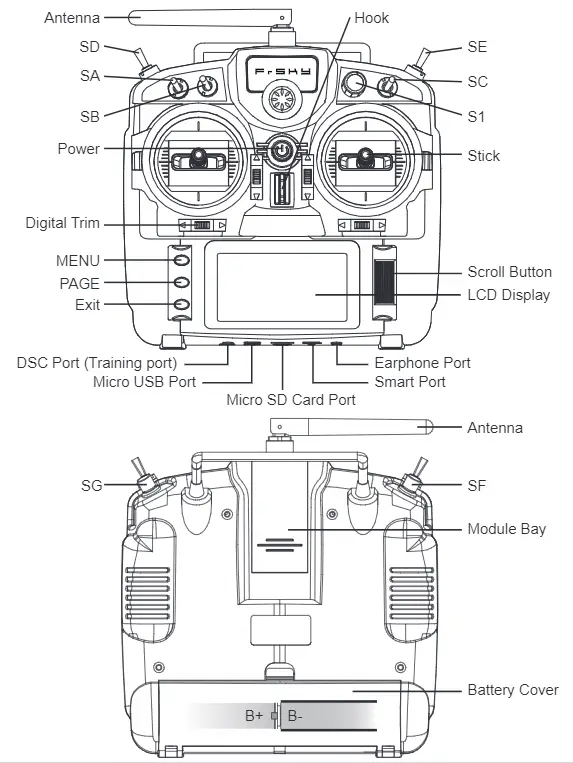
Step 6: Set Failsafe mode
There are 4 failsafe modes: No pulse, Hold, Custom and receiver. No Pulse: on loss of signal the receiver produces no pulses on any channel.
Hold: the receiver continues to output the last positions before signal was lost.
Custom: pre-set to required positions on lost signal.
Receiver: set the failsafe on the receiver (see receiver instructions) in ACCESS Protocol.
Step 7: Range
Range refers to Taranis X9 Lite/Taranis X9 Lite S range check mode. A pre-flight range check should be done before each flying session. Move the cursor to [Range Check] and press the Scroll Button. In range check mode, the effective distance will be decreased to 1/30. Press the EXIT to exit.
About OpenTX:
Scroll Button
To navigate menus or widgets, roll the button to left or right as navigation.
FLYING SAFETY
Warning:
To ensure the safety of yourself and others, please observe the following precautions. Have regular maintenance performed. Although your X9 Lite protects the model memories with non-volatile EEPROM memory (which does not require periodic replacement) and of a battery, it still should have regular check-ups for wear and tear. We recommend sending your system to your FrSky Service Center annually during your non-flying-season for a complete check-up and service.
Battery
Using a fully charged battery (DC 6.0~8.4V). A low battery will soon die, causing loss of control and a crash. When you begin your flying session, reset your transmitter’s built-in timer, and during the session pay attention to the duration of usage. Also, if your model used a separate receiver battery, make sure it is fully charged before each flying session.
Stop flying long before your batteries become over discharged. Do not rely on your radio’s low battery warning systems, intended only as a precaution, to tell you when to recharge. Always check your transmitter and receiver batteries prior to each flight.
Where to Fly
We recommend that you fly at a recognized model airplane flying field. You can find model clubs and fields by asking your nearest hobby dealer.
At the flying field
- Pull throttle stick to idle position, or otherwise disarm your motor/engine.
- Turn on the transmitter power and allow your transmitter to reach its home screen.
- Confirm the proper model memory has been selected.
- Turn on your receiver power.
- Test all controls. If a servo operates abnormally, don’t attempt to fly until you determine the cause of the problem.
- Start your engine.
- Complete a full range check.
- After flying, bring the throttle stick to idle position, engage any kill switches or otherwise disarm your motor/ engine.
Updates
FrSky is continuously adding features and improvements to our radio systems. Updating (via USB Port or the Micro SD card) is easy and free. To get the most from your new transmitter, please check the download section of the FrSky website for the latest update firmware and guide for adjusting your sticks. (www.frsky-rc.com)
FrSky Electronic Co., Ltd.
www.frsky-rc.com
Contact us: [email protected]
Add: F-4,Building C, Zhongxiu Technology Park, No.3 Yuanxi Road, Wuxi, 214125, Jiangsu, China
Technical Support: [email protected]


