GARMIN Bark Limiter 2
BARKLIMITERTM 2
© 2017 Garmin Ltd. or its subsidiaries
All rights reserved. Under the copyright laws, this manual may not be copied, in whole or in part, without the written consent of Garmin. Garmin reserves the right to change or improve its products and to make changes in the content of this manual without obligation to notify any person or organization of such changes or improvements. Go to www.garmin.com for current updates and supplemental information concerning the use of this product.
Garmin® and the Garmin logo are trademarks of Garmin Ltd. or its subsidiaries, registered in the USA and other countries. BarkLimiterTM and Garmin CanineTM are trademarks of Garmin Ltd. or its subsidiaries. These trademarks may not be used without the express permission of Garmin.
The Bluetooth® word mark and logos are owned by the Bluetooth SIG, Inc. and any use of such marks by Garmin is under license.
Getting Started
![]() WARNING
WARNING
See the Important Safety and Product Information guide in the product box for product warnings and other important information.
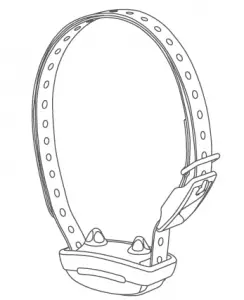
BarkLimiter 2 Device Overview
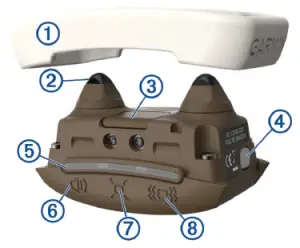
- Collar band
- Contact points
- Charge port (under weather cap)
- Power and mode selection button
- LED indicator
- Tone mode
- Auto-rise/smart mode
- Vibration mode
Charging the Dog Collar Device
NOTICE To prevent corrosion, thoroughly dry the contacts on the collar and the surrounding area before connecting the charging clip. You should fully charge the battery before you use the device for the first time. Charging a fully depleted battery typically takes about two hours. NOTE: The device does not charge when it is outside the approved temperature range (Specifications, page 4).
- Pull up the weather cap 1 from the charging port 2.
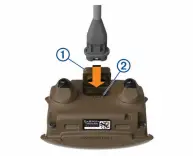
-
-
NOTE: The device turns on automatically when you remove it from the charger.
Turning On the Dog Collar Device
The device remains on until you turn the device off manually (Turning Off the Dog Collar Device, page 1)
TIP: The device does not issue corrections for two minutes after any button press, or after the device is removed from the charger.
Hold the power key until all of the status LED indicators turn green.
The device beeps, and an LED indicates the active mode. An LED turns blue when the smart mode is active. An LED turns green when any other mode is active. After two seconds, a blue or green LED turns red.
Turning Off the Dog Collar Device
Hold the power key until the status LED turns solid red and the device beeps.
Attaching the Dog Collar Device to a Collar Strap
You can attach the dog collar device to a collar strap that is a maximum of 25.4 mm wide (1 in.) and 2.78 mm thick (0.11 in.).
- With the buckle facing outward, insert the end of the collar
strap 1 through the slot 2 on the collar device.
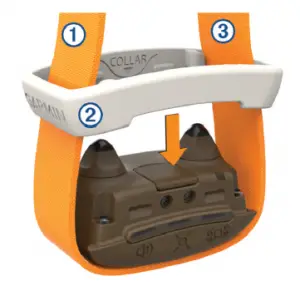
- Pull approximately two-thirds of the collar strap through the slot on the opposite side of the device.
- Snap the collar band onto the device. 4 Pull the collar strap until it is tight across the front of the device.
Pairing Your Smartphone with the Dog Collar Device
You can use the Garmin CanineTM app on your compatible smartphone to pair your dog collar device using Bluetooth® Smart wireless technology.
- Go to www.garmin.com/apps, and download the Garmin Canine app to your smartphone.
- Open the Garmin Canine app on your smartphone.
- Follow the on-screen instructions to create an account, set up your dog profile, and pair the dog collar device.
- Bring your smartphone within 10 m (33 ft.) of the dog collar device.
- Connect the dog collar device to the charger. The device enters pairing mode.
When the device is paired with your smartphone, a message appears.
Fitting the Collar on Your Dog
CAUTION To help reduce the chance of irritation, remove the collar when not in use. You should check the fit and comfort of the collar daily.
This device is not intended for human use. Do not attempt to use on any person.
Do not spray the device with harsh chemicals including but not limited to flea or tick spray. Always ensure that all flea or tick spray applied to the dog is completely dry before placing the collar on the dog. Small amounts of harsh chemicals can damage the plastic components.
In order to effectively train the dog, the collar and device must fit the dog properly. If the collar is too loose or positioned incorrectly, stimulation may be inconsistent. This can delay or prevent successful training.
- Position the device at the front of the dog’s neck, with the
status LED facing toward the dog’s chin and the device against the throat. TIP: For bark correction, the device should be positioned near the dog’s vocal cords. This location varies based on the breed of dog. If the device does not seem to detect the dog’s barks, you should move the device closer to or farther from the dog’s body to find the ideal location. - Confirm that the ID tags on the collar strap do not come into contact with the device. NOTE: ID tags contacting the device may cause unintentional corrections.
- Tighten the strap so that it is very snug around the dog’s neck, and fasten the buckle. NOTE: The collar should fit tightly and should not be able to rotate or slide on the dog’s neck. The dog must be able to swallow food and water normally. You should observe your dog’s behavior to verify that the collar is not too tight.
- Wiggle the device to work the contact points through the dog’s coat. NOTE: The contact points must have contact with the dog’s skin to be effective.

Garmin Canine App
The Garmin Canine app allows you to review your dog’s daily activity and get insights into your dog’s behavior. The app also allows you to wirelessly send software updates to your dog device.
Set up bark correction: Allows the device to detect and correct barks automatically. You can adjust the method of the corrections. When using stimulation, you can adjust the intensity level or use auto-rise.
Analyze your data: You can view summary data, including your dog’s daily activity level and number of barks. You can view more detailed information about your dog’s activity, including event times and corrective actions used.
Set up family members and dogs: Allows you to create and edit dog profiles, pair compatible dog collar devices, and invite other family members.
Syncing the Dog Collar Device with the Garmin Canine App
Garmin® recommends you sync your device daily to review updated data in the app and receive important notifications, such as low battery alerts and software updates.
- Bring your smartphone within 10 m (33 ft.) of the dog collar device.
TIP: You may need to wake the device if your dog is stationary for a long period of time. - Open the Garmin Canine app. The dog collar device periodically syncs data with the Garmin Canine app automatically. The app indicates when the last sync occurred.
- View your current data in the Garmin Canine app.
Bark Correction
NOTICE Before playing with your dog, you should remove the dog collar device or deactivate the correction feature.
When using the BarkLimiter 2 device, you should remove all other collars, tags, or other items from your dog. These other items can cause the BarkLimiter 2 device to activate when the dog is not barking.
The BarkLimiter 2 device can correct your dog automatically when the dog barks. The device detects vibrations to distinguish between barking and other vocalizations. You can use the Garmin Canine app to manually adjust the amount of barking allowed. You can allow no barking or set a custom number to indicate how many barks are allowed before correcting your dog. You can also allow some barking (up to 5 barks) to help avoid unintentional corrections resulting from everyday activity, such as yawning, sneezing, or going through a dog door.
You can use any of these methods when correcting your dog with the BarkLimiter 2 device.
- Tone
- Vibration
- Smart mode
- Stimulation
NOTE: If you turn off all correction methods, the device continues to detect your dog’s barks without performing any corrections. This can help you track your dog’s barking behavior using the Garmin Canine app.
Smart Mode
You can configure the bark allowance and correction type in the Garmin Canine app. You must enable smart mode on the device for the changes you make in the Garmin Canine app to take effect. If the device is not in smart mode, the device reports only the bark history.
Selecting a Training Mode
When your device is paired with a smartphone (Syncing the Dog Collar Device with the Garmin Canine App, page 2), you can use smart mode. You must select smart mode on the collar to use the settings in the Garmin Canine app. When you do not select smart mode during setup, the device defaults to the last standard mode you used.
TIP: The device turns off when you hold the button for more than three seconds.
When the mode is set in the app, the center LED indicator turns blue and the smart mode option becomes available after you cycle through the standard corrections. You must press the button to see the current mode. When a correction is issued in smart mode, the corresponding LED indicates your selected correction.
You can select a standard or smart mode.
- Remove the collar band from the device.
- Press the mode button until the green LED indicates the current mode.
- Press the mode button within two seconds to cycle the green LED through the modes, and select a mode.
NOTE: When the center LED is blue, you can select smart mode.
After two seconds, the LED turns from green to red, and the device issues a sample correction of your selected mode.
When you select stimulation mode, the device does not issue a sample correction.
If the device is in smart mode, the blue LED cycles to a green, then a red LED on the selected correction mode.
Status LED Indicator
The center status LED indicators flashes when the device detects a bark or has a low battery charge.
|
|
|
|
|
|
|
|
|
|
|
|
|
|
|
|
Correction Methods
Stimulation: Applies a brief stimulation. You can manually adjust the stimulation intensity level using the Garmin Canine app.
Tone: Activates an audible tone. A tone can provide a patterned interruption to stop a behavior. The tone can be more effective when it is already associated with a negative consequence or alternate behavior.
Vibration: Applies a vibration to the dog for a short period of time to help break focus on the current cause of a behavior. The effectiveness of the vibration may vary based on the dog’s temperament and experience.
Automatic Intensity
The device can set the stimulation intensity level automatically based on the barking behavior of the dog. The device starts at the lowest intensity level and increases the intensity level gradually until the dog stops barking. When the dog is quiet, the intensity decreases over time.
The automatic intensity feature is designed to eliminate excessive nuisance barking. To stop barks sooner, you should set the intensity level manually.
The extended panic guard is a safety feature that disables stimulation after four corrections at the highest level, with 10 seconds between corrections. After the fourth correction, the device waits until no barks are detected in 2 minutes.
NOTE: When you set a fixed correction level, the device does not enter extended panic guard, even at the highest level of correction.
Choosing the Correct Intensity Level
You should choose the lowest intensity level that discourages the dog from barking. If you have never used a bark correction collar with the dog, the dog requires time and experience to learn that the bark is the cause of the correction.
- From the Garmin Canine app, set the intensity to the lowest level.
- For thirty minutes, when the dog barks, observe the dog for a reaction, such as a head shake, neck movement, a change in the way the dog barks, or just a change in expression.
- If there is no reaction, increase the intensity by one level until the dog has a slight but recognizable reaction to the stimulation.
- Allow 24 hours for the dog to learn to respond by not barking.
- If the dog continues barking while wearing the collar, increase the intensity level gradually until you find the level that discourages the dog from barking.
Troubleshooting
The bark detection is too sensitive
If the BarkLimiter feature activates when the dog is not barking, or if the bark detection appears to be too sensitive, you can try these tips.
- Use the Garmin Canine app to adjust the amount of barking allowed before correcting your dog.
- Use the Garmin Canine app to turn off the BarkLimiter feature during heavy play, when the dog is very active, or when the dog is eating.
- Remove all other collars, tags, or other items from your dog.
My dog collar device is not responding
If the dog collar device stops responding, you can try these tips.
- Verify the dog collar device is turned on (Turning On the Dog Collar Device, page 1).
- Enable Bluetooth wireless technology on your smartphone.
- Pair the dog collar device with your smartphone (Pairing Your Smartphone with the Dog Collar Device, page 1).
- Confirm that you are the only user currently attempting to train the dog. NOTE: Only one smartphone can be connected to the dog collar device at a time.
- Check the battery level of the dog collar device in the Garmin Canine app. NOTE: You should sync your dog collar device with the Garmin Canine app to view updated information and battery level notifications.
- Hold the power key for 10 seconds to reset the dog collar device.
My device does not seem to be active
When the device is active, the selected mode LED flashes only when the device detects a bark, or you press the button.
- Verify the collar is turned on (Turning On the Dog Collar Device, page 1).
- Verify in the Garmin Canine app that the battery is not low.
- Remove the device from the dog, and press the mode button. The device flashes the current battery status. If the LED is red, or the device does not respond, charge the device (Charging the Dog Collar Device, page 1).
My device is not charging or does not hold a charge
If the device does not seem to be charging or holding a charge, you can try these tips.
Troubleshooting
- Verify the charging connections are secure (Charging the Dog Collar Device, page 1).
- Verify the AC adapter and outlet are functional.
TIP: To determine whether the adapter is functional, you can plug the device into your computer with a USB cord. - Verify the status LED indicators are green after charging.
My dog is still barking
If the dog continues barking while wearing the device, you can try any of these options to improve the effectiveness of the device.
- Tighten the collar until it is very snug (Fitting the Collar on Your Dog, page 2).
- Adjust the position of the device on the dog’s neck (Fitting the Collar on Your Dog, page 2).
- Wiggle the device to work the contact points through the dog’s coat.
- Gradually increase the intensity level (Choosing the Correct Intensity Level, page 3).
My dog is barking too much
The BarkLimiter 2 device detects barks and, when paired with the Garmin Canine app, shows when barking occurs. You can use this information to determine the cause of the dog barking and take steps to prevent the behavior. Each dog and situation is different, and you should experiment to discover what works for your dog.
TIP: Barking habits can change as a dog ages. A younger dog can outgrow barking behaviors, and an older dog can develop new barking behaviors. You should discuss sudden changes in barking behavior with your veterinarian.
If you are home when the dog barks, you can play with the dog or take the dog for a walk. If the dog barks when you are not home, you can take some precautions to reduce barking.
- Prevent the dog from seeing objects or people that can trigger barking. You can install privacy fencing for outdoor dogs, and close the blinds or curtains for indoor dogs.
- Provide a safe place for the dog to reduce anxiety barking. The safe place should be cozy, limit the view to outside stimuli, and include a toy or food to occupy the dog.
- Increase the physical and mental activity of the dog. Some dogs are vocal when they are bored. You can increase the amount of physical activity and engage the dog in active training and play time.
- Look for suggestions online (Getting More Information, page 4).
Getting More Information
You can find more information about this product on the Garmin website.
- Go to support.garmin.com for additional manuals, articles, and software updates.
- Go to buy.garmin.com, or contact your Garmin dealer for information about optional accessories and replacement parts.
Third-Party Software License Agreement
Copyright © 2009-2012 ARM Limited.
All rights reserved.
Redistribution and use in source and binary forms, with or without modification, are permitted provided that the following conditions are met:
- Redistributions of source code must retain the above copyright notice, this list of conditions and the following disclaimer.
- Redistributions in binary form must reproduce the above copyright notice, this list of conditions and the following disclaimer in the documentation and/or other materials provided with the distribution.
- Neither the name of ARM nor the names of its contributors may be used to endorse or promote products derived from this software without specific prior written permission.
THIS SOFTWARE IS PROVIDED BY THE COPYRIGHT HOLDERS AND CONTRIBUTORS “AS IS” AND ANY EXPRESS OR IMPLIED WARRANTIES, INCLUDING, BUT NOT LIMITED TO, THE IMPLIED WARRANTIES OF MERCHANTABILITY AND FITNESS FOR A PARTICULAR PURPOSE ARE DISCLAIMED. IN NO EVENT SHALL COPYRIGHT HOLDERS AND CONTRIBUTORS BE LIABLE FOR ANY DIRECT, INDIRECT, INCIDENTAL, SPECIAL, EXEMPLARY, OR CONSEQUENTIAL DAMAGES (INCLUDING, BUT NOT LIMITED TO, PROCUREMENT OF SUBSTITUTE GOODS OR SERVICES; LOSS OF USE, DATA, OR PROFITS; OR BUSINESS INTERRUPTION) HOWEVER CAUSED AND ON ANY THEORY OF LIABILITY, WHETHER IN CONTRACT, STRICT LIABILITY, OR TORT (INCLUDING NEGLIGENCE OR OTHERWISE) ARISING IN ANY WAY OUT OF THE USE OF THIS SOFTWARE, EVEN IF ADVISED OF THE POSSIBILITY OF SUCH DAMAGE.
Device Information
Specifications
|
|
|
|
|
|
|
|
|
|
|
|
|
|
|
|
|
|
|
|
|
1 The device withstands incidental exposure to water of up to 1 m for up to 30 min. For more information, go to www.garmin.com/waterrating.