Garmin Venu 2 Series Watch
User Manual
© 2021 Garmin Ltd. or its subsidiaries
All rights reserved. Under the copyright laws, this manual may not be copied, in whole or in part, without the written consent of Garmin. Garmin reserves the right to change or improve its products and to make changes in the content of this manual without obligation to notify any person or organization of such changes or improvements. Go to www.garmin.com for current updates and supplemental information concerning the use of this product.
Garmin®, the Garmin logo, ANT+®, Approach®, Auto Lap®, Auto Pause®, Edge®, and Venu® are trademarks of Garmin Ltd. or its subsidiaries, registered in the USA and other countries. Body Battery™, Connect IQ™, Firstbeat Analytics™, Garmin AutoShot™, Garmin Connect™, Garmin Express™, Garmin Golf™, Garmin Index™, Garmin Move IQ™, Garmin Pay™, Health Snapshot™, tempe™, TrueUp™, and Varia™ are trademarks of Garmin Ltd. or its subsidiaries. These trademarks may not be used without the express permission of Garmin.
Android™ is a trademark of Google LLC. Apple®, iPhone®, and iTunes® are trademarks of Apple Inc., registered in the U.S. and other countries. The BLUETOOTH® word mark and logos are owned by the Bluetooth SIG, Inc. and any use of such marks by Garmin is under license. iOS® is a registered trademark of Cisco Systems, Inc. used under license by Apple Inc. Wi‑Fi® is a registered mark of Wi-Fi Alliance Corporation. Windows® is a registered trademark of Microsoft Corporation in the United States and other countries. Other trademarks and trade names are those of their respective owners.
This product is ANT+® certified. Visit www.thisisant.com/directory for a list of compatible products and apps.
M/N: A03947, A03948
Introduction
WARNING :
- See the Important Safety and Product Information guide in the product box for product warnings and other important information.
- Always consult your physician before you begin or modify any exercise program.
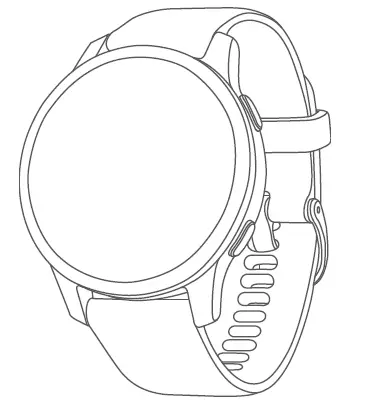
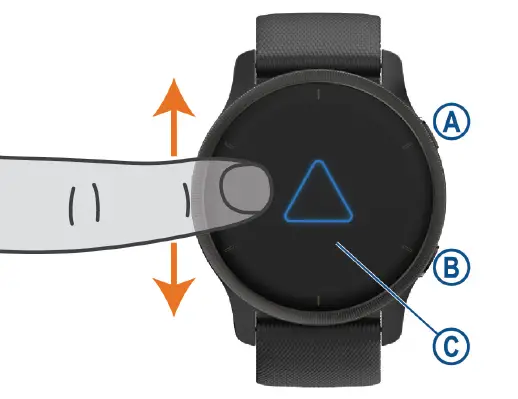
Device Overview
A – Action button: Hold to turn on the device.
Press to start and stop the activity timer.
Hold for 2 seconds to view the controls menu, including device power.
Hold until you feel 3 vibrations to launch the assistance feature.
B – Back (Menu) button: Press to return to the previous screen, except during an activity.
During an activity, press to mark a new lap, start a new set or pose, or advance to the next stage of a workout.
Hold to view a menu of device settings and options for the current screen.
C – Touchscreen: Swipe up or down to scroll through glances, features, and menus.
Tap to select.
Double-tap to wake the device.
Swipe right to return to the previous screen.
During an activity, swipe right to view the watch face and glances.
From the watch face, swipe right to view the shortcut feature.
Touchscreen Tips
- Drag up or down to scroll through lists and menus.
- Swipe up or down to scroll quickly.
- Tap to select an item.
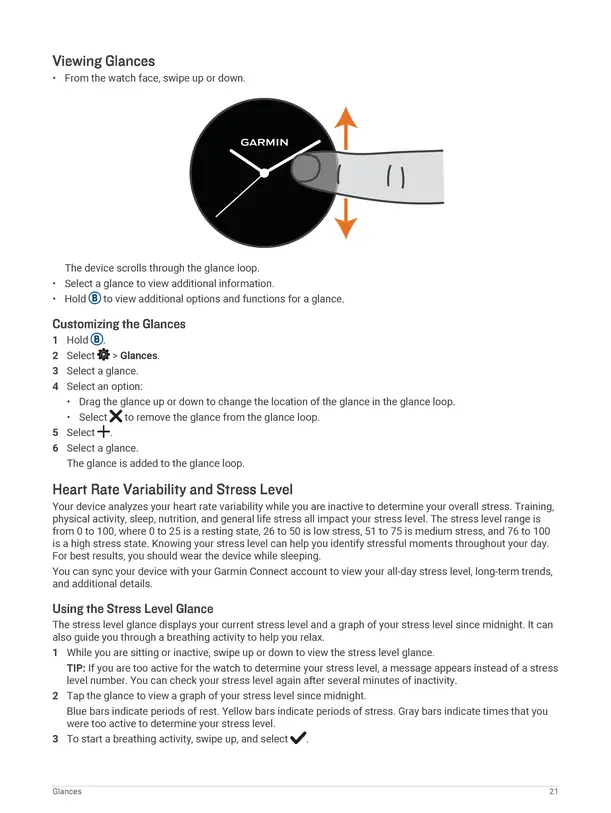
- From the watch face, swipe up or down to scroll through the glances on the device.
- Tap a glance to view additional information, if available.
- During an activity, swipe up or down to view the next data screen.
- During an activity, swipe right to view the watch face and glances, and swipe left to return to the activity data fields.
- When available, select ∧ or swipe up to view additional menu options.
- Perform each menu selection as a separate action.
Locking and Unlocking the Touchscreen
You can lock the touchscreen to prevent inadvertent screen touches.
- Hold to view the controls menu.
- Select
 .
.
The touchscreen locks and does not respond to touches until you unlock it. - Hold any button to unlock the touchscreen.
Using the Controls Menu
The controls menu contains customizable shortcuts, such as locking the touchscreen and turning the device off. NOTE: You can add, reorder, and remove the shortcuts in the controls menu (Customizing the Controls Menu, page 39).
1. From any screen, hold A for 2 seconds.

2. Select an option.
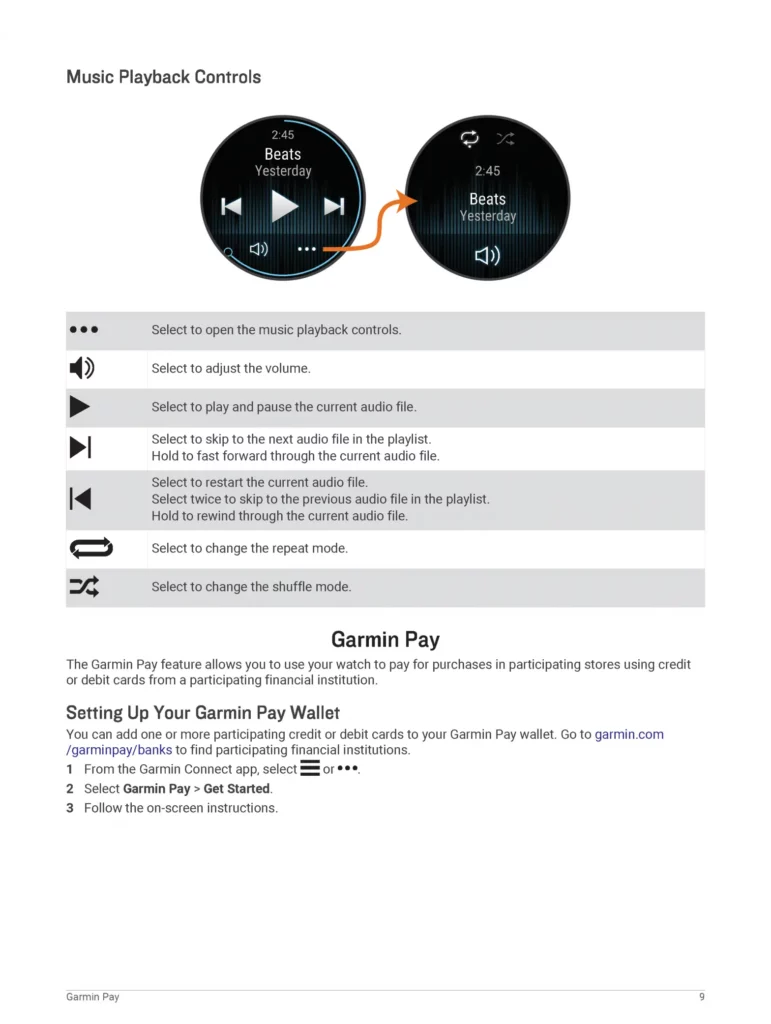
Icons
A flashing icon means the device is searching for a signal. A solid icon means the signal was found or the
sensor is connected. A slash through an icon means the feature is turned off.
![]()
Setting Up Your Watch
To take full advantage of the Venu 2 series features, complete these tasks.
- Pair the device with your smartphone using the Garmin Connect™ app (Pairing Your Smartphone, page 3).
- Set up Wi‑Fi® networks (Connecting to a Wi‑Fi Network, page 7).
- Set up music (Music, page 7).
- Set up your Garmin Pay™ wallet (Setting Up Your Garmin Pay Wallet, page 9).
- Set up safety features (Safety and Tracking Features, page 11).
Smart Features
Pairing Your Smartphone
To set up the Venu 2 series device, it must be paired directly through the Garmin Connect app, instead of from
the Bluetooth® settings on your smartphone.
- From the app store on your smartphone, install and open the Garmin Connect app.
- Select an option to enable pairing mode on your device:
• If this is the first time you are setting up your device, hold A to turn on the device.
• If you previously skipped the pairing process or paired your device with a different smartphone, hold B,
and select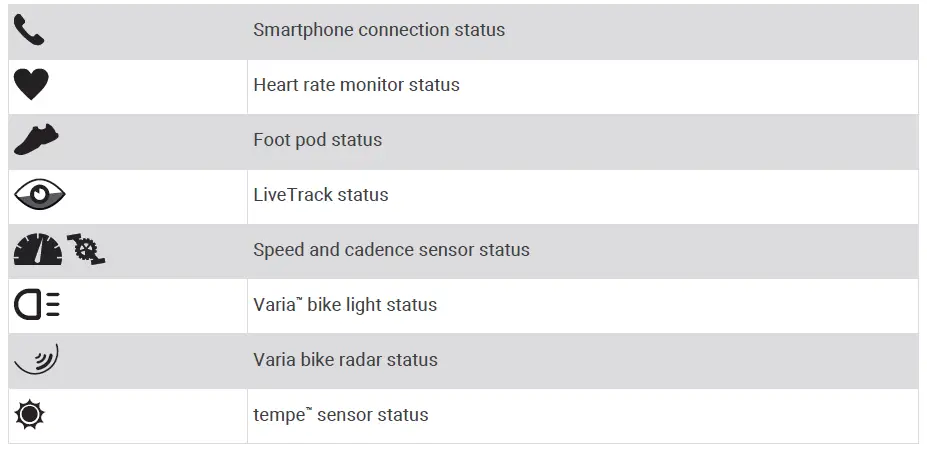 > Connectivity > Pair Phone to manually enter pairing mode.
 - Select an option to add your device to your Garmin Connect account:
• If this is the first device you have paired with the Garmin Connect app, follow the on-screen instructions.
• If you have already paired another device with the Garmin Connect app, from the menu, select
Garmin Devices > Add Device, and follow the on-screen instructions.
Connected Features
Connected features are available for your Venu 2 series device when you connect the device to a compatible smartphone using Bluetooth technology and install the Garmin Connect app on the connected smartphone. Go to www.garmin.com/apps for more information. Some features are also available when you connect your device to a Wi‑Fi network.
Phone notifications: Displays phone notifications and messages on your Venu 2 series device.
LiveTrack: Allows friends and family to follow your races and training activities in real time. You can invite followers using email or social media, allowing them to view your live data on a Garmin Connect tracking page.
Activity uploads to Garmin Connect: Automatically sends your activity to your Garmin Connect account as soon as you finish recording the activity.
Connect IQ™: Allows you to extend your device features with new watch faces, glances, apps, and data fields.
Software Updates: Allows you to update your device software.
Weather: Allows you to view current weather conditions and weather forecasts.
Bluetooth sensors: Allows you to connect Bluetooth compatible sensors, such as a heart rate monitor.
Find my phone: Locates your lost smartphone that is paired with your Venu 2 series device and currently within Bluetooth range.
Find my device: Locates your lost Venu 2 series device that is paired with your smarphone and currently within Bluetooth range.
Phone Notifications
Phone notifications require a compatible smartphone to be within Bluetooth range and paired with the device. When your phone receives messages, it sends notifications to your device.
Enabling Bluetooth Notifications
Before you can enable notifications, you must pair the Venu 2 series device with a compatible smartphone (Pairing Your Smartphone, page 3).
- Hold .
- Select > Connectivity > Phone > Notifications.
- Select During Activity to set preferences for notifications that appear when recording an activity.
- Select a notification preference.
- Select Not During Activity to set preferences for notifications that appear when in watch mode.
- Select a notification preference.
- Select Timeout.
- Select a timeout duration.
- Select Privacy.
- Select a privacy preference.
Viewing Notifications
- From the watch face, swipe up or down to view the notifications glance.
- Select the glance.
- Select a notification to read the full notification.
- Swipe up to view the notification options.
- Select an option:
• To act on the notification, select an action, such as Dismiss or Reply.
The available actions depend on the type of notification and your phone operating system. When you dismiss a notification on your phone or the Venu 2 series device, it no longer appears in the glance.
• To return to the notification list, swipe right.